A home workshop is far from uncommon in the yard of any zealous owner. When arranging it, there are some features that must be observed. Our review will help you select and make homemade machines and devices for your home workshop, as well as understand the technology of their manufacture. Each owner can independently select the necessary equipment. And if you know the technical features of the structures, then you can arrange the room on your own. When arranging equipment, it is important to plan for sufficient space. It is better if the workshop is equipped in a separate room.
The quality of work and comfortable working conditions depend on the functional arrangement of a home workshop.
Homemade machines and devices for the home workshop
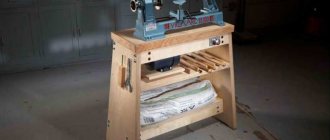
Before selecting a set of homemade machines and accessories for the garage, it is necessary to create optimal working conditions. In this case, the size of the room must be at least 6 square meters. m. You can attach an additional room to the garage or to the house. It is important to decide what types of work you will carry out, as well as make a list of equipment and necessary tools.
A compact workshop can be set up in a garage
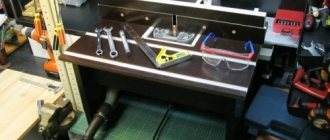
It is most convenient to organize storage of some types of tools on the wall. This will save space. It is also convenient to use racks and shelves. To save useful space, it is worth making universal devices that combine several functions. The table should be equipped with drawers, and also used as a carpentry workbench.
Ergonomic design of the desktop allows you to place the maximum number of items
When choosing homemade machines and devices for your home workshop, you can select different types of mini equipment. For working with metals, the following options are used:
- grinding equipment is used for processing metal surfaces: grinding, polishing and sharpening. Its manufacture requires a minimum number of components and parts. The equipment includes sharpening stones and an electric motor. For the stability of the device, mounting elements are used;
Grinding equipment option
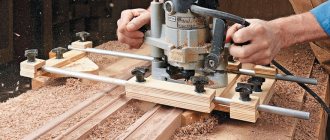
- A milling machine is used to drill holes. In the manufacture of such a lifting mechanism design, a steering rack is used. In addition, you can install an angle milling machine.
A professional version of this design.
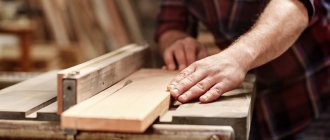
Various homemade tools and do-it-yourself devices are used for wood processing. The most commonly used types are cutting, turning and grinding. With their help, you can perform all types of work at home. The following equipment is used for wood processing:
- cutting machines . The simplest device is an electric or chainsaw. Such units can be disk, belt, or chainsaw sawmills. When making homemade equipment, it is worth considering the diameter of the disk, as well as the width of the cutting part;
Simple cutting equipment
- grinding device. The simplest option is made from a stable table, a vertical grinding shaft and an electric motor. An abrasive belt is used to process the ends of wood blanks.
Grinding device
Related article:
Woodworking machines for the home workshop. Specialized equipment with an electric drive greatly simplifies the processing of wood blanks. But acquiring it involves significant investments. To successfully solve this problem, you should carefully study the materials in this article.
DIY tool shelves: popular designs and manufacturing
It is worth noting the following options for storing tools:
- racks;
- hanging shelves;
- wall structures;
- shelves in the form of shields on which small tools can be mounted.
Unusual shelves for arranging tools
You can make a panel shelf for tools with your own hands like this:
- cut out a shield from plywood and mark the places where the shelves will be installed;
- make shelves with side walls, the length of which should correspond to the length of the shield;
- the shelves are fixed to the panel using self-tapping screws;
- hooks are mounted, which are equipped with a special thread;
- The brackets are being installed on the back side of the shield.
This way you can make a simple panel structure, which will allow you to put your workshop in perfect order.
For your information! Panel shelves are functional. You can attach hooks or special holders to them. An additional lamp can be hung above such a structure. In this case, you can use a small light bulb.
Choosing a location for a workshop: good advice
Place for building a workshop
When determining a location for a future carpentry workshop, it is necessary to take into account some axioms of its placement:
- As far as possible from residential areas and buildings with domestic animals, if any. The noise produced by work equipment will have an adverse effect on the nervous system of your household.
- It is advisable to choose an open space. The absence of shadows will allow you to save a little on heating the workshop in winter and on lighting throughout the year. Solar radiation will heat and illuminate the room.
- To avoid flooding of the building during rains and snowmelt, there is no need to build it in places with a low general level. This can lead to problems with the building itself and even to emergency situations, such as electrical short circuits.
- It is advisable to ensure ease of access in all weather conditions in order to avoid constant snow clearing in winter, and to prevent flooding of the building during spring snowmelt.
- A plot of soil not suitable for farming will be an excellent place for a future builder
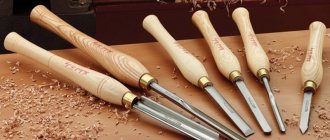
Designing a carpentry workbench with your own hands: drawings, video
Let's start learning about useful DIY household gadgets from the workbench. This useful unit comes in the following varieties: stationary, mobile and folding.
The diagram shows the main elements of such a workbench
Remember that a do-it-yourself folding workbench drawing should contain the following details:
- a working surface, to create which you will need a board at least 6 cm thick. In this case, hornbeam, beech or oak are used. You can use boards painted with drying oil;
Special drawings will be required to carry out the work.
- a vice structure is mounted on the top cover;
- The supporting legs of the workbench are made of pine and linden. Longitudinal connecting beams are placed between them to ensure stability of the entire structure;
- Shelves for tools are mounted under the workbench.
The diagram shows how to correctly assemble such equipment.
You can see how to make a simple workbench in this video:
Technology and drawings of a do-it-yourself carpentry workbench: simple design
To make such a device, you will need drawings with the dimensions of the carpentry workbench.
In this photo you can see how the folding structure is made
Let's look at how to build such a device:
- To make the lid you will need thick boards. The dimensions of the shield should be 0.7 * 2 meters. Long nails are used for fastening;
- the roof is finished using timber;
- depending on the dimensions of the carpentry workbench, vertical supports are used;
- The height of the working surface of do-it-yourself carpentry workshop tools is determined. Markings for the beams are applied on the ground where these elements are buried;
- The workbench cover is being installed. The support bars are attached in pairs. In this case, long self-tapping screws are used.
Homemade design option
Features of creating and designing a wooden workbench with your own hands
You can buy a wooden workbench or make one yourself. Additionally, the structure can be equipped with drawers. So, let's look at the manufacturing technology:
- vertical supports are fixed using horizontal jumpers. They make grooves for connecting fittings. In this case, a chisel and a hammer can be used;
- When the jumpers are installed at the required level, holes are made in the bars on the support. Then the bolt is mounted, after which the elements are tightened;
- horizontal jumpers are installed two pieces on each side. Parts under the countertop will be required for installation above the work surface;
- bolts are used to secure the work surface. Holes for fastening elements are drilled on the tabletop. The bolts are mounted so that the bolts are recessed.
Wood Construction Drawings
You can easily make a belt sander at home. In this case, you will need an emery cloth and a sanding belt. Its sticker is applied end-to-end. To strengthen the seam, it is necessary to place dense material under the bottom. In this case, you should not use low-quality glue.
Ready frame for the table
The diameter of the tape shaft should be several mm wider in the center than at the edge. To prevent the tape from slipping, it is necessary to wind it with thin rubber. For the manufacture of grinding devices, you can select designs such as planetary, cylindrical grinding and surface grinding.
Technology for making a carpenter's vice for a workbench with your own hands
For workbenches, you often make a vice with your own hands at home. The video allows you to see this process:
To make such a design you will need special studs. To work, you will need a screw pin with a thread. You also need to prepare a couple of boards. One element will be fixed, and the second will move. When manufacturing, it is necessary to use drawings of a vice with your own hands. In each of the boards it is necessary to make holes for pins, which are connected with nails. Then screws and nuts with washers are inserted into them. When constructing a homemade vice with your own hands, you should use instructions and ready-made diagrams.
Carpenter's vice design
Helpful information! If you make the pins movable, you can make workpieces of various sizes.
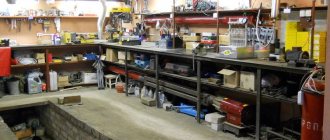
Workshop project: where to start
The first step in designing is to determine what specific workshop work you will be doing. It is advisable to think through and write down all planned work, both in the near future and in the future. Based on this list, it is necessary to compile a list of auxiliary equipment necessary to complete the assigned tasks.
Next, determine the availability of the necessary tools (from a chisel and hammer to a drill and jigsaw), nails and screws, blanks and finished products. Don't forget to complete your list with a powder fire extinguisher and a first aid kit. Then determine how to arrange all the above things, what cabinets, racks and shelves are needed for this. Let's move on to the list of main equipment. The list must be completed:
- workbench;
- machines, according to the list of works;
- advanced equipment;
- industrial vacuum cleaner;
- heating radiators;
- a box of sand;
- washbasin;
- container with water;
- locker for special clothing;
- a stool.
workshop equipment
After this, you need to add cabinets and racks with items from the first list to the second. Next, we determine the place for future blanks. The recommended minimum size of such a rack is 1 m × 6 m; it also needs to be added to the second list. Such a detailed list will allow you to calculate the dimensions of the future joinery.
Making a metal bench with your own hands: drawings
If you often work with metals, the best solution would be to create a metal workbench with your own hands. Wood material is not suitable for such purposes, since it will often be damaged when processing metal products.
Universal metal option
It is worth noting the following elements of such a device:
- horizontal jumpers are used to ensure longitudinal rigidity;
- Small rack beams are made from profiled pipes. They are used to assemble the frame part of pipes. In the corner zone there are welded spacers, which are made of steel strips;
- for rack beams, profile pipes with a wall thickness of 3-4 mm are used;
- corner No. 50 is necessary for the racks on which the tools are mounted.
To create high-quality seams, it is necessary to use a carbon dioxide semi-automatic machine, as well as a pulse-type welding machine.
Assembly of a universal device begins with the frame. To do this, long and short beams are welded. To prevent them from twisting together, follow these steps:
- place the elements on a flat surface;
- in areas where connecting points are located, it is required that the beams are joined using spot welding;
- in this case, welds are made on one side of the frame and then on the other.
The diagram shows the frame of the metalworking machine, as well as its full view.
After this, the rear beam and vertical posts are mounted. It is important to check how evenly they are located in relation to each other. If there are any deviations, they can be bent using a hammer. When the frame is ready, special corners are attached to it to strengthen the structure. The tabletop is made of wooden boards, which are impregnated with a fire-resistant liquid. A steel sheet is placed on top. A plywood shield is attached to the vertical rack parts. The same material is used for lining the cabinet.
Table 1. Making a metal bench with your own hands
| Image | Installation stages |
| A carbon dioxide semi-automatic machine is used for welding the structure. | |
| Creating a structure frame. For welding, all parts must be laid out on a flat surface. At first, the joining joints are simply tacked together, and then all the seams are welded. The rear pillars and beam are welded to the frame. | |
| After welding all the stiffening elements, the following frame is obtained. | |
| Then a reinforcing angle is attached to the frame to secure the tabletop. Before installation, the boards must be treated with a special fire-resistant compound. A sheet of metal is attached to the top. | |
| The side walls are finished with plywood panels, and wooden boxes are placed in the right cabinet. To protect the base, the surfaces are coated with various paints and varnishes. First, the primer is distributed, and then a special enamel is used. |
Joinery joints in furniture
The boards are connected to each other in various ways, resulting in correctly shaped pieces of furniture. You can connect boards with nails and screws, but since they create holes, it is advisable to camouflage them. Therefore, in cases where the products are not planned to be painted after manufacturing, or when glued material or veneered material is used, it is better to make connections that do not damage the surfaces (without drilling for screws, etc.).
Connections with dowels are suitable for this purpose, that is, when holes with a diameter for the dowel are drilled in both elements being connected. The distances between the holes are determined in advance. Dowels are inserted into the supporting part or into the transverse connection and secured with glue. Next, glue is applied to the parts prepared in this way and they are pressed against each other. In the case when the dowel enters the hole with difficulty, it is driven in with light blows of a hammer, and in order not to damage the surface of the dowel, bars are placed on it.
Important! If you cut the dowels in advance to a certain length, then the holes for them will have to be drilled to a depth adjusted to a millimeter.
The second way to connect parts on open tenons is to insert the tenons of one bar into the eyes of another. This connection is made on the back corners of furniture drawers, in shelves, racks, where the spikes will not interfere. Blind tenons are not visible from the front, since they enter the end of the slab or board so that they are covered by a layer of wood. The tenons are cut in such a way that the joint acts as a strong wedge. This type of grip is much easier to perform than with dovetail cleats, which have a trapezoidal cleat profile.
To gouge out the dovetail with a chisel, the boards are secured with a clamp to the work table. To ensure clean edges, the wood is hollowed out to half the thickness of the board, and then the board is turned over and hollowed out on the other side. Of course, for an accurate connection, the hollowed out areas are first carefully marked with cuts.
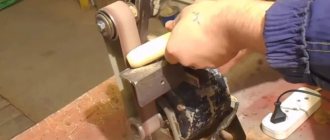
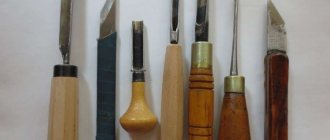
Do-it-yourself knife sharpening device: drawings and nuances
To make a sharpener from a washing machine engine with your own hands, you can take parts from old Soviet appliances. To build a sharpening machine you will need the following parts:
- tube for turning flanges;
- grindstone;
- special nuts;
- steel elements for the construction of protective casings;
- cable cord;
- launching device;
- a block of wood or a metal corner.
Homemade unit for sharpening knives.
The flange section must match the dimensions of the sleeve. A sharpening stone will also be placed on this element. This part will also have a special thread. In this case, the flange is pressed onto the motor shaft. Fastening is carried out by welding or bolting.
The working winding is fixed to the cable. Moreover, it has a resistance of 12 ohms, which can be calculated using a multimeter. A frame is also made, for which a metal corner is taken.
How to sharpen a drill for metal: do-it-yourself device
You can make a simple metal drill sharpening machine from ordinary tools. An abrasive block is suitable for this.
At home you can use the following equipment:
- You can use an electric sharpener to sharpen the drill. In this case, sharpening is performed from the edge. When using a sharpener, you need to pay attention to the sharpening angle and the fixation of the drill on the axis of rotation. Excess metal should be removed gradually. Finally, the edges are shaped into a cone;
- A grinder is used as a do-it-yourself sharpening machine. For sharpening, the cutting tool is secured in a vice. To do this, the mounting angle is selected, and the disk is mounted.
Varieties of devices for sharpening drills
It is worth considering that the grinder is mounted on a flat surface. In this case, the disk should be located downwards. If the grinding device is not secured securely, it can damage the drill. Sharpening with a grinder can only be done for products with a small diameter. It is not possible to finish using a grinding device. The edge of the shield is used to support the cutting tool.
You can also use a drill attachment, which should be equipped with a grinding disc with sandpaper. To grind elements with a drill, you need to find two flat surfaces.
Drilling machine for home workshop
You can make a drilling machine attachment from a drill with your own hands. The drawings will help you understand the design. For such a design you will need the following elements:
- base or frame;
- rotation device;
- mechanism for ensuring supply;
- stand for fastening the door.
Installing the machine in the workshop
Here are the main steps in making a homemade drilling machine with your own hands:
- Chipboard is used for racks. In this case, you need to choose a thickness of at least 20 mm;
- To maintain the accuracy of the drill machine, it is necessary to use guides. In this case, you can use steel strips;
- For the pads, steel clamps are used.
To make a drilling machine you will need a rotary tool feed mechanism. The design uses springs and a lever. There are various tools for sharpening drills.
Assembling a drilling machine with your own hands: drawings with dimensions
The design will also require the manufacture of a homemade vice for a drilling machine. The simplest device can be assembled from a drill, without a steering rack. To minimize vibration processes, it is necessary to build a more massive table. The stand and table are connected at right angles. In this case, the drill can be attached using clamps. A vice is mounted on the table surface.
Complex drawing of a drilling machine
Designing a press for a garage with your own hands
The design of a homemade garage press is intended for straightening, pressing, bending sheet materials and for compression. Devices for plumbing work are characterized by a compact and simple design. The forces from such a press can vary between 5-100 tons. For garage work, 10-20 tons is quite enough. To make a similar design, a manual drive is used. The hydraulic device contains two chambers with pistons.
Homemade design
Do-it-yourself press from a jack drawings
You can see how to make a simple device on a special video of a press made from a jack with your own hands:
https://www.youtube.com/watch?v=7Yf_ApwwJgs
A simple option is a hydraulic one, which can be constructed from a bottle jack. An important element is the frame, inside of which the jack is placed. The platform is used as a reliable base. The upper surface is used to support the elements being processed. The table should move freely up and down on the frame. In this case, rigid springs are attached to the base on one side, and to the working surface on the other.
Using a jack
Here is a simple assembly diagram:
- the necessary elements are cut out according to the drawings;
- The base is mounted by welding. In this case, the steel structure should resemble the letter P;
- a mobile table is made from a pipe and channel;
- Finally, the springs are fixed.
Construction of a carpentry workshop with your own hands
The location has been chosen, the project has been prepared, and the construction of the carpentry workshop can begin. Construction should be divided into several stages:
Foundation
foundation
- At a pre-selected location, we mark the perimeter of the future workshop.
- We select soil to a depth of 70 cm for the future slab foundation.
- Along the edge of the pit we place formwork 20 cm protruding above ground level.
- We prepare the base from gravel and sand, carefully compacting it to a thickness of 20 cm.
- We carry out reinforcement. We take the reinforced mesh and lay it on the base. We screw the second layer of reinforced mesh to the bottom one using pieces of reinforcement 250 mm long with Ø1.5-2 mm knitting wire.
- We install anchor bolts in places where the machines are installed.
- Fill it with M200 grade concrete.
- Cover the concrete with a tarpaulin or film and leave until completely hardened for 3-4 weeks. In hot weather, it is advisable to periodically water the concrete.
Walls
Wall installation primarily depends on the selected material. If the structure is wooden, then to fasten the lower crown when pouring the foundation along its perimeter it is necessary to lay threaded rods. Further construction of walls comes down to the construction of a wooden structure. The room can be made of brick or foam concrete blocks at your discretion. After making the box, install the window and door blocks. Make the roof according to a pre-prepared sketch with your own hands.
Floor
Floors in a carpentry shop play an important role. It is usually made from several layers. A base of 5 mm thick sand is made on the foundation, then it is covered with roofing felt and boards are laid on top or an armored mesh is laid and poured with concrete. The second option is more reliable and popular.
If the carpentry is made of wood, then it is necessary to impregnate the walls with fire retardant compounds. Next, you need to bring all communication networks into the room and perform the wiring. All cable lines in cross-section must correspond to the current load imposed on them during further operation. In a workshop, wood is placed in metal pipes for fire safety purposes in case of a short circuit; in other buildings, corrugated pipes made of self-extinguishing polymers are used.
Next, we install and connect the ventilation system and machines, arrange cabinets and shelving, install shelves, and lay out tools.
Heating in the workshop is provided using oil radiators or autonomous water heating. An electric boiler can be used as a source of heating the coolant, and if it is possible to equip a room for a boiler room, gas or solid fuel boilers can be used. It is better not to use solid fuel boilers in a wooden workshop; there is a high probability of accidental fire.