DIY cardboard photo stand » Useful homemade products
DIY cardboard photo stand
. A convenient photo stand can be glued together from cardboard quickly and easily.
To make such a stand we will need:
- thin cardboard,
- glue,
- scissors and drawing supplies.
You can use shoe or candy boxes - then the stand will also be bright.
Making a stand for a photo frame
First of all, we draw out the templates for the stand parts. All parts, except the base, will have allowances for gluing. Dimensions and allowances are indicated in the diagram.
We cut out each piece from cardboard in two identical copies.
On one of the base parts we mark and make two 7 cm slots - one in the center, the second parallel to the first, 1 cm from it. On one of the parts of the vertical back wall we mark and make a 4 cm long slot. We bend the allowances on all parts.
From below we thread a part of the back wall with a slot into the central slot of the base. At the bottom we glue the allowance to the base. From behind we thread both parts of the support into the slot in the rear wall. We glue their allowances to the wall.
Glue the parts of the support together. From below we thread the back wall without a slot into the central slot of the base. Glue both parts together. We glue the halves of the front wall together up to the allowances. We thread the wall from below into the second slot. Glue all three allowances to the bottom. Glue the bottom part of the base, hiding the allowances inside. The cardboard photo stand is ready!
Category: Home Ideas / Photo Frames
www.freeseller.ru
Support the phone
Now let's take a look at the phone stand, which can be created in a few minutes.
Let the novice master not be intimidated by the question of how to make it. You won’t need a saw, jigsaw, drill or other “scary” devices. Holders for modern gadgets are made from straightened paper clips and cardboard folded in a simple way.
There are original individuals who do not see a problem in creating a stand at all. It is enough to take two office clips so that the phone stands upright.
We recommend reading:
- Special rescue equipment
- How to insulate a veranda for winter living: a review of the most effective methods, instructions, materials, installation diagrams
- Tile work: description of all stages + step-by-step instructions for beginners
Old cassette boxes, wire bent in two or three steps, or fragments of Lego constructors are also perfect for this purpose.
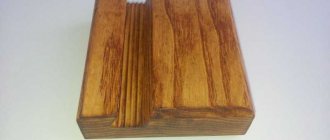
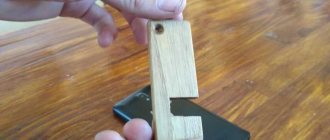
For those who are not looking for easy ways, it is advised to build a stand from a wooden block, cutting out a groove for the phone in it. Those who like to collect origami will create an intricate craft that will comfortably fit a communication device. For such a stand you do not need thick cardboard.
It happens that you need to charge your phone, but there is no table or chair near the outlet. Shouldn't a faithful friend hang on a cord? A plastic bottle will be used.
It is necessary to wash it and outline the contours of the stand with a marker. The front part should be slightly shorter than the phone itself so that it does not fall out of the “case”.
A hook is marked on the back wall, which the cup clings to the charger. We cut out the craft along the contour and use it for our health!
Photo holder - 5 ideas that you can implement yourself
Each of us has not the best days - when we just want time to quickly come to the evening, so that we can hide at home, so that, having changed into slippers, we can leave all our problems and troubles behind the threshold. How do you save yourself on days like these? It has long been proven that needlework is one of the best relaxing procedures. Try making a photo holder with your own hands - during the process you will be so carried away that you will forget about all the possible troubles and difficulties. In addition, later, when the photo holder is ready, when returning from work, you will always meet the eyes of those dear to you, and this is a separate plus.
Photo holder - 5 ideas that you can implement with your own hands:
1. Photo holder - mountain
The people you love deserve the best, the highest! Make each of them their own Everest - all you need is polymer clay, paint and diligence. Just start working - and you are guaranteed a good mood; it will come on its own, displacing the worries and worries of the past day.
Master Class
2. Macaron holders
Do you like macarons? Bright, juicy, incredible! Just looking at these delicious cakes will lift your mood and improve your well-being! Imagine how much you will want to smile if, in addition to your unrealistically attractive appearance, you can also see the beloved faces of your children, parents, and husband. Definitely do it!
Master Class
3. Heart holders
What could be sweeter and kinder than a simple naive heart that holds, as if hugging, a photograph of a person dear to you? Make such a photo holder on your desktop - and any negative thoughts will disappear before they even have time to form words. This is a simple project, but there is a lot of meaning hidden in its simplicity.
Master Class
4. Photo holders made from wooden blanks
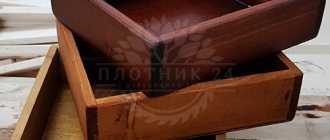
Do you have a wooden cube or ball on hand? Be sure to twirl them in your hands, take a closer look at the patterns that nature has created, and then, having figured out how to best play with them, decorate them and turn them into stylish eco-friendly holders for family photos. Very warm, sincere things for the warmest relationships.
Balls, cubes
5. Stylish holders made of clothespins with decoupage
And this project definitely deserves the title of the most relaxing! It contains everything: creative search, fine motor skills, selection of the most delicate materials, and calm, unhurried, almost meditative work. Choose the motive that best suits the state of your soul, and create for pleasure!
Master Class
Discussion of the article
You can rate the article, share your opinion, and subscribe to comments on the article.
What else to read on this topic on the Handicraft Runet:
www.darievna.ru
Advantages and disadvantages
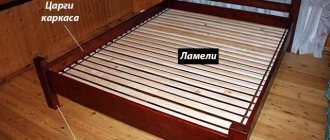
Chairs made from logs have many advantages:
- Affordability of the material;
- Environmental friendliness of the product;
- High strength and wear resistance of the structure;
- Ease of manufacture. The work of constructing a chair from a log can be done even by those who do not have carpentry experience. Moreover, the simplest design can be made in less than 1 hour;
- A broken structure can be easily repaired or disposed of;
- Ease of product care and restoration;
- Original appearance of the product. Having a developed imagination, you can build not only a practical, but also an unusual structure.
However, log chairs also have their disadvantages. The disadvantages of products include the following factors:
- High sensitivity to moisture. Even with careful treatment of the material with water-repellent solutions, a log may crack if exposed to moisture for a long time;
- The massiveness of the products and their heavy weight;
- Flammability of the material. Almost any wood is a highly flammable material. Therefore, it is not recommended to use such chairs near an open flame, even after treatment with a fire retardant solution.
Also, the disadvantages of chairs made of natural wood include the specificity of tactile sensations and associations that this type of furniture can provoke.
MK frame stands | Country of Masters
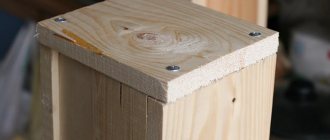
I needed an A4 frame, but I couldn’t find one with a stand to put it on a table, only one with loops to hang it on the wall. So I decided to make the stand myself.
I cut out 3 templates like this (you can do more, depending on how heavy the frame is)
And 2 such corners (a rectangle made of cardboard was bent in half)
I glued the templates together and glued the corner on one side and in the same way on the other side.
It should look like this.
I covered this blank with self-adhesive film and glued it to the frame.
Maybe it will be useful to someone.
stranamasterov.ru
Spice jars on the bottom wall of the cabinet
I saw somewhere a jar that came with runners that can be attached to the bottom of the cabinet, and then simply insert the jar into the grooves. Then the can will slide out like a closet door. I can’t remember where I saw such a miracle, but it gave birth to an idea in my head: it may not be so easy to make a sliding mechanism, but using the bottom wall of the cabinet is quite easy. You just need to screw the lids on the jars, and voila - you can screw the jars themselves into them and store spices that way. I Googled it, and it turned out that such a cool idea was not only in my head.
DIY photo holder.
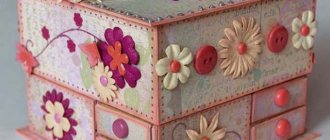
Every family has photographs that are most dear to us as memories, and often we want them to be in plain sight and not stored in an album. Of course, there are frames for this, but often they are large and there is not always room for them. You can make miniature photo holders with your own hands. The material for them is the simplest, they are made quickly, and their design will give you great pleasure, especially since you can decorate them using almost any technique available to you: scrapbooking, quilling, decoupage, paper art, etc. So let’s begin. We need two cardboard blanks measuring approximately 8 by 8 cm, two wooden clothespins, PVA glue and double-sided tape.
Instead of cardboard, you can take these plywood blanks. These are actually coasters for glasses.
I decorated my blanks using decoupage technique. I used a rice card and made a craquelure.
I also decorated the reverse side.
I also tinted the clothespins to make them look completely aesthetically pleasing, but this is not necessary.
And then everything is very simple. We glue our clothespins onto one of the blanks. Regular PVA glue.
This is how our future photo holder will stand.
Next, to stabilize the photo holder, we glue double-sided tape to the clothespins. The distance between the workpieces will become wider and the holder will be more stable.
We attach the second blank to the tape.
That's all. The photo holder is ready!
Let's add some more plastic roses and you can insert a photo. To do this, squeeze the lower part with your fingers, the clothespins will open and clamp your photo.
This holder is made using scrapbooking technique.
Here, as you can see, for greater stability I did not use tape, but an additional third clothespin, divided in two. It is more stable.
You can put the whole photo.....
Or you can (if you don’t mind the photo) cut off the excess and place it in a homemade frame like this.
Well, and one more, again using the decoupage technique. This is the front side.
On the reverse side I used the same napkin, but without additional details.
stranamasterov.ru
General requirements for material for manufacturing
When choosing a material for making a chair, it is important to pay attention to the following points:
- No damage to wood in the form of internal and external cracks, fungal infections and traces of parasites;
- In a cut of high-quality material there should be no traces of fused or underdeveloped knots;
- The wood must be strong and wear-resistant.
The main varieties of trees from which you can build a chair for home use are:
- Larch;
- Oak;
- Maple;
- Ash;
- Alder;
- Pine;
- Cedar;
- Beech.
To construct an element of garden furniture, it is recommended to use coniferous trees. Possessing a large amount of resin, they resist decay processes, as well as fungal infections and parasites, much longer.
DIY photo frame, ideas - photo examples
Photographs... They store the most interesting moments of our lives. How to save the pictures themselves? It is best to frame them and place them in a visible place.
But unusual accessories that match the stylistic design of the room can cost a lot of money. And finding a truly exclusive framing model will most likely not be easy. Is it possible to assemble a photo frame with your own hands?
Undoubtedly! And from the most incredible materials. And rest assured, such a thing will not end up on the shelf, it will be put on public display.
Where to begin
Like any business, collecting photo frames begins with choosing consumables and manufacturing techniques. As the master classes show, photo frames are most often made:
- made of wood,
- all kinds of paper,
- cardboard
DIY wooden photo frame
But this is just the tip of the iceberg. The imagination of craftsmen is limitless, and for them a photo frame made of paper is a long-past stage. They work with literally everything they can get their hands on:
- plastic;
- polystyrene foam;
- matchboxes;
- pencils;
- CDs;
- straw;
- twigs;
- fabrics;
- test.
Photo frame made of pencils
Let's try to understand the intricacies of making the most interesting options.
Cardboard photo frames
Dense material will allow you to assemble a fairly strong picture frame. It can not only be hung on the wall, but also displayed on a shelf or desktop.
The technique of assembling a photo frame with your own hands is simple. You need to cut out two parts slightly larger in size than the photo you plan to frame. In the standard case, the frame is made in a rectangular shape, but if desired, you can experiment. In one of the rectangles, the central part is cut out so that strips at least 4 cm wide remain along the edges. If the accessory is planned to be mounted on the wall, then a loop of rope or thin tape will need to be glued to the back. You can see how to make a support leg for a photo frame out of cardboard on the Internet.
Cardboard photo frame details
We assemble the structure using glue, after which all that remains is to decorate the result. Just painted cardboard will look sad. Since this template differs from a paper photo frame in its durability, you can decorate it in any way you like. Make an applique by cutting out blanks from colored paper, or cover them with cut-outs from packaging wrapper. In the latter case, the cardboard base will not need additional decoration. On top of a fairly beautiful picture, it will look tacky and ruin the impression of an unusual photo frame.
Cover the frame with beautiful wrapping paper
It happens that finishing paper has a magnificent texture and a completely ridiculous color. Don't rush to put it aside. Just repaint the material in a shade you like, and feel free to use it to realize your idea.
Is your house full of old postcards? Great! Watch a master class on quilling photo frames. You'll probably like the idea.
Photo frame decor using quilling technique
You can also decorate the workpiece with colored paper napkins. They are cut into squares, crushed into loose lumps and fixed on a cardboard base. Such beauty of work cannot be achieved even by those who are far from creativity.
You can decorate the frame with colored paper napkins
To decorate a photo frame from scrap materials, sequins and beads, brooches and coins, buttons and the remains of old puzzles are suitable . It can be covered with fabric, tied, or braided with threads. Felt, guipure, lace, satin, velor - the list goes on and on. There will always be a way to use whatever is in the bins.
Decorating a photo frame with buttons
Paper photo frame
Do you have a desire to do handicrafts, but no ideas on how to materialize your dream? Take a look around. There will probably be remnants of wallpaper from renovations in the house. You can use them to build a magnificent three-dimensional frame for a photo.
Do you know the art of origami? Then you can make more complex versions of products that are assembled from several sections. It is worth involving children in such an exciting activity. Give them a home workshop on how to create a photo frame. For origami, you can take the most inconspicuous paper and subsequently decorate it at your discretion.
Photo frame – origami
Is there nothing in the house but newspapers? But they, too, may well be put into use. By the way, this material is the easiest way to create unusual photo frames. You can work with newspapers using a variety of techniques. For example, they can be rolled into tubes, from which frames for photographs are then woven.
Photo frame made from newspaper tubes
DIY photo frame made of wood
“Those who know the weaving process first-hand can safely create photo frames from scrap materials such as wicker and twigs.”
Also an excellent material for handmade. The easiest way is to assemble a photo frame from twigs and twigs. To fix the elements into one whole, use organza or not too thick rope. If you want to make the structure as reliable as possible, you can additionally glue the parts using a glue gun. To preserve the natural texture of the material, the product should be opened with colorless varnish.
Photo frame made of twigs
Those who know the weaving process first-hand can safely create photo frames from scrap materials such as wicker and twigs. Use willow branches, reeds, and willows. Don't throw away your popsicle sticks. They can also become the basis of a frame.
Popsicle sticks can become the basis of a frame
Unusual photo frames: decor ideas
Did you know that a photo frame made from scrap materials is a multifunctional item? This is not just a stand for a good photo: it can be used as an element of interior decor, and not just a simple one, but an accent one. If the assembled photo frame seems boring and too simple to you, try to refine it and fit it into the surrounding environment. To turn a nondescript item into an exclusive item, anything you can find in your sewing box or storage room will do. Let's see how this can be used?
Eco-style in the decor of cardboard photo frames
Seafood
So that the souvenirs brought from the resorts do not lie dead weight and can fulfill their role as a “reminder” of a wonderful vacation, remove them from their hiding places and use them to frame photographs of the appropriate theme. Small pebbles will be an excellent decoration. The pebbles can be left in their natural form or painted in fun colors.
Small pebbles will be an excellent decoration for a photo frame.
Elements can be laid out, sorted by size, trying to create some kind of ornament, or simply in random order, diluting them with other gifts from the sea coast. In any case, it will turn out non-trivial and nice.
A frame made of shells will remind you of a wonderful vacation
Magic nuts
Remember the lines from “The Tale of Tsar Saltan” about difficult nuts? We will also need gold shells to decorate the photo frame with our own hands, and we will get them using spray paint. Divide the walnuts in half, place the halves on paper and paint them with gold paint. After drying, glue the decor onto the frame. Simple and magical!
Decor of photo frames with golden shells
Eco miniatures
The easiest way to get unusual photo frames. From the gifts of nature you will need:
1. Egg shells.
2. Small shells.
3. Thin branches.
We beat the shell into fragments (not into dust!), and paint the sticks with white paint. Now all that remains is to glue everything onto the base.
This light mixture can also be used to decorate a paper photo frame. The center of such a craft can be not only a photo. Place themed decor there, such as a hodgepodge of large shells and bright autumn leaves.
Decorate a photo frame with eggshells
Aroma frame
A photo frame can not only be beautifully decorated, but also scented to boot. Anise stars and cinnamon sticks emit a rather pleasant smell. The elements are simply glued onto the finished frame. Their number and location are determined arbitrarily.
Materials for decorating aroma frames
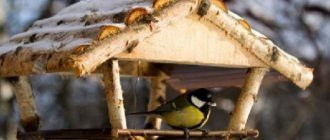
Photo in birch bark
A truly unique frame decor option. You can get hold of a piece of unusual finishing material from florists.
Master class photo frame made of birch bark
The birch bark layer is cut into 4-5 strips. Their number depends on the type of fastening of the frame structure. An additional strip of birch bark plays the role of a supporting leg, so it will only be needed to create structures that will be displayed on shelves.
Birch bark strips
We cut out a photo frame blank from cardboard of the required size and paste the selected photo onto its front part. Use colored cardboard, preferably green shades. Glue birch bark strips around the perimeter, decorated with unusually shaped buttons (in the form of leaves or flowers).
Glue birch bark strips around the perimeter
Attach the stand and send the original accessory to its intended place. Black and white photographs will look more impressive in such a natural frame.
Ready-made birch bark photo frame
In fact - braid
Vintage charm
Attractive technology with simplicity. For greater effect, it is better to paint a cardboard photo frame purple. Now you can glue the snow-white lace braid onto it. To complete the composition, add buttons of different diameters and colors at the corners. The exquisite photo stand is ready.
Photo frame in vintage style with lace
Perky spirals
Multi-colored curls of twisted cord and double-sided tape are what you need to transform a boring frame. We release one side of the tape from the protection, attach the tip of the cord and begin to lay it, twisting it in a spiral. When all the curls are ready, fix the strip on a paper photo frame.
Twisted cord frame
Frame in buboes
Very interesting frame design. To work, you will need braid with small dense buboes and transparent glue. A master class on creating a photo frame is not required. All actions are on an intuitive level.
The tape is glued around the perimeter of the product. The frame is laid on the surface. The inside is carefully covered with a protective layer of cling film. The pompoms are straightened out and laid out beautifully, after which they are treated with an adhesive composition. The latter will need to be sprayed from a spray bottle.
Bright photo frame with pompoms
After drying, the braid will become rigid and the buboes will not sag.
Options for decorating photo frames with other available materials
Denim design
Even a child can dress cardboard photo frames in jeans. Cut out pieces of the desired shape from old things and simply glue them to the base. For better adhesion, press the workpiece with something heavy and leave it to dry in this position. Now highlight the inner perimeter with thin twine or orange twisted cord and you can insert a picture into an unusual photo frame.
Photo frame made from old jeans
Wax decor
This postal accessory makes a great decoration for a frame. We collect multi-colored sealing wax and melt it. Using a stamp, we make impressions on the base. The finishing touch will be a bow made from packaging twine.
Decor made of colored sealing wax
Photo frames from scrap materials
“Photo frames made of cardboard framed with knitting threads look impressive”
This may sound paradoxical, but the simpler the material used to make a photo frame, the more impressive the result will be. Test your ideas in practice.
An incredibly beautiful frame will be made from a piece of ceiling tile. All you need to do is cut out a figure of the intended shape in it with a stationery knife. It can be not only a rectangle: give the unusual photo frame more original proportions. Make it oval, hexagonal, triangular, heart-shaped. The decoration stage will complete the work. The base can be painted or decorated with adhesive parts.
Ceiling tile photo frames
No less attractive frames can be made from scraps of ceiling or wall plinths. We cut out the sections according to the dimensions of the structure and assemble the parts into the given shape by gluing the end parts. We decorate at our discretion. Fast and effective!
Photo frame made from wall plinth
Cardboard photo frames framed with knitting threads look impressive. The base is wrapped with mohair, colored acrylic or other types of yarn. Children's photographs will look especially tender in such a frame.
Cardboard photo frame framed with knitting threads
Is a paper photo frame boring? Try making it from a glossy magazine. Tubes are wound from its multi-colored leaves, which are then collected together. For convenience and speed of the process, the sheets can be wound onto a pen or pencil.
Photo frame from a glossy magazine
Upgrade an old frame with discs. They are broken into fragments and a pattern is laid out from small elements on the surface to be decorated. To make it even more decorative, the resulting voids between the parts are painted with acrylic paints. It is more convenient to use tubes. Through their sharp spout it will be easier to carefully fill the voids.
The process of laying out a pattern from disks
The same principle can be used with colored glass. Stained glass decor will look great!
But perhaps the most unusual photo frames can be called products made from... dough. It is kneaded according to a special recipe. For a glass of flour you will need half a glass of fine salt and water, as well as 50 ml of vegetable oil. If a colored model is conceived, then food coloring is added to the dough. Mix the dry ingredients and fill them with colored water. Knead the mixture and season with vegetable oil. Knead the dough until ready. Roll into a ball and leave it to lie under a towel for a couple of hours.
Necessary materials for making a dough frame
Make a frame from the rested dough and dry it in an oven preheated to 100 (no more!) degrees. The process will take several hours, but the dough will not crack. Don't forget to turn the unusual photo frame over. At the end of the procedure, the product is allowed to cool and is opened with varnish.
Paint the finished frame in the desired color
It is not necessary to make the frame initially colored. Leave it white and decorate it as you wish after baking.
If you’re not ready to work on a photo frame with your own hands, but you still want to add something exclusive to your home, use transparent glass containers. Roll the photo into a tube and immediately push it into the neck of the bottle. For greater effect, fill the bottle void with glass balls of different colors, dried grass, and cereals.
Original photo frame from a bottle
Create an entire photo collage by mounting your photos on an authentic wheel hanging on the wall. The abundance of small photographs in photo frames made from scrap materials does not fit into the decor, but you really want to put them on display? Combine them into one picture. To do this, you will need to assemble a frame made of wood or plastic, like a picture frame. In addition to this, stock up on: small nails or a set of colored pushpins, jute, measuring tape, clothespins.
Photo collage in a wooden frame with clothespins
The size of an unusual photo frame is determined by the number of pictures that should fit in it.
Lay out the photos on paper in the order in which you would like to see them inside the painting. Take measurements and assemble the photo frame with your own hands. Now, drive nails in the appropriate places and stretch the jute over them. Using clothespins, hang photographs along the stretched threads, like laundry on a line. Your picture has been created!
The beauty of such a decorative element is that the collection of photos in it can be changed regularly. You can make thematic or nostalgic collages, photo reviews of recent events in the family. Creative and always relevant!
The content of the photo collage can be changed regularly
Conclusion
As you can see, a DIY photo frame can be created from anything in a matter of hours. The main thing is desire!
Photo gallery - DIY photo frame
yellowhome.ru
Manufacturing options
There are two ways to make a chair or stool from a solid log without using any fastening elements:
- By firing method;
- Cutting out the product with a chainsaw.
Both manufacturing options require subsequent grinding and finishing work.
Firing method
Using this method, you can easily make a stool from a log, or a piece of furniture such as a bar stool. To create a product, you need to take a hewn log of suitable height and diameter and make two cross-shaped cuts in it, perpendicular to each other. It is most convenient to work with a chainsaw. The depth of the cut depends on how tall the legs should be.
The log is placed in an open area and a little flammable liquid is poured into the center of the cuts. This could be machine oil or fire starter fluid. After this, the center of the log at the cuts is set on fire. The combustion is controlled by turning the log with the required side to the wind or by placing small twigs inside the log.
Using this method, it takes about 8 hours to make a stool.
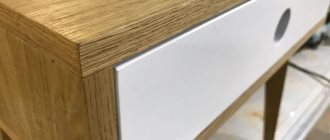
Chainsaw
Using a chainsaw, you can cut not only a stool or bar stool from a solid log, but also a product with a backrest. In this case, the design can have both standard and unusual shapes. The final result depends on the desires and imagination of the author, as well as the geometry of the lumber.
A chair made from a log using a chainsaw
The work consists of gradually cutting out individual elements from a solid mass. In this case, either a chopped log or a log with bark can be used.
DIY photo frames made from simple materials: 14 fashionable ideas
Cool fashionable photo frames are an integral element of any interior. DIY photo frames can not only become a unique accessory for your home, but also serve as an excellent gift for family and friends.
In this post, Lobsta.ru made a selection of 14 cool ideas on how to make a photo frame with your own hands from simple materials, many of which can be found even at hand.
Frame of dry twigs
This option is suitable for creativity with children; they will willingly help you first collect sticks in the forest, and then happily break them into short pieces. What you will need: a wide-brim frame, a glue gun, sticks
Source
Frame from an old rustic window frame
Source
Photo frame from an old book
An unusual frame made from an old book is a great example of a photo frame made from materials you have on hand. Suitable for a small but very sweet photo. Step-by-step instructions in the pictures below:
Source
Frames made from cardboard tubes and toilet paper rolls
This creative panel is suitable for some kind of photo story, for example, about your last trip. What you will need: toilet paper rolls and any other cardboard tubes of different diameters, scissors, glue, paper knife, pencil. Step-by-step instructions in pictures below: Source
Large panel with metal mesh
What you will need: How to do it: Attach the metal mesh with a stapler to the frame on the reverse side. Use clothespins to attach the photos to the grid. Source
Dry moss frame
A stunningly vibrant photo frame made of real moss is a sophisticated decoration for your home.
What you will need: an old wooden photo frame, dry moss (can be ordered here ), glue. How to do it: Just glue the moss around the perimeter. Decorating will take no more than 30 minutes and will bring a lot of fun.