Wooden furniture has been made for thousands of years, but today it has been undeservedly forgotten. The reason for this attitude is the lack of high-quality and stabilized material - the preparation of wood on an industrial scale at the current level makes the final product too expensive.
However, homemade furniture made from natural wood is still made by home craftsmen. The most popular products are benches and chairs made of logs, which are easy to manufacture and can create a specific look for their surroundings. Take a closer look at them.
Garden furniture style
Rustic is the first on the list of justified options.
The main milestones of the style were wood, rounded lines, relief and slight negligence. Proponents of perfectionism will more like crafts in a somewhat similar loft style. The rustic style will help in arranging a natural environment for spending free time in peace and quiet. Furniture in the English style is made with classic “notes”, balanced proportions and lines. The combination with small unevenness in the landscape will be organic. The Japanese trend in design involves the observance of straight lines and, in fact, Japanese motifs, designs and patterns. Decorative plants will complement the street ensemble. The garden in the spirit of French classicism is furnished with sophisticated products. At the same time, symmetry should be maintained in the arrangement of furniture. Other relevant styles in this context:
- eco-style;
- Oriental;
- Mediterranean.
Types of designs
Drawing of a garden table
One of the popular options for garden furniture is a gardener's workplace. Even if you are not an avid gardener, without a well-equipped table it will be much more difficult for you.
If you prefer original solutions, you can make a picnic table in an unusual style.
Folding garden chair
On a fine summer day, a gazebo with folding chairs and a table, which are not only comfortable, but also compact, will be indispensable. Bright modular structures, such as benches, will add variety to the landscape. During frequent family vacations, do not forget to take care of the kids and make a table and chairs of a suitable size for them.
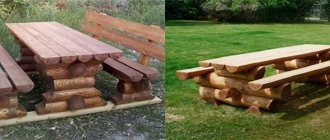
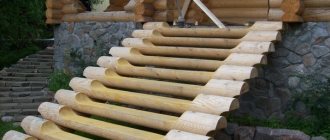
DIY table and benches made of rounded logs
Interesting decor ideas for antique furniture
February 27, 2014 whiteman
When finishing the construction of a house or other buildings made of rounded logs, there are always unnecessary scraps of this material left after cutting out door and window openings, and even so, there is always a supply of a couple of logs. These materials, of course, can be used for firewood, but you can make a very useful thing - a table and benches. Made from this material, they will be almost eternal, and they can be placed anywhere: on a plot or terrace, in a gazebo, on a platform near a bathhouse, in general, a useful thing. Therefore, do not rush to scorch the pieces and trimmings, there will always be a use for them, so put them under a canopy, do not let the fungus and the sun kill them.
Now we will look at this set, made of logs with a diameter of 160 mm-180 mm; with a larger diameter, the height of the product changes, so it is necessary to make changes to the design. I myself made it from a log Ø 180 mm, later I will post drawings and sketches of a product with a larger diameter and a canopy over it.
Let's start. The product size will be 2000 mm by 1500 mm. The height of the table is approximately 900 mm, the height of the benches is 650 mm, this is approximately because... much depends on the type and size of the interventional groove. For those interested, the weight of this set, made of pine with a density of 600 kg/m3, is exactly 360 kilograms. The fastening is standard for a log - a dowel; you can fasten each crown separately, or you can fasten two or three at once; I will write an article in more detail later about the types and rules for assembling "otsb". If you are going to place this product on the site, lay a waterproofing layer and antisepticize the material. We carry out assembly at the installation site.
First, look at the number and sizes of parts, prepare everything in advance so that you have enough material, here is a table with the sizes and number of parts:
So, we lay the first crown, arrange the logs according to the sketch:
The second crown, according to the drawing:
We assemble the third crown as in the drawing:
We assemble the fourth crown, this completes the assembly of the log benches, all that remains is to attach the boards, and we continue to assemble the table:
Finishing the log table:
After assembling the log base, we make the surface of the table and benches from boards, it is better to use them with a thickness of 40 mm - 50 mm, and fasten them through the gap on a nail, while water will not stand on the surface. If the product will be located indoors or under a canopy, you can attach the boards end-to-end to each other; to fasten the boards, use wood screws (white or yellow). After assembly, before painting, you can go over the surfaces with sandpaper, round the edges of the corners, remove greasy and dirty stains, this will improve the adhesion (bond, adhesion) of the paint coating to the material, and also treat the product with an antiseptic. That's all, our table and benches made of rounded logs are ready!
I hope you found this article with drawings helpful and liked it, if so, tell your friends!
Published in furniture category
Where is it most often used?
The use of rounded logs is relevant in many stylistic areas of residential decor, as it can be successfully combined with other materials, with many color shades in the decor of walls, ceilings, and floors. But most often such decorative items can be found in rooms with decor in the following styles.
| Room design direction | Characteristic |
| Country | Country style is distinguished by the naturalness of its materials, so log tables, chairs, beds, and cabinets will fit perfectly into rooms of this style. |
| Provence | Provence requires laconic forms, simplicity of color shades and naturalness of the materials used, which, by the way, corresponds to furniture made of rounded timber. |
| Loft | The loft style is unusual and simple, practical and resists everything overly pompous and expensive. However, it is log furniture that is successfully combined with glass, brick, and plaster, which are so often used in such interiors. |
| Classic | When properly processed, natural wood furniture acquires a strict, conservative look, which is very important for classic living rooms and bedrooms. |
No less relevant is log furniture for a garden house, a gazebo on a summer cottage or a park. But you shouldn’t leave it in the open air for a long time, as precipitation will negatively affect the quality of the surface.
You can complement the beauty of timber furniture with the help of decorative elements made of natural rattan, glass or metal, leather.
Assembling a table base from logs
- Reinforcement and glue will help make the assembly of the structure reliable and durable. Insert metal pieces into the joining logs. The rods must fit exactly into the holes. If they peek out slightly, cut off the same amount at the end of the metal fastener. Disassemble the structure for final connection.
- Fill the bottom hole ¼ full with glue, then insert the reinforcement, put the next log according to the drawing on top (we recommend numbering all the logs used accordingly in the drawing).
- On top-mounted logs (the rods are in them), fill the holes with glue to the very edges.
Children's birthday menu: ideas for the festive table
Leave the resulting design. The glue must dry.
Adviсe
Garden chair from a stump
In order to make a piece of furniture from scrap material, an old barrel will help you, which will later become an unusual chair with a back. In a short time, you can build a bench using boulders as support legs and a wooden board as a seat. To build such a bench you will need the following tools:
- planer for processing boards;
- drill with a diamond attachment;
- anchor bolts.
Having processed the board using a plane, they adjust the boulders to the required height, after digging a hole and arranging a sand cushion at the bottom. It is necessary to drill holes in the board and stones for anchor bolts.
The final step is to tighten the bolts and cover the surface of the board with a protective layer of varnish.
Creative solutions in the design of a hunting lodge and furniture for a fisherman
Making a carpentry workbench with your own hands
For each room, be it a gazebo near the house or a bathhouse, we try to create unique interior accents, and we transfer some solutions to rooms for different purposes if we see that our idea will only benefit from this. For example, wooden arches made of logs painted with picturesque landscapes can complement the hunting design of any room.
Also, small coffee tables are suitable for all rooms in the hunting lodge - we often make their tabletops from cut wood; and the legs are made of suvels and burls. All this creates a colorful and impressive hunting design and makes the house truly memorable and atmospheric.
Beautiful examples
Massive chopped bed. This piece is incredibly strong due to its design. The bed is wide enough and comfortable, so it can comfortably accommodate a couple of people.
Combined set of table and benches. Quite elegant, it has a somewhat lightweight design (in the production of the tabletop and seats, boards, rather than halves of logs, were used). Joining the material in a “paw” type will add reliability and strength to the furniture.
A very atmospheric chopped sofa in the loft style. There is nothing superfluous in this model; the structural elements are roughly assembled, which adds extravagance to it.
To learn how to make a bed from logs with your own hands, watch the video.
Assembly
Log table with dimensions
- Let's mark the prepared log for sawing. After that, using a chainsaw, we will divide it into the necessary parts. You can do this yourself or hire a sawmill. The services of professionals will cost a certain amount, but the likelihood of damaging the log will be reduced.
- Carefully cut the logs for the tabletop lengthwise. Make sure the cut is even. The halves of the logs will be positioned with a flat surface up, so they form the table top.
- After sawing, clean the resulting parts from the bark. This can be done with an ax or chisel and hammer. Carefully cut away the bark, being careful not to damage the surface of the log.
- If necessary, cleaned logs are processed with a grinding machine. This way you can achieve a smooth surface and hide wood defects.
- Putting the details together. We cut out a round groove for each log, on which another will lie on top. Try to adjust the size of the groove to the part as much as possible, this way you will achieve greater stability.
- We connect the folded logs with self-tapping screws. To do this, we make a hole 15 centimeters deep in the top log. Then we place a self-tapping screw in the hole and tighten it with a screwdriver. We connect all the logs in series.
- We fix the table cover on the resulting stands. This is done using the same screws. For beauty, you can disguise the screw caps with metal caps.
- We thoroughly impregnate the finished table with a protective composition. Apply three to four coats to best preserve the wood. The drying time of the impregnation is eighteen hours, after which a layer of varnish can be applied.
Care
In addition to watering, there are two other activities that should be kept in mind. It's rain and wind. In a homemade flower garden, the volume of soil is small, so until the plants reach the required root size, the flowers need to be protected from heavy rain. The soil in the flowerbed is usually covered with small shavings and wood chips, which prevents the soil from being washed away.
The second problem is weeds, which need to be removed in the first weeks of warm weather. If you start a flowerbed, the flowers may not gain the necessary green mass
For hanging plants, it is important to regularly trim the tops, otherwise the process of uncontrolled moisture loss will begin.
How to make your own table?
A log table made with your own hands will serve for a very long time and will become a real reason to sit in nature on a warm summer evening, drink tea, talk, or, conversely, enjoy the peace and quiet.
The type of logs from which it can be made is not of fundamental importance, but it is much easier to construct from rounded logs than from wood cuts covered with bark. However, this is a matter of taste and individual vision of your own garden interior, although ensembles of a bathhouse, gazebo, doghouse, well, house and garden table made in the same style and from the same material look very impressive.
Making such a table from logs with your own hands is very simple. All work will consist of the following:
- Decide on the dimensions based on the available materials and taking into account the place where the furniture will be located.
- Make the most detailed drawing indicating the dimensions, for which you need to make all the necessary measurements. This will greatly simplify the work itself.
- Select logs for the legs, make sections of a certain length according to the design, cut out inclined corners on those parts on which they are provided, give the cuts the chosen decorative shape and finish them with stain.
- Cut out all parts and align the places for future fastenings. For convenience, they can be marked with a marker directly on the material.
- Prepare reinforcement bars or threaded rods. Each leg will have two metal rods, slightly longer than the height of the structure itself.
- Drill holes for reinforcement fasteners, the diameter of which should not be significantly wider than the rods themselves, and the lower parts should not be drilled through.
- Pour glue into the lower grooves, insert the rods and leave everything to dry. After the glue has dried, you need to try shaking the reinforcement to make sure the fastenings are tight. Next, you should string the remaining parts step by step, allowing the glue to dry.
- While the structure is drying and assembled, you can prepare everything you need for the countertop.
- The parts defined below the surface can be nailed, or they can also be fixed to the reinforcement if a decent piece of it remains on top. When choosing the method of installing the “face” of the table using self-tapping screws or nails, the protruding pins of the rods must be cut off.
- You can additionally fasten the tabletop parts from below with slats.
- Finally, the finished table must be varnished.
The tabletop deserves special attention. Its appearance depends solely on the imagination of the master and can be absolutely anything, not only in form, but also in content. For example, you can use fragments of ceramic tiles and lay out a mosaic. Broken tiles are sold for mere pennies at any large hardware store. However, besides tiles, you can use any materials.
For example, make a decorative panel from everything that comes to hand, and cover the resulting picture with glass, making sure to secure it at the junction with the wood with glue.
Or lay out a picture of dry leaves, covered on top with a glass panel for tabletops. There are no restrictions in the design of the front part of the table, except, perhaps, practical expediency and the availability of free time for creativity.
There is nothing difficult about making a table with your own hands; all you need is your own desire and quite a bit of patience and effort.
Of course, garden furniture can be made with your own hands not only from logs, but also from almost anything that comes to hand. But, made from materials remaining on the site after construction, the table will solve the problem of recycling scraps and, if all the details are properly worked out, will last for decades, while being permanently located in the garden.
Chopped dog kennels
If your dog lives in the yard, then she simply needs shelter from the scorching sun, rain, wind and snow. After all, she, like a person, needs a place to rest and sleep. Sleeping on the ground or hiding under a bush during a rainstorm is not only unpleasant, but also harmful to a dog’s health. That is why log dog houses are the only correct solution in such a situation. By purchasing a log cabin for your pet, you not only keep him healthy, you also add a beautiful decorative element to the area.
Kennel for the dog “Baby” Art: 012 Price: 19,000 ₽
Buy online
Dog house “Terem” with architectural cuts of the end of the log Art: 013 Price: 20,000 ₽
Buy online
Large dog house “Caprice” with an extension under the porch, chopped from a log Art: 014 Price: 30,000 ₽
Buy online
Nuances of choice
Log furniture has a number of advantages. However, this rule applies only to those pieces of furniture that are made strictly according to technology using high-quality fittings and fasteners. Saving on components or protective coatings for logs can have a detrimental effect on the durability of structures and will reduce their resistance to the negative influence of external factors. Therefore, you need to choose such interior items carefully, without haste, weighing all the pros and cons.
Read also: Common hawthorn plant description
Let us describe the main factors that cannot be ignored when choosing wooden furniture:
- cost - the process of creating furniture from logs is quite complex, painstaking and cannot be rushed. Only if this condition is met can it be said that the log bed will serve for several decades in a row. That is why interior items of this kind cannot be cheap. A low price should alert the buyer, force him to carefully inspect the design for defects, read the accompanying documentation for the product (quality certificate, passport, assembly and maintenance instructions);
- sizes - log interior items often have impressive dimensions, so they should not be selected for narrow spaces with poor lighting. In small rooms they will look overly bulky and will weigh down the space. And for large spaces, such furniture is simply a godsend;
- surface aesthetics - the logs used in the manufacturing process of the furniture structure should not contain knots, chips of the interlayer in the wood mass, and the annual rings should be located as close as possible. These factors will indicate the high quality of the material used. If the bed does have such shortcomings, its price should be significantly reduced.
Taking these factors into account, you can choose successful models of tables, chairs, beds or cabinets made from rounded logs and profiled logs for your home or cottage
Types of products
Furniture made from logs is very relevant for many premises. In its manufacture, different types of wood are used, so the operational parameters may vary.
Conventionally, experts divide all wood species used in the production of log interior items into two types:
- made of hard wood: maple, oak, ash, walnut. Such species are relevant for the manufacture of furniture that experiences the highest load during operation. For example, a bed frame, a dining table top;
- from soft wood: poplar, willow, pine, spruce, chestnut. These types of wood are used for the manufacture of decorative elements when decorating log furniture. For example, facades, carved decorations.
We also note that furniture made from solid logs will be more reliable, durable, and more expensive than options made from laminated veneer lumber.
The appearance of log furniture may also be different, which is a consequence of the use of different compositions to give the item high resistance to impact:
- painted - to decorate wooden furniture, various types of coloring compounds are used, which can completely cover the natural pattern of the wood or slightly shade it. This ultimately determines the external aesthetics of the item;
- varnished (matte, glossy). Varnish with a gloss effect allows you to add clarity and brightness to the wood grain. Such surfaces are perfect for classic interiors. And matte wax gives the surface a special charm, relevant for country, Provence and other areas of residential decor.
Benches made of wood and brick
When making garden furniture from logs with your own hands, it is very important not to forget about two things:
- Impregnation of wood with special compounds that protect it from atmospheric influences - otherwise the wood will quickly rot or lose its aesthetic value;
- Grinding all surfaces and cutting off corners - otherwise your vacation will be marred by various injuries such as splinters, abrasions, and bruises.
To make a table from logs you will need the following tools and consumables:
- An electric chain saw (it is desirable that the chain be hooked), an electric drill with a 10-15mm drill, reinforcement bars of the same diameter, a hacksaw for metal, a file;
- Planer, sandpaper (4-grit, 2-grit and zero for finishing), universal glue (epoxy is best);
- Axe, chisel, hammer, screwdriver, screws and nails of suitable sizes;
- Special impregnation for wood (for exterior use) and varnish, brush or roller;
- Stain, wood paint for exterior use - if the product is to be tinted or painted.
Before starting work, you must complete a drawing indicating all the design details, their dimensions and location.
To make furniture from wood, choose those parts of the wood that are not damaged by bark beetles and have not begun to rot. Do-it-yourself garden furniture is made in the following order: after all the work is completed, it is necessary to coat it with paints and varnishes in order to protect the products from pests and precipitation.
Photo - a reliable and stable bench, unfortunately not mobile
The brick will act as legs, and the wooden board as the seat. The bricks are laid out in seven or eight levels, depending on the desired height of the bench.
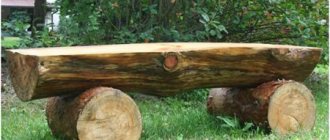
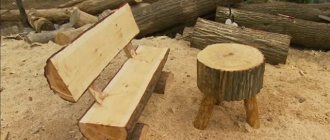
To create such furniture, it is not necessary to immediately buy material. Sometimes it is enough to look around and select drying trees on the site that cannot be rejuvenated by cutting branches and fertilizing. When we cut them down, we get a mass of wood that can be used to create, for example, a bench from logs.
For this, a base is selected that will be processed. Having marked the cut points with an electric saw, we cut the log in half and construct a back and seat from both parts. To fasten them together, strong branches cleared of bark are used, in which holes are drilled with a drill and a steel rod is inserted.
Garden bench support made of logs.
To prevent the metal from moving freely in the resulting space and the bench from becoming loose, the most common PVA glue is used to work with wood. It needs to be poured into the recess and a rod inserted there, allowing the structure to dry. In order for the bench to last longer, before assembly, all parts must be thoroughly sanded, all damage must be removed, and cracks and cavities must be filled with a special grout.
If the owner does not have steel rods at his disposal, and it is difficult to purchase them, you can use ordinary nails, removing their heads. A prerequisite when creating furniture: treatment of all parts with impregnation, which subsequently eliminates rotting, mold formation, and colonization of bug colonies. After assembly, when the furniture is already firmly installed, the surfaces are covered with layers of varnish, which will give a well-groomed appearance and protect from bad weather.
The back with which the bench is equipped can also be decorated using not boards, but 2-3 forged intricately curved rods, which are not so difficult or expensive to buy. Additions made from wicker, which is very easy to work with, will look no less impressive. It is durable and can be used to create a high back or armrests if the log is not large enough.
Tools for making furniture from logs.
To neutralize resins, several compositions are used to choose from:
- acetone and water in a ratio of 4 to 1;
- a solution of acetone and caustic soda in a ratio of 20 to 4;
- potash and soda ash in a ratio of 5 to 6.
We suggest you familiarize yourself with the passage of pipes through walls in sleeves
The mixture is thoroughly rubbed into the bark-free wood several times and washed off. After this, the material is dried naturally or using a hair dryer.
Beautiful examples
You can create furniture for your home and garden yourself. It will be unusual and stylish just because you created it yourself. You can brag to your family and friends. Homemade products will help bring your ideas to life and reveal your individuality. For example, you can knock down frames for armchairs and a sofa from edged boards. Place soft, colorful pillows there, and also lay down a fabric of a suitable color. Such furniture will become the highlight of your summer cottage.
Be sure to find out the exact dimensions of each element so that you can make an original folding chair. It will always come in handy at the dacha. Such furniture can be easily rearranged and moved to the place you need.
When implementing your interesting ideas, do not forget that the models should fit the overall style of the room. Nowadays, the most common sets are those created in a modern or French style. High-tech, country, and minimalist styles are also relevant.
You can often see different combinations of materials. This could be, for example, wood, cast iron, metal-plastic trim. To create a romantic atmosphere, furniture in the Provence style is suitable. It can be made of wood or it can be forged options.
The main requirement for any product is convenience. Rattan structures are often used. They are not only visually attractive, but also quite comfortable and convenient. You can decorate the products with a variety of pillows and fabrics.
You can focus on fashion, but it is better to choose those products that you like. Then the interior items will only cause you delight and positive emotions. The main thing is to follow a single style, adhere to the color palette and not be afraid to experiment.
Now you know how to create furniture for your garden and dacha with your own hands
Don't forget about the most important step - creating a clear outline. Follow it step by step, and you will be able to create a real masterpiece that will delight you and your loved ones
Be sure to prepare the place for work, all the tools and parts, so as not to look for them later. This will help make the work process relaxed and easy. Unleash your talent by starting to create interior items with your own hands.
To learn how to make garden furniture with your own hands, see the following video.
Features of assembling wooden tables
If a person undertakes to make something, it means that he knows how to use tools, read blueprints and work with lumber. Such a home craftsman does not need to be taught the basics of carpentry. But it would be worth noting a number of nuances when making a wooden table. These notes will only help in the process.
Let's start with the types of connections. There are quite a few of them, but for a table that you assemble with your own hands, the ones listed below are quite enough.
On the dowels
In this case, the parts are fastened by placing them on an adhesive composition (Fig. 1 – 3).
The nuance is that to make the “cylinders” that are inserted into pre-drilled “channels”, a tree of a denser structure than the table elements is taken. This is what ensures the strength of the connections. Before installing them, chamfers are removed from the edges of the dowels and holes.
These round sticks are available for sale in any furniture showroom in several sizes. Turning them, even if you have a carpentry machine, is a waste of time. It is not recommended to purchase plastic dowels for the table; they are used for detachable connections. For example, frame furniture (walls, multi-level shelving, etc.).
You should not use nails to fix table elements (Fig. 4). Metal and wood differ in the degree of thermal expansion. Such a connection will not last long - it will begin to “shatter”, especially if the table is intended to be installed on the territory or in an unheated room.
On the kings
It is advisable to make such connections if the table either has to be disassembled periodically, or without this it is impossible to move it through the doorway. Although not all drawers require dismantling the structure. The most commonly used options are shown in the figures.
Bolted
Such connections are used mainly for garden furniture or those installed in extensions; for utility tables. An example is shown in the figure.
The nuance of working with fasteners
In order for the self-tapping screw to be easily screwed in and “go” in the desired direction, a hole is first made at the point of its installation using a drill with a diameter slightly smaller than the fastener leg. The main thing is to maintain the coincidence of the axial lines, that is, to prevent skew. In this case, to “plant” the screw, you can do without a screwdriver.
Features of wood processing
Everyone knows that a plane is used first, an abrasive with a large grain, and then a fine one. But sometimes it turns out that the last stage, polishing, has to be done many times. Much depends on the type of wood and the degree of drying. After applying the first layer of varnish, the fibers may “stand up”. Nothing wrong with that. You should wait for the workpiece to dry and repeat its processing with abrasive. The work is painstaking and takes time. But it is precisely this method that can bring “problem” wood to ideal “smoothness.”
To eliminate the risk of injury to a person, all edges and corners of the table should be slightly rounded.
Features of external decoration
- Minor defects in the form of cracks and chips are eliminated with putty.
- Once sanding is complete, all wood dust must be removed. In this case, a regular household vacuum cleaner with an appropriate attachment will help out. It is recommended that after such cleaning, wipe the entire table with a slightly damp cloth, let it dry and repeat removing any remaining dust. After this, you can safely start applying stain or varnish - there will be no “pellets” on the wood.
- You can add originality to the table not only with the help of curly cutouts, an unusual shape of the tabletop or legs, a combination of textures of different species, and so on. One of the good options is artistic painting.
And finally. The work of independently making something out of wood (for example, a table) is just the initial stage of mastering the skill of a “designer-assembler”. Having developed technologies and techniques on wood and acquired the necessary skills, it is enough to simply switch to other materials - metal, plastic, glass. So the benefits of a wooden table made even according to the simplest drawing (besides the pleasure of work and money saved) are obvious - time not wasted.
Materials
Solid wood furniture is popular. Unlike metal, it is environmentally friendly and safe. As already noted, country furniture can be made from different types of wood. The most popular are conifers. They have healing properties, but are notable for the release of epoxy resin, so the wood should be deresined so that the furniture does not stain clothes.
Buyers often prefer to purchase products made from pine. It can be classified as a soft breed. However, it is not durable enough. However, the products from it will turn out to be the most creative and fantastic. Eucalyptus options are attractive. Larch models will require special care when using such products outdoors.
The most reliable and durable options include products made from hardwoods - yew, birch, dogwood. They contain special oils that protect against the effects of natural phenomena. They will serve you for many years. Teak furniture is also a great option. This breed is resistant to various climate changes. This type of wood is used in shipbuilding. You can distinguish furniture made from this material by the attractive natural patterns on the wood.
If you want to make attractive wicker structures, you should pay attention to flexible tree varieties. For example, these could be bird cherry branches
They are quite pliable, soft and plastic. This will help you show your imagination and create real masterpieces.
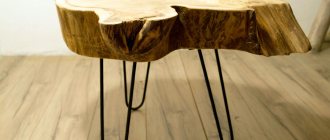
Garden furniture with logs at the base will look good. They won't even need to be processed. You just have to cut the appropriate size and install them at the required distance. The table can be made quickly and easily. It is enough to place a thick stump in the middle, build a tabletop, and the furniture is ready. You can use different types of wood.
You can make garden furniture from boards. This particular product has a predetermined flatness and a small thickness. All this allows you to successfully connect the boards together using nails. Using a regular grinder you can sand the product. It is worth noting that in this case you should first create a tabletop. This is done by fastening the boards together. Then you can move on to the base.
Recommendations for masters
To ensure that wood furniture pleases you for a long time, there are some tips that should not be neglected:
- Be sure to protect wooden furniture from precipitation and temperature changes. For this purpose, you can find special solutions and compositions in stores.
- Be sure to treat all corners and surfaces that come into contact with the body. This way you will protect yourself from splinters and other injuries.
- Don't neglect drawing up a drawing. This will help you calculate the amount of material and think through all the details.
After watching the video, you will learn how to make a table from a log with your own hands.
https://youtube.com/watch?v=MEr4bSXiDK8%3F
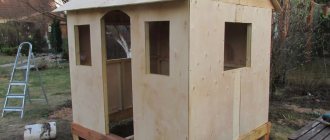
Stump - teremok
You will need: a stump, a log, a hammer, a saw, a chainsaw, a chisel, a hacksaw, tall grass for a broom, an elastic band or rope, for the path - pieces of roofing felt, fine gravel, a watering can with water, a regular broom, a fence, a brush, paint, toys.
Master Class
- Remove the core from the stump for doors and windows.
- Mow the tall grass and make a broom.
- Place a grass broom as a roof.
- Line the path to the tower with pieces of roofing felt.
- Cut the log into circles using a chainsaw, then lay them out on the roofing felt.
- Fill with fine gravel and sweep the gravel from the wooden circles with a broom.
- Fill with water and leave to dry.
- Put up a fence, paint the tower and place toys as residents.
The tree stump is ready!
Create a drawing
Before you begin installing the table, you need to make a drawing on a sheet of paper. Here the dimensions of the structure are plotted and a log layout diagram is selected. You can make a drawing on paper in several projections.
A three-dimensional drawing made in computer programs is considered more convenient. You can examine a piece of furniture from all sides, select dimensions, and also determine how a particular type of wood will look. The table, which is designed with a special program, can be adjusted to suit the specific interior of the room.
Implementation of unusual ideas
Furniture made on site
To create interesting items for decorating the landscape, you can decorate tables, chairs and benches with beautiful original branches. Such furniture will become a wonderful and appropriate element of the garden exterior and will not leave any of the guests indifferent.
Another option for making a table for a summer house is to use a large cut of the trunk as a support and a horizontal cut of the butt as a cover. The horizontal cut is fixed on a shield made from parts of the trunk. To make the structure reliable, it must be supported with logs, the tops of which have been previously hewn off, and secured to support pillars.
Choosing a stump
The most important point in this master class, of course, will be the process of finding the right stump. In our case, a part of a 100-year-old tree was selected, which its owners were planning to cut down any day.
Avoid soft woods such as pine to avoid rotting and choose the piece that is straightest at the top and bottom. Although, if you have a crooked stump, but you just fell in love with it, then you can fix it all and just trim the crooked parts.
The longer your stump takes to dry, the better, especially if you decide to use soft wood. But even hardwood stumps need to be thoroughly dried before you begin. Let the hemp sit indoors for several weeks.