Benches are a mandatory element of the design of a yard or personal plot. You can have a good time there after a hard day at work. In addition, the original and neat bench is a stylish decoration for the site. A do-it-yourself log bench is a great way to decorate your garden plot, as well as make comfortable garden furniture for a pleasant pastime. This bench combines practicality, functionality, durability and presentable appearance. In addition, if you follow the rules and recommendations, its production will not take much time.
A log bench is a great way to decorate your garden plot
Types of log garden benches
Using the simplest logs, you can make several types of benches for garden decoration. Some of them are quite complex to make yourself, others can be easily made using simple tools and materials.
The most popular types of benches:
- Garden bench without back. One of the simplest and yet most effective options. To make it, you will need only three blanks, which are made from one sawn log. You can also use small logs to make armrests. They should also be installed as legs.
Bench without back
- Traditional shop. This log bench has a solid and solid appearance, so it will become a real decoration for your garden plot. Vertical and horizontal bars are used for manufacturing. And for an original design of the product, you can use a jigsaw to cut out an unusual ornament on the top crossbar. Making it yourself will not be easy, but such a bench will become a real decoration of the garden and a great place to relax.
Massive bench with back
- Table with fixed seats. This device includes a full-fledged table with fixed benches. All elements are made from beams. The legs of this table are installed crosswise, which makes the structure strong and stable.
Table with fixed seats
- A bench made from a single piece of wood. This type of product has a stylish and unusual appearance. To produce it, you should use a medium-sized solid log. It needs to be sawn lengthwise, using only the lower part. The upper part or remaining branches must be used as legs.
- Circular shop. This bench can be installed around a beautiful tree. In this case, it is recommended to install the seat close to the trunk. The advantage of such a bench is the ability to seat a large number of people.
- Furniture set. It can be created from a large stump of an old tree. The stump will be the table leg, and the tabletop can be made from two knocked down boards. To make benches, ordinary logs are suitable, which must be cut lengthwise into two parts. Additionally, you can make backrests.
These types of log benches will allow you to decorate your garden plot in a stylish and original way. For their manufacture, you can use various types of wood and finishing materials.
A simple way to make a “wild” stool from thick wood
... which you won’t be ashamed to put in your home. Look how easy it is:
Please note that it is not at all necessary to master a chainsaw, since the scale of the workspace allows you to correct the unevenness of the first cut.
Such a stool will fit into the interior, as well as a table made of logs, especially in a log house in the “wild style”.
Another method of making a stool, where you don’t even need to cut anything out:
A thick enough piece of wood can make an excellent chair. If you burn it, sand it and varnish it, you get an exclusive product that would be a pity to take outside:
Preparatory work
One of the most important elements of construction is the preparation of the drawing. It should include the following elements:
- Dimensions. The seat should have a width of about 50 cm and a back height of 40-50 cm. These dimensions can be increased, but the proportions must be respected. The distance from the ground should be about 50 cm.
- Product style. You need to decide on it in advance in order to think over the type of product and materials for decorating the shop.
- Accommodation. Depending on this parameter, you must select the type of bench. The product without a back is suitable for installation in the garden, and a massive bench can be placed near the house or in a gazebo.
- Choice of material. Various types of wood can be used for construction. However, it is better not to use coniferous species. The reason for this is the release of resin.
- Calculation of materials. Produced on the basis of a previously completed drawing.
Before starting work, it is recommended to treat the wood. This will protect it from the negative effects of the environment, insects and fungi.
How to collect?
In order to make the process of assembling garden furniture as easy as possible, we recommend stocking up on all the necessary tools in advance. Professional jigsaws and planes in stores are quite expensive, so if you plan to assemble one bench and settle down there, then it is not advisable to purchase them for personal use - ask your country neighbors or friends.
The process of making furniture will be much easier if you find the necessary instructions or drawing in advance. Once you gain experience, you can easily improvise and create your own unique projects. But in the initial stages, it is better to stick to proven schemes.
Tools and materials
To make a bench from a log, you should prepare in advance all the necessary materials and tools for the work:
- chainsaw;
- jigsaw;
- axe;
- grinding machine;
- building level and tape measure;
- welding machine for decorative surface finishing;
- primer to protect metal elements;
- paint coating for wood;
- wood of the selected type.
After preparing the necessary tools, you should perform the appropriate calculations and start preparing the required amount of material.
You can learn more about making a bench from a log from the video:
Useful tips
To make garden benches, you should use high-quality material. The service life of the product will be extended by treating wooden and metal elements with special primers, paint and varnish.
The surfaces of the parts should not have irregularities, burrs, or protruding sharp parts of fasteners.
To install the bench, you need a flat area without stumps, holes and stones.
It is recommended to make the back and seat from separate parts, leaving gaps between them for ventilation.
The bench should not be placed under fruit trees. Falling fruit will quickly ruin its appearance.
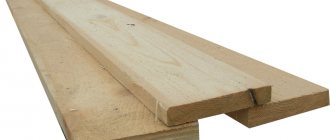
Log bench manufacturing technology
A DIY log bench allows you to stylishly and unusually decorate any garden plot. To make it strong, durable and aesthetically attractive, it is important to follow the main manufacturing steps:
- Removing knots and bark. For this, it is most convenient to use an ax.
- Cutting blanks about 2.2 meters long, as well as two pieces of 70 cm and 60 cm. This work is best done with a chainsaw.
- To make the back and seat of the bench, you should use the longest part of the log, sawing it into two halves.
- Use a chainsaw to make a rounded part onto the blanks for the backrest so that the board is approximately 10 cm thick. The same should be done with the blanks for the armrests.
- On the armrest blanks, rectangular grooves should be cut into which the backrest will be installed. Their depth should be about 15 cm. They need to be positioned with an inclination that will correspond to the inclination of the backrest.
- Using a grinding machine, the surface of the bench is completely cleaned.
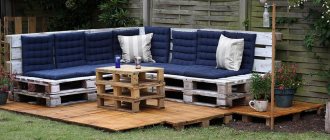
Neat and comfortable bench made of logs
After completing the manufacture of all the parts of the bench, you need to thoroughly clean their surface from the resin and begin assembly.
Where can you put furniture
Garden furniture made from logs is very sensitive to moisture and dampness, so it should be placed in a sunny and well-ventilated place. An excellent solution would be an open veranda, where all elements will be reliably protected from rain. For the winter, it is better to remove wooden furniture from the street or at least cover it with plastic.
It is better to place wooden furniture in a sunny, well-ventilated area.
Anyone can make garden furniture from logs with their own hands. The main task is to choose the right drawing or make it yourself, and purchase really high-quality materials. If all the preparatory steps are completed, the final assembly can be completed even in 1 day.
Features of surface cleaning from resin
When using softwood, proper surface cleaning of resin is extremely important. This can be done in various ways:
- Solvent. Resin removal can be done using acetone, alcohol or turpentine. The advantage of these substances is the rapid removal of resin and preservation of the wood structure. It must be mixed with water, applied to the wood with a soft brush and dried. All that remains is to rinse with warm water.
- Alkali. These include caustic soda, which is recommended to be mixed with acetone and water. This solution perfectly removes resin and resin. But to prevent alkali residues from destroying the wood, after treatment they should be thoroughly washed off and a paint coating applied.
- Ammonia. Effectively used to remove large resin drips. Ammonia should be mixed with acetone and then applied to the wood. Wash off after 20 minutes.
When processing wood, personal protective equipment must be used to prevent damage to the skin and eyes.
Model selection
The choice of the master is determined by the availability of available material, the purpose of the bench and the level of working skills.
For the most inept and unpretentious, an option with a large-section log or beam laid directly on the ground is suitable. The only thing that needs to be done is to level the surface and treat it with a protective compound.
Beginners should try their hand at extremely simple models made of calibrated timber and boards without a back or decorative elements.
Those who have a chainsaw and at the same time have the opportunity to get a large-diameter barrel can be advised to “just remove all that is unnecessary”, obtaining a product of the required shape.
For those for whom the ability to work with wood, a good set of tools and materials removes all restrictions, you can choose any model - from purely wooden to combined, for example, with cast or forged elements.
Bench assembly
The bench should be assembled at the place where it will stand. To make a bench from logs, you need to do it from the side in this order:
- Mount the stop with the flat areas facing down. The distance between supports should be 1.7 meters.
- After that, the armrests are mounted so that the distance to the center of the armrest is approximately 20 cm. To secure them, it is best to use dowels.
- The seats are mounted in recesses in the supports, and dowels are also used for fastening.
- The backrest is mounted into the grooves of the armrests and secured with self-tapping screws.
- Primer treatment and painting or varnishing.
This method will allow you to independently create a bench with a back to decorate your garden plot. Additionally, you can decorate the bench with carvings, burning patterns and massive forged elements.
Frequently asked questions
During the manufacturing process, home craftsmen have a lot of similar questions. You can answer them immediately:
How to finish board seats so that they blend more harmoniously with the log frame?
You can artificially age wood by brushing it with a wire brush (or using a drill attachment to remove rust). This treatment makes the material more natural and gives it a vintage look.
Do I need to sand the logs?
There is no fundamental requirement, since the trunks of some species of deciduous trees look very attractive in their natural form. It is necessary to inspect the material and determine its general condition - if it is clear that the bark will soon fall off, it is better to remove it immediately.
Is it possible to paint such furniture?
Paint reduces the naturalness of the material and hides its texture. However, there are no serious contraindications in this matter; the user decides it independently.
If there is a mixture of softwood and hardwood, can they be used together?
It is possible, but it is recommended to sand the logs immediately for a more uniform natural color.
Is it possible to finish furniture by firing it with a torch?
This is a good way, fast and gives an attractive result. You just need to remember to apply a finishing layer of clear (or tinted) varnish so that the furniture does not leave stains on clothes.
Original log benches that you can make yourself
Installation
Assembling a table, both from rounded logs and from regular ones, primarily depends on what kind of furniture you plan to make. But, in any case, there are several main points that are the same for both complex designs and very basic simple tables.
- Drilling holes for reinforcing bars - in the log that serves as the basis for future furniture, that is, in the lowest one, the holes should not be through. A depth of half the thickness of the part will be sufficient, but in all the following elements they must be through.
- All holes should be 30 cm from each other, this is the most optimal distance that will ensure the strength of the entire structure.
- All drilled holes must be tightly filled with epoxy glue so that the rods do not dangle in them.
- The places where the parts are attached to each other should be well aligned and not too deep, ideally within 5-6 cm, this will prevent possible cracks during further use of the furniture.
Wall panels
Eco-decor can be taken as the basis for a design project; it will look great. Let us note that the level of stylistic design depends only on talent, imagination and perseverance, since any products made from dry branches require careful implementation. Almost anything can be made from driftwood, scraps of wood, various large dry branches, thin tree trunks - furniture, lamps, decor and, of course, wall panels.
Branches in a picture frame
The theme of the autumn forest was repeatedly revealed by many artists, for example, Klimt. Trees with fallen leaves create a calming atmosphere that promotes relaxation. Meanwhile, such decor for a hallway, living room or bedroom made of dry branches reminiscent of a forest can be decorated with bright elements at any convenient moment; they will thematically enliven the interior and bring natural beauty into it.
Panel of twigs on a wooden base
To make panels from branches for your home, you will need flexible specimens that can be given any shape, and can also be easily placed along the wall. Fastening dry branches to the wall is ensured with the help of staples, self-tapping screws, followed by grouting the cap, and “liquid glass” glue.
Wall decor with tree branches and cuts
For small dry branches use a glue gun. This method will be invisible and look organic from the outside. Branches for decoration go well with modern furniture, complement the Provence style, shabby chic - they will always look good.
Snag - an idea for a sculpture
Branched bends of roots, gnarled stems, powerful stumps - the best material for creating the image of realistic and fictional figures
For some, the curves are wings, while others recognize the silhouette of an animal in them. Do not limit your imagination, use wood in its natural beauty
Have you collected a collection of various branches and twigs? Try creating something more complex like this beautiful stallion creation. Thanks to movement, precise proportions and shapes, the sculpture seems to come to life before your eyes!
Notice the exotic image in the driftwood? Finalize the form, show its character to the maximum, making the figure noticeable to everyone
Old driftwood is an unusual and valuable material for impressive decorative items, furniture, and expressive figures. Most likely, we have not mentioned all the options for their use. Now you!
What other uses for driftwood can you imagine? Or maybe you already have a piece of art made from this original material at home?