Every owner of a country property tries to create the most comfortable living conditions on his or her plot. Many people make gazebos, create alpine slides and pave garden paths.
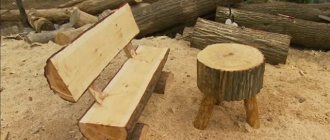
One of the most original solutions will be a table made of logs, because it is ideal for installation in a gazebo or any other place. Making and decorating a table from a log of wood is not difficult.
Types of log tables
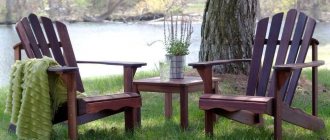
Furniture made from logs will ideally fit into the design of any garden plot of a country house. The table can be placed on the veranda of the house, under a canopy or in a gazebo. It will look cozy against the background of a log house.
Based on the shape of the tabletop, furniture can be divided into several types:
- rectangular structures are very convenient and functional, as a rule, they have enough area to freely accommodate all family members;
- furniture with rounded edges will suit the original interior of a room with interior decoration made of natural wood;
- a table made of rounded square logs is perfect for a small gazebo.
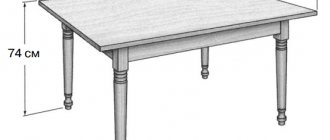
The size of the table will depend on its location and the maximum number of users. The main feature of the design is the original shape of the legs. They are usually made from halves or whole logs. Furniture is made from wood of various species. Such material remains after the construction of a private house, garden buildings, and auxiliary buildings.
Recommendations for masters
To ensure that wood furniture pleases you for a long time, there are some tips that should not be neglected:
- Be sure to protect wooden furniture from precipitation and temperature changes. For this purpose, you can find special solutions and compositions in stores.
- Be sure to treat all corners and surfaces that come into contact with the body. This way you will protect yourself from splinters and other injuries.
- Don't neglect drawing up a drawing. This will help you calculate the amount of material and think through all the details.
In these simple ways you can assemble an amazingly beautiful wooden table.
After watching the video, you will learn how to make a table from a log with your own hands.
Create a drawing
Before you begin installing the table, you need to make a drawing on a sheet of paper. Here the dimensions of the structure are plotted and a log layout diagram is selected. You can make a drawing on paper in several projections.
A three-dimensional drawing made in computer programs is considered more convenient. You can examine a piece of furniture from all sides, select dimensions, and also determine how a particular type of wood will look. The table, which is designed with a special program, can be adjusted to suit the specific interior of the room.
Scheme for work
To take into account all the little things, you need to think through the drawing before work. Each size must be marked on it. If you are going to align the boards on only one side, then the diagram must be made in three dimensions.
If you will not process the boards, then a two-dimensional drawing will suffice. As a result, all parts of the table with their actual size should be drawn on the diagram.
Preparation of logs
At the initial stage of making a table from logs with your own hands, you will need to prepare raw materials. All products are selected in accordance with the dimensions indicated in the drawing. You can make furniture from materials without preliminary surface preparation, but it will look rough.
To make a beautiful wooden table, you will have to work hard and spend a lot of time preparing the raw material. All bark is removed from the wood using an ax or a hammer with a chisel. You need to act with special care so that there are no chips or cracks left on the surface of the logs; it should be even and smooth.
Important! If it is necessary to make a tabletop from log halves, it is recommended to use the services of sawmills. You can make the cut yourself using a chainsaw, but it will take longer to prepare the surface.
To connect the workpieces into a single structure, special grooves are made on each of the parts. You can do without this. In this case, a perfectly flat surface is made at the joints of the parts using a plane, but the width of the plane should not exceed 3 centimeters.
To create beautifully shaped furniture for a summer house, the edges of the log (top, bottom) are cut at an angle of 45 degrees. All end parts are cleaned with a file and then with sandpaper until a completely flat surface is obtained. Then they take a drill with a drill that matches the diameter of the reinforcement used and drill holes in the parts for their reliable connection. The holes are made at an angle of 90 degrees (straight) in the right places opposite each other. Afterwards, you need to carefully sand all the edges of the wood.
Why made of logs?
Probably every person has seen a wooden frame in the Russian style at least once in his life. From exactly the same logs you can make a beautiful table for a gazebo or even at home. Similar homemade furniture is used in the interior of a bathhouse. You can easily install it yourself. To do this, you need to acquire the necessary materials and tools.
Tools
Before carrying out the main work, it is necessary to prepare the following list of tools and equipment:
- Special impregnation for wood improves the appearance of the material and protects its surface from the appearance of fungus and mold. This is especially true if the table will be used outside in the garden. There is no point in saving on the solution; it is better to take it with a reserve.
- A hacksaw with fine teeth allows for accurate cuts of workpieces.
- An ax and a chisel with a hammer are used for removing bark from logs and some other work (grinding grooves and finishing small recesses).
- A chainsaw is considered one of the main tools when working with wood. With its help, you can cut logs both longitudinally and transversely.
- A screwdriver allows you to carry out work far from a power source.
Additional consumables you will need are self-tapping screws for fastening the parts into a single structure and transparent varnish to create a protective layer on the surface of the furniture.
Features of operation
Natural wood is particularly susceptible to moisture and solar radiation. Therefore, in order to extend the service life of a log table, you should follow some rules for its operation:
- do not place hot objects on the countertop surface;
- clean from dirt after use;
- periodically update the varnish coating;
- install a log table under a canopy.
If the table is installed outdoors, then in winter it is recommended to bring it indoors. Before doing this, you must clean it of dirt and dust. The storage area for the table must be dry and ventilated.
Assembly
Step-by-step instructions for assembling a garden table are as follows:
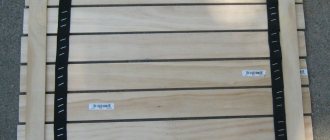
- Marking lines are applied on the log and sawed with a chainsaw (when making parts for the table top, it is better to use the services of sawmill workers).
- The parts are cleared of bark using a sharp ax or a chisel and hammer.
- Clean the surfaces with a grinding machine.
- The parts are assembled into a single structure.
- Self-tapping screws are used to connect products; they are screwed into the workpieces using a screwdriver.
After making the frame of the stand, they begin to secure the table top.
Fastening the table top
In practice, there are two options for securing the table top. In small-sized furniture with minimal load on the upper part, the frame is covered with a sheet of chipboard and the element is secured with self-tapping screws. The tabletop is covered with self-adhesive paper. The lid fastening option is suitable for furniture with top dimensions of no more than 1 x 1 meter.
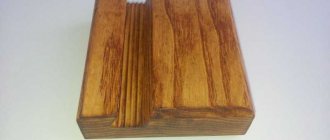
In another case, longitudinal cuts of logs or wooden beams are used to make the tabletop. It is necessary to carefully process the front surface with a plane so that all parts acquire a uniform structure.
Important! Make the surface of the tabletop as smooth as possible, which will prevent injury when using the furniture.
Table finishing
After assembling the furniture, they begin to coat the structure with protective compounds. It should be remembered that the working solution must be applied to a surface that has been previously cleaned of debris and dust. When the protective layer is completely dry, the table is covered with transparent varnish.
Tools
The materials you need to stock up on are logs and, if necessary, stain. The tools you need to acquire are:
- saw and hacksaw;
- drill with large drill bits;
- plane;
- screws and nails;
- “Moment” glue for wood and metal;
- hammer;
- a piece of leveled reinforcement;
- sandpaper.
Labor and cost
Preparing wood, sawing logs, making grooves and other operations is a rather complex process that requires maximum care and experience from the performer. For professionals, it will take at least 2 hours to complete all operations, for inexperienced users – much more.
The cost of furniture will depend on the type of wood (if the material needs to be purchased) and the price of consumables. For example, one self-tapping screw costs at least 5 rubles, plus additional funds for protective compounds: the price of 200 milliliters of varnish is about 200 rubles, a can of protective impregnation will cost at least 600 rubles.
The nuances of using a chainsaw when building garden furniture with your own hands
Here is a wonderful example of a garden bench that is as designer and unique as it is simple:
Exclusive bench carved from a single curved log
But the simplicity is only apparent. Indeed, its design is elementary - just one log, no other parts or fasteners. The entire structure - seat, back - was cut out with a chainsaw. However, to cut such a shaped product, you need to have excellent command of a chainsaw, a feel for the tool and the material. Therefore, this bench is not so simple.
To evenly halve a log, you also need to have some skill. A couple of tips to make your work easier:
- make markings not only at the end, but also along the log;
- if the log is debarked, draw two lines - a strip along which the cut will go, 1 cm thick - this is the approximate thickness that the saw will “eat”;
- if you want to leave the bark and it is inconvenient to draw on a log, then you can stretch a cord from end to end and carefully saw along it;
- secure the log so that it does not “walk” due to the vibration of the saw, support it with wedges, bars, etc.
To decorate a bench or bench, you can lightly run a saw chain along the flat part of the half-logs - the seat and back - and make a few transverse scratches and gouges to age the wood and give the shape a natural look. When sanded, the chipped areas will be smoothed out and will not interfere with use, but the appearance of the bench or bench will become more interesting.
To age wood, firing and brushing are also used - scratching with a hard steel brush.
Another bench made of logs that is easy to make with your own hands
This option is suitable if you have logs of small diameters. To make it clear, it’s better to see it once:
Log bench, front view
The same bench, rear view
Everything here is also clear from the picture. The logs are connected - articulated into longitudinal grooves. Half logs - for the back and seat. For the backrest supports, grooves are cut out in the logs of the “legs”, but, in principle, they can be secured with screws or nails. The bottom bar is necessary for the rigidity of the supports.
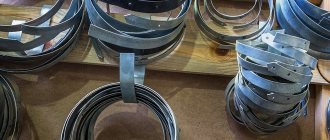
What's the main thing here? The main thing is to fasten the supporting logs, “legs”. They can be fastened together:
- dowels - metal or wood; as such, reinforcement can be used;
- nails;
- screws, self-tapping screws.
The fastening elements should be staggered between different logs. When attaching the supports for the backrest to the body of the main lower supports, you need to make sure that the fastening elements do not intersect inside the solid wood.
Checkerboard arrangement of dowels in the joints of logs
Important: Do not screw in a screw or drive a nail from scratch! This way you can split the log, especially if it is small in diameter. Pre-drill the holes with a drill equipped with a long drill bit!
How to choose material
The easiest way is to purchase a ready-made saw cut and look for suitable options in online stores. However, for many users it is more interesting to choose the material themselves and make a plate from a log.
To make a tabletop, you need a plate of the largest possible size. It can be obtained from large diameter logs, at least 500 mm (ideally more than 600 mm).
Coniferous trees predominate on the territory of our country. They have pronounced annual rings, straight-grained wood with a large amount of resin. It is the resin that can become an undesirable point, since it has poor contact with paint and varnish coatings. It is noteworthy that most conifers have a similar texture and are easy to confuse.
Hardwoods have a wide variety of textures. There are rocks with pronounced annual rings and a large number of pores. These are ash, acacia, chestnut. There are species with homogeneous and inexpressive wood - birch, maple. However, it is these rocks that have significant undulation in the lower part of the trunk. Therefore, it is recommended to cut them along the longitudinal axis.
It is difficult for an inexperienced person to determine by the type of log what it will look like when cut. This is a task that is not available to every professional - a tree trunk is a living organism, and its condition is extremely difficult to predict.
However, you can adhere to the basic rules:
- You should not choose a rotten log. You can knock on its side - if the sound is dull and “raw”, it’s better to look again;
- an uneven and knobby trunk in this case will only be an advantage, since its cut looks more attractive;
- the closer to the root the cut is located, the more interesting its texture will be;
- cracks or other imperfections, if not too many, can only decorate the tabletop (although they will have to be completely filled with epoxy resin or polyester putty).
Most often there is not much choice. There are few large trunks, since they are brought only to order. Therefore, you have to be guided by the main condition - size. If the size of the cut is suitable for solving the tasks, flaws can be corrected or hidden.
What can you make yourself?
Almost any table can be used by each of us. This simple household item does not require special knowledge or special professional skills. We start making wood products at school, during labor lessons. Therefore, a simple wooden design of a laptop table will be quite feasible. You can also make both the chairs and the bench for your country house yourself.
You can come up with your own design for home crafts. A folding table will not constantly occupy living space. It can combine several functions. From a place for changing a baby, to a work surface for home crafts.
A wide field for creativity will be provided by a combination of wood and other materials. Don't be afraid to experiment. Connect dissimilar objects together and you will achieve amazing results. Even if you decide to combine rarely combined elements, don't be afraid to try. Any ideas can be realized.
DIY wild style bench
The simplest piece of garden furniture that you can make with your own hands is a bench. If you have a thick enough log, you can cut it out of a solid mass, and you will get something like this:
Solid log bench
We cut it out with a chainsaw and polish it. We burn it, cover it with varnish, stain – details to taste. This shop looks quite original, despite the simplicity of the design.
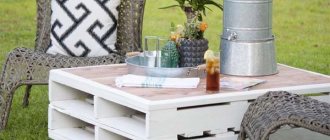
If there is no such thick log, then here is the second option:
The ideal combination of ease of manufacture and aesthetic results
It's intuitive how this is done, right? In general, all furniture of this type is folded, just like a log house - the upper elements are placed in cut-out grooves. In this case, the connection goes “into the bowl”, but it is not necessary to cut out an even “moon” groove; it is enough to cut out a triangular segment so that the main half-log sits firmly in the block legs. Such grooves are easy to cut out with an ax - no fine work is required.
The log for the seat does not have to be smooth and without knots; it can also be crooked. The same is true in the case of making a bench. The natural curvature of the material, on the contrary, will add spectacularity to the product - brutality and stylish “wildness”.
Bench made of crooked half-logs