how to make a table from pallets
The step-by-step instructions presented here will help you transform ordinary pallets into something unusual that will look great in your home or garden. Using these tutorials, you will learn how to make pallet tables that are just as beautiful as standard furniture. These are not only outdoor tables made from pallets for the garden , but also quite functional dining tables made from pallets . And of course, a variety of options for cute coffee tables made from pallets . DIY pallet tables are a really popular and easy way to make stylish furniture that doesn't require a high level of craftsmanship and saves you a lot of money. Most of all these wooden pallet tables only require good sanding, easy assembly and a good finish. Making a table from pallets with your own hands is an excellent practice for beginners. Using these instructions with step-by-step photos, anyone can make any of the options proposed here.
Where to get raw materials
For anyone who decides to implement this idea at home, it is better to first choose an ordinary coffee table as a future product. Using this simple piece of furniture as an example, in the future it will be easier to independently make more complex structures from wooden pallets.
Before you begin to implement the task and try to make a table from pallets, you will need to solve a number of practical issues, including the problem of acquiring the starting material.
In order to get a beautiful table, you should first visit the nearest hardware store or furniture store. Usually in the backyard of these establishments, right on the street, you can find wood blanks suitable for making a table. The issue of their purchase must be agreed with the administration.
Another option for purchasing property is to find an advertisement for the sale of pallets and other wood containers, the average cost of which varies from 50 to 200 rubles per piece. These can be completely new pallets, or already used ones.
Using Vime
In order for a wooden product to have a beautiful appearance, proper quality and meet its purpose, in the process of working on its manufacture it is necessary to strictly comply with all requirements. When connecting parts of a wooden structure, efforts are required so that there are no cracks or gaps at the joints and that they are positioned in relation to each other perfectly accurately when gluing.
Each master can make clamp clamps with his own hands, which will be useful to him in the workshop. With their help, you can make connections between parts of unusual, unique shapes, cover flat, volumetric and relief surfaces, design framed facades, stair steps, assemble furniture, panels, etc. with your own hands. They also splice wood and fix edges for cladding.
To glue or join bars in thickness and width, horizontal or vertical wedges are used, which can be single-story or multi-story. Fan and rotary types of weims are also used. Other varieties are used to assemble various frame furniture structures from bars, door and window blocks, including with your own hands.
Sometimes the work of professional craftsmen requires the use of stops and hydraulic cylinders. For these cases, single-sided or double-sided clamps, or devices with rotors with a horizontal axis of rotation can be used.
Preparing for assembly
Immediately before you start making your own table from pallets, you will need to thoroughly prepare for subsequent assembly.
First, you need to disassemble the purchased pallets and clean them with a wire brush from adhering dust and dirt. Next, you will need to wipe the wood surfaces with a damp cloth and wait until they dry.
After the workpieces have dried, they proceed to grinding and protective treatment of those parts that face the outside of the table structure and with which the user will be in direct contact.
Note! When disassembling and removing nails from pallets, you should act very carefully, trying not to damage the working surfaces of the wooden dies.
The operations for sanding and protecting the surfaces of pallets are no different from the same procedures carried out for other wood products and parts. For sanding, ordinary sandpaper can be used, and antiseptic agents applied in several layers are used as a protective coating.
How to make disposable wedges from timber
This is a simple design option. It is not the most reliable, but sometimes it happens that for constant use it is not needed. This instruction will allow you to create a simple disposable clamp.
You will need:
- beam;
- high strength self-tapping screws;
- saw;
- carpenter's hatchet;
- screwdriver
The creation technology is as follows:
- Wooden parts must be laid flat and horizontal.
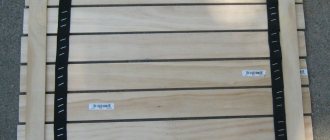
- Position the workpiece. The gap between the parts is approximately 40 centimeters.
- On both sides of the workpiece, strictly parallel, it is necessary to lay a long beam, which is attached to the crossbars with self-tapping screws.
- To compress the workpiece, the clamp must be wedged with special wedges.
- As soon as the wooden shield is glued, the wedge can be disassembled and the parts can be used for other purposes.
Tools and consumables
In order to make a kitchen table or a small country table based on ready-to-use pallets, you need to stock up on the following tools and auxiliary materials:
- an electric drill with a set of drills and an abrasive brush, made in the form of an attachment and used for polishing the surface of wood;
- nail puller, screwdriver and hammer of suitable size;
- a set of brushes and rollers for painting surfaces, protective varnish and primer;
- acrylic or polyurethane dyes.
In addition, to make a table from pallets for a summer house with your own hands, you will need special fittings (handles, wheels, corners), as well as small clamps for fastening.
To make it easier to screw screws into wood, some craftsmen recommend stocking up with a bar of soap. And finally, to adjust the size of individual wood pieces, you will definitely need a hand saw or circular saw.
Stages of work execution
Start making a clamp with your own hands. It is necessary to prepare a profile pipe of rectangular cross-section with dimensions 60x30x3 mm. The length of the pipe should be 120 cm.
These dimensions for the load-bearing beam were chosen due to the fact that it is often necessary to glue large sheets of wood or make wooden doors. Therefore, the clamp must be of such dimensions that workpieces of such large dimensions can be secured in it.
Workpieces that are too large are rarely made. In most cases, furniture panels of small sizes and intermediate platforms for stairs will be produced. It is necessary to take measures in advance to ensure that when making the shield, glue does not get on the surface of the device.
In cases where the length of the clamp does not allow for a large workpiece, you need to glue such a shield in parts. First, workpieces of such width are glued together that they can be clamped in a clamp. Then a wide blank is assembled from narrow shields. For this purpose, movable clamps are used.
Then you need to make screws and nuts. The screw is made from a hexagon 300 mm long with a cross section of 28 mm. It must have a metric thread of 2 cm. The nut is made in the form of a 32 mm hexagon, 60 mm long.
Spacers 1 cm thick are placed under the nuts. Then welding is performed. After this, a clamp is made from a 5 cm metal rod.
It is not advisable to make a clamp with a smaller diameter. Otherwise, it will push through the wooden spacers that are placed between the workpiece and the clamp. If you do not use spacers, you can deform the workpiece.
You need to drill a 1 cm hole in the end of the screw on the clamp side. 2 ball bearings are installed in this hole to reduce friction.
Then the nuts are welded. It is necessary to ensure that the screw is parallel to the profile. Otherwise, the workpiece will be pressed through.
You need to completely tighten the screw and nut. Then a clamp is put on the groove. After this, gaskets are placed under it.
Using a level, make sure that the parts are positioned strictly parallel. The parts are secured and then welded.
Welding is performed with small seams to prevent deformation of the material when the metal is heated during welding.
Then clamps are made from a corner measuring 60x60 mm. Weld the corner to the profile. The profile is welded from two corners. They are adjusted so that there is the possibility of free movement and at the same time so that there are no large gaps.
Fasten the clamps. To do this, drill holes with a diameter of 12 mm. They put pins in them. Thanks to this, you can quickly change the position of furniture parts during production.
If during work the workpiece turns out during compression, then the reason for this may be the non-perpendicular position of the stop in relation to the supporting beam. Therefore, you need to check the correct location of the parts using squares and a building level.
Then a hole is drilled, a thread is made and a screw is screwed in. The correct position of the workpiece can be adjusted using a screw.
When drilling holes, take into account that the screw with a movable stop moves 200 mm. When attaching a fixed stop, the distance between the holes should be 150 mm. Otherwise, areas may appear where the workpiece will not fit.
First, a through hole is made on the clamp. After that, install it in its place and press it with a clamp. Then the profile of the supporting beam is drilled through this hole. This way you can accurately fasten parts together.
You can make a clamp in which you can press the shield to the supporting profile. This design is more reliable, but more difficult to manufacture.
This concludes the work on making a homemade clamp.
The design of the clamp allows for high-quality gluing of furniture panels of various sizes and thicknesses.
In this article you will find detailed instructions for making weima
with your own hands.
If you are engaged in the manufacture of furniture from, then you cannot do without carpentry clamps
. You don't have to buy it for this. You can make the glue for gluing yourself
.
Making a table on wheels
If you decide to make a small table on wheels for your cottage, you will need to take the following steps. In the event that the tabletop of the future product does not coincide in size with the dimensions of the pallet, you need to completely disassemble it using the nail puller and hammer prepared earlier.
You should once again clean the disassembled workpieces from dust, and then sort them according to the quality of the wood. The front surfaces of the selected workpieces must be thoroughly polished using sandpaper or an attachment inserted into an electric drill.
Important! When sanding with power tools, be sure to wear a protective face mask and eye protection.
From the prepared blanks, two table bases are assembled according to the size of the future tabletop. Separately from them, boards of suitable width are prepared, which are subsequently used to fasten the tabletop itself and the base mounted below.
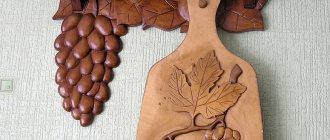
At the final stage of making a coffee or coffee table, all that remains is to screw wheels of suitable dimensions into the corners of the base located in the lower part. The result is a cozy and squat table with a convenient bottom shelf on which you can store books and various knick-knacks.
To increase the attractiveness of the resulting product, it is recommended that all surfaces be first treated with a wood primer and then painted with decorative varnish or stain.
Insulation materials
SIP panel structure diagram
When choosing SIP panels, it is better to seek help from specialists. But if this is not possible, it is worth studying the main types of insulation and their characteristics.
There are three main types of insulation:
- polystyrene foam (expanded polystyrene);
- mineral wool (basalt insulation);
- polyurethane foam.
And each of these insulation materials has its own advantages and disadvantages.
Styrofoam filling in the panel
Polystyrene foam is positioned as insulation, distinguished by its durability. In addition, it is an environmentally friendly material. It has waterproof properties and is not afraid of the sun. But at the same time, such material is very flammable and burns quickly.
Mineral wool practically does not burn and is also harmless to health.
Mineral wool panel filling
This insulation also withstands biological and chemical influences well. But despite the set of such important advantages, basalt insulation has very low resistance to moisture.
Polyurethane foam conducts heat poorly and is highly flammable, but it has a high insulation threshold.
Polyurethane foam as a starting point for a sandwich panel
The thickness of the building material, and therefore the price, directly depends on the thickness of the insulation itself.
The price of the SIP panel is 1,300 rubles per square meter. Its thickness is 174 mm, width – 1250 mm, height – 2500 mm.
In our country and the CIS countries, sandwich panels of the following sizes are used:
12+100+12=124 mm;
12+150+12=174 mm;
12+200+12=224 mm.
Increasing the height of the table top
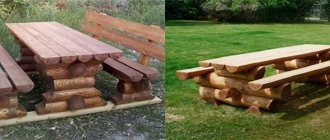
In the event that there is a need to make a higher table, you can do it in several ways. The simplest of them involves replacing the transverse boards with higher wooden posts, forming the original legs of the future structure (see photo on the left).
Note! In order to increase the rigidity of such a table made from pallets, it is recommended to choose thick and wide boards for making stands.
The second option for increasing the height of a home-made product is to use a high support base, made from the same pallets in the form of a square box. The support is finished to match the color of the main part of the structure and only after that is fixed on the lower plane of the tabletop. This technique is optimal for making a kitchen table at which you can sit without worrying about free legroom.
As in the previous case, upon completion of assembly (or before it), all thoroughly sanded outer surfaces of the pallets should be treated with a primer, and after drying, covered with varnish or polyurethane dye. The result should be a sturdy table for four people.
Basic information on sharpening knives
Whether it’s an elite purchased artificial stone for sharpening, or a cheap cobblestone from Soviet times, the rules for sharpening knives apply equally to both the former and the latter.
Specialized sharpeners can reduce the effort involved in the process without a significant drop in quality, but the less influence a person has on sharpening, the more expensive the purchase will cost him in monetary terms.
1) Angle + rules for uniform sharpening
The sharpening angle is selected for each blade individually, depending on its area of application. For 96% of knives, general recommendations were derived, but there are 4% of blades that require a person to have a zonal distribution, that is, in different parts of the blade, it is necessary to maintain different values of inclination.
Folk devices for sharpening drills versus ready-made ones
| Sharpening angle | Blade type |
| from 9 to 16 | Blades for surgical purposes. This also includes straight razors used by barbers. |
| from 16 to 26 | Specialized knives used by pastry chefs and other culinary specialties. For example, knives for bread, vegetables or meat. |
| from 19 to 26 | Ordinary knives that are used for household purposes. |
| from 24 to 31 | Specialized knives for hunting, fishing and hiking. |
| from 32 to 45 | More rigid blades, most of which are not knives at all - axes, cutlasses, machetes, carpentry tools, etc. |
It makes no sense to indicate the exact value of the sharpening angle, because if a person sharpens the blade using the same water stone, then maintaining the same value of inclination in relation to the block will be unrealistic from a physical point of view. This gives rise to the range of permissible vibrations when working with the tip.
Recommendations for sharpening a knife by hand:
- high-quality fixation of the blade allows you to avoid slippages that harm the edge of the tip. In addition, a careless attitude towards this issue can lead to injuries to those sharpening;
- the whetstone must move along the edge of the blade at a uniform speed, without delays or stupors in the middle;
- the point of contact of the tip with the sharpening element should be located at a perpendicular angle;
- the applied pressure on the plane of the blade must be commensurate with the area of the tip touching the sharpener.
And of course, don’t forget about maintaining the sharpening angle. Only comprehensive implementation of all the above recommendations will allow you to achieve high quality sharpening of the blade of even the dullest knife that you can find in your own household.
2) Classification of sharpening tools
If we are talking about the classic idea of sharpening a knife blade, then here the abrasive plays the first role. There are many sharpening stones and most of them are quite inexpensive. Another question is the sharpener's skills. In their absence, it is more rational to turn to more automated devices, which we will discuss in the second part.
| Type of whetstone | Peculiarities |
| Water | Before use, such a block is soaked for 15-30 minutes in water. Thanks to the preparatory stage, you can save up to 40% of the sharpening surface of the stone, which makes the material suitable for purchase by thrifty owners. |
| Oily | Its structure is similar to water, but has a more oily surface, which allows you to avoid soaking it before use. A less economical option for a sharpener. |
| Natural | The basis is natural stone with industrial post-processing. Expensive pleasure. |
| Artificial | The abrasive is based on non-natural elements. Cheap analogue of natural. |
| Rubber | Not a very convenient option for sharpening a kitchen knife, but there are some on sale. |
The advantages of using sharpening stones include versatility, long service life (for generations) and compactness of the item. Among the disadvantages, we highlight the need for manual sharpening skills and the occurrence of unevenness on the stone, which leads to uneven sharpening of the blade.
VIEW Professional sharpening stone on AliExpress →
Please note: some craftsmen make sharpening bars with their own hands. It is based on 3-5 layers of glass 0.5 centimeters thick. The layers are joined together with glue, and sandpaper of the desired grain size is put on top. If necessary, a person can replace a worn component with a new one at any time. Comfortable.
Other hand sharpening products also include musat - a rod with a certain level of roughness for adjusting and sharpening knives at the final stage.
VIEW Musat – rod on AliExpress →
The classification of musats is made based on the geometry and materials used in the manufacture of the sharpening element. The basic indicator for musat is the roughness of the drawing, which is the size of the notches on the surface of the rod.
For more advanced users there are alternatives:
- manual sharpening machines.
VIEW Manual sharpening machines on AliExpress →It’s quite easy to make such a sharpener with your own hands. It’s easy to find drawings with instructions on the Internet. If you are too lazy to engage in amateur activities + don’t mind a couple of thousand rubles - specialized stores are waiting for you;
- electric sharpeners.
VIEW Electric knife sharpeners on AliExpress →Not every housewife would want to see such a bandura with a motor in her own kitchen. Qualitatively? Yes. Comfortable? Not always. The artificial abrasives of such machines are not always of high quality, so the choice should be taken with great responsibility.
In addition to large assemblies, compact variations of such equipment can often be found in markets and Chinese online stores. Small manual and electric sharpeners adequately perform their functions, but housewives simply kill their knives with such sharpening. In 60% of devices, the emphasis is not on rough cutting of metal, but this is a direct path for your elite knife to the trash after 3-7 sharpenings.
3) Instructions for manual sharpening
Before you begin, you should learn 3 rules - maintaining the angle, applying even and gentle pressure on the surface of the blade, and pre-rinsing the sharpening stones before direct use.
Let's take a closer look at the algorithm of actions for a beginner. Instructions for sharpening knives:
- We wash the block from metal shavings, dust and crumbs of the stone itself, which will be used further.
- We are preparing a place for work. The most important point is to conveniently position the stone. The speed and quality of sharpening the blade will depend on this.
- Let's decide on the sharpening angle depending on the selected type of tool. The higher the quality of the steel, the finer the blade sharpening is required. For a cheap knife from the kitchen, this parameter is not as important as for sharp razors and fillet knives.
- We sharpen it away from ourselves. When moving from a straight line of the blade to a curve, we gradually change the angle (figure below), maintaining perpendicularity between the direction of movement and the point of contact of the edge with the block.
- Periodically wash the stone and shake off metal shavings.
- We continue sharpening at an angle until a small burr forms on the edge. Turn the knife over and repeat the procedure for the second side of the blade.
- Having achieved the result with a medium-grained abrasive, we change the stone to a finer one, and repeat sharpening according to the same principle, but with a fewer number of repetitions (50%-70% less). Changing the block for kitchen and grocery specialized knives for the third time does not make much sense.
- To achieve razor sharpness, we grind the edge of the blade with leather using GOI paste.
To make it easier to change and maintain the sharpening angle, it is better to use special devices. For example, a homemade knife sharpener. Drawings with dimensions are easy to find in the public domain on the world wide web, and in terms of cost, this equipment option will cost 3-5 times less than a purchased mechanism analogue.
Possible errors when sharpening manually:
- Using a single sharpening stone. To get a full-fledged blade with high sharpness, you need at least 2 bars with different levels of grain.
- The formation of false burrs can confuse the sharpening edge. The blade will become dull after a couple of weeks, and the edge will have to be sharpened again.
- Sharpening occurs without first cleaning the blade from dust and grease. The cleaner the blade, the better a person can sharpen the knife.
- Strong blade pressure. In this way you will spoil not only the surface of the stone (its evenness), but also kill the very edge of the knife.
And of course, if you do not maintain the required sharpening angle for the blade, the work will go to waste. This is especially true for specialized knives made of high-quality steel, which are not cheap.
Making a dining table
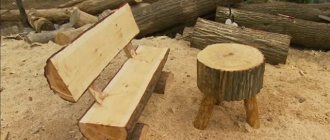
To implement the project of a table for eating, among other things, you will need to make a durable wooden box, the basis of which is the same disassembled pallets. This design may be slightly smaller in size than the dimensions of the table top. At the same time, like the working base, it must also go through the preparatory stage, which was described earlier for pallets.
You can assemble such a box from scraps of pallets or bars measuring 25 x 25 mm. For an average-sized table, you will need approximately four meters of such timber and several pallets of two types, namely: square with sides one meter per meter (for a table top) and regular, having standard dimensions.
From a typical pallet, disassembled into separate parts, it will be possible to make eight low supports that are inserted between the tabletop and a base of the same size. The entire structure assembled from the listed parts is mounted on a previously prepared and stained support box, which must be installed on a well-leveled floor surface.
There are known options for manufacturing a country table, assembled in the form of a folding structure, which, when not in use, is compactly folded and taken away for storage in the attic or storage room.
To manufacture it, in addition to all the listed components and fittings, you will need to purchase special hinges that allow you to perform the corresponding operations with the table (fold and unfold).
Fixation device
The second important part of the tool rest is the clamping bar. It can be made from 2 parts.
L-shaped plank measuring 150x180 mm, the width of the shelves is 50 mm (top);
A rectangle-shaped strike plate measuring 50x100 mm (bottom).
When making a clamping bar, the machine operator performs the following actions:
Places the bottom bar on the far edge of the top bar;
Makes 2 holes in the center and retreats 25 mm from the edges of the part, connects the parts through the holes with two 8 mm bolts;
Screws in 8 mm bolts on 2 sides. In such a situation, the head of the nearest bolt is located near the top bar;
Welds the bolt heads to the plates and grinds them in advance until roundness is formed;
Yes, the inclined board retreats 40 mm from the edge and draws a line with a thicknesser;
Makes one 8 mm 25 mm gap at the bottom and top edges;
Using markings, he connects the edges of the slots and uses a jigsaw to make a cut with an allowance. Use a file to expand the groove to a width of 8.5 mm;
It fastens the planks using a groove that is in the board; the top bolt is tightened with a nut and thus firmly fastens the plank.
Then tightens connection 2 with nut;
When pressing the bottom bar (in the niche of the base), screw a wing nut onto the second bolt.
Foundation for a house made of SIP panels
Foundation reinforcement
The foundation is, first of all, the foundation of a building. It transfers the entire load of the building to the underlying soil layers. In addition to the strength of the foundation itself, you need to consider:
- total area of support on the soil;
- the supporting capacity of the soil itself;
- groundwater levels.
Experts believe that the most common mistake when pouring a foundation is the excessive abundance of concrete and metal in it.
The most popular types of foundation are:
- pile (pile-tape);
- columnar (columnar-ribbon);
- shallow monolithic slabs;
- tape deepening;
- tape recess with a plinth.
But, it is worth noting that among this variety, for frame panel houses the best option would be shallow recessing.
Arranging the floor in a house using SIP panels
Construction of the first floor floor
Another proof of the distinctive properties of Canadian construction technology is the technology of floor construction.
Floors and ceilings are also built from SIP panels.
Although many contractors recommend laying a regular wooden floor in such houses with insulation between the joists and beams. These floors are reliable and more durable. In addition, this floor will be easier to disassemble or repair.