Making a chair with your own hands from wood is easy and fun, and such furniture will fit equally harmoniously into the interior of an apartment or a small country house. This item will undoubtedly become your favorite vacation spot. In addition, you can make it yourself, even if you have no woodworking skills.
To do this, you need a drawing, which you can make yourself or take a ready-made project. Otherwise, you will need to purchase materials for work and tools, and then begin this exciting process.
DIY wooden chair
Choosing a model
There are many different options for wooden chairs. They all differ in type of design, design, and the presence of additional parts.
Table 1. Models of wooden products
| View, illustration | Description |
| Such structures are characterized by good wear resistance; they rarely deform even as a result of constant use. Such products are installed in dining rooms, offices and other premises. Antique-made furniture pieces are especially popular. To do this, they use various paints in cans and special design techniques. |
| These are very comfortable chairs, they have an aesthetic appearance. Compared to the previous model, this product requires more careful care, otherwise it will quickly lose its original appearance. Such designs can be placed in any type of room: in the living room, children's room, even in the kitchen. The model involves a solid frame, and the seat, back, and armrests are upholstered with soft material. In addition, the products differ in the degree of filling. |
Table 2. Product types by design features
| View, illustration | Description |
| These are very compact structures that have a folding mechanism, due to which they can be moved without any problems. Such designs will be appreciated by travelers and lovers of country holidays. |
| Such products are ergonomic and suitable for small spaces. Similar designs come with a rigid frame or with soft upholstery. |
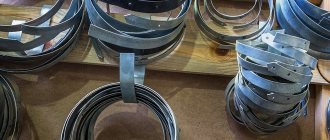
| This product has an unusual appearance and is easy to manufacture. The process uses hardwood and wire. This chair is ideal for a cottage or country house. |
| Pieces of furniture of this type have a truly royal appearance, because they resemble a high throne. They are made of wood and then can be upholstered with soft fabric. An armchair with high support will fit perfectly into any classic-style interior. |
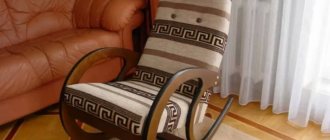
| The main feature of this product is the arched legs. Making it yourself is quite difficult, because not every beginner will be able to achieve the correct rounded shape of wooden blocks. This activity requires certain skills, but the result will be magnificent, and the rocking chair will become a favorite resting place for all family members. |
What if there is no carpentry?
Although shavings and sawdust are not dirt at all, wood processing is quite a garbage business. At the same time, modern materials and cutting methods make it possible to create printed garments that hold their shape under load without a frame. This is perhaps the main reason that frameless upholstered furniture is gaining increasing popularity among craftsmen and amateur craftswomen. The most common are embroidered chairs, because... the whole essence of a home chair is soft elasticity and, in general, it doesn’t need a functional frame.
Construction of a frameless bean bag chair
The structure of a sewn chair is shown in Fig. The purpose of the double cover, the choice of fabric and filling are described above; Here we only note that there is absolutely no need to put a zipper on the inner cover. Both covers are sewn inside out and the last seam of the inner one after filling in the filler is sewn up with the scar facing outwards. It’s easier, cheaper and more reliable, and the scar is still not visible. Before sewing the last seam or installing the fastener, the cover is turned inside out.
The last (detachable) seam of the outer cover should be 0.8-1 m long, because through it you will have to put the outer cover on the inner one that has taken shape. If the filling is solid (foam rubber, neoprene block), 2 half-length zippers are placed on the detachable seam, fastened towards each other, otherwise the inner bag will get stuck in the asymmetrical cut.
Homemade grommet
If the zipper is replaced with lacing, the allowances along the edges of the split seam are folded and ironed before turning the cover inside out, a thick, strong braid is inserted into the lapel, and the wings of the lapel are quilted. Then, using a hole punch, holes for the cord are punched in increments of 4-6 cm and framed with eyelets. In extreme cases, the holes are cut with petals, a ring of wire or durable plastic is applied, the petals are folded through it and glued with PVA; then the grommet is tightly covered with a harsh thread (see figure on the left) and glued again. Several types of chairs fit into this general design and sewing scheme.
Note: processing allowances are everywhere within 15-30 mm.
Pillows
Who, as a child, did not lie on a pillow placed upside down? The simplest sewn chair is a large pillow. But it’s only good for fun, but it’s not good for relaxation: either there’s no back, or there’s something sticking out between the legs. It also easily wrinkles and falls to the side. Therefore, the cushion chair is made only to look like a pillow under the head, but in fact it is quite ergonomic and stable.
Patterns of armchairs-pillows
The easiest way is to pattern a cushion chair according to pos. and on the left in Fig. There are only 2 parts with a bend, and even then a simple radius one. Filler – foam rubber. But this “pillow” looks angular and doesn’t really look like the real thing. To get a more elegant chair that looks more like a real rumpled pillow, pos. b, you need to reduce the bottom, narrow the back, and trim the remaining parts obliquely by 5 cm, as shown in Fig. In this case, the filler is foam or neoprene.
Ottoman
Structurally and in terms of material consumption, a chair-cushion is similar to a chair-pouf, like a footprint. rice. It is more difficult to tailor, but pouffe chairs have an important advantage: they are suitable as a play and recreational children’s chair “from zero to school.” But not a working chair, a high chair, or other functional children's furniture! Having got used to falling apart on something soft, the child runs a great risk of ruining his posture!
Bean bags for children
Pouf chairs are most often sewn according to a pattern of 3 parts: shell (ring sidewall), seat, bottom. But in operation it turns out that the only vertical seam (or zipper) soon separates or breaks. Therefore, it is best to sew a pouffe chair from 5 parts with an insert at the front, as shown in Fig. The liner works similar to the stitching on the toes of work or military boots. It doesn’t look good on weekend shoes, but the chair liner can be made decorative, and there won’t be any extra seams on the shell.
Sack and pear
It’s not far from a pouffe chair to a bean bag chair with a higher back. The simplest bean bag chair can be sewn from 3 parts, as on the left in Fig. The front vertical seam, due to the support of the rider on the back, is less loaded and quite reliable.
Patterns of a bean bag chair and a pear chair
A simple bean bag chair has its drawbacks: the filling, especially foam, tends to spread out, and the back does not provide full support. You won't fall apart in such a chair with all your heart; your back will be damaged. The pear-shaped chair on the right in Fig. is free from these ailments. Option of cutting the bottom (bottom) No. 2 allows you to save approximately 0.5 m of fabric with a width of 1.44 m, because When marking the cut, parts according to option No. 2 can be squeezed between the wedges. In any case, the zipper is located along the diameter of the bottom.
Ball
An excellent option for a sporty child or adult is a ball chair, see fig. Cutting fabric for it is not so difficult if you use not the dimensions from the network, which are most often incorrect and not tied to anything, but the radius of the generatrix and the central angle of the polygon. In Fig. they are given for a ball chair with a diameter of 80 cm; for a diameter of 60 cm it will be 165 and 128 mm, respectively, at the same angles.
Ball Chair Element Templates
Sewing a ball chair has some features:
- Because The detachable seam is short, the cover will have to be sewn single from antistatic fabric.
- To prevent errors from accumulating during sewing, which will negate all the work, the polygon templates are carefully checked, applying sides to each other. All sides of both templates must be the same length to within 0.5 mm; for an 80 cm ball – 100 mm. Unusual for cutting work, right? But when sewing, the error accumulates. For 20 6-gons + 12 5-gons, the discrepancy can reach 0.5x32 = 16 mm and then the corners cannot be reduced by any tightening.
- The filler is poured into the cover through a rolled-up cardboard pipe with a diameter of 60 mm. You can use a piece of plastic.
- If the ball is laced, the split seam is made with a valve, like in old leather soccer balls, so that the filling does not spill out.
Note: the filling volume for the described chair-cushions and 80 cm ball is about 250 l, and for the bag and pear about 350 l. The internal volume is filled completely, then washed.
Like real
Here in Fig. – frameless chair with foam filling, simulating a cabinet chair. Armrests, if needed, are sewn like a backrest. The entire product can serve as a module from which a sofa, chair-bed, etc. can be assembled. The base is foam rubber slabs of grade (density) 40-45, 10 cm thick, glued together with PVA in pairs to a thickness of 20 cm, pos. 1. Seat and foot zippers are located at the back, and backrest/armrest zippers are located at the bottom. They must be paired, pos. 2, because it is very difficult to push the foam rubber in any case into a deep cavity through an asymmetrical split seam.
Frameless chair for an apartment
Note: in the same way, but from foam rubber of a smaller thickness, the seat and back cushions of some of the chairs described above and below are made.
The tongues for sewing together chair elements about 10 cm wide (pos. 3) do not provide a complete guarantee against sideways displacement with distortion, so pairs of buttons, pos. 4. The backrest/armrests are sewn filled before filling the seat, and the seat and backing are sewn together after.
To prevent the lower (folded) decorative trim from getting dirty and rubbing against the floor, it is advisable to place the chair on a plywood or plank pallet with low (approx. 5 cm) legs. It unfolds through the bottom, pos. 5. In this case, you get a good temporary, say, at the dacha, crib for a child. And if you save a little on foam rubber and lengthen the legs due to the chosen height, you will get a good chaise lounge for the veranda, pos. 6. So that, again, the lower (when unfolded) edge of the footrest does not wear out, it is sheathed, including a corner, with technical fabric. When folded, the upholstery will be at the back between the pillows and will be almost invisible.
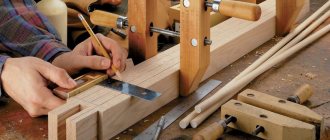
Features of working with wood
Wood has long been considered the most popular material used in the manufacture of furniture to this day. This is due to a large number of positive qualities: wood is quite easy to process, even a beginner can handle this process. To prepare products, you can use simple tools; it is not necessary to purchase high-tech equipment.
You can even cut parts with a bow saw
You can purchase lumber at an affordable price in almost a hardware store, while ready-made furniture structures made from solid wood have a fairly high cost. That is why it is recommended to make such simple products as a chair with your own hands.
The main advantages of natural wood are:
- Environmental Safety. This material is non-toxic, therefore any harm to human health is excluded.
- Wood has good strength; it rarely deforms due to impacts and other mechanical influences.
- A structure of any configuration can be made from wood. In addition, such products will harmoniously fit into any room with any interior design.
In order to buy high-quality wood, you should consider the following features of the material:
- the humidity level should be no more than 12-13%;
- there should be no cracks, other damage or traces of mold on the surface;
- there must be a minimum amount of resin.
It is necessary to choose only high-quality lumber.
You should pay attention to such points when purchasing ready-to-use lumber. In some cases, it becomes necessary to dry the wood yourself, after which it will need to be treated with a special compound to protect against fungus.
Important point! It is better to purchase material taking into account the stock, because not in all cases it is possible to accurately calculate the required quantity. In addition, during the work there is a risk of damaging any part.
An equally important criterion is the type of wood. When making outdoor furniture, only varieties with the most durable texture are suitable. These include pine, rowan, larch, and oak.
Linden has good durability
If a heavy load is expected to be placed on the product, then it is better to choose linden or alder. Material of this structure is a little more difficult to process, but it will last for many years.
If the chair will be installed near any pond or swimming pool, then it is advisable to purchase fine-pored wood for manufacturing - this will avoid problems with deformation of the structure.
Video - How to choose boards?
What materials are used to make chairs?
When creating chairs, professional furniture makers and home craftsmen use various materials. In order to make the right choice, you should consider each of them in more detail. We recommend that beginners take a closer look at solid wood, furniture panels or MDF - such materials are easier to process at home.
Table 2. Materials used in the manufacture of the frame
Material Description
Natural solid wood or furniture panels made of wood
Wood is the most popular material that is widely used to create furniture. It is environmentally friendly, durable, and with proper care will remain in its original form for decades. Natural wood is suitable for those craftsmen who do not want to save on material. Furniture panels and other sawing are a more budget-friendly, but no less beautiful and natural option.
Please note that such products are not recommended for installation in rooms with high humidity (baths, saunas). In addition, natural wood will need to be treated with an antiseptic and covered with several layers of varnish.
Metal
Entire chairs with armrests are extremely rarely made from metal; only a few craftsmen use such material for the frame
Such products will look less respectable; they are very simple, so they are best suited for a terrace, gazebo, or garden plot. Their main advantage is good strength. But for making chair legs, metal will be ideal. The only thing is that you will have to purchase ready-made legs in a specialized store, because it is not possible to make them at home.
Plastic
Plastic is often used only when creating some elements of the chair - either the seat itself or the pads on the armrests. Plastic has two main advantages - it is a budget material that does not require special care. Products of this type will ideally fit into the interior design in a modern style and are well suited for a child’s room.
Rattan or wicker
Wicker furniture will be very difficult to make with your own hands - this requires certain skills. However, such chairs will look great in the garden, on the terrace, and you can master the weaving technique to decorate the back of a chair or seat, making the rest of the elements from wood, which is much easier.
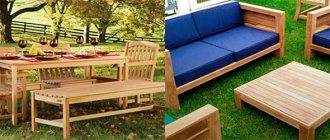
DIY garden chair
Before starting work on the manufacture of the chair, it is necessary to prepare the following materials and devices:
- cedar veneer;
- screws;
- wood glue;
- sandpaper;
- finishing varnish;
- drying oil;
- scotch;
- thick paper for patterns;
- plane;
- saw;
- milling equipment;
- hacksaw;
- drill;
- clamps;
- a simple pencil;
- measuring tape.
Approximate diagram of creating a chair
Preparing parts
Step one: first you need to make patterns for the design, marking the dimensions of the parts on thick cardboard. In our case, we should get the following elements:
- legs (4 pieces) – 2x25x78 centimeters and 2x7.6x53 centimeters;
- back - 2x28x91 centimeters;
- armrests - 2x12x40 centimeters (2 pieces) and 2x7.5x61 centimeters;
- connecting strip - 2x5x58 centimeters;
- additional strip (2 pieces) – 1.2x2x2.5 centimeters.
Elements of a garden chair
Step two: you need to cut out the parts from cardboard, and then transfer them to the wood (circle), after which you can saw the parts of the future chair. This should be done very carefully - the peculiarity of cedar boards is that they are susceptible to chipping, so cutting should only be done along the grain.
Sawing the parts
Connecting parts
Step one: before starting assembly, all parts must be thoroughly treated with an antiseptic against fungus and dried. Only then can you proceed to the next steps.
Preparing the product for processing
Step two: we adjust the finished parts to the required size and at the same stage leave markings for the holes for fasteners.
We trim the parts of the structure exactly along the intended contour
Step three: use a drill to make holes for the fasteners, and then fix the parts together.
The location of the boards affects the strength of the entire chair frame
Step four: fix the chair leg (back) at an angle of 90 degrees, and fix it on the other side in the same way. It is necessary to connect the sides of the structure.
The end parts of the planks and the opposite ends of the legs must match, which will allow you to obtain the correct location of the structure
Step five: place the supports and then secure them with clamps.
The joint should be very tight
Step six: install the backrest guide from above using screws, adjusting it to the crossbar from below. We mark the markings with a simple pencil on all the crossbars, as well as on part of the back, after which we make a hole, holding the bar.
We fix the planks one by one
Step seven: make curves by cutting the boards along the marked lines.
Installing the rail on the seat
Step Eight: The last step is to sand the entire surface of the chair using sandpaper. It is important to achieve perfectly smooth wood without burrs. Then you need to treat the product with heated drying oil and cover it with several layers of varnish.
After applying the varnish, the chair should dry for some time.
Video - Simple wooden chair
DIY rocking chair
During the manufacturing process the following will be required:
- plywood sheets;
- cardboard;
- putty;
- dye;
- pencil;
- ruler;
- tape measure;
- sandpaper
- jigsaw;
- fasteners;
- drill.
Step-by-step instruction
Step one: prepare the details. The entire structure of the chair consists of two side parts, three horizontal connecting strips and 35 crossbars (needed to create the seat).
In this design, the most labor-intensive stage is the creation of the sidewalls, so it is recommended to mark them on cardboard, then cut them out, and only then transfer them to the wood.
Side parts diagram
Step two: to make the side parts you need to take multi-layer plywood 3 centimeters thick. Then you should transfer the part from the cardboard to a plywood sheet and carefully cut it out with an electric jigsaw.
It is necessary to make such parts in the amount of 2 pieces
Step three: after which the side parts must be thoroughly sanded with sandpaper and their edges trimmed using a grinder or milling equipment.
Hand router is suitable for cut processing
Step four: from plywood of the same thickness you will need to make horizontal connecting strips 120 centimeters long and 10 centimeters wide. After which they need to be sanded with sandpaper, but you should not process the edges with a router.
Cut three horizontal strips
Step five: you need to take a block of wood 5x2.5 centimeters and cut it into 35 pieces, 120 centimeters each. After which they should be sanded and the edges removed.
Planks need to be sanded
Step six: in the middle part of the outer arc of the sidewalls, at the back and near the legs, we mark the places where the horizontal strips are fixed. After which these marks should be duplicated on the other side. Then you can make holes for the fasteners.
We mark the places where the horizontal strips are attached
Step seven: we make through holes on the end parts of the sidewalls, and then we connect the frame with horizontal strips using screws.
We connect between special parts of the main frame of the chair
Step eight: next you need to take the bars that we prepared earlier and attach them one by one to the seat with self-tapping screws.
We cover the frame, thanks to which the seat is formed
Step Nine: The last step will be thorough surface treatment. To do this, you must first fill all the holes and go over the wood with sandpaper. Then the surface is coated with a primer and several layers of varnish.
Making a three-layer varnish coating
Pattern with detailed dimensions for children and adults
To make a pear chair you will need to make a pattern.
You can draw it yourself or find a ready-made version on the Internet. The pattern is drawn on graph paper. And then it is transferred to the fabric. The parts are cut along the contour.
Attention: when transferring the pattern to the fabric, do not forget to leave allowances of a few centimeters on each side.
The pattern of a chair for an adult will consist of the following parts:
- 6 pieces of wedge-shaped parts, 15 cm wide and 40 at the ends, with a diameter of 50 cm and a length of 130 cm;
- diamond-shaped top 15 cm on each side;
- The bottom is diamond-shaped, 40 cm on each side.
The pattern of a chair for a child will consist of the following 6 wedge-shaped parts:
- height – 90 cm;
- diameter – 45 cm;
- width – 40-22 cm.
The bean bag chair consists of:
- Internal zippered cover filled with polystyrene foam. Here you should choose thick cotton or raincoat fabric.
- Outer cover. Suitable for manufacturing: corduroy, leather, velor. You will need to sew a 1 meter long zipper onto the removable cover.
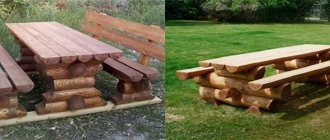
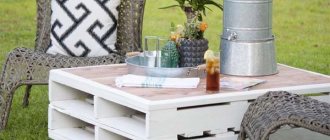
Country house chair made from pallets
You can make such a design with your own hands, spending only a few hours. During the work you will need the following:
- wooden pallets (you can buy new ones or disassemble old ones that are no longer used);
- hammer;
- nails;
- sandpaper;
- fastenings;
- primer.
Chair made from pallets
Step by step instructions
Step one: in this case we will need to take two pallets of the same size, which will then be divided into parts. Moreover, if the design involves the presence of additional decorative elements, then more pallets will be needed.
Divide the pallet into parts
Step two: the surface of the wood should be thoroughly sanded.
Sanding the surface of the pallets
Step three: first you need to connect the parts of the seat and backrest together. At this stage, you can make a small cut to get the slope of the back.
Connecting the back and seat
Step four: it is better to fix all the parts with screws, because the connection made from nails is not very reliable.
Important point! Some craftsmen prefer to secure the design parts with glue. In this case, it is better to use heat-resistant options, so that the structure does not deform even in extreme heat and does not crack in the cold.
Ready chairLately, you can often see homemade interior items made from pallets when visiting someone. These are structures used to transport goods. It turns out that it is not so difficult to make a sofa from pallets (pallets) with your own hands, and in terms of its quality it can be even better than what you can buy in a store.
DIY wooden shell chair
To make the structure you will need the following:
- sheet of bent plywood;
- sandpaper;
- jigsaw;
- paints and varnishes;
- wood glue;
- fasteners.
Step-by-step instruction
Step one: before you begin the process of making such an unusual chair, you should prepare a drawing. You should do it yourself, relying on ready-made diagrams. It is important to correctly indicate the dimensions of the parts.
Deciding on the size of the chair
Step two: saw the parts along the marked lines. In order not to make a mistake, you can first practice on an unnecessary piece of wood, and only then move on to a plywood sheet.
Cutting diagram
Step three: then all parts should be varnished in 3-4 layers. It is better to choose high-quality paints and varnishes. In this case, you will need to first sand them with sandpaper. This is done in order to protect the structure from the negative effects of the environment.
We paint wood with varnish
Step four: you can connect the parts of the chair together using wood glue or self-tapping screws. If you choose the second option, it is important to screw the screws in as deep as possible so that they are not noticeable.
Finished design
Decorating wooden furniture
An equally important stage in furniture manufacturing is decor. At the same time, it is not necessary to purchase expensive accessories for such purposes, because you can even use old, unnecessary things, pillows.
You can cover the back and seat with padding polyester, and stretch decorative fabric on top. Fasten the upholstery to a wooden structure using a furniture stapler. In addition, the back is sometimes decorated with buttons, which are covered with the same fabric. You can hide the marks from the staples with decorative edging or various laces.
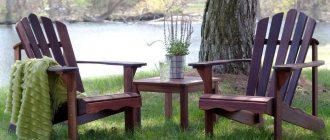
Example of garden furniture design
At this stage you will have to show your imagination. You can decorate the surface using paint of different colors - this will allow you to get a unique product that suits your interior specifically.
Finally about the unusual
However, cardboard is very useful in creating chairs. For example, for modeling unique chairs, pos. 1 in Fig. Sheets of cardboard are glued together to the thickness of the chosen plywood or board, cut into blanks and assembled from them into a model, which, of course, cannot be sat on. After fitting, the model is disassembled and a set of templates for cutting the base material is obtained. True, although it is not difficult to fill the gaps of the skeleton with polystyrene foam or polystyrene foam, in order to cover such a chair with soft material and trim it with decorative fabric, you need to be a cutter and an ace seamstress.
Unusual homemade chairs
Armchairs made of felt or overcoat cloth, pos. 2, covered with foam cubes (the seat is supported by a hidden plywood insert), pos. 3, or water pipes, pos. 4, already require more invention than high skill. Felt and tubular, of course, will cost a pretty penny. But a chair made from cubes can be made even by less than adult craftsmen and craftswomen. And a hand-made chair for my mother’s birthday – it really couldn’t be cooler.
In general, the chairs, even without reaching complex representative ones, give scope for creative self-expression like few other pieces of furniture and homemade products in general. So, since the chairs are on the way, create, invent, try!
Frequently asked questions from beginning furniture makers
Before you start making this or that design, you should familiarize yourself with the list of questions that beginners in this business often have.
How to cut parts?
When cutting longitudinal parts, it is better to use a circular saw, and for transverse parts, an electric jigsaw.
Jigsaw
How to connect parts of the structure?
For connections that carry the main load, you will need to use euroscrews or self-tapping screws. In other cases, the parts are assembled using wooden choppers and glue.
Chopiki
Paint or varnish?
The choice of materials for processing depends on the quality of the wood itself. If the material does not have any defects, it can be treated with stain and then a layer of varnish can be applied. If stains appear on the surface, the wood must first be puttied, coated with a primer, and only then painted.
Wood varnishes come in different shades
How to reduce the consumption of paints and varnishes?
Quite often, during final finishing, the paint is quickly absorbed into the surface, which is why bald spots remain on it. This happens because natural wood has a porous structure. That is why professionals recommend pre-treating it with drying oil.
Drying oil for wood processing