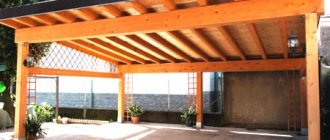
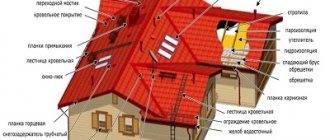
The roof is the headdress of the building; it not only protects from atmospheric influences, but is also its real decoration. Roofs and ceilings of any structures must be reliable, but the roofs of wooden houses in particular, because wood is extremely susceptible to moisture. Incorrectly chosen type, poor-quality installation, design errors - all this can cause unscheduled repairs.
Pros and cons of a timber roof
Roofs with a timber rafter system are used for wooden and frame houses, as well as for structures made of slabs and piece building materials. This type of coating is considered universal and has many advantages:
- environmental friendliness and safety;
- warm house, wood retains heat well;
- good sound insulation (largely depends on the type of roof);
- natural ventilation of the attic floor or attic;
- low cost and ease of installation.
The disadvantages of timber roofs include low fire resistance and high requirements for timber for the installation of rafters. The fire resistance of timber can be increased by treating the wood with fire retardants.
Roof "without a single nail"
From the antiquity of traditional Russian wooden architecture - a roof “without a single nail”
The chickens were cut into several side slats. The chickens themselves were cut down from spruce trunks, and the hook was made from the root system. The hens supported the stream - a hollowed out log, against which rested the boardwalk - the roof plank. The upper part of the plank was laid freely on the ridge beam in such a way that during shrinkage the upper ends of the gables could freely converge. For this purpose, space was left during installation. The ridge beam (knes) was hewn on both sides so that the gorges would fit more tightly.
If you leave 10 cm for lifting the gorges along the Knes, then this will be more than enough, because when shrinking, the chicken will also fall, and therefore the gorges lying on the beds. From above, the gorge was pressed against the ridge beam with an ohlupnik - a heavy hollowed out log. In this way, the gorges were fixed both at the top of the roof and on the plumbs.
Of course, now no one forces you to meticulously follow the ancient technology; where appropriate, you can use nails, screws, etc. The main thing is to grasp the principle. What is it?
Here's what:
In the same way, today you can attach a continuous sheathing to a slab roof. If you don’t want to bother with chickens (although this is no more difficult than with a rafter system), then you can rest the boards against a hollow hollowed out in the upper crown. Moreover, you can do the opposite - attach the boards to the ridge beam, so that they then fall into the hollow in the upper crown. This is exactly how they work when installing a warm roof using “Norwegian” technology, which I will briefly discuss below.
Choosing timber for rafters
For rafters, it is preferable to use coniferous timber. The timber must be aged and have a humidity of 18-22%. If the humidity is above 22%, the wood will shrink unevenly, which will lead to misalignment of the rafter system and disrupt the geometry of the roof. For country houses and residential cottages, timber with a section size of 50*150, 50*200, 100*200 mm is most often chosen for making rafters. It is not advisable to use a larger beam, because at the same time, the load on the walls of the building will increase significantly.
The timber must be treated before installing the rafters. For processing we use:
- flame retardants - increasing fire resistance and reducing flammability;
- antiseptics - protection against rotting and fungus;
- insecticides - protection against insects and rodents.
Features of roof construction
The work begins with a project. It is important to choose the optimal configuration that will provide not only the desired appearance of the building, but also withstand a lot of roofing material and precipitation, which is especially important in winter. First, a drawing is created, a general view is displayed on it, the main dimensions are indicated, and the elements of the rafter system are drawn.
Important! Creating a project for the roof of a wooden house and its subsequent implementation is a difficult task; it is worth attracting specialists. You must understand that a poorly made roof will cause not only discomfort, but will also significantly bring forward the date of major renovation of the building.
When designing a roof for a wooden house, we must not forget about its peculiarity: wood breathes. Depending on the time of year, the size of the building can change significantly, the walls shrink. It is worthwhile to provide mechanisms for compensating for seasonal shifts and to allow the roof to float.
In addition to the project, it is worth sketching out a work plan in which each action is described step by step: from creating a rafter system to laying roofing material and insulation.
Types of timber rafter systems
A rafter system made of timber can be one of two types:
Layered rafters. This is the most popular option in private construction. With this method of installation, the rafter legs rest on a beam, which is located around the perimeter. The central part is reinforced with a ridge girder. In large buildings, additional beams are used to increase strength.
Hanging rafters. The structure is mounted on external walls. Crossbars, struts, headstocks, etc. are used as additional elements. The bars are held together by tightening. The use of hanging rafters requires detailed calculations.
When choosing a rafter system, designers take into account the angle of inclination of the future roof: for steep slopes, the optimal solution is layered rafters, for flat ones - hanging rafters. In some cases, the rafter system is combined: layered rafters alternate with hanging ones.
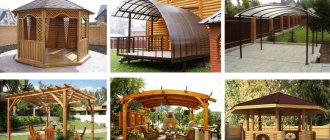
How can roofs differ?
- According to the form.
Log houses, as a rule, have pitched roofs of various shapes. The most typical and simplest one for private houses is a gable (or gable) one. This is exactly what we will talk about in this article.
Some common roof shapes
Also in low-rise construction, attics and, accordingly, mansard roof shapes are popular. However, for the attic it is not necessary to construct a broken-shaped roof. You can make a so-called “half-attic” if you raise the walls by approximately 1/3 or half of the floor and install a regular gable roof. You can even get by with a regular gable (triangular) roof if it is wide and high enough.
Scheme of architectural solutions for the attic floor
- According to the degree of insulation.
In principle, you can cover the sheathing with slate, and you’re done. And to insulate the ceiling - the ceiling between the attic and the living floor. This is, of course, the simplest and most brutal option. Many people prefer to tinker more thoroughly with a roof, even a cold one - especially now, when so many materials have appeared, and according to the assurances of their manufacturers, you cannot take a single step without all kinds of steam, hydro and other insulation and insulation. But the key idea is that it is much easier to structurally insulate the attic floor (ceiling) than the roof itself. Especially if we are talking about a log house with chopped pediments, and then it will be clear why.
On the other hand, you can make an insulated roof - for the attic, or in order not to make a separate ceiling (for example, in a bathhouse - in a relaxation room).
- According to the design of load-bearing elements:
- Many people know that the main load-bearing elements of the roof are the rafters. But there is also...
- roofing on slabs
These horizontal logs are logs, cut into males
and...
- mixed slab-rafter structure.
Rafter-slab roof structure
Rafters can be rigidly connected to the frame of the house, or they can be sliding (“floating”) - an independent rafter structure. Hard ones are traditionally divided into:
- hanging - exert bursting pressure on the walls when the weight of the roof is transferred to the building; acceptable with a width between supports (external walls) of up to 6 - 6.5 meters;
- layered - connected to each other by a tie - a beam - at the lower ends, and thus exert vertical pressure; mandatory when the step between supports is from 7 meters.
Designs of hanging and layered rafters
In the pure version, hanging rafters are rare; they are often reinforced with crossbars, additional racks, jibs and other structural elements. The entire structure of a pair of rafters with other elements is called a truss. In addition to suspended and layered structures that are assembled on site, there are roof trusses that are assembled in a factory and delivered ready-made.
Ready-made roof trusses
- Of course, roofs also differ in the type of roof covering, but this is understandable.
Calculation of timber for rafters
The purpose of calculating the rafter system is to determine the required cross-section of the beam. To do this, you need to know: the length of the rafter legs, the installation pitch of the elements and the parameters of future loads. The dependence of the cross-section of the beam on the installation pitch of the rafters is shown in the table:
| Length of rafter legs, cm | Rafter spacing, cm | Section of rafter beam, cm |
| up to 300 | 120 | 8 x 10 |
| up to 300 | 180 | 9 x 10 |
| up to 400 | 100 | 8 x 16 |
| up to 400 | 140 | 8 x 18 |
| up to 400 | 180 | 9 x 18 |
| up to 600 | 100 | 8 x 20 |
| up to 600 | 140 | 10 x 20 |
Example: to make rafters from timber 3.5 m long, you can use two options: 1) timber 8x16 cm in increments of 1 m; 2) timber 8x18 cm with a pitch of 1.4 m. Knowing the length of the house wall and the pitch, you can easily calculate the required number of rafters and beams.
For other roof elements, dimensions should be taken based on SNiP 3.03.01-87 (updated SP 70.13330.2012):
- Mauerlat - 10x10 or 15x15;
- purlins, crossbars and struts - 10x10, 15x15 or 10x20;
- puffs - 5x15;
- hemming boards - 2.5x10 or 3x10.
The length of the rafters should not exceed 6 m! A structure greater than 6 m will not provide sufficient deflection strength.
When designing a timber roof, design engineers must calculate the current loads on the rafter system. The calculation takes into account the weight of the final roofing covering, thermal and waterproofing, sheathing, drainage and snow retention elements, as well as temporary loads. The calculation is made using special programs. It is impossible to make such a calculation on your own due to the large number of variable variables.
Roof on slabs - ideal for chopped gables
Slegs are horizontal log beams that connect and rigidly fix the gables of the log house; are not only a natural constructive, but also an architectural element. For example, long logs (pomochi) protruding from the gables fit elegantly into the design of a “wild log house” - you can put a wide console on them.
A slab roof structure looks something like this:
Log house with natural slab structure of the future roof
What's good about this decision?
- Why rafters if there is already a main supporting structure for the roof? Additionally, there is no need to nail or install anything. If you lay them down often enough, then they are a ready-made sheathing on which you can lay, for example, tiles or shingles. In any case, slate or metal tiles will lie on the floor.
- You can put a continuous sheathing (boards end-to-end) on top of it, which is almost a finished roof!
- The legs are cut into the males, and, therefore, when shrinking, they are lowered along with the gable of the log house - there is no need to do anything with sliding fasteners.
Layers are laid so often that it is practically a ready-made sheathing for any solid roofing material!
Generally speaking, the slab structure appeared much earlier than the rafter structure.
All of the above advantages of slugs are valid if nothing is rigidly attached to them so that this fastening prevents shrinkage. That is, if you nail the sheathing on the legs, then shrinkage will become a problem - the purlins will sink along with the males, but the sheathing and everything that you nailed to them will not.
But! You can lay boards on the beds without fixing them rigidly. Thus, we get either lathing or wooden - for example, plank roofing.
How to do it? It is possible, in principle, to nail the edges of the boards to the ridge beam (knes) along one line parallel to the axis of the knes - so that with a slight change in the angle at which the boardwalk will lie, it will not be torn off. But even this is not necessary.
The old technology of Russian wooden architecture suggests a solution.
Installation of timber rafters
To install prepared and processed timber into a rafter system, you need a set of professional tools: a construction level (preferably laser), an angle grinder, a gas or electric saw, a drill with a set of drills. It is also necessary to prepare fasteners in advance: screws, corners, clamps, etc.
There are two options for assembling rafters:
- Assembly is carried out on the ground, and the finished rafters are lifted up and installed. This option is not suitable for massive rafter systems, because A construction crane is needed to lift the structure.
- Assembly is carried out on the roof. In this case, only timber, boards and tools rise to the top.
Anti-shrinkage roof structure for chopped gables
There are two fundamental solutions:
- roof on slags - close in technology to traditional nailless roof structures of traditional Slavic log houses;
- installation of sliding rafters.
There is also a rafter-rafter system, but these are the same sliding rafters, only with the addition of side rafters.
This is generally “modern” - a rethinking of the system of beams and rafters. But effective!
Rafters on slabs are often too much
In fact, this is butter oil, because in the first version the load-bearing beams are located horizontally, and in the second version vertically. Both structures are powerful enough to withstand the heaviest roofing, such as a tile roof. There is no point in duplicating them.
Another thing is that in addition to holding the roof, the sleds also rigidly connect the gables. And when rafters are added to such a structure, they do this in two cases:
- to lay sheathing on the vertical rafters;
- to make a thick pie of a warm roof for the attic.
It is likely that engineering solutions for arranging a warm roof on a slab base are quite possible, but they have not yet been developed, since for now developers have enough rafters. Therefore, if you plan to build an attic, you cannot avoid installing rafters if you do not want to experiment.
Installation of a gable roof made of timber includes the following steps
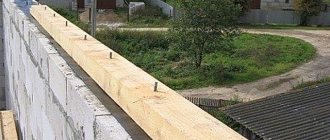
Mauerlat installation
The strapping is laid on the long walls of the house and attached to them using anchor bolts. In this case, the Mauerlat should be leveled along the inside of the wall. Waterproofing must be lined under the harness: geotextile, TechnoNIKOL, waterproofing or regular roofing felt. For timber houses, the role of the mauerlat can be performed by the very top crown. However, if the roof needs to be raised higher, then the Mauerlat is indispensable here. In the same way, 1-2 planks are laid on the internal load-bearing walls of the house.
Installation of supports and skates
The timber supports are mounted on a bench with a selected pitch. The supports are leveled and secured with jibs - boards 2.5x10 cm. The racks are rigidly attached to the bed with nails or metal corners (reinforced version). The ridge beam (purlin) is laid on the posts and secured with nails and metal corners.
When installing hanging rafters, the racks are installed temporarily, and the Mauerlat is attached to the wall using additional metal ties, because with this type of rafter system, an increased load will be applied to it.
Mauerlat for hanging rafters. Rafter legs are secured with brackets
Installation of rafter legs. The method of installing rafter legs depends on the type of rafters chosen. The legs of the layered structure are installed on the Mauerlat and secured using brackets, screws or staples. Reinforcement with brackets gives the rafters additional rigidity. If the length of the timber does not allow for overhangs, then fillets are mounted, which are made from the same timber as the rafters. The fillies are fastened with nails. The rafters are connected at the ridge of the roof, forming a triangle.
The hanging rafters are laid on the mauerlat, a cut is made, into which the rafter leg is then inserted and fastened with nails. Thanks to the sawing, the beam fits tightly to the Mauerlat and does not need to be fastened with brackets and brackets. Tightenings are applied to the installed rafters.
Connecting elements
The internal structure of the roof of a wooden house is distinguished by many joints of different configurations. Creating a rafter system requires precise cuts, therefore, high skill of the builder. Many specialists still use classical methods when creating a rafter system, but this is not at all necessary.
The industry offers a wide range of fasteners that will facilitate the assembly of the structure without compromising reliability:
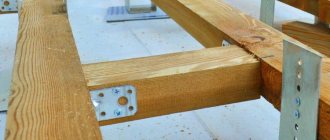
- Rafter foot holders will allow you to quickly and securely fasten the rafter heel to the mauerlat. Depending on the specific project, you can choose a rigid mount or a floating one;
- the support helps connect pieces of timber at right angles or attach a beam to the wall of a building;
- metal connecting plates will ensure high reliability of the joint of the boards being joined. A wide range will allow you to choose the optimal part for any type of connection;
- corners of different configurations are something without which it is impossible to create modern wooden structures. You can choose rigid products with a fixed angle or sliding ones, allowing you to connect boards at any angle.
When assembling, you cannot do without all kinds of studs, including those with “screw” threads, bolts and nuts to create reliable detachable bolted connections.
Advice! With all the variety of modern fasteners, you should not discount time-tested nails. With a skillful approach, a cheap nail will help create a roof of no less quality than any modern fasteners.
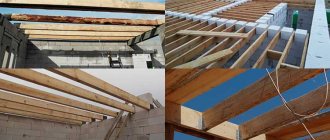
Installation of sheathing
Once the roof timber rafter system is ready, you can begin installing the sheathing. For the lathing, 50x50 timber and dry boards 3 cm thick and 20-35 cm long are selected. Before lathing, the rafters are covered with waterproofing. The material is laid with overlaps of at least 10 cm and secured with construction tape.
The pitch of the sheathing depends on what roofing material was chosen for the covering and the slope of the roof. The pitch of the sheathing for corrugated sheeting and ondulin can be determined from the table:
| Corrugated sheet | Roof inclination angle, gr | Sheet thickness, mm | Lathing step |
| S-8 | at least 15 | 0,5 | Continuous sheathing |
| S-10 | up to 15 | 0,5 | Continuous sheathing |
| S-10 | more than 15 | 0,5 | up to 300 mm |
| S-20 | up to 15 | 0,5 — 0,7 | Continuous sheathing |
| S-20 | more than 15 | 0,5 — 0,7 | up to 500 mm |
| S-21 | up to 15 | 0,5 — 0,7 | up to 300 mm |
| S-21 | more than 15 | 0,5 — 0,7 | up to 650 mm |
| NS-35 | up to 15 | 0,5 — 0,7 | up to 500 mm |
| NS-35 | more than 15 | 0,5 — 0,7 | up to 1000 mm |
| N-60 | at least 8 | 0,7 0,8 0,9 | up to 3000 mm |
| N-75 | at least 8 | 0,7 0,8 0,9 | up to 4000 mm |
For metal tiles and seam roofing, continuous sheathing is performed (for roofs with a slope of more than 20 degrees) or discharged (for a slope of less than 20 degrees). Continuous sheathing is carried out with minimal gaps - no more than 5 cm. The best option: perform the sheathing in accordance with the recommendations of the manufacturer of the selected roofing product.
Regardless of the type of roofing covering and the calculated pitch, the sheathing is continuously mounted around roof windows, in places where complex roofs are broken and in those places where heavy elements of the drainage and snow retention system will be installed.
Under a soft roof, the sheathing is made of panel materials: plywood or OSB. The sheets are attached end-to-end to the rafters using self-tapping screws, forming a flat surface on which bitumen shingles are then installed.
Procedure for constructing a wooden roof
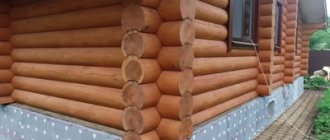
Before you start building a roof, you need to choose the materials correctly and competently. The wood must be dry; the appearance of fungi and wood cancer on its surface is unacceptable. To make the structure last longer, you should choose materials that do not have a rim. It is also recommended to coat all components with antiseptics and fire retardants. Such products will protect the roof not only from rot, but also from fire.
It is recommended to coat the wood with antiseptics and fire retardants Source roomester.ru
Choosing a roofing covering
A timber roof is universal, allowing you to choose any type of roofing covering. The following roofing options are popular in private housing construction:
- Seam roofing.
- Metal tiles.
- Ondulin.
- Profiled sheeting.
All these types of roofing materials are characterized by high strength and durability. The most affordable is ondulin, made from cellulose and polymers. Metal tiles are more expensive, but have a presentable appearance and require minimal maintenance. The disadvantages of roofing made from these materials include the need for sound insulation, because... every blow, precipitation and gusts of wind will be heard in the house. Also, such a roof necessarily requires insulation.
Separately, it is worth mentioning soft tiles - this is a relatively new roofing material based on synthetic bitumen. The material has a beautiful design, is silent, and is not subject to corrosion or rotting. A significant disadvantage of flexible tiles is their relatively high cost.
When to put a roof on a log house?
Immediately after the walls are erected and before installing windows and doors. Sometimes there are recommendations: wait until the shrinkage takes place, or make a temporary roof. It's all nonsense. A house without a roof is not even a house yet. The geometry of the log house is formed during the shrinkage process with all the loads, that is, the house must be completed and the roof too. It makes sense to do temporary roofing only if you have difficulties with the construction of a permanent roof.
Technologies that make it possible to build a log roof that will survive shrinkage exist. There are no objective reasons to postpone construction.
Timber roof insulation
Despite the fact that a timber roof is quite warm, it needs insulation. Thermal insulation is carried out after the installation of the roof covering. Inside, the timber roof consists of rafters with sheathing and waterproofing. The following can be used as insulation:
- polystyrene foam or extruded polystyrene foam;
- mineral wool;
- sprayed polyurethane foam.
Each type of thermal insulation has its own advantages and disadvantages. For example, polystyrene foam is fire hazardous, flammable and does not allow the roof to “breathe”, but it has excellent heat-retaining properties and is low cost. Insulation based on mineral wool is suitable for large buildings, because... The weight of the mineral wool is quite large. The material is used in slabs or rolls. Thermal insulation is attached to the sheathing. The thickness of mineral wool slabs depends on the region and averages 15-20 cm. Mineral wool is environmentally friendly, breathable and durable.
Polyurethane foam spraying is the best way to insulate a roof. The material is sprayed with a special installation and creates a sealed coating without seams or joints. The disadvantage of polyurethane foam is its high cost.
In order for a timber roof to last a long time and not require expensive repairs, it is necessary to install an effective drainage system that will prevent water from entering the roof. The calculation of gutters is carried out taking into account the slope of the roof, roofing material and the amount of precipitation.
You can ask your question to our author:
What kind of roof should be installed on a log house?
For a log house roof with chopped gables, only the option with sliding rafters is suitable.
All this is due to significant shrinkage of the log house. Now we are talking about gable roofs. It's simple: if some part of the frame is higher than another, then the geometry between these parts will change after shrinkage. Each log loses up to 15% of its diameter in the process of shrinkage, but this is a fairly large amount. For rounded logs the standard is 6-8%.
A chopped pediment is like this:
Chopped or male pediment (and in terminological terms - gable)
The logs in the gable (gable) part are called “males”.
If the log house is a flat box, then all its walls will settle equally. But if some parts (gables) are higher than others (longitudinal walls), then the difference in height between them will change, and if you build a roof on rigidly fixed rafters, then it will literally be torn off the frame, the males may fall out... In general, this is fraught with a serious emergency situation.
Here's how the chopped pediment shrinks:
Dynamic shrinkage pattern. It is important that not only do the rafters slide down and the ridge go down, but the angles of the entire geometry of the pediment change
For which log houses are rigid rafter structures suitable? For those without tongs! When the roof is placed on a flat frame box - for example, a hip roof. Or you can make a frame pediment (with boards, a blockhouse, etc.) ... But this will not be quite a log house in its pure form.
The hip roof can be placed on a full-fledged log house on rigid rafters
A full-fledged log house with a gable roof can only have a chopped pediment. Why? Because the pediment is also a part of the house, and a considerable one at that. If you make it frame, it turns out that half the house is a frame assembly. Maybe this is practical - because it is simpler - but in this case, it is practical to build the entire house using frame technology. Log houses are erected for their special merits, and if they are to be done, then do it sensibly and without half-measures.
Here's an example. Well, it costs money to install such a log house. Well, you can fly to the resort. Well, why do you need a bathhouse, because you can wash yourself in the shower? Well, if a person wants it! Maybe all his life he dreamed of building a house, building a log bathhouse. Well, I could do it! So, at the last moment, the attic was filled with boards, like some kind of barn? Well, just be patient and do it right so that there is candy! For the soul, for yourself!
“Disadvantage” of the slug design
This is a very conditional “disadvantage”. The point is that since the rafter system is now in fashion, no current engineering solutions have been developed for arranging a warm roof on slabs. Although such solutions are undoubtedly possible.
However, if you are interested in a roof with a “cold” attic, or a summer attic, then a slab roof is the best option. The roof in this case is better - traditionally - planked.
This is a plank roof, but it looks like steel, right? Will last for half a century 100%!
Load distribution
The special design of the roof of a house made of timber assumes the presence of not only vertical, but also lateral loads. To minimize the negative impact of vertical loads, the roof structure involves the installation of additional supports, thanks to which the weight of the roof is evenly distributed over all supporting structures. But most of all you should be wary of the impact of lateral load, due to which the walls of the log house can change their geometry. To avoid this, the upper frame is reinforced with ties made of 100x150 timber, which is cut into the opposite “extendable” wall beams using a dovetail joint. If the house is large and the design of the rafter system involves the use of racks, then the base under the roof is reinforced with beams - 150x150 beams, which are cut into the top frame of the log house perpendicular to the floor beams. The racks will subsequently rest on the beds; they most often determine the location of the internal walls of the attic.
Step-by-step calculations
The configuration and dimensions of any pitched roof are determined by the rafter frame. Slopes are laid on the edges of the rafter legs, forming a dihedral angle. They construct rafter systems from rolled metal and wood, and use industrial-made structures and lumber in construction.
Let's look at the options available for the efforts of an independent master, i.e. construction method of constructing a roof frame from lumber.
Stage #1 - choosing the type of rafter system
The method of constructing a gable roof is indirectly related to the dimensions, but without taking into account the difference in the design of structures it will be difficult to understand the geometric parameters.
Two traditional technologies are used in the construction of gable roofs:
- Layered , according to which there is a strong fulcrum at the top and bottom of the rafters. The lower support is the walls of the house, equipped with a Mauerlat. The top of the layered rafter legs rests on a purlin that forms the ridge. The purlin is supported on a support system specially constructed for it, on an internal wall or on stone gables of the box, erected before the roof structure. The layering method is mainly used when arranging large houses with an internal load-bearing wall or a number of columns.
- Hanging , according to which the tops of the rafters rest only on each other. The walls serve as support for the bottom, as in the previous case. The hanging rafter legs form an equilateral triangle, the base of which is called a tie. Taken together, such a system does not create thrust, i.e. does not transfer the bursting load to the walls of the box. Rafter triangles are installed either ready for installation, i.e. assembled on the ground, or constructed from individual rafters on site. The absence of an upper support makes adjustments to the scope of use: the hanging method is used in the arrangement of only small buildings with small spans.
Schemes of both types of rafter systems include a minimum of structural elements when covering boxes up to 8-10 m wide.
When constructing larger spans, there is a danger of deformation of the rafter legs. To prevent sagging and deflection of wooden parts made from lumber, reinforcing elements are installed: struts, contractions, side purlins, etc.
Additional parts provide rigidity and stability to a large structure, but increase the load. We have already discussed how the total load is determined and the elements of the rafter system are calculated.
Stage #2 - width calculation
Both types of wooden rafter systems are constructed on floor beams or on a mauerlat. How the roof width is calculated depends on the type of base:
- When mounted on floor beams, they form the eaves overhang, i.e. determine the dimensions of the roof.
- When installed on a Mauerlat, the width of the roof is determined by adding three values. You need to sum up the width of the box and two projections of the width of the eaves overhang. However, the calculations use only the load-bearing part of the roof width, equal to the width of the box.
The function of the Mauerlat in frame buildings is performed by the upper frame, which at the same time connects the disparate elements into a single frame. In wooden construction, the mauerlat is the upper crown, folded with timber or logs.
In the case of using the “beam” scheme of the device, so-called matrices are used - bars or logs laid under the upper crown of the foot as an overlap.
The eaves of roofs mounted on a mauerlat can be formed directly by rafter legs, fillets sewn to them or a brick protrusion. The latter option, naturally, is used when constructing brick walls. The choice of overhang width is dictated by the type of roofing and the material from which the walls are made.
Examples of recommended overhang widths:
- For slate roofing no more than 10cm;
- For bitumen shingles in the range of 30-40cm;
- For metal tiles 40-50cm;
- For profiled sheet 50cm;
- For ceramic tiles 50-60cm.
Walls made of logs and timber require enhanced protection from slanting rain, so the overhangs above them are usually increased by 10-15 cm. If the maximum width of the overhang recommended by the manufacturer is exceeded, it is necessary to take measures to strengthen it.
It is possible to install external struts on walls or support pillars, which can simultaneously play the role of structural elements of a terrace, porch, or veranda.
Stage #3 - determining the slope
The angle of inclination of the slopes is allowed to vary within wide limits, on average from 10º to 60º with permissible deviations in both directions. Traditionally, both planes of a gable roof have equal angles of inclination.
Even in asymmetrical structures for residential buildings, they are generally placed at an equal angle, and the asymmetry effect is achieved by constructing slopes of different sizes. Most often, differences in the slope of the main parts of the roof are observed during the construction of country houses and household facilities.
The procedure for determining the optimal slope of a gable roof is significantly influenced by three factors:
- The type of covering, coupled with the weight of the sheathing intended for it. The type of roofing material determines the installation technology and the method of constructing the base for its fastening. The denser the roof is, the lower the slope can be. The fewer overlaps and joints between the covering elements, the lower the roof is allowed to be. And vice versa.
- The weight of the roof together with the components of the roofing pie. A heavy coating located at an angle to the horizon presses on the base only with its projection. In short, the higher the slope, the less mass is transferred to the floor. Those. Under a heavy roof you need to build a steep roof.
- Climatic specificity of the region. A high slope facilitates the rapid removal of snow and water, which is highly desirable in areas with significant levels of precipitation. However, high slopes are very sensitive to the effects of winds that tend to overturn them. Therefore, in regions with characteristic strong winds, it is customary to build flat structures, and in areas with abundant precipitation, roofs with a high slope.
In the regulatory documentation used in calculating angles for the construction of gable roofs, there are units that can confuse home builders who are inexperienced in roofing. The simplest quantity is expressed in dimensionless units, the most understandable - in degrees.
The second version conveys the ratio of the height of the roof to half its width. To determine it, a line is drawn from the central point of the ceiling to the top of the roof triangle. A real line is drawn on the house diagram, imaginary on the site. The value is indicated either as a percentage, or in the form of a mathematical ratio such as 1: 2.5... 1: 5, etc. The percentage is trickier and more inconvenient.
Stage #4 - determining the height of the ridge
A roof with two slopes may or may not have an attic at the request of the owner. Useful spaces are not allowed in the attic spaces of gable roofs. For this purpose, there is a technology for constructing sloping roofs. However, the height of the attic used for maintenance and inspection of roofs at an angle is not arbitrary.
According to the requirements of the fire service, there must be at least 1.6 m from the top to the ceiling. The upper limit is dictated by the aesthetic beliefs of the designers. They claim that if the height of the roof is greater than the height of the box, then it seems to “press” on the building.
The height of the ridge top for hanging roofs built on beams is most easily determined by the drawing method:
- Draw a diagram of the house box to scale.
- We are looking for the middle of the upper floor.
- From the middle up we lay the axis of symmetry.
- We put half the width of the roof in any direction from the middle - we get the extreme point of the overhang.
- Using a protractor, we draw a straight line from the extreme point of the overhang at the angle recommended by the roofing manufacturer. The point of its intersection with the axis will be the top of the roof. Let's measure the distance from the top to the ceiling and get the height.
To get a complete picture, you need to draw the second slope on the diagram in a similar way. Parallel to the lines of the drawn slopes, two more lines must be drawn at a distance equal to the thickness of the rafter legs on the same scale.
If you are not satisfied with the roof configuration, you can “play” with the height on paper, changing the position of the apex point and the slope of the roof within reasonable limits. The same manipulations can be carried out in one of the drawing programs.
When drawing the outline of a roof constructed using layered technology, the thickness of the purlin beam should be taken into account. With impressive power, it will slightly shift the position of the slopes.
Craftsmen believe that calculations of the elements of the rafter system for the construction of a gable roof can generally be reduced to calculating only the cross-section of the purlin. This is the most loaded element; all the others have the right to be thinner. For example, if calculations show that a ridge girder requires 100×150mm material, then 50×150mm boards are sufficient for rafters, supports, and struts.
The process of finding the height of structures with overhangs formed by fillies is not much different from the method described. It’s just that the slope angle is drawn not from the extreme point of the overhang, but from the lower attachment point of the rafter to the mauerlat. In any case, it is better to select variations in the slope and size of the gable roof planned for construction on “paper” than on the construction site.
Stage #5 - calculation of material consumption
A normal owner thinks about the construction budget ahead of time. True, the preliminary estimate, by definition, will contain inaccuracies. The process of erecting a gable roof will impose its own adjustments on the initial calculation of the material, but it will help to find out the volume of the main expenses.
The preliminary estimate should include:
- Beam for installing a mauerlat. In residential construction, lumber with a cross-section from 100×150mm to 200×200mm is used. The footage is calculated around the perimeter of the box with a 5% margin for processing and connections. Similar material is purchased for the device of the bed, if it is designed.
- Board for making rafters. Most often, for the manufacture of rafter legs, material with a cross-section from 25×150mm to 100×150mm is used. The footage is determined by multiplying the length of the outer edge by the quantity. The material is purchased with a margin of 15-20%.
- A board or block for making struts, ties and supports with a section of 50×100, 100×100mm, depending on the project. You also need a reserve of about 10%.
- Material for sheathing. Its consumption depends on the type of finishing coating. The sheathing is constructed either solid, if bitumen shingles will be laid, or sparse for corrugated sheets, metal tiles, ordinary tiles, slate, etc.
- Rolled waterproofing, the footage of which determines the type of roof and the steepness. High roofs are covered with a waterproofing carpet only along the overhangs, ridge and in convex or concave corners. Gently sloping ones are covered with a continuous carpet.
- Finish coating. Its quantity is calculated by summing up the areas of the slopes. If there are embedded dormer windows, then their areas are also calculated. They just calculate it as a rectangle, and not in fact. The amount of stock for installation is recommended by the coating manufacturers.
- Material for cladding gables and overhangs.
- Corners, plates, screws, staples, nails. Anchors and studs are needed, their quantity will be determined by the project.
You will also need shaped elements for arranging through passages through the roof, valleys, overhangs, and ridge. The sketch of the estimate presented is valid for a cold structure. For an insulated roof, you will need to purchase insulation and a vapor barrier film, a block for the counter-batten and material for lining the roof from the inside.
Warm roof for the attic using “Norwegian” technology
In this case, the point is not in this specific technology - I won’t explain it in detail now - it’s in the principle of constructing such roofs. The general principle is the same everywhere.
As I already said, if you want to make an attic, then you will have to tinker with the slab-rafter structure of the roof. In addition, a broken mansard roof and a chopped pediment of a log house are a bad combination. If there is a log house and male tongs, then it is better to build a semi-attic.
House with a semi-attic
Let me briefly highlight the main points of the general scheme:
- We have a ledge and a ridge ledge, which is hewn in order to place boards on its hewn edges.
The sheathing is attached relatively rigidly (with nails) to the ridge beam
- We have a lower crown with a hollowed-out groove into which the boards fit (they don’t go in all the way - a good margin is left for shrinkage; that is, this sheathing will slide down).
- The boards are laid end-to-end in a checkerboard pattern so that the second layer overlaps the joints of the first, and fastened together to form a wooden shield. On top it is a continuous sheathing, on the bottom – that is, inside the house – there is an attic ceiling.
A groove in the top crown of the side wall so that the sheathing can slide when shrinking (similar to the “flow” in a traditional log house without nails, don’t you agree?)
So far, everything is very similar to a wooden roof on slats, isn’t it?
- A vapor barrier is placed on the shield.
- The rafters are placed on sliding fasteners.
- Mineral wool is laid between the rafters.
- (It’s interesting here - after all, polystyrene foam is possible! And why not? Mineral wool is not at all more environmentally friendly and not “more natural”, and for that matter - polystyrene foam is not afraid of condensation, which means there is no need for the hassle with insulation films. But for some reason more often we are talking about mineral wool in the recipes for such “pies”.)
- On top of the insulation is a waterproofing membrane.
- And this is where the meaning of the rafters comes in! Another sheathing is attached to them.
- The finishing roofing material is attached to it.
Get the basic idea: in this whole scheme, sliding rafters appeared only because it was necessary to put insulation, for example. In order to get a “warm” roof for the attic. In any other case, the roof could be laid directly on the first sheathing, or even immediately on the bottom!
This is the general principle:
For the construction of log house roofs with chopped (male) gables, if it is possible and even necessary to install powerful massive slabs, the installation of rafters is only necessary in the case of arranging an attic.
In general, you need to think creatively so as not to do bad, unnecessary work. And now many people have a strange and irrational belief that no matter what kind of roof there is, rafters are a must! But this is far from true.
A little about wooden roofing
It would seem: wooden roof? she'll rot!
This is wrong. A roof made of aspen shingles (similar materials are shingles, ploughshares), or planks can last 40-50, or even more years. An additional advantage is that such a roof is easy and cheap to repair - you only need to replace the damaged elements. In the case of a major renovation of a plank roof, only the top layer of the gorges will have to be changed; the underlay, as a rule, remains intact.
What is a plank roof? This is the first layer of hewn boards, on top of which is the second layer. Birch bark (“rock”) can be laid between them for additional insulation, waterproofing and an antiseptic effect. Birch bark has powerful antiseptic properties, and extends them to those materials that come into contact with it. There is no point in impregnating such wooden roofs with anything - the rain will quickly wash it away anyway, and there will be no special effect.
I recommend a very high-quality video about roofing in Russian wooden architecture:
As for the “warmth” of such a wooden roof, think for yourself. This, of course, is not 20 cm of some “Rockwell”, but two layers of tightly fitted wood covered with birch bark. In any case, it is warmer than bare slate, tiles, or metal tiles, etc. That is, for an attic or summer attic that is completely protected from severe cold and moisture - excellent. Yes, such a roof does not allow water to pass through. It does not need a vapor barrier (after all, it breathes, just like the walls of a log house!). Therefore, by the way, there is no need to fill a wooden roof with bitumen, or shove roofing material there, as some strange people sometimes advise. Due to such attempts at “modernization”, the roof may, on the contrary, rot – because natural ventilation will be disrupted.
Similarly, a shingle roof has the same properties.
Simple and to the point about aspen shingles:
The difference between a gorge and a regular edged board is that when cutting a log into boards, the natural structure of the wood is disrupted - the fibers are torn. During the production of planks and shingles, splitting occurs along the fibers, making these building materials better resistant to aggressive environmental influences.