Living in a wooden house, sooner or later any homeowner needs to build a wooden canopy for the house. Many people are afraid to start building a wooden canopy for their house with their own hands, thinking that this process is complicated and time-consuming. But there is nothing complicated in the arrangement of this structure.
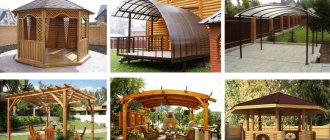
Design and decoration of a wooden canopy for the house
Let's look at several ways to attach a canopy to a building. Having understood the essence of the design, you can modify and build it yourself.
Why tree
Wood is an environmentally friendly, affordable material, reliable and safe for humans, which is the main factor why this material has been in demand for many years; it is distinguished by its warmth, naturalness, and color. These factors allow this material to add uniqueness and beauty to landscape design.
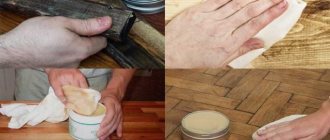
Of course, wood does not have high strength coefficients, unlike stone and iron structures. Wooden structures are subject to rot and attacks from insects and mice. But this can be avoided if you properly treat the wood with stain and fixing solutions. The varnish also has its own profound effect, and the varnished wood itself looks gorgeous.
Wooden canopy design option
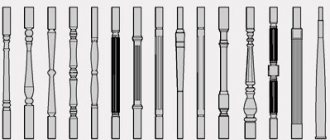
When it comes to wooden sheds, some people think that they are simple, nondescript structures. But everything will depend on the imagination, the desire of the average person to correctly draw up a project. You can decorate the designs with filigree carvings, balusters and beautiful carved elements. At the same time, take into account the image of the garden where the canopy will be located, next to the house or separately.
Important! The entire structure should look proportional and interesting. This is the only way a canopy attached to a wooden house will please you.
Materials
There are a lot of options, but the most common ones should be considered. The entire building consists of a frame and a roof.
Frame
The basis for the canopy is traditionally made of concrete, wood, metal, stone, brick. What choice will be depends on the exterior of the house. Wooden devices will be the most obvious in terms of choice: such material can be easily processed with household tools, that is, professional skills from the builder are not required. This option always looks noble, harmonious with the landscape. But you need to be prepared for the fact that a structure made of boards is afraid of external aggressive conditions.
Metal awnings are certainly no less popular. These can be ready-made, prefabricated aluminum products, which often involve a tent roof. Or they can be welded structures made of round pipes or metal profiles. Also not uncommon in this category are welded extensions made of stainless steel. These are forged awnings.
But working with metal yourself is much more difficult than working with wood. Special expensive equipment will also be required. The big enemy of a metal frame is rust, so all parts of the structure are primed, cleaned, and painted. The material also tends to quickly heat up and cool down, so it is still better to make the railings to the canopy (if a parapet is provided) made of wood.
Sheds made of concrete, brick and stone are always more massive and even outwardly more stable structures. They are planned at the moment when the idea of erecting a canopy enters the sketch phase. But more often they are built in parallel with the house, that is, the roof of the house and the canopy in this case will be the same. But if it is decided to carry out an extension with a canopy later, it would be necessary to carefully think through the foundation with a tie.
Roof
Ideally, the roof of a canopy is made like the roof of a house - the material is the same. True, it is impossible to say that this is advisable in every case. In particular, if the canopy is small and is not done at the time of construction of the house. A popular roofing option for many summer residents today is considered to be a carbonate canopy, or, to be more precise, cellular polycarbonate 6-8 mm thick. This material allows you to work quickly and organize a practical result. You can choose the color and fit into a modest budget without any problems. And for beautiful arched structures, for example, this is always a win-win option.
If it is decided to make the roof soft, you need a continuous sheathing made of plywood with moisture-resistant properties, and also, as an option, slats, edged boards, the same bars, etc.
What types of canopies are there?
They are classified according to design features, and are:
- with a gable roof;
- single-pitched;
- inclined;
- straight;
- multifaceted.
Canopies can be divided according to location:
- free-standing;
- built-in;
- attached;
Example of a canopy attached to a house - decorative.
The material can also be different:
- polycarbonate canopies;
- stone;
- brick;
- combined;
- tree.
The most popular among ordinary people is a wooden canopy. This is not surprising, since the design is very simple to implement and does not require much effort or significant costs. Such work as making a canopy can be done by almost every homeowner. The first step is the project.
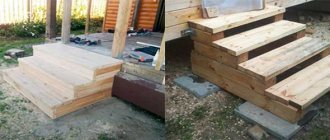
How to lay out the site
The finishing touch is the floor under the canopy.
A simple gazebo for tea drinking is suitable for wooden flooring. If there is a barbecue installed inside, it is better to choose tiles or completely concrete the area. These materials will fit perfectly under a carport made of timber for a car made of timber. To save money, the parking space is covered with gravel. Rain and melting snow will not leave puddles on such a surface; they will seep down.
In the future, you can show your imagination and decorate the timber canopy with carvings, plant climbing perennial plants, and paint the roof in a bright color. In general, make sure that the timber carport becomes a decoration of the site.
Project development
The design for the structure is mandatory, as it solves the main problems in analyzing the conditions of the structure. Especially if the device is attached to a finished building. Data about the base and wall of the house are extremely important, as are acclimatization conditions (wind load, amount of precipitation in winter, location relative to the cardinal directions in the location chosen for the construction).
Scheme with dimensions of the canopy for the house
In addition, it would not be superfluous to take care of the decorative details, types of roofing that are preferable in a particular situation, and select the roof shape and size. The more detailed the project, the easier it is to implement. Competent digital calculations will help you find out the amount of materials and mandatory construction costs. The easiest way is to build a canopy or canopy over the porch.
Installation of supports
The first thing you need to take care of is what the canopy will stand on near the wooden house. Some craftsmen advise placing a canopy on simple wooden logs and making a sheathing and roof on them. This is a possible construction option, but it may happen that after a while there will be heavy rain, and then the canopy may simply move away from the building. And if the ground is loose, then the canopy can become very skewed. Don't forget to take this into account when you design your project.
Scheme for installing canopy supports
For this reason, the canopy should only be installed on concrete supports, this will guarantee that no bad weather will harm the stability of the canopy. This will be a kind of foundation, and therefore its arrangement needs to be considered step by step.
- We start digging holes. We will not make a strip foundation, as it is very expensive. To save money, we will install a columnar round foundation. To dig holes you need a round drill 35 centimeters in diameter. The holes must be at least 50 centimeters deep - this is necessary so that the canopy does not sag over time. If you don’t have a drill at hand, you can dig holes with a bayonet shovel.
- We do reinforcement. It is worth noting that the specific gravity of the structure in this case we do not need to equip the formwork. Therefore, reinforcement can be made directly into the hole, and we use reinforcement with a cross-section of 8 mm - this is enough.
Reinforcement of a columnar foundation
Take four long rods and tie them with knitting wire at a distance of 30 centimeters from each other. We place the finished reinforcement in the holes perpendicularly. - Concreting. For a wooden canopy with your own hands, just take M200 cement and mix it 1:4, but it should not be too thick. Concrete is poured into the prepared holes.
- We are setting up the basement. It is needed to ensure that the tree does not touch the damp ground. Therefore, you need to raise the foundation by 15 centimeters; for this you need to make a small formwork from boards. This formwork must be filled with concrete and removed after three days.
After this, all that remains is to install decks with a diameter of 30 centimeters, along which the primary piping will go.
Support beam with vertical posts
Action plan:
- The markings are applied along the entire wall of the house, in the place where the beam is installed.
Drawing with dimensions for installing a canopy to the house - Use self-tapping screws to attach the beam to the wall along its entire length.
- Install a special triangular system to strengthen the beams.
Support posts can be installed in several ways:
- fasten the beam directly to the formwork;
- install the thrust bearing in the formwork, and then attach the timber to it;
- fixing the thrust bearing directly to the wooden or concrete base.
The mounting option is selected based on the specific weight of the structure. If you plan to build a small canopy, then the first method will be an excellent option. If the specific gravity is large, you need to choose the second or third option.
Installation of rafters
The rafter system requires care and precision. For rafters you need to take 150x50 mm timber. This section is taken for a span of six meters. In this case, it is necessary to take into account the specific gravity of the structure and the minimum slope. The step between the rafters should be no more than one meter. One side of the beam needs to be firmly secured to the support beam, the other is laid on the rack. The rafters must be positioned strictly perpendicular.
There are several ways to secure the rafter system:
- screw it with wood screws;
- connect using corners;
- if the wall is brick, then consoles or dowels are used;
- to the concrete surface using anchors.
The rafters should lie at the same level so that there is no distortion in the roof.
Lathing:
- You need to make markings on the rafters to cut out the grooves.
- Cut small grooves 4 cm deep.
- Insert the boards into the grooves of the supporting rafters.
- Once the sheathing is installed, you need to secure the entire system with corners.
Once the sheathing is assembled, you can begin attaching the roofing material.
Roof installation
Roofing material can be different, starting from ordinary slate and ending with polycarbonate.
The process of installing a canopy roof on a house
Let's look at how to cover a wooden canopy with the latest material. For installation, you need to prepare self-tapping screws with thermal washers, a trim profile, and connectors.
Procedure:
- cut the polycarbonate sheets so that the seams fit onto the sheathing;
- the seam should not fall on the stiffeners;
- Apply a special sealing tape to each seam at the joints of the sheets;
- drill through the polycarbonate with a drill at the points of attachment to the sheathing;
- you need to screw the polycarbonate to the sheathing through the seal;
Attaching polycarbonate sheets to the canopy frame - a connecting strip is installed at the junction of the sheets;
- A corner profile is placed on the corners.
Interesting! Some owners of houses with a canopy do not cover the roof with roofing material, but simply plant climbing plants around the canopy, growing to form a natural and beautiful awning. Video about making a wooden canopy with your own hands.
Canopy over the porch
When starting to build a wooden canopy over the porch, carefully calculate everything and make a drawing. It is necessary not only to decide on the length of the beams, but also to calculate the angle of inclination. This is necessary so that during the construction process there is no large distortion.
There are no standard sizes for this structure; you need to calculate it individually based on the size of the porch. The height of the structure should be comfortable for residents.
The tallest person should stand quietly on the porch without touching the roof. The tilt angle cannot exceed 35 degrees. Advice. If you don’t know how to make calculations, then lay out the material on the ground with which you plan to cover it, the resulting rectangle needs to be measured - this will be the size of the canopy over the porch.
Design and decoration of a wooden canopy over the porch
Tools and materials
To build a canopy over the porch with your own hands, you need the following material:
- beam 150x150 mm, for the rafter system and supports;
- a wooden block 7.5x7.5 cm for sheathing and a board 2.5 cm;
- roofing material;
- anchors, screws, staples to create a structure;
- shovel;
- nails with self-tapping screws;
- screwdriver, hacksaw;
- tape measure, paint;
- plumb line
Before starting work, prepare the site for construction, mark where the supports will be located. The ends of the beams that will be in the ground should be treated with liquid waterproofing material to prevent rotting.
Detailed description of canopy construction
Mounting the beam on the wall:
- draw a line along the level in the place where the beam will be located;
Attaching the canopy to the wall - attach the timber with anchors to the wall at the marking point, having previously cut grooves in it for the rafter system;
- if the porch is more than two meters wide, then it is advisable to mount vertical supports along the edges.
Installation of vertical supports:
- dig the supports prepared in advance to a depth of 50 cm;
- fill the holes with concrete;
- As soon as the concrete hardens, you need to cut the beam to the desired height and attach a second beam for support.
Advice. You need to try to make the roof so that the snow does not cake on it; to do this, for every 1 meter of roof length we make supports 10 centimeters below the support beam attached to the wall. Lathing:
- attach the rafters to the supports;
- the pitch between the rafter beams is 80 cm, so that the snow does not bend the roof in winter;
- fasten the rafters into a groove or onto brackets;
An example of installing canopy rafters in grooves - lay the sheathing perpendicular to the rafter beams;
- the boards must be laid so that the sheet of roofing material rests on them at the edges and in the middle.
Roof installation:
- as soon as the sheathing is ready, it needs to be treated against mold and rot;
- installation of roofing material begins from the free edge;
- secure with nails or screws;
- ready to decorate the canopy.
Foundation
The basis of the structure is the foundation. It requires a responsible attitude. A canopy made of timber is quite light; the foundation for it can be made at a point, under each of the supports.
First, measurements are taken and markings are made. The boundaries are marked with a tight rope. The number of support pillars must be equal to at least the number of corners:
- two for attached ones;
- for autonomous rectangular ones - four;
- complex shapes require more pillars.
If the building has long walls, craftsmen recommend placing pillars every 3-4 m. Then, in the places where it is planned to install the supports, holes are dug 1-1.5 m deep and about half a meter wide. Sand and gravel are poured into them in layers and carefully compacted.
Then the prepared bars are placed in the recesses and covered with gravel. For additional strength, use a solution of cement with crushed stone.
For additional protection from harmful influences, the wood is additionally wrapped with roofing felt.
Wood canopy
There is an easier option to build a canopy over the porch for the house yourself - a canopy. A simple small structure that can be simply assembled on the floor and then nailed over the porch. The shape of the visor can be different, it is described in the project:
Installing a simple wooden canopy over the porch
- Arched.
- Single-pitch.
- Curly.
- Gable.
But if you are not a master in this matter, then it is better to make a single-pitch canopy. Dimensions are calculated according to the drawing, which must be drawn up in advance. The width of the canopy should be half a meter larger than the porch. The length of the slope is 80 cm. For consoles it is better to use 7.5x7.5 cm timber, for sheathing - use thinner material, for example, 5 cm. The angle of inclination will be 30 degrees. All parts must be painted or treated with water-repellent impregnation.
The attached structure consists of 3 bars:
- vertical - needs to be fixed to the wall - this will be the basis for fastening the strut with the crossbar;
- fasten the support beam to the crossbar, the sheathing will be mounted on it;
- build a strut to support the roof.
Variant of the design of a wooden canopy
The beam support, located behind the canopy, is attached to the risers. The rafters and supports are connected to each other by slats, forming a triangle. Attached using self-tapping screws. This canopy can be covered with any roofing material.
To minimize noise from precipitation, you need to put roofing felt or insulation under the roofing sheet.
Anchors can be used to secure the structure to the wall of the building. The fasteners must be long so that they fit two-thirds into the wall - otherwise the canopy may move away from the wall. The video shows the step-by-step process of making a wooden canopy over the front door.