Craftsmen are drinking. Excuse me, they are having a intimate conversation. For one, instead of the sacramental “Vasya, do you respect me?” “Vasya, how many hands would you like for yourself?” comes out of your mouth? He thinks about it: “How much? But who knows... Well, how much work is needed there..."
Hands, of course, to hold, press, pick up, etc. Therefore, such an auxiliary tool as temporary removable clamps of various types - clamps - is always lacking for a craftsman. There wasn’t enough at a time when these same clamps cost a penny. Nowadays they can charge more than 1000 rubles for a good clamp. Despite the fact that now even in small piece production, power tools, electric and gas welding, pressure gluing and other technologies that require reliable holding of parts during the working process are widespread. The purpose of this article is to tell the reader how to make a clamp with your own hands at home. Preferably - from scrap materials with minimal need for welding and turning work.
Note : in English, a clamp is cramp (screw), bar clamp (spring-lever) or simply clamp, similar to how a screwdriver (screw driver) is often called simply screw. A person who knows spoken English well, but is unfamiliar with the technical features (these are very different languages), hearing something like “Give me screw driver,” most likely will not understand what they want from him. Moreover, poorly educated English-language articles are most often “swallowed.” If you happen to find yourself in a similar situation, listen: “the screw” means a tool, and “a screw” means some kind of threaded hardware (screw, screw) that is twisted with it.
Varieties
The purpose of this publication is not to build something like an encyclopedia of mounting clamps - there are many types of them, and there are even more patents for new, “super-super” ones. Our task is to show which clamps are most needed in a home workshop, and how best to make a clamp without wasting a lot of material and time.
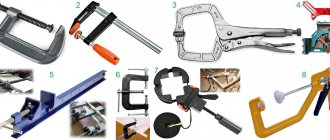
The most common types of clamps in handicraft production are shown in Fig:
- G-shaped (G-cramp; G-clamp) is the most reliable, reliable and cheapest of the general-purpose clamps. Disadvantages: it takes a long time to tighten and can turn the parts being glued if the stop hinge is of poor quality or not maintained. The latter is quite important: an adhesive layer that has not set is a good lubricant, but it is undesirable to separate and recompress the surfaces being glued together, as the strength of the dried joint decreases sharply. In addition, a regular G-clamp does not hold round parts well, so a special pipe clamp is used to secure pipes or a round profile for welding or butt soldering (see next figure). Assembled from ordinary structural steel s=(2.5-4) mm, such a welded clamp provides reliable fixation of pipes up to d(120-150)x(1.5-4) mm.
Clamp for welding and butt soldering of pipes - F-shaped (F-cramp). Quick-clamping, operates on the principle of jamming the sliding stop in the dead center position. Pressure until it is firmly secured is most often provided by a screw clamp, as in a G-shaped clamp. An even “softer” and faster clamping, but less reliable, is provided by a trigger-eccentric clamping mechanism, see below. The most versatile and widespread of the clamps. The main disadvantage is that due to vibrations and shocks during operation, it can self-unclip and release. Or, on the contrary, it jams tightly, and when wedged with a hammer blow (see below), either the clamp or the part “shoots out”. It is not suitable for adaptation to butt welding of pipes: the jaws are driven by indirect heating and the pipe joint moves apart.
- C-shaped (C-clamp, fixing tongs). A fairly narrowly specialized tool. The main purpose is to compress the parts to be glued. Simple C-clamps are made with a spring clamp. The trigger-lever clamp allows you to precisely set the clamping force.
- Angle clamps for welding linear parts (pipes, profiles) at a given angle. There is no completely established special Anglo-American term. The most commonly used are welding clamp and dead-lock clamp.
- Joiner's bench - a carpentry clamp for joining panels from boards, slats and beams, assembling units from shaped parts (for example, railings with balusters). On the trail. rice. a rail clamp is shown; There are also rack and pipe ones, see below. Please note that pipe clamps are sold under the name “pipe clamp”, and clamps for end-to-end welding/soldering of round timber should be searched for under the query “welded clamp”.
- E-shaped (E-clamp). A highly specialized tool for edging carpentry with glue. If you need to carefully glue an edge on existing valuable furniture/interior design, it is difficult to do without an E-clamp.
- O-shaped or tape, or crimp grip (loop stay, loop brace). Band clamps are most often used by virtuoso carpenters and furniture makers-restorers. If you can fetch up to $1000 or more for a well-restored antique Viennese chair, then for a slightly skewed or wobbly chair they will fetch, at best, 15-20 of the same ones. Making a frame for a large painting or photograph without a tape clamp is also not so easy.
- Lever-plunger (precision clamp). When the trigger is pressed, the plunger (pusher) with the clamping stop moves smoothly forward. The trigger is released - the plunger is fixed by a spring-loaded slide, which becomes in the dead center position. Pressing again releases the slide and further advances the plunger. A good lever-plunger clamp can securely clamp a chicken egg without damaging its shell. In a home workshop, such precision clamping is unlikely to be needed, but suddenly a good precision clamp can be obtained from a mounting gun for tubes with silicone, etc. viscous compounds. A fixed jaw can be easily installed into the opening (window) for the neck of the tube, and a movable one is mounted on the rod instead of the standard pusher. If necessary, both can be removed and the tool can be used for its intended purpose.
Manufacturers of clamps
One of the important criteria for choosing tools is the reputation of the manufacturer. We have selected brands whose products you can trust:
- Gross is a manufacturer that is part of the Russian concern “World of Instrument”. Offers high-tech products made at a professional level. The company's catalog has a large selection of carpentry, plumbing, measuring and other tools.
- Zubr is a company that appeared only in 2005, but has already established itself thanks to its high-quality, reliable products. The brand's equipment can be trusted with the most complex tasks.
- Kraftool is a German manufacturer of professional construction tools for various tasks. The company's products are famous for their ergonomics, stylish design, and durability.
- Fit or Finch Industrial Tools is a Canadian company that produces hand and power tools for professional or home use. The brand was born in 1996, today it is one of the largest players in the global market.
- Stanley is a brand known since 1843. The American manufacturer quickly gained recognition due to the high quality of its products. This logo sells reliable manual or electric construction equipment made from durable materials, which are distinguished by well-thought-out ergonomics and high performance.
- Cobalt is a Russian brand that makes assembly and plumbing equipment. The company follows three main principles: reliability, ergonomics, optimal price.
- Matrix is a German manufacturer whose product range includes more than 3,000 items. Here you can find everything from fasteners to plumbing equipment or automotive tools.
- Sparta - produces accessories for home or car repairs. They are known for their low prices and are in demand among thrifty buyers who do not often resort to construction work.
- Santool is a company that has been selling hand-held construction tools since 2004. The main advantage of its products is a reasonable combination of price and quality. The brand's products are intended for personal use, but are also in demand in small workshops.
- Sibrtech is a brand that makes a simple, reliable, inexpensive tool. The name combines two words – Siberia and Technology. Laconic design and the absence of unnecessary bells and whistles are the main differences between the brand’s products. Sibrtech products are designed to help with home or car repairs.
How to do which
Any of the clamps described above can be made independently in a home workshop. Carpentry clamps are made of metal - the wooden frame and jaws of the tool will not withstand the back pressure of the material of the part(s), the clamp will weaken during operation, and the clamp itself will become unusable. With welded and soldered clamps it’s already clear: only metal; wood is a flammable material.
Carpentry clamps for working with valuable wood or products are best made of wood, but you can also use metal ones with spacers made of plywood or even shingles. It is better to use wooden clamps for gluing into a layer (on thick workpieces from several thin ones), even if metal or plastic is being glued - wooden jaws provide a more uniform distribution of pressure over the plane and, accordingly, better gluing quality. Fragile parts (glass, etc.) are compressed for gluing only with wooden clamps.
Wooden clamp for screed
One of the most accessible and inexpensive examples to make yourself. It is easy to do and easy to use. For its production, maple or pine planks are taken. Their minimum width can be 5 cm, thickness not less than 0.6 cm. A metal rod with four nuts is used as a lock. To make a handle, you will need any hardwood that does not have visible external defects. The moving part is completely dried and can easily be moved along the metal rod.
At the ends of the rod there are two nuts that are tightened to prevent divergence. You can use a simple locking nut, as well as the original nut with a stationary lock. Additionally, two more nuts and washers are screwed on both sides. These nuts lock each other. Be sure to leave an opening for the rotating pin.
G-shaped
The frames of factory-produced G-clamps are cast. It is impossible to organize a steel foundry in a garage or barn, even in a forge on your own property. Since G-clamps, being the most “graspy” ones, are used mainly in metalworking and welding work with rather long and/or heavy parts, a homemade G-shaped clamp must be made of welded or solid metal.
Craftsmen often weld themselves clamps from sheet steel, pos. 1 in Fig.:
Homemade G-Clamps
Apparently, copying the profile of the frames of factory products, which in this case is incorrect. Profiles of cast frames of clamps are shown in pos. 2. Pay attention to the fairings and fillets (shown by arrows). Smoothing the profile is necessary to avoid the concentration of mechanical stress: they “love” corners and crevices, like bed bugs. But the weld does not work like a fillet! No, the clamp most likely will not break or bend. However, the recoil of the clamped part will move the frame a little, and it will be difficult to achieve precise fixation, and it is possible that the part may rotate when the clamp is tightened.
Homemade clamps made from channel sections are quite reliable (item 3). Disadvantages: labor-intensive, disproportionately heavy compared to the working width. You can cut a channel into clamp frames if you need to compress the parts very tightly. The best option for clamp frames for normal work is made from a square profile pipe, pos. 4. Depending on the size and wall thickness of the workpiece, clamps from corrugated pipe can be made for a working width of up to 1 m or more, see video:
Video: clamps from a profile pipe
Note: for the manufacture of the most important unit of the G-clamp - the screw clamp - see the end, since it is also used in other types of clamps.
G.E.
A type of G-clamp is a clamping one, which could roughly be called a GE-clamp. Clamps are well known to builders of small wooden boats, but they will also be very useful in small wooden construction (for example, a country or frame house, outbuilding, etc.).
Drawings of the clamping clamp and the method of their use are shown in the figure:
Drawings and procedure for using clamping clamps
For example, when sewing, say, a crossbar (truss structure) of a roof, each subsequent board is first pressed tightly against the previous one, and then attached to the rafter beams. Accordingly, the reliability and durability of the entire roofing pie are greatly increased.
Types of clamps by design
According to the design, among all existing clamps there are several types:
1. Cabinet.
In this case, the tool is used to fix the elements being processed on oblique and parallel planes. The clamping force is provided by the body of the clamp, which explains the name of this type. This device looks like two metal rectangular beams, fastened on one side with a strong strip. One bar is fixedly attached to the bar, while the second is equipped with a tightening screw, due to which it can move freely. The opposite part of the bars represents the lips.
To clamp parts, metal bars are brought all the way into the workpiece and the screw, which is equipped with a convenient handle, is tightened. This model is used most often by craftsmen.
2. Magnetic.
This model is usually used in the welding process, since it allows you to pre-fix a pair of metal workpieces, for example, tubes, profile angles, etc.
Such a clamp may look like an isosceles right triangle, pentagon or hexagon. The edges of the clamp are equipped with magnetic inserts, thanks to which the metal elements are fixed.
3. Screw.
This is a fairly common type of auxiliary tool, which has different designs, but the main clamping force is always achieved by a screw with a handle and a heel. The model may look like a body clamp, where the clamping screw passes through the block, and the nickel acts as a lip. It is also possible to manufacture a body in the form of a G or “P” type clamp, where a clamping screw with a coin passes through one of the “legs”.
Forged screw clamps are often found, for the manufacture of which tool steel is used. The fact is that after forging and hardening, the metal is characterized by increased strength, which means that the tool made from it is the most reliable.
We recommend articles on metalworking
- Steel grades: classification and interpretation
- Aluminum grades and areas of their application
- Defects in metal products: causes and search methods
4. With ratchet.
Outwardly, this type most closely resembles a large clothespin. The device is clamped by hand, and opening the lips becomes impossible due to the ratchet mechanism. The clamp can be loosened using the pawl lever or button provided for this purpose.
5. Hydraulic.
This clamp, like a screw clamp, has a G-shaped body. The difference is that the screw of this type is replaced by a device similar to a jack, the rod of which has a nickel on it.
6. Vacuum.
This tool is a frame on which vacuum suction cups with built-in hand pumps are installed parallel to each other.
A similar model is necessary for positioning two flat parts in the same plane, for example, a pair of MDF sheets or metal.
7. Trigger.
This type is also known as quick-clamping. This is an F-type clamp, where one jaw is fixedly fixed on a metal bar, and the second is equipped with a handle like a pistol, with a lever reminiscent of a weapon trigger, and a special lock flag. If the flag is turned to the position in which the tool is unlocked, the movable lip can easily move along the bar.
Otherwise, you can press the parts by pressing the lever. Moving the lip in the opposite direction is impossible due to the locking mechanism. Generally speaking, this tool is very similar in principle to sealant guns.
F-shaped
The device of the F-clamp, so to speak, in its entirety, is shown in the following. rice.:
F-clamp device
During use, the shoe is moved along the guide until the heel touches the part. Then with your thumb you move the pawl or press it (depending on the design of the latch), and the shoe becomes wedged on the guide. Then the part is pressed by turning the handle of the screw clamp, or by retracting the trigger of the eccentric clamp. Unfastening and unclenching - in reverse order.
There is no particular point in installing a complex locking mechanism in a homemade F-clamp. Then, to jam the shoe, press on its inner butt, or lightly hit it with a light hammer if the clamp is powerful and wide-grip. As a rule, the slide self-weeds itself when the screw is unclamped or the trigger is thrown into the socket. If the shoe is jammed, wedge it with a light blow to the outer butt from the side of the stop (in the direction opposite to the jamming one).
Left on the trail. rice. Drawings of a quick-release F-clamp with wooden jaws are given. In the center is the appearance of the tool, and on the right is the procedure for using it. Dimensions are converted from inch; they may be rounded to the nearest whole mm.
Drawings, appearance and procedure for using an F-clamp with wooden jaws
The main purpose of this clamp is clamping when gluing into a layer. The preferred sponge material is maple, elm, hornbeam, beech, oak or other wood that combines high strength and toughness; For example, the thrust combs of jointing and copying machines for wood are made from such wood. For other options for homemade quick-release clamps, see the video selection:
Video: homemade F-shaped clamp
Video: eccentric clamp
Video: quick clamp - DIY clamp
Types of clamps
The use of different types of carpentry clamps is determined by what problems it will solve. There are several types of clamps, which have major differences in size, function and shape.
The most versatile option is the G-clamp. It is lightweight, easy to use and provides high clamping force. Their main advantage is the absence of backlash in the jaws. The disadvantage is that they can only connect workpieces that are small in thickness.
Other clamp options available for use include:
- F-shaped. They consist of a movable bracket that can slide along the guides. Fixation is carried out with a screw, and the jaws additionally have protection in the form of pads. This way the surface will remain intact and unharmed.
- The end ones consist of a cast frame with three clamping screws. This T-shaped design helps secure edges and ends. The disadvantages include the fact that it is not always convenient to use such a clamp alone; sometimes the help of someone else is necessary.
- Corner clamps are bodies on which there are clamping heels and 1-2 screw clamps. Allows you to securely fasten the workpiece at a right angle. The disadvantages include the limited ability to work with large wooden elements.
- Automatic clamps (another name is quick-release) consist of an iron bar and two jaws, one of which is movable and the other is fixed. Clamping occurs using a lever mechanism. The advantage of this type is lightness and strength, as they are made from a plastic composite mixed with fiberglass.
- Clamping ones work like clothespins, they are convenient and light, but at the same time have a small gripping depth. Used for gluing and securing oversized parts.
- Tape. Such clamps are a clamp made of dense and durable synthetic fabric, as well as a block that allows you to tighten it. Often, special plastic elements are sold in the kit, allowing you to adjust the corners. With their help, you can carefully fix the product without distortions.
Each of the proposed clamp options differs in cost. If you have to simply fix the same type of materials, you can easily limit yourself to purchasing more universal clamps. However, clamps or band clamps may be needed to solve specific problems.
Also, according to the clamping method, clamps are divided into traditional and quick-clamping.
Corner welds
The corner clamp for welding work must be entirely metal. High accuracy of fixation of parts and stability (stability) of their positioning are not required in this case: welding is not a precision work, and a couple of clamps are enough so that the clamp can be removed and welded without it. But the clamp must be applied (or inserted into it) on round and profile pipes, as well as on solid profiled long pieces. A “gentle” clamp is also useless.
Based on these considerations, the best material for the frame of a welding clamp is a steel angle with a thickness of 3 mm, pos. And in the figure:
Angle clamps for welding and soldering work on metal
Closing the corner into a triangle with a transverse tie will greatly increase the strength of the clamp, and by adding a couple more clamps to the crossbar, we get a clamp for welding at angles of 90 and 45 degrees, pos. B. The clamps are definitely screw: the eccentric, firstly, will not hold a heavy length; secondly, from heating during operation it can simply deteriorate.
Wooden and steel clamp
It is also shaped like the letter F. Its key difference is the use of metal parts. The durability and strength of the metal plays an important role in this case. The most difficult part is the plate itself, into which the bar will later be inserted. Several holes need to be drilled. When finished, you can clean the metal using a grinder. The plate must move easily on this plate. A gap is drilled at the opposite end of the plate, which should match the thread of the screw stud.
The end should be made at an angle to fully match the cutouts. This is done easily by grinding on a machine. How to make the remaining parts was discussed above.
Carpenter's pliers
Wooden temporary clamps are used in carpentry as widely as steel ones in plumbing and welding. Due to the characteristics of the main structural material, carpentry clamps are made almost exclusively C-shaped (pincer clamps).
The most powerful of the carpentry clamping devices is the alligator clamp, pos. 1 in Fig.:
Types of carpentry clamps
Sponges made of oak, elm, beech, hornbeam, walnut. Threaded pairs – from M12. Clamping parts with a crocodile is a troublesome task, so instead they often use an articulated screw C-clamp, pos. 2. Its “jaws” can be glued from plywood, and only the lining (“lips”) can be glued from durable wood. Instead of a shaped nut, it is possible to use a regular hexagonal nut, pressing it into the handle in a vice; in this case, the handle should be made of maple, beech or elm; oak may split when pressed.
Alligator clamps are used to securely hold fairly large and heavy parts. When gluing, you don’t need a strong clamp, but you need a lot of clamps, at least 3-4 per 1 linear meter. m glue joint. Therefore, carpentry clamps for gluing are most often made of plywood. Each “jaw” is glued together from 3 or another odd number of layers. In one of the “jaws” with a protrusion there will be a middle layer, and in the opposite one there will be two outer ones; In this way, and with the help of a steel pin, a hinge is formed. The clamp is spring (pos. 3 in the figure), and made from available elastic materials, pos. 4.
Cutting out and adjusting blanks of plywood crocodile clamps is a labor-intensive task, but the modern craftsman has at his disposal an excellent substitute - cuttings of large-diameter PVC pipes. A split ring made of pipe, a pair of wooden sticks, the same number of pieces of garden hose, and a clamp for pressing when gluing is ready, pos. 5. Cheap and cheerful. For more information about wooden clamps, see the videos:
Video: DIY wooden clamps
For the second, we advise you to go to YouTube and read the comments, there are tips on the case.
The principle of operation of the clamp
When a specialist works with wooden and metal workpieces and needs to fix the product for precise processing. This can be done using clamps. Ancient models allowed it to be fixed with one hand, modern models free both hands of the master. Not only are they quick-release, but at the same time they allow you to use both hands. The following types of clamps are known:
- Assembly.
- Manual.
- Angular.
- Screw.
- Lever.
Lever clamps are based not only on the worm-screw principle of operation, but also on the lever mechanism. They are also called clamps. They make it possible to accurately and instantly fix the part. The use of enormous force is not required here; all the main work is done by levers. These clamps have a very simple design, so you can make them yourself at home. This principle of operation allows not only to fasten the part, but also to calculate the compressive force. This is important, for example, when gluing. Other types of clamps differ only in the method of fastening the parts.
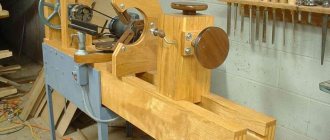
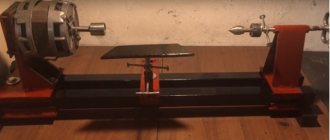
Vayms
Boards/slats/beams were assembled into shields by the carpenters of Ancient Egypt; By the way, they already knew a wood lathe. But if you look through carpentry manuals and promotional materials from 100-120 years ago, you will find that back then furniture for the poor was made from wood of a quality that would be elite in today’s times. And then, in orders for production (piece by piece) it is stipulated “as the material arrives.” This is the first. Secondly, tastes have changed. Today's ones make us remember the Rococo era - our contemporaries prefer something “natural”, pretentious; if possible - unique. Both circumstances could not but affect the designs of clamps - special carpentry clamps for gluing long lumber along the edges, which is bonding.
If you want to make, for example, a simple kitchen stool “like grandma’s”, and you have straight-layered boards for this, without knots or strands, then it is quite possible to get by with traditional homemade rim, pos. 1 and 2 in Fig.
Archaic (traditional) and modern vaymes
But if you are planning to build a shield like the one in Fig. 3 (and it’s beautiful, after all), then the clamping force will be needed an order of magnitude greater - after all, now the boards need to not only be pressed, but literally pressed into each other, and so that the entire assembly does not swell or turn out.
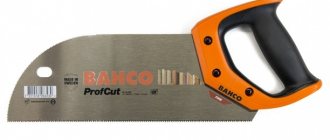
It is precisely this kind of unification that is carried out by modern Vimes. The rail clamp mentioned at the beginning is an expensive pleasure, and at least 5-6 of them are needed for a tabletop panel. Unfortunately, there is no equivalent homemade equivalent, but pipe and rack wedge stops (item 3) are sold and rented at reasonable prices. A sufficiently powerful rack wedge can be assembled on a section of steel profile pipe, pos. 4. If you need to quickly glue a couple of small boards into an edge, then a mini-frame for this can be built from an unusable hacksaw for metal, see next. rice.
Mini-weapon from a hacksaw
For other designs of homemade weims, see the story:
Video: do-it-yourself wires
The best quick-release clamps
Quick-release clamps allow you to fix or release a part with one hand, which is especially convenient when carrying out work at height. VyborExpert specialists studied the proposals of manufacturers in this segment, among which they selected the three best.
Gross 20717
One of the best carpentry quick clamps. The body is made entirely of metal, the trigger is made of dense impact-resistant plastic. The tire is made of cold drawn steel. The ratchet mechanism can be easily adjusted with one hand. Installation into the working position or exit from it takes a couple of seconds. The tool is fixed securely.
The model is suitable for quickly clamping and holding parts up to 10 cm thick. The locking mechanism creates a force of 1200 N. The pressure jaw has a rubber pad that protects the surface being processed from damage. It is better to immediately place it on the glue so as not to lose the lining during use.
Advantages
- The workpiece does not move;
- Reliable materials;
- Deep grip;
- Good ergonomics.
Flaws
- The price is above average (from 1700 rubles);
- Inconvenient for tight spaces.
It is not always possible to secure products in narrow places, since movement of the handle requires movement. But such situations happen infrequently, and they do not affect the quality of the device itself from Gross.
Bison 32246-210
Reliable compact quick-release clamp. The high-tech nylon construction is durable and additionally reinforced with fiberglass. The device is suitable for quickly fixing parts with a diameter of up to 7.7 cm. Movable elastomer jaws do not get dirty and do not damage the object being clamped. They reliably fix even uneven products. The two-component handles are ergonomic, fit well in the hand and do not slip out.
Advantages
- Low price (about 500 rubles);
- Hardened spring;
- Convenient to work with one hand;
- Available in most stores;
- Light weight (150 g).
Flaws
- Your hands get tired quickly.
A powerful spring in the design is both a plus and a minus. It securely holds the clamped element. But due to the fact that you hold the tool with one hand, it is not very convenient to work for a long time.
Kraftool 32019-75-300
Reliable F-shaped tool for fast, reliable crimping of products during welding work. The metal case without plastic inserts ensures high strength of the device and allows it to work at extremely high temperatures. Thanks to the clamping width of 30 cm, the design grips thick boards, metal or plastic objects.
Fastening and releasing parts from the clamp occurs faster than with conventional screw models. The workpieces are securely and quickly fixed and do not move due to vibrations. It is convenient to operate the tool with one hand.
Advantages
- Strong clamp;
- Thick, comfortable handle;
- Clamp depth – 7.5 cm;
- Convenient ratchet mechanism.
Flaws
- Expensive (from 2300 rubles).
Kraftool is an excellent quick-release clamp that does not deform during use. The only thing that stops many from buying it is the high price.
Crimping grip
Band crimp clamps (crimp clamps, O-clamps) are rarely used by home craftsmen. But it’s not a technological circumstance that makes me remember them: 3,000 rubles. For a branded one it's still cheap. Meanwhile, an O-clamp that is no worse can be made with your own hands.
For this you will first need a flat textile sling and 4 swivels for it. The corner clamp, jaw and screw clamp slide are made of wood and fiberboard, on the left in Fig. The procedure for use has some peculiarities (by the way, the same applies to the most expensive branded ones).
Homemade crimping clamp for furniture and carpentry work
Let's say we need to assemble a series of identical photo frames. If they are different, the tool will have to be retooled for each. If not, then:
- The product parts are initially assembled dry, without glue.
- Lay it out on a plaz (flat plane) and use the marks on it to set 90 degree angles.
- Loop the slings and place the clamps in the corners.
- By moving the swivels, we achieve a weak, uniform tension on the branches of the sling (on the right in the figure).
- Gradually tighten the clamp, watching the corners of the product.
- If one of the corners diverges, then you need to apply a little sling in its direction, pulling it through the sotv. swivels.
- The adjustment of the crimping clamp is considered complete if it is possible to use a clamp to bring all the corner gaps “into a thread” - there is no need to turn the screw any more.
Now, if a series of products is being made, after gluing one screw, the screw is loosened, the next one is inserted (with glue in the corners), the clamp is tightened “to the threads,” etc.
Rating of clamps
The choice of tool depends primarily on the tasks facing the user. Clamps vary in speed, principle of operation, shape, width or depth of grip. When compiling the rating, the VyborExpert team studied the characteristics of models offered on the market, reviews of professionals, opinions of builders, and customer reviews. When comparing products and adding them to the TOP of the best, the following criteria were taken into account:
- Method, clamping power;
- Speed of work;
- Material, build quality;
- Equipment;
- Functional;
- Weight;
- Availability in stores.
It is also important to check corrosion protection in models. Coating with powder paint or varnish will protect it from rust, preserve its appearance, and also extend the life of the device.
The best glass cutters
Screw clamp
The most unpleasant thing when using a clamp is if the washer (heel) gets stuck on the hinge and begins to rotate the part. The clamp then has to be removed and reinstalled, and the small part may break.
To avoid such a situation, the heels of factory-made clamps are placed on a ball stop, on the left in the figure:
Designs of screw clamps of clamps
Making it yourself is unrealistic: in addition to precision turning, you also need metal that combines high strength and toughness. Therefore, the clamping units of homemade clamps are most often made with cup-shaped ones under a screw with a washer (drawings on the right there). Such a clamp requires regular maintenance: the heel is rinsed in kerosene 2-3 times until the dregs of worn metal cease to stand out. Then add 2-3 drops of spindle, watch oil, etc. to the junction of the heel and the screw. liquid lubricant.
About carving
Threaded pairs of factory clamps, as you know, have a special thread - rectangular or trapezoidal with an increased pitch. A DIYer will most likely have to use a piece of threaded rod and a regular nut with a metric rolled thread. To prevent the clamp from jamming, you must, firstly, go through the nut with a second tap, respectively. standard size. If the thread is larger than M12, then use the second and third taps sequentially. The rod is similarly passed through with a die 2-3 times until the die (the die) starts to “run” freely along the thread when struck with a finger on the carrier of the driver. Secondly, the threaded pair must also be regularly wiped with a rag with kerosene and lubricated with any grease for machines and mechanisms.
Note : if a nut is welded onto the frame of a metal clamp, then the thread in it actually has to be cut anew - the original thread is strongly influenced by welding.
In conclusion, we give a video overview of various designs of clamping washers for homemade clamps:
Types of clamps by structural features
Due to differences in design, different types of clamps make it possible to effectively fix parts made of a wide variety of materials of specific shapes and sizes at certain angles. Some of these tools are designed for welding work, others can simplify the carpenter’s task, and others cannot be avoided when gluing flat parts end-to-end.
Today you can find many different clamps on sale, including subway clamps, but it’s worth mentioning the closing model, because it occupies a separate place among all types of this auxiliary tool. In fact, we are talking not so much about an additional device, but about an independent installation element. It is used to attach the mounting profile to I-beams when holes need to be drilled.
From the point of view of structural features, the following types of clamps are distinguished:
- G-shaped.
An excellent option for working with metal. Since this model is forged and made from tool steel, it boasts high strength and is suitable for temporarily holding together multiple metal parts. Due to the fine thread pitch, good clamping is achieved without backlash, so working with workpieces is greatly simplified and periodic tightening is not required.
These clamps allow you to glue parts, press sheets of metal together for welding, and secure a flat element of a product while processing with a grinder or file. It is important that fixing the workpieces does not require much effort from the specialist.
- End
In its design, this model is close to type G clamps. It has a cast or forged body, three screw clamps with heels located at right angles to each other. This device is excellent for working with wood, as it allows you to achieve good adhesion of surfaces and their mutual fixation. For this reason, end clamps are most often used by woodworkers when gluing trim to the ends of furniture.
However, there are also some disadvantages here, for example, some inconvenience of use caused by the fact that you have to simultaneously hold the adjustment, tighten the screws and hold the clamp.
- T-shaped.
The main difference between this clamp and all the others is the presence of a guide profile in the form of the letter “T”. Its length in some models is more than a meter. Movable lips are fixed to the profile, and the clamp is provided by a screw with a handle, which is connected to the second lip. This clamp is suitable for securing sectional workpieces and is the most suitable tool for installing window frames and making furniture.
- F-shaped.
This design is less reliable than the already described G-shaped type of clamp fastening. Despite this, this clamp is used very often, as it has a wide range of adjustments. At one end of the metal rail there is a fixed lip, and at the other there is a lip with free movement, and a clamping screw with a washer (nickel) is also installed on it.
If adjustment of the sliding frame is required, the tool is completely released from the load. To clamp the parts, the screw foot is pulled tightly to their surface and the screw is tightened. In this way, the angle of the bracket changes, the latter becomes motionless, and reliable fixation is ensured.
The length of the slats depends on the model and often reaches several tens of centimeters. In this way, it is possible to fasten several parts, but only on the condition that their total width does not exceed the length of the given strip.
A similar device can often be found in a carpentry workshop, however, specialists usually give preference to other types, since F-shaped models have to be worked with two hands at once, which is not always convenient.
- Tape.
An excellent auxiliary tool for carpenters and coopers. Such a narrow specialization is easily explained: this type of design includes a tension mechanism and a rigid tape or belt, which allows for uniform distribution of the load over the entire surface of the attracted elements. A similar clamp is most often used in the manufacture of wooden barrels (during fixing rivets), assembling round chairs and frames.
- Pipe.
The main element of this design is a tube with a fixed lip. The second lip is not fixed and moves along the pipe. To fix it, a special stopper is used, and a screw with a handle is used to tighten the workpieces. This model is suitable for more convenient gluing of large panels in the production of countertops and doors. Typically, at least a pair of such clamps are used simultaneously, and they are installed on opposite sides of the boards. In this way, it is possible to align the workpieces and securely secure their elements.
It is impossible not to mention the rather large length of this model, which causes certain difficulties in operation. Therefore, although this tool is indispensable when assembling panels, it has to be abandoned when you need to fix small parts on the tabletop.
This type of clamp is usually attached to standard steel water pipes. This is very convenient: if you need to glue a very wide shield, all that remains is to replace the tube of the factory tool with a longer one.
- Spring.
The main advantage of this type of clamp is that it can be used even with one hand. The design of this clip is similar to a large clothespin. Let's say right away that this is the least reliable of all the options, since the parts are pressed by an ordinary spring.
In other words, it is not possible to regulate the clamping force. The elasticity of the spring gradually decreases, which means the pressure exerted on the workpiece decreases. This design also has one more significant disadvantage, namely, a small grip. Therefore, this type of clamp is usually used in cases where large clamping force is not required.
- Pistol type clamps.
Professionals value automatic clamps for their ease of use. This type of model looks like a metal bar with a removable fixed lip installed on one side. At the other end there is a movable lip equipped with a trigger, that is, a special mechanism with two handles. To tighten a trigger-type clamp, you need to squeeze the handles - according to the principle of operation, it resembles a pistol, which is what the name of this model is associated with.
With the help of clamps of this type, it is possible to fix workpieces with one hand and at the same time provide considerable clamping force. In addition, you can use a similar clamp as a spacer if you turn the lips in the opposite direction. This versatility makes this clamp very popular. However, you need to understand that the mechanism gradually wears out, which is why the level of maximum force for compression and expansion drops.
If you want to use automatic models in your workshop, we recommend that you pay attention to those that allow rearrangement of the lips. Then you will have the opportunity to both pull the products together and push them apart. In other words, you will be able to disassemble tenon joints and perform specific complex gluing.
- Angular.
These clamps have a special design, so they are always easy to recognize against the background of other models. This type of clamp can be magnetic or screw. The second option is only suitable for connecting boards or wooden blocks at right angles.
An angle of 90° is achieved thanks to a powerful cast body with a pair of protruding heels. Usually only one screw is used for clamping. Not only does this design allow you to set an even angle, the through holes provided in its main part make it possible to attach this tool to a work table or workbench.
If you need to fix metal pipes, corners or profiles at right angles, choose a corner magnetic clamp. This type of model is an isosceles right triangle with magnets on its sides. This clamp does an excellent job of pre-fixing metal parts, allowing you to accurately maintain the angle between them.
Clamp in the shape of the letter F
These options can be either metal or wood, and in their shape they are similar to calipers. It’s still not difficult to make such a clamp. It is recommended to use durable wood or metal as the material.
It is necessary to make small cuts in the rail so that moving parts can be fixed. Your workpieces are secured using a holder that is adjustable thanks to nuts. If the holder is loosened, the workpiece can be easily removed from the clamp.
Note!
Do-it-yourself compressor: selection of materials and tools for assembly at home + step-by-step instructions for making and assembling yourselfHomemade products for the garage with your own hands: options for products for arranging a garage, detailed diagrams and drawings for creating with your own hands
Do-it-yourself press - design features, choice of manufacturing materials. Step-by-step instructions for making it yourself + simple diagrams and drawings