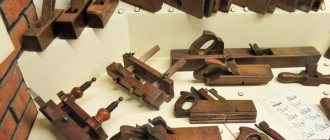
The abundance of carpentry and carpentry tools can sometimes be confusing. For example, if you compare a chisel and a chisel, it may seem that the tools are the same and there is no point in buying both. This is a big mistake: a chisel and a chisel are very different and cannot fully replace each other. To choose the right tool, it is worth understanding the difference between a chisel and a chisel and which is better to use for specific work.
Source vergleichen.de
Description of the tool
To perform a number of works, both carpentry and carpentry, it is often necessary to make rectangular or square holes in solid wood. With round through or blind holes everything is clear - a drill and a drill of the required diameter are enough. But with such non-standard holes, a chisel is used - a tool designed for chiselling work.
Primitively, it can be imagined as a metal rod with one sharply sharpened end. But this is only a schematic representation; in fact, the chisel looks a little different, its rod has a complex shape, with a sharpened blade and a powerful wooden handle. At the base of the structure lies a rectangular or square steel bar. The working edge is a beveled edge at an angle of 25-30 degrees. The other end usually takes the shape of a pike during forging - a wooden handle is put on it. A solid wooden handle is made of hard wood, but given that it is the handle that will be hit by a mallet or hammer, the material chosen is durable and tough, such as beech or oak.
A carpenter's chisel can have a different blade size; its main difference from other tools is that the blade has the same cross-section along its entire length. This is due to the fact that it is used for rough processing of workpieces, while the main work consists of chiseling wood across the grain. It looks massive due to the large handle and blade. Its secret is the metal from which the blade is forged. It is difficult to make it at home without blacksmithing skills. The metal used must be durable, hold an edge for a long time and not be afraid of shock loads.
What features do chisels have?
All versions of the tool in question are designed for hollowing out metal, brick, concrete, wood or other material. The working part is made in a square or rectangular form.
It is worth considering the fact that the handle can be removable or non-removable. For the removable version, you can purchase a variety of attachments. In addition, there is a tool that acts as an attachment for a hammer drill. The peculiarity lies in the special shape of the shank, which ensures reliable fastening. The scope of application is very wide - construction, repairs, production sites. When using a hammer drill with a nozzle of this type, you can significantly increase productivity, since the electric motor significantly simplifies the task. Often, a hammer drill with a chisel attachment is used to break off tiles or create grooves; the shape of the working part can differ significantly.
Device and principle of operation
The design of the tool is quite simple - a metal rod with a sharpened edge at one end and a wooden handle at the other. There are standards for carpentry tools - GOST 1185-80 defines a chisel as a percussion-type hand tool.
The design, despite its simplicity, has its own characteristics, and the parts have their own names. The metal blade is called the blade, the wooden part is called the handle.
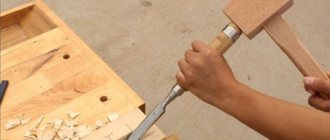
The tool is used to chisel holes in the longitudinal and transverse direction of wood fibers. When working with a hammer or mallet, blows are struck on the handle. To prevent the handle from cracking, a metal ring can be installed in its upper part.
In operation, the chisel is used as follows:
- The place that needs to be hollowed out is marked on the workpiece;
- Place the sharp edge of the blade on a line perpendicular to the direction of the fibers and make a notch with a light blow of the mallet;
- In a similar way, notches are made along the entire perimeter of the recess;
- After the notch has been made along the entire perimeter, 3-4 mm of wood is removed from the hole;
- The next step is to remove a layer of 2-3 mm;
- After this, a notch is made again around the perimeter;
- The operation is then repeated until the desired excavation depth is achieved.
Shank Types
For carpentry and carpentry type tools, the use of two types of shanks is allowed. For carpentry, a shank in the form of a pointed peak is more often used. The carpenter's style can use both a peaked shank and a bowl shank.
These types of shanks are used depending on the purpose - the bowl is made for 18-25 mm rods, which are used in carpentry and can withstand heavy loads.
Lance, used for small rods. These types of shanks, in addition to rigid fixation in the handle array, are additionally fixed with a metal cap on the blade side. When using a chisel with this type of handle, you should not use a hammer; it is better to use a wooden mallet or mallet.
Material
The state standard also defines the type of material used to make the rod. To make the blade, 12 grades of steel are used; for the wooden handle, the material used must be made of hard wood.
Dimensions and weight
Standards such as dimensions and weight are also defined for the tool. Carpentry chisels are designed for finishing work and are smaller in size. So, with a blade width of 6 mm, the maximum weight should be 180 grams. The largest weight of a carpentry chisel with a rod width of 20 mm is 370 grams.
The carpenter's tool is more powerful and, accordingly, heavier - with a blade width of 16 mm, the weight should be no more than 430 grams, and for the largest one with a width of 25 mm, the weight should be 630 grams.
The carpentry tool also has a large length - the total length with the handle is 345 mm. The length of the canvas is 150-157 mm. The joiner's is smaller - its total length is 315 mm, of which the working rod is 165 mm long. The total length of the handle is 185 mm, and the working part is 110 mm. The shape of the handle is complex - in cut it is 40 by 36 mm.
History and characteristics of the instrument
At the time of excavations of ancient cities and settlements, the remains of wooden utensils were obtained, which were characterized by quite high quality and beauty. This indicates that various tools were used during the work, including a chisel. The chisel tool is a simple product, the purpose of which is to gouge out various holes and sockets, as well as surface roughing. The key feature is the one-sided sharpening of the cutting edge.
As previously noted, a wood chisel has a rectangular working part. However, recently, tools with a semicircular blade have become widespread.
Its purpose is to obtain grooves of various shapes, as well as to clean corners. There is also a U-shaped version, which has recently been used to obtain recesses intended for door hinges. By using a special tool, the quality of the resulting excavation is significantly improved.
The product in question is a hand-held tool. The carpentry chisel GOST 1185-80 is equipped with a special handle, which significantly simplifies the process of processing the material. In the manufacture of this element, various materials can be used, in most cases wood with increased density.
Download GOST 1185-80
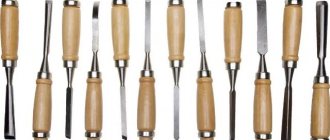
Types of bits
As already mentioned, the chisel is used in both carpentry and carpentry. Its size also depends on the purpose of the tool - for more difficult work, when it is necessary to install door frames, insert locks or adjust stair steps, massive carpentry tools are used. A carpenter has several sizes of chisel in his arsenal - a wide one with a blade 25 mm wide, a range of medium ones with a width of 20, 18, and a model with a narrow shaft of 16 mm.
The carpentry type of tool is designed for a different type of operation; precision and accuracy of cutting are required here. Unlike a carpenter's chisel, a carpenter's chisel is smaller and lighter - the maximum size of a rod of this type is 20 mm.
Carpentry work
Wood is simply a unique working material. Durable and lightweight. It is easy to process, and after that it retains heat and smell.- Raw wood is plastic and perfectly takes the required shape during processing.
- High-quality carpentry will highlight the grain of the cut, so there is no need to paint the wood.
- To prevent the timber from losing its pattern during processing, you must first determine the direction of the fibers. A complete picture will be given by sawing the timber across and along the grain, at an angle of 45°.
Proper placement of the drawing on the timber will help you create a real masterpiece and emphasize the beauty of the texture pattern!
chisel tool
| Share on social networks: | Rate this article: Loading… |
Difference from a chisel
The difference between a chisel and a chisel lies in the specific application. The chisel is intended for rough work; its main purpose is to gouge out solid wood. This operation is carried out by hitting the handle with a hammer or mallet. A chisel is a thin tool; most operations are performed using manual force, and only certain operations are performed using a mallet or hammer.
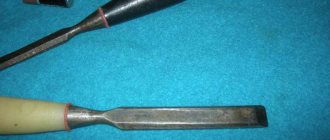
A chisel and a chisel also have structural differences - the chisel resembles a chisel, it has a massive square-shaped blade, a powerful handle with a metal ring on the butt plate. The chisel has a thin blade; for finishing work, you do not need to additionally hit the butt plate with a hammer. The sharpened blade of a chisel is designed for cutting wood in small pieces, most often with just hand force.
Another difference is the shape of the blade and sharpening point. A chisel with the blade sharpened at an angle of 20-25 degrees is enough to make a through hole, a recess, or remove part of solid wood.
It is customary to use a chisel to fine-tune parts to the desired size. The chisels themselves are not only flat, they come with a semicircular blade and a beveled cutting edge. When sharpening, a carpenter's tool is usually sharpened using emery, but a carpenter's tool, after sharpening on emery, must be sharpened manually on a whetstone.
Manufacturers
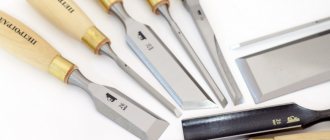
When choosing carpentry tools, it is important to pay attention to the manufacturer’s brand. There are several brands that have proven themselves to be the best. Among them are the following.
- "Anchor". This manufacturer produces sets of chisels that are perfect for beginners. The handle of the tool is wooden, the blade is made of durable alloy steel, which increases the service life of the chisel. The sets contain tools of different sizes, among which you can choose a chisel for any type of work. This manufacturer also has a very attractive price for its product.
- Stanley. Chisels from this manufacturer are designed for fine woodworking. This tool has a two-component handle, the blade is made of durable high-carbon steel. Therefore, this tool can be used to process even the most durable types of wood.
- Matrix. This manufacturer produces chisels and chisels for deep wood processing, thanks to long blades. The handle of these tools is usually rubber, but extremely durable, which allows you to strike the chisel with a mallet without fear of damaging it.
- Narex. Experienced carpenters use tools from this manufacturer. The cost of such chisels is higher than that of other brands, but these tools are highly reliable. The chisel blade does not become dull even with daily use.
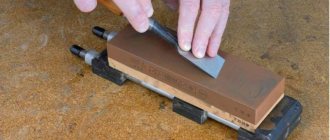
Terms of use
Before starting work, the chisel is sharpened. This is done on an emery wheel. The sharpening angle should be 20-25 degrees. The sharpening itself should be as smooth as possible, the cutting edge should not have any distortions, even a slight distortion of 3-4 degrees will affect the final result and the quality of the workpiece.
Working with a chisel is not difficult; a little training is enough to learn how to use it correctly. The process is carried out as follows:
- The workpiece is marked with a pencil and securely fastened;
- The blade is placed along the marked line so that the rod has a vertical position;
- The first blow of the mallet on the handle should be light - with its help, a small indentation is made.
- The second blow is applied harder - the tip should enter the workpiece 4-5 mm.
- After that, it is removed from the array and installed nearby. The next blow is delivered. The process is repeated.
- After a closed contour is formed, the top layer of wood 3-5 mm is removed using a chisel.
- The remaining layers are removed using a different method - here it is placed at an angle of 30-45 degrees to the horizontal surface and the wood is removed along the grain. With light blows the wood is hollowed out from the solid wood.
Security measures
The first rule of safe work requires that the blade be well sharpened. If you use a blunt tool, there is a danger of injuring yourself by applying excessive force in the work.
The second rule requires that the workpiece itself be correctly fixed when working. Rigid fixation will ensure high quality work and no injuries.
The third rule is that the rod and handle itself should not have chips, cracks or burrs. The handle must have a ring.
Knowing about these properties of the tool, in the future it will be easy to master the techniques of working with it and make the correct selection of the chisel by type and size.
Recommendations
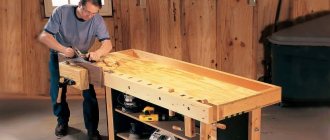
When chiselling, the lower part of the part should not shake, so it is pressed tightly to the table surface. It is recommended to place a piece of plywood under the element being manufactured so as not to damage the table. It is better to secure the long part to the tabletop using a clamp.
Before making deep holes, it is recommended to make a socket in the place of the transverse strokes with a drill, and to develop the resulting groove with a chisel. Before work, markings on the site of the future nest are applied on both sides, leaving allowances for future stripping. The chisel is selected according to the width of the hole, which allows you to make a through socket in one step. Otherwise, the hole must be processed on one side and gradually expanded, having previously sawed through the excess part to the desired width.
After work, the chisel is sharpened to remove any burrs that have formed on it. Proper sharpening ensures the edges of the tool are even and free of dents.
How to use a chisel, chisel and chisel
Download PDF
Download PDF
Chisel and chisel are woodworking tools. A chisel is a tool for working stone and metal. These tools consist of a handle with a blade beveled at various angles, and come in a variety of sizes. Some types of chisels have metal or wood handles and blades and can be expensive. A sharp chisel can be used to cut recesses and patterns, smooth rough surfaces, and cut corners for grooves and/or dovetail joints. Knowing how to use a chisel, chisel, and chisel can make your job easier, more efficient, and safer.
Using a narrow hand carpenter's chisel
- 1
Use a narrow hand chisel for fine woodworking such as planing or sculpting.
- A narrow hand chisel has a thin blade beveled at an angle of 15 degrees.
In wood planing, the knife-sharp edge of a narrow chisel is used to cut small pieces of wood.
- While planing, press the narrow chisel against the piece of wood that is lying flat on the surface.
- 2
Secure the piece of wood tightly to a workbench or vice.
- The better you secure the product, the more control you will have when pressing hard on the product.
- 3
Position the blade at a slight angle to the surface of the wood.
- When planing, you are not removing a lot of wood, so you can do it along or against the grain of the wood.
- 4
Place one hand on the chisel blade and press it against the surface of the wood.
- This hand controls the forward movement of the blade.
- 5
Move the chisel with your other hand, placing it on the handle.
- 6
Raise or lower the chisel handle to control the cutting depth.
- 7
Repeat this step and sharpen the blade as necessary.
Using a flat chisel
- 1
Use a flat chisel on both soft and hard wood to cut deeper, such as when shaping or making mortises.
- The leading edge of a flat chisel is straight and square.
The edge is ground and sharpened - like flat iron.
- A flat chisel has a heavier blade than a narrow chisel, it is located at an angle of 20 degrees.
- 2
Hold the flat side of the chisel flush against the wood.
- 3
Use a wooden hammer rather than a regular hammer to guide the flat chisel because a wooden hammer absorbs and distributes the impact.
- 4
When working, remove thin shavings, otherwise you risk splitting or damaging the wood.
- Make sliding or cutting movements with the chisel, cutting across the top fibers of the wood.
- 5
Raise or lower the chisel handle to control the depth of the cut.
- 6
Repeat this step and sharpen the blade if necessary.
Using a Half Round Chisel
- 1
Use a half round chisel for fine woodworking, such as carving or sculpture.
- The half-round chisel has a curved end and a long handle.
The half-round chisel has 8 standard blade angles and comes in different widths.
- A half round chisel can be used to carve wood or to remove pieces of wood around a pattern to make the job easier.
- 2
Fix the wooden product tightly to the surface. This will help prevent injury if the half round chisel slips, which often happens.
- 3
Place your index finger on the part of the chisel where the metal blade meets the handle.
- 4
With one hand, press the chisel toward the wood in a forward direction.
- 5
Raise, lower or rotate the handle to achieve the desired effect.
- To cut deeper, hold the chisel perpendicular to the wood and hit the handle sharply with a wooden mallet.
- 6
Work the chisel along the grain, otherwise you risk damaging the wood.
- 7
Repeat these steps, changing the size of the chisel to suit a particular pattern and sharpen the blades as needed.
Use on stone
- 1
Use a chisel to groove, trim, or shape brick or stone.
- A stone chisel is wider and shorter than a wood chisel and is typically made from a single hardened piece of metal.
Stone chisels are generally duller than woodworking chisels because they rely on force rather than sharpness to operate.
- 2
Make a clear mark on the stone with special chalk or a dark pencil
- 3
Set the chisel perpendicular to the stone at the mark you made.
- A type of chisel with a beveled blade on one side is used for separating large pieces of stone or parts of it.
A chisel with a beveled blade on both sides is used to cut straight lines.
- Sculpting or engraving stone requires a wide range of specialized tools and cutters.
- 4
Strike the chisel handle sharply with a hammer, wooden mallet, or sledgehammer.
- 5
Continue striking along the line until a crack forms.
Chisel - Wikipedia photo
This article is about the tool;
for a car with this nickname, see: LADA Samara. Chisels with an unsuitable butt plate A chisel is a percussion-cutting tool for working metal or stone. When applying impact force to the chisel from the side of the striker part (butt pad) using a hammer, sledgehammer, jackhammer striker, chipper, concrete breaker or hammer drill, the cutting edge of the chisel acts on the material being processed, cutting it or splitting it.
The figure shows a cutting edge with a sharpening angle α. Angle α is selected from the range 35°, 45°, 60°, 70° depending on the operating conditions of the tool
A chisel is, in most cases, an oblong rod with a rectangular, round, oval or polyhedral cross-section. The chisel is sharpened at one end (the working part), and the other end of its body (the butt plate) is intended for striking with a hammer. To ensure safe operation and protect hands from accidental hammer blows, a “mushroom” can be placed on the body of the chisel - a hollow handle with a side, made of rubber, wood, plastic or metal. The working part of the chisel has a double-sided sharpening with main and auxiliary cutting angles; To increase durability, the cutting edge is slightly blunted. The shank and working part of the chisel must undergo thermal improvement.
Depending on the working conditions, the following materials are used for the manufacture of chisels:
- Carbon tool steels (U7, U8, U9, U7A, U8A, 6ХС, 9ХС): for cutting metals.
- Structural steels (45, 50, 40Х, 60С2) equipped with carbide plates (VK15, VK20, VK25, VK30, VK8V): for cutting stone.
In addition, the chisel can be used as an improvised wrench: a notch is made on the edge of the nut, and by placing the chisel at an angle to the edge of the nut, the nut is unscrewed/tightened with gentle blows of the hammer. The method allows you to unscrew/tighten nuts with “licked” edges, but requires a certain skill.
org-wikipedia.ru