A roller bit is a rock-cutting drilling tool that acts on rock using crushing or crushing-shearing methods.
Roller bits are the most common type of drilling tool when drilling wells for various purposes: oil, gas, geological exploration, water, blasting, etc.
The most common are tricone bits with cantilever supports and welded feet.
They are used for drilling both very hard and very soft rock.
History and characteristics of the instrument
When excavating ancient cities and burial mounds, archaeologists often find remains of wooden utensils. This suggests that in ancient times our ancestors already mastered the art of woodworking. In Rus', all buildings, as well as all household utensils, starting from the necessary furniture and utensils, were originally made of wood.
With the development of the art of carpentry, manufactured objects became more and more elegant. To securely fasten wooden objects, a chisel tool was invented.
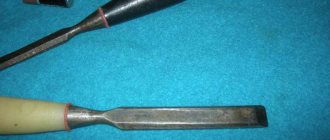
A chisel is a simple carpentry and joinery tool, the purpose of which is to gouge out holes, nests, and tenons during rough processing of wood . It is a square or rectangular steel bar, slightly tapering towards a pointed end, with a one-sided sharpening.
Along with square and rectangular shapes, semicircular fabric is widely used. This tool is intended for cutting the necessary grooves and cleaning up the corners of the product. Or a U-shaped blade, convenient for creating recesses for hinges on doors and window frames.
The joiner's and carpenter's chisel is a hand-held tool, and therefore is equipped with a handle for convenient use. The process of cutting holes is carried out using hammer or mallet blows, so the handle is made of hard wood, has a flat top, surrounded by a metal ring that does not allow the handle to split from the blow.
Device and principle of operation
The design of the tool is quite simple - a metal rod with a sharpened edge at one end and a wooden handle at the other. There are standards for carpentry tools - GOST 1185-80 defines a chisel as a percussion-type hand tool.
The design, despite its simplicity, has its own characteristics, and the parts have their own names. The metal blade is called the blade, the wooden part is called the handle.
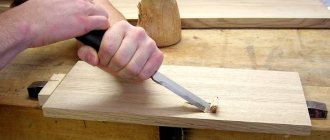
The tool is used to chisel holes in the longitudinal and transverse direction of wood fibers. When working with a hammer or mallet, blows are struck on the handle. To prevent the handle from cracking, a metal ring can be installed in its upper part.
In operation, the chisel is used as follows:
- The place that needs to be hollowed out is marked on the workpiece;
- Place the sharp edge of the blade on a line perpendicular to the direction of the fibers and make a notch with a light blow of the mallet;
- In a similar way, notches are made along the entire perimeter of the recess;
- After the notch has been made along the entire perimeter, 3-4 mm of wood is removed from the hole;
- The next step is to remove a layer of 2-3 mm;
- After this, a notch is made again around the perimeter;
- The operation is then repeated until the desired excavation depth is achieved.
Shank Types
For carpentry and carpentry type tools, the use of two types of shanks is allowed. For carpentry, a shank in the form of a pointed peak is more often used. The carpenter's style can use both a peaked shank and a bowl shank.
These types of shanks are used depending on the purpose - the bowl is made for 18-25 mm rods, which are used in carpentry and can withstand heavy loads.
Lance, used for small rods. These types of shanks, in addition to rigid fixation in the handle array, are additionally fixed with a metal cap on the blade side. When using a chisel with this type of handle, you should not use a hammer; it is better to use a wooden mallet or mallet.
Material
The state standard also defines the type of material used to make the rod. To make the blade, 12 grades of steel are used; for the wooden handle, the material used must be made of hard wood.
Dimensions and weight
Standards such as dimensions and weight are also defined for the tool. Carpentry chisels are designed for finishing work and are smaller in size. So, with a blade width of 6 mm, the maximum weight should be 180 grams. The largest weight of a carpentry chisel with a rod width of 20 mm is 370 grams.
The carpenter's tool is more powerful and, accordingly, heavier - with a blade width of 16 mm, the weight should be no more than 430 grams, and for the largest one with a width of 25 mm, the weight should be 630 grams.
The carpentry tool also has a large length - the total length with the handle is 345 mm. The length of the canvas is 150-157 mm. The joiner's is smaller - its total length is 315 mm, of which the working rod is 165 mm long. The total length of the handle is 185 mm, and the working part is 110 mm. The shape of the handle is complex - in cut it is 40 by 36 mm.
Types of chisel
Hand carpentry tools should be present in the arsenal of any man who is accustomed to doing household work with his own hands . The set of devices for wood processing is determined by the type of work performed. Depending on the area of application, the chisel has the following types:
- Carpenter's chisel. Intended for use in large construction (log houses, roofs, floors). The width of the working blade exceeds the carpentry model and widens at the base. To attach the handle, instead of a shank, a conical tube is used, into which a wooden handle is inserted. The total length of such a tool is at least 300 mm. Together with carpentry tools, it will be quite useful for people living in private houses.
- Carpenter's chisel. It has a working blade no wider than 15 mm. It is used in smaller jobs (furniture, window frames, inserting locks). The handle is attached by attaching it to the shank until it touches the collar. A carpentry device is more suitable for use in an apartment.
Drilling work with a roller bit
This type of bit is caused by chipping and crushing rock. This device is intended for drilling wells for the purpose of gas or oil production. The equipment looks like this: a complex type combination with rotating teeth of different sizes.
Roller-type bits are used for drilling operations of all levels of rock hardness. Thanks to this universal property, they are widely used. It is impossible to do such an installation with your own hands; it is recommended to purchase one.
This equipment contains a rotary drilling tool with quarry machines and a cutter, which has teeth of various lengths and configurations. Carbide-based pins can be pressed into it. Tungsten carbide (from which the teeth are made) is capable of breaking down any rock, from the softest to the hardest.
The roller bit is used for drilling:
- exploration wells;
- operational;
- search engines;
- exploration;
- geotechnical engineering, etc.
Diagram of a single-cone bit/
In terms of technology and design, this equipment is difficult to manufacture. They come in one, two, three or four cones.
Features of design parameters:
- The axis of the cutters and their tops are relative to the axis of the bit.
- The angle of inclination of the roller cutter axis is determined by the axis of the device.
- The number of cones on the roller cutters.
- Location of the ring teeth.
- The originality of the geometric parameters of the bit elements.
This type of equipment is applicable to drilling exploration wells and blasting wells. It is especially necessary for the destruction of hard rocks. The invention of a chisel with cone-shaped cutters belongs to the USA.
A roller-type drill bit is considered an integral element of drilling operations. It became popular in Russia due to the fast and efficient drilling of oil and gas wells.
With the help of cutters, which are made of hard steel or alloy, strong rocks are destroyed. They rotate, mounted on the bit supports, and the equipment itself rotates along with them, pressing against the bottom.
A core drill bit can consist of many cutters of different shapes. The rock destruction element is teeth made of alloyed steel or milled teeth. Their combination contributes to the effective destruction of any rock. To increase the resistance of the cutters to all kinds of damage, they are filled with a tungsten carbide alloy. The shape and parameters of this equipment (point angle, length and arrangement of teeth) depend on the properties of the rock. For drilling operations, teeth with a wedge-shaped cone are used.
To break up hard rock, supports are used in the bit's design. Sealing supports is necessary for complex work.
Roller bits come in solid-body and sectional designs. The first type of chisel is characterized by welding the paws with cutters, the second - by welding a separate section.
Difference from a chisel
When used at home, uninformed people often confuse a chisel with a chisel.
Although they look almost the same, these instruments are still different . They differ:
- According to the type of work performed. Chisels are used to create small recesses, to clean and align grooves, to create chamfers by cutting wood. A chisel is needed for more rough work performed by gouging.
- By method of use. To work with a chisel, only hand pressure is used, and gouging occurs together with a mallet or hammer.
- The design of the gouging object differs from a chisel in that it has a thicker blade and the presence of an upper crimp ring on the handle.
Types of chisels based on operating principle
Currently, tool factories produce, and numerous stores sell a huge amount of the tools under discussion. Based on the principle of operation, we distinguish the following types of chisels:
The latter type also includes an electric chisel. This tool is multifunctional; it can be used in furniture restoration or repair work, for removing old paint or carpet from the floor, etc. The electric chisel has a convenient, handy body, light weight, and spot lighting. The tool can be used in hard-to-reach places. The kit comes with attachments of different sizes and shapes. “Chargers” are included with the battery versions.
Terms of use
This piece of joinery is used for hollowing out blind and through sockets in workpieces, while the workpiece must be fixedly fixed. The required nests are hollowed out according to pre-made marks. First, using a mallet, the transverse fibers of the wood are cut through, then the chips are removed in one working pass.
By periodically deepening the blade into the wood under the influence of a mallet, the required depth of the cut-out nests is achieved.
When chiselling, closed cutting occurs, as a result of which all three edges of the chisel must be cutting, so that during operation the side cutting edges clean the planes of the nests being made.
Choosing a set of chisels for all occasions
Before purchasing chisels, first of all, you need to decide what they are needed for. If this purchase is for a one-time job (repairing windows in an apartment), you can buy an inexpensive set that will not be needed for several years. If wood carving is your life’s work, then the choice of tool must be taken with full responsibility. According to the manufacturing method, chisels are forged, cut and stamped. Forged ones have a thicker blade, which allows you to work with harder materials.
Punching machines allow you to maintain high precision when working with materials of lower density and hardness. It is necessary to install thrust washers on stamped chisels so that the handles do not “sit” on the shank when struck by the mallet. Depending on the type of handle fastenings, chisels are produced with mounted cones-skirts and with shanks. Options with a cone mount are better able to withstand fairly strong lateral and impact loads. They also better resist twisting and bending when making holes if used as a lever. The length of the chisel matters: optimally 10-15 cm.
Security measures
When carrying out joinery and carpentry work using the gouging method, it is necessary to pay attention to the condition of the equipment used . After all, the better the working surface is sharpened, the smoother the processed surface will be. To avoid injury when gouging holes, pay attention to the integrity of the tool handle and the striking part of the mallet.
There should be no chips or cracks. The workpiece must be securely fastened . The direction of work should be away from you.
A chisel is a tool with a narrow focus, so it is highly undesirable to use it for other purposes.
General requirements for tool maintenance
Before use, both carpentry and drill bit models must be carefully checked for the integrity of the cutting part. Work should only be carried out if the functional edge is properly sharpened. The equipment of mining installations is more demanding in terms of technical content. Maintenance personnel must check the correct pressing of the working segments, the stability of the impact mechanics with a minimum level of vibration, the mobility of the rollers with bearings and the sharpening angles of the journals. Tricone bits are considered the most resistant to loads, but they also require special modifications as their service life is exhausted. Provided that the cutting surfaces are processed with high quality, it is possible to obtain optimal calibration with centering of the nozzle, which will have a positive effect on the well drilling process.
How to sharpen chisels correctly. On water stones, grinder and regular sandpaper
Are you sure you know everything about your chisels? Read on topic:
Review of carpentry chisels. We talk about the types, characteristics and subtleties of choosing the main hand tools
There are several techniques for sharpening chisels. The method of sharpening on water stones is rightfully considered the gold standard. It gives the best result and the main part of our conversation will be devoted to it. We will also talk about how to sharpen a chisel on a grinder and whether it is possible to achieve razor sharp carpentry tools using ordinary sandpaper.
APPENDIX 2 (recommended). STRUCTURAL ELEMENTS OF JOINERY BITS PARTS
APPENDIX 2 Recommended
Drawing 1 Cloth (item 1)
Canvas (item 1)
Damn.1
mm
| Tolerance range 15 | ±2 | ±2 | No less | ||||
| 6 | 4 | ||||||
| 8 | 6 | 130 | 165 | 55 | 8 | 16 | |
| 10; 12; 16; 18; | 4 | 150 | 185 | 6 | 10 | 18 | |
| 20 | 5 | 160 | 200 | 65 | 8 | 12 | 20 |
Fig.2 Handle (item 2)
Handle (item 2)
Damn.2
mm
| Blade width | |
| No less | |
| 8-18 | |
Fig.3 Cap (item 3)
Cap (item 3)
Damn.3
Sharpening chisels on a sharpener
If your chisel has a smooth bevel, a cutting edge without jagged edges, and a suitable sharpening angle, you won't need a sharpener. In this case, you can immediately proceed to finishing sharpening on a water stone or other flat abrasive, using the algorithm that we described above. A sharpening machine (grinder) is used exclusively for rough processing of a blade: when you need to resharpen a chisel to a different angle or remove nicks on a “killed” edge.
Blade sharpening options: regular and concave wedge
Sharpening chisels with flat and concave chamfers
A chamfer with a concave plane is inferior in strength to a regular wedge, so this method of sharpening is not used for chisels that are designed to be struck with a mallet.
Subtleties of working on a sharpening machine
Many woodworkers are still wary of grinders. This is due to the fact that even with a full hand on the sharpener it is very easy to overheat the blade, as a result of which the steel will change its properties and become brittle. In this case, you will have to completely resharpen the singed edge, sacrificing the length of the blade and getting a bunch of headaches in the bargain.
Today, the problem of burnt edges is partly solved by aluminum oxide wheels. Due to their “loose” structure, they tend to break easily when in contact with metal, exposing new sharp edges to the abrasive grains. This reduces the risk of burns, but, we repeat, only partially. Basically it's all up to you. It is important to monitor the speed of the machine and do not forget about cooling the blade in water. Also, while sharpening, you should not press the chisel blade too hard against the rotating disk - this also increases the risk of overheating.
Sharpening chisels on water stones
The most popular sharpening method is the use of artificial water stones. This method provides the most delicate and precise guidance of the cutting edge. To bring the stones into working condition, they are pre-soaked for 3-10 minutes. During the sharpening process, the abrasive is actively moistened from a spray bottle or used directly in a bath of water.
The tool is sequentially processed on stones of different grain sizes. The simplest and most effective scheme is the use of three types of abrasives:
If you want to polish the edges of your chisel to a mirror finish, use an additional 8,000 grit for a fine polish.
With this method of sharpening, it is very important to follow the sequence. By skipping the intermediate abrasive, you will have to remove the surface longer, wear out the stone more actively, waste energy and overheat the blade.
Briefly about the types of abrasive
Artificial sharpening stones consist of microscopic sharpening grains bonded into bars with a ceramic bond. Silicon carbide is most often used as an abrasive base. Due to the fragility and sharpness of the microparticles, such a stone provides high sharpening performance. Silicon carbide abrasives do not overheat the blade, quickly provide a suspension, do not require long soaking and produce a pleasant sound when sharpening. In terms of their characteristics, they are superior to stones made from electrocorundum powders or clay, and they are recommended to be purchased as the first sharpening kit.
Preparing sharpening stones for work
Mark the surface of the stone with a pencil and place it in a bath of clean water for 3-10 minutes. When the stone stops releasing small air bubbles, it will mean that it is ready.
Take a sheet of 240 grit waterproof sandpaper, wet it and place it on the wet glass. The water will prevent the sandpaper from moving during operation.
Move the sharpening stone back and forth, making circular movements from time to time. When the pencil lines disappear, this means that the working surface is completely flat. After alignment, chamfer the edges of the block so that they do not crumble during further use. The stone is ready.
Let's move on to sharpening
Your task is to achieve a perfect plane of the chamfer and the back of the blade - then at their intersection a perfectly smooth cutting edge is formed. At first, do not chase speed, but concentrate on consistency of movements and uniform pressure. Be sure to use a rubber mat. This detail turns out to be very important. The backing prevents the whetstone from slipping and play on uneven surfaces, so you can fully concentrate on the sharpening process and better feel every stroke on the stone.
Aligning the back of the blade
Sharpening of chisels traditionally begins with processing the back of the blade. 800 grit abrasive is used as a starting stone.
With one hand, the blade is pressed against the stone, and with the other, it is held strictly perpendicular to the long side of the block. With light and even pressure, the tool is moved along the entire length of the working surface. After processing on an 800 grit stone, all large marks on the back of the blade should disappear, and the surface should acquire a uniform dullness as shown in the photo. Before moving on to another abrasive, a chisel bevel is processed on the same stone.
Chisels for wood carving and more - we determine the quality
The reliability and durability of the purchase largely depends on the quality and hardening of the steel. Chisels should be made exclusively from tool steels, i.e. made of alloys that are quite strong, but not brittle. Such steels should be marked with the following symbols: drop forged, CrV or the inscription “chrome vanadium”. If this marking does not indicate the manufacturer, and the set itself is very cheap, then it is a Chinese counterfeit.
Before going to the store, it makes sense to familiarize yourself with tool manufacturers and reviews of their products. As a rule, conscientious manufacturers label their products, provide an address and guarantees. You should not buy tools without an address; it may turn out to be a deliberate defect. Also, do not try to overpay for a set of functions, for example, a universal chisel will not always be the right choice if most of the attachments never work, moreover, if exotic paintings break down in some cities, it will be impossible to purchase them separately.
Source
Sharpening a chisel on sandpaper
To achieve a quality as close as possible to sharpening on water stones, it is important to ensure an ideal plane. To do this, use a glass or ceramic plate substrate. The sandpaper needs to be smoothed well and fixed on the plane. Double-sided tape is suitable for this. Even better, try to find sandpaper with a self-adhesive base.
As for the abrasive, the best result is shown by a combination of four types of grit: P400, P800, P1,500 and final polishing at P2,000. A fundamentally important condition is to use waterproof sandpaper, since during the process you will have to actively moisten the abrasive surface. Otherwise, the sequence of actions is identical to sharpening on water stones, which was discussed in detail above.
They start by leveling the back side of the blade using P400 sandpaper, after which the chamfer is processed on it. During sharpening, the abrasive is generously sprayed with water. On each skin, an average of 30 passes are made back and forth, then they switch to a finer-grained belt. Just as when sharpening on water stones, it is important to ensure that the surface of the blade being processed is strictly parallel to the sandpaper and evenly adheres to the abrasive with each stroke. Over time, you will achieve consistency in your movements and will be able to achieve a razor sharpness on your chisels in 10-15 minutes.
All that remains to be done is to check the quality of sharpening. The ability of a chisel to remove the thinnest layer of shavings from the end of a tree is a successfully passed test of the quality of your work.
Source
The correct sharpening angle for a chisel
Wood chisels have different sharpening angles, and it is thanks to this that you can understand the purpose of the tool.
There is nothing difficult about sharpening a chisel. Your task is to achieve an ideal plane of the chamfer and the back of the blade . Then at their intersection a straight and sharp cutting edge will be formed. It seems simple. But this process needs to be worked out well, having made a dozen or two resharpenings.
Don't go for an expensive tool at first. The simpler the first chisels, the better. You will get good at constant sharpening, and the soft, pliable steel will allow you to feel all the nuances of this process.
Sharpening a cutting edge under an electron microscope with a magnification of 100x
The first photo shows the result you need to strive for: the flat front chamfer and the back of the blade form a perfectly smooth and sharp edge. The second magnification shows the so-called “nail” defect, when, due to the rounded corners, the cutting edge does not work along its entire length. In the third photo everything is clear without any comments.
About microchamfers
Once you have finished sharpening the chisel, you can add a second micro level to the chamfer. We are talking about the so-called microchamfer. It allows you to increase the durability of the cutting edge by increasing the final sharpening angle (remember what we talked about at the beginning). Micro-chamfering is especially appropriate on hard blades with a brittle cutting edge.
It is unlikely that it will be possible to create the correct micro-chamfer without the help of a sharpening trolley, since here we are already talking about precision positioning of the tool. Many carriages have special modes for this. After completing the main sharpening, simply switch the regulator, which will move the blade to the micro-bevel position. After making 4-5 very light passes on an 8,000 grit stone, the microbevel will be ready.
The chisel in the foreground has a clearly visible microbevel