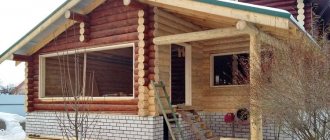
- Extension to a brick house made of aerated blocks
- Foundation and plinth
During the operation of old houses, the need often arises to build an extension - and not only an unheated veranda or garage, but also a full-fledged room designed to provide living space for members of an overgrown family. To ensure that the additional room is warm and does not lead to a sharp jump in heating costs, it is better to use a gas block for the construction of its walls. Moreover, this can be not only an extension to a house made of aerated concrete - block masonry can be combined with both brick and wooden walls. How to do this correctly will be discussed below.
Premises requirements
It is possible to make an extension to your house with your own hands. The most optimal thing is when the appearance of such a room is combined with the house itself. But this factor is not always the most important; the main thing is that the extension is durable and of high quality. Considering the lightness and reliability of the structure, many choose a frame extension to the house. It is inexpensive, reliable and quickly erected.
Think through all the details in advance. Each type of room has its own nuances. The veranda does not provide heating, unlike the additional room. If it will be a kitchen or bathroom, lay utilities and pipes before construction begins, take care of future insulation and waterproofing.
Select in advance the most optimal size of the extension
Materials
The modern building materials market offers a large selection to suit every taste and budget. The greatest demand today is for extensions made of foam concrete, aerated concrete, cinder block and similar large-format masonry varieties and frame structures. Frames are in the lead due to the speed of construction, relative accessibility and simplicity; in terms of energy efficiency, they are not inferior to stone buildings due to the use of insulation.
However, if possible, it is recommended to choose a material similar to the main one: a wooden extension to a wooden house, etc. This is especially true for houses that are not supposed to have the same façade as the extension. If you plan to use siding or similar cladding, the choice is unlimited.
Construction of the foundation for the extension
The most important point in the construction of an extension is the arrangement of the foundation. If the owner took part in the construction of the house, he knows all the nuances of the size and design of the old foundation. When purchasing a ready-made home, such information may not be available. In this case, you need to dig a hole yourself near the wall of the house and take measurements of the foundation, its depth and determine the nature of the soil.
We recommend choosing a foundation similar to the foundation of the house itself. Different types of foundations interact less well with the soil, which can lead to excessive pressure on the old foundation and further shrinkage.
Decide whether the foundations of the buildings will be connected by a rigid connection or whether the base of the new extension will be separate
Strip foundation
The strip foundation is poured in the shape of a rectangle in two ways: closed, and also in the shape of the letter “P”, open.
There are several options for connecting the foundations of the house and the extension:
With a closed method of pouring concrete:
- install a sheet of expanded polystyrene 50 mm thick between the foundation strips. It will be part of the formwork when pouring concrete. After filling, the remaining gap must be sealed with sealant;
- connect the ends of the foundations with a reinforced frame. At the end of the base of the house, drill holes in two staggered rows. Place reinforcing bars there, which you will later connect to the frame of the extension’s foundation;
With the open filling method:
- pour the foundation of the extension in the shape of the letter “P”, and install insulation on the crack in the house;
- To connect buildings, drill holes for reinforcement only at the junction of two foundations.
For a strip foundation, they dig a trench and fill it with a cushion of sand and crushed stone. After this, the formwork is erected and reinforcement begins
Columnar foundation
If your extension is small in size and weight, a columnar foundation is a good alternative to a strip foundation. Such a foundation is suitable for constructing a frame extension at high groundwater levels.
Stages of construction of a columnar foundation of an extension:
- Dig holes deeper than the freezing level of the soil; the distance between them should not exceed 1.5 meters.
- Place a bed of sand and gravel at the bottom of the holes. Compact the material well and lay the roofing felt.
- Prepare strong formwork from boards or plywood for each pit.
- Reinforce the formwork using 4 bars of periodic profile reinforcement.
- Pour the concrete mixture into the formwork and wait until it hardens completely. Remove the formwork and make a grillage.
The columnar foundation is suitable for light extensions and is one of the simplest and most cost-effective types of foundations
Binding options
Two foundations can be attached to each other and rigidly connected only if several conditions are met:
- construction from blocks is carried out on soils that are not prone to heaving;
- the house has stood for several years and has undergone complete settlement;
- both bases have approximately the same depth.
If all points are fulfilled, a trench is dug along the old foundation and short reinforcement bars about 30 cm long are embedded into it up to the middle. The free ends are fixed in the second base.
An extension made of foam blocks to a brick house can be attached using metal rods 6-8 mm thick. They are driven into the old masonry every 2-3 rows to a depth of about 15 cm and the same amount is left for bonding with foam concrete. In the brick layer, the reinforcement is additionally fixed with cement-sand mortar. Such joining is performed only to a level of 2.5-3 m above the foundation, since it is not possible to calculate the difference in shrinkage above.
The situation is more complicated with dissimilar materials. For example, you can attach a kitchen or a veranda made of foam blocks to a wooden house, but you cannot make a rigid connection between them. Due to the difference in the properties and time of construction of objects, their shrinkage will occur unevenly, which will lead to rapid destruction of the walls at the connection points. Other methods apply here:
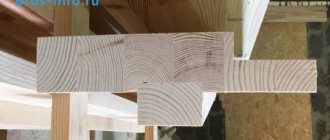
1. Sliding fixation is performed through longitudinal grooves cut into the blocks, ensuring free vertical movement of the walls relative to each other.
2. Insulated gap. As in the case of a connection between two foundations without reinforcement, there are no fastening points here. The house can be attached closely to the main one, and the joint can be filled with any insulation: cord, mineral wool or polyurethane foam.
The appearance of such dissimilar tandems leaves much to be desired, so subsequent finishing, for example, with siding, will hide the specific seams between the walls.
Cost of blocks and masonry
To estimate how much the extension will cost, you will need a plan with dimensions marked and a calculator. It is more convenient to make the calculation when you have already chosen the size of the foam blocks. Usually stones of 600x300x200 mm are used, but there are quite a lot of options. You will also have to take into account the brand - factories produce products with a density from D400 to D1000, but for an extension D600 will be enough. Their average price does not go beyond 3100-3200 rubles.
| Dimensions, mm | Price per piece, rubles | Price per cube |
| 600 x 300 x 100 | 57,6 | 3200 |
| 600 x 300 x (150-250) | 83,8 – 139,5 | 3100 |
| 600 x 400 x 200 | 151,2 | 3150 |
| 600 x 400 x 300 | 234 | 3250 |
| 500 x 300 x 100 | 58,5 | 3200 |
| 500 x 300 x (200-250) | 93 – 116,2 | 3100 |
| 500 x 400 x 200 | 126 | 3150 |
A house made of foam blocks can easily be calculated according to the project by calculating the area of the walls from the foundation to the roof minus the openings. After this, the number of stones in the masonry and their total cost are determined. If you attach a kitchen or garage so that one of the walls is common with the house, costs will be significantly reduced.
You will have to spend money on reinforcement and adhesive composition. The consumption of metal rods will be determined by the height of the extension and the pitch of the reinforced belts. Each cube of foam concrete will require approximately 20 kg of glue (slightly less than a bag) - that’s another 240 rubles/m3.
The services of professional builders will cost at least 2000 rubles/m3.
Various life circumstances can lead to a decision to increase your living space. Extensions can be built for a kitchen, bedroom, bathroom or other living area. The main task in this matter is to choose the right type of foundation so that it is of high quality and reliable.
Choosing a foundation type
- Tape
- Columnar
- Pile
The first type of base for an extension is the most universal.
Strip foundations are suitable for both light and heavy buildings. To avoid subsidence of the strip base, you need to use a closed contour of the base.
Columnar base
can only be used for lightweight structures. Its advantages include extremely low cost and high reliability. The only disadvantage of a columnar foundation is that you cannot construct a basement in it. The supporting base here is brick or reinforced concrete pillars, the distance between which should be from 1.5 to 3 meters.
Also, larch beams can act as pillars, but due to its fragility and high cost, this material is used extremely rarely.
If the site of the planned extension has weak soil and the mass of the structure will be high, then it is better to use a foundation on piles, which can be made of steel, reinforced concrete, wood or asbestos. All piles must be connected with a strapping beam.
Features of linking the new foundation to the old one
There are 2 ways to connect the new foundation to the old one:
- Technology with rigid reinforcement.
You can use this method when the age of the building exceeds 15 years and the foundation is well preserved. The main nuance is that there should be no heaving soils. - Expansion joint.
The most inexpensive and easy to use method. Can be used in strip, column and pile foundations. For insulation, you can use roofing felt.
Advantages
Rigid reinforcement:
- Can be used for old buildings
- Low cost
Expansion joint:
- Easy to apply
- Low cost
- Can be used on any type of foundation
Flaws
Rigid reinforcement:
- Application on heaving soil is not possible
Expansion joint:
- No disadvantages
Installation of the base floor of the extension
For a columnar foundation, a wooden floor base is suitable. When constructing a strip base, there is a choice between wooden and concrete floors. If the extension room will be used as an additional room, care must be taken to ensure high-quality thermal insulation and a flat surface.
When comparing the properties of durability and strength, a concrete floor takes a leading place, but a wooden house has good heat and sound insulation. Wood beams are also faster and easier to install.
Concrete floor
Before pouring the floor, consider the soil characteristics of the extension. Concrete floors are not installed on moving soil. If the room is never heated, the concrete structure may deform over time.
The construction of a concrete floor includes the following steps:
- After the strip foundation has completely dried, dig out the top layer of soil 25-35 cm inside the structure and compact the surface of the earth.
- Fill with river sand 10 cm thick. Compact and lay two layers of roofing felt in a checkerboard pattern.
- Fill in expanded clay to a thickness of 15 cm. Install special beacons or bricks around the perimeter of the expanded clay cushion. Place a building level on top and level the base of the floor. If the extension is being built for a summer cottage, it is not necessary to lay the reinforcing mesh.
- Pour in a high-quality concrete solution, level it using the rule and wait for complete hardening.
A building level will help make the surface of the concrete floor as level as possible.
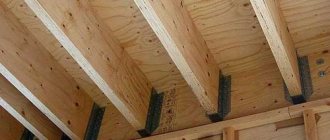
Floor on wooden beams
For a columnar foundation structure or frame extension, it is necessary to install load-bearing logs. They act as the skeleton of the building, evenly distributing the load throughout the entire extension.
The beams are laid using the following technology:
- Install and secure a double layer of waterproofing on the foundation pillars.
- Before installation, treat wooden beams with a special antiseptic.
- Lay the floor beams on the foundation pillars and secure with corners. Fasten the beams together in the same way.
Load-bearing logs must be large and made of high-quality wood; the strength of the entire structure depends on them
Why does deformation occur?
Deformation during foundation shrinkage
Different foundations behave differently when in contact with soils susceptible to heaving. Therefore, if the base is strip, then the new one should be the same. Another important rule: you cannot lower the new foundation below the main one.
How to determine the width of the sole of the strip base:
- You need to take a metal rod, the end of which is bent at a right angle.
- We push the rod under the structure so that the hook is positioned horizontally.
- After the rod passes the base, we unfold it so that the hook is positioned vertically, with the tip up.
- Pull the rod towards you until it stops.
- Let's make a mark.
- Unfold and pull out the rod.
- The segment from the mark to the fold is equal to the width of the sole.
Reasons for shrinkage of the extension:
- The main building has usually already settled down, but the new extension is just beginning to sink.
- Part of the attached foundation rests on imported soil, and part on “native” soil. This leads to complex deformation displacements, causing the formation of cracks in the most unpredictable places.
The consequences of natural shrinkage can be minimized by extending the construction period. To do this, we allow the foundation to stand for at least one season. The extra weight will cause some shrinkage, but not as much.
Construction of extension walls
The walls for the extension are selected according to a material similar to the house itself. The most common materials for building walls are brick and wood.
To connect the walls of two buildings, it is better not to use a rigid connection. The difference in age between the old and new walls can lead to uneven settlement and cracks. Leave a distance of 2-3 cm between the walls of the building, which after erecting the walls, fill it with polyurethane foam.
Frame walls
The necessary materials for the construction of frame walls are high-quality wood and mounting angles. We install the frame to the base of the extension on the supporting elements installed earlier.
For ease and efficiency of assembly, it is recommended to assemble the wooden elements on the ground and then install:
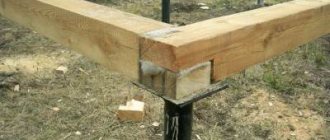
- Install the corner posts first, securing them with reinforced steel corners. Fasten the intermediate beams either using the full cutting method, or in the same way as the corner beams.
- Additionally, secure the intermediate beams with temporary bevels, which must be removed after the walls of the extension are completely installed.
- Secure the upper tier of the frame in the same way as the lower part. For better strength, each beam can be fixed with braces on both sides.
- After installing the frame, sheath the external walls of the extension using wooden boards or sheets of plywood.
Fastening wooden elements using corners is faster and more reliable than using the method of completely or partially cutting down the thickness of the timber
Brick walls
The technology for constructing brick walls includes the following stages:
- Before starting construction, level the foundation using a cement-sand screed. Lay a layer of roofing material on top for waterproofing. Lay the first row of bricks on roofing felt without the help of mortar.
- Attach small diameter reinforcing bars to the brick rows of the main house. Drill holes every two rows of brick. During the process of bricklaying the extension, protruding reinforcement from the walls of the main house will end up in the joints between the new brick laid.
- Stretch a rope parallel to the wall, which will help build the brick rows as evenly as possible. Between every third row of bricks, you can lay a reinforcing mesh, which will reduce shrinkage and increase the strength of the walls.
After erecting the walls, tie them at the top with a concrete belt. Pour concrete mortar into the constructed reinforced formwork.
The laying of the first row begins from the corner, and the thickness of the walls depends on the functions of the future extension
Rigid slab-to-slab connection
It is possible to rigidly join two slab bases only if they are of sufficient thickness - at least 40 cm. Thinner structures cannot be connected, since in this case the slab will work maximally in compression and cracks will appear as a result. Another mandatory condition is the presence of a protrusion from the base of at least 20 cm. In the absence of a protrusion, the connecting reinforcement will be laid directly under the load-bearing walls, and this is unacceptable. If there is no protrusion or it is less than 30 cm, then you can use corners with a pin for the connection rather than reinforcement. The fasteners are attached to the base of the house from the corner side, and the pin is concreted into the base of the extension.
Extension ceiling and roofing
The roof of the extension should also be in harmony with the main building. Select high-quality roofing material and carry out construction calculations of dimensions and angles of inclination. For slate and metal tiles, the optimal angle of inclination is from 30-40º, for metal profiles - from 20º, for corrugated sheets - from 12º.
The technology of the roofing process includes the following stages:
- Install ceilings in the form of wooden beams on the walls. Secure them with corners at a distance of 50-70 cm from each other. If the walls are made of brick, embed the beams in concrete. Then cover them with boards and insulate them.
- Lay the Mauerlat around the perimeter of the side walls. It will serve as a support for the rafters, which are erected at a distance of no more than 70 cm from each other. There should be the same spacing between the rafters and floor beams. To protect the walls from water, the rafters must extend 30 cm beyond the walls.
- Place a special waterproofing film on the rafters and install lathing in the form of horizontal boards.
- Place the selected roofing material on the sheathing.
The simplest and most affordable option for independent roofing is considered to be a pitched roof.
Floor insulation on beams
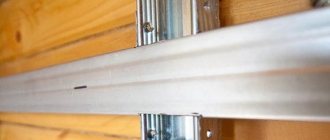
To provide insulation and floor covering, a subfloor is installed. Cross boards are laid on the supporting joists of the extension.
Further technology includes the following steps:
- Lay a waterproofing film on the subfloor, on top of which install additional joists.
- To insulate the floor, lay several layers of polystyrene foam or mineral wool between additional joists.
- Lay another layer of vapor barrier on top, on which sheets of oriented strand board will be laid.
- Install a finished floor covering.
The waterproofing film will protect the floor from moisture, and OSB sheets serve as a durable coating
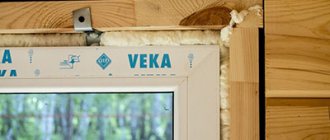
Frame walls
To insulate frame walls, a sheathing of wood blocks is created around the perimeter of the walls and ceiling. The insulation of the extension is carried out using rolls of mineral wool. The thickness of the wooden block and the cotton wool roll should be the same. The distance between the bars corresponds to the width of the insulation roll.
After thermal insulation, we waterproof the surfaces. The waterproofing film is laid overlapping and nailed to the sheathing bars. Next, the room is decorated with plastic, sheets of plywood or wooden paneling.
Expansion joints
When constructing extensions to large buildings for various purposes and in the presence of different soil structures under the foundation strip, expansion joints are used. Therefore, the soils themselves have different resistance and the load on the soil in different places of the foundation is different.
Seams are always used at various heights and levels of the building in order to maximally neutralize the resulting loads, and seams are often made at the level of the base or plinth, connecting the different tiers of foundations.
Expansion joints are insulation installed in the gap between the wall and the base; there is no provision for a rigid connection to the frame. Often tow or polyethylene cord is used as insulation, less often polypropylene, polyurethane or polystyrene foam.
- The gap between the future and existing buildings must be at least 5 cm. To create the necessary gap, use boards, plastic or slabs covered with waterproofing. This will be the expansion joint in the future.
- For small wooden buildings, it is enough to make a gap of up to 2 cm, for brick and concrete - from 5-10 cm.
The seams can also be filled with sealant or foam, and the surface can be coated with protective compounds that are resistant to weathering.
Brick walls
The brick walls of the extension can be insulated outside and inside. Internal insulation is carried out in the same way as insulation of the walls of a frame extension. Foam plastic is often used for external insulation of a brick wall. The insulation is glued to the outer walls of the building using a special glue in a checkerboard pattern.
The slabs are additionally reinforced with dowels, which are installed in the walls. A reinforcing mesh is applied on top and final plastering is carried out.
Recommendations
- What is an armored belt and why is it needed? The armored belt is an important reinforced concrete structure. It is designed for high-quality strengthening of external walls of buildings. The armored belt is laid along the perimeter of the external walls of the building and evenly distributes the load. With its help, the likelihood of cracking of the structure as a result of soil mobility is reduced.
- The armored belt is poured after the walls are erected. Formwork is constructed using boards; the boards are secured along the entire perimeter of the walls on the outside and inside. The lower part of the formwork is screwed to the walls with self-tapping screws, and the upper parts are connected with short wooden blocks. Along the entire length of the formwork, 3-4 reinforcing bars are laid parallel to each other. Short reinforcement is laid along the width, and the frame itself is connected using a special wire. The formwork is poured with concrete mortar.
Glass wool rolls are the most common and cost-effective thermal insulation material. - DSP floor slabs belong to a new type of building materials. Cement particle boards are made from wood shavings and wood. They are highly durable and do not allow moisture to pass through. DSP boards are more durable than chipboards and are suitable for floor finishing. They are resistant to damage by rodents and are not susceptible to mold or mildew. When working with DSP boards, you must wear a respirator and safety glasses, as the sheets become very dusty when cutting.