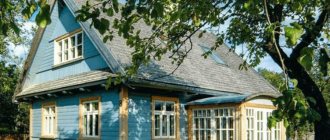
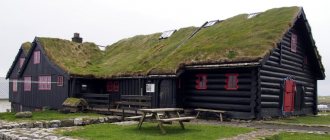
Few city dwellers do not dream of their own country house. Housing outside the metropolis means clean air, nature, space, fruit from your own garden.
But not everything is so rosy. Buying a new house or building, as they say, from scratch is very expensive. Here it’s time to think about another way, because for fairly little money you can buy dilapidated housing and restore it.
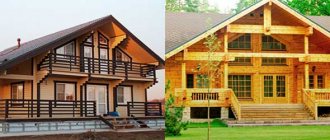
Repairing a wooden house is not as difficult as it might seem at first glance, and certainly not as expensive as starting a full-fledged construction project.
Home condition analysis
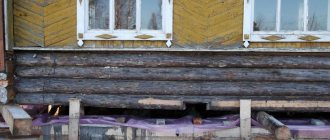
Advertisements for the sale of a wooden house can be found all the time. Most of these are buildings of venerable age, built 50 or more years ago. It just so happened that it was then, half a century ago, in an era of shortage of everything, including building materials, that houses were often built from wood.
The age of the building is a problem, but you should not despair in advance, even if at a quick glance it seems that the house is really dilapidated, it is easier to demolish it than to restore it, in reality everything may not be so gloomy. This is especially true for log buildings. Logs are a surprisingly durable, reliable material. It is worth noting that a high-quality repair of a log house of a wooden house with your own hands will extend the life of the building for more than one decade.
That’s right, before making a final decision to purchase, it’s worth going to the site, carefully inspecting the building, and identifying its problem areas. If the house really cannot be repaired, it doesn’t matter. There are many people who want to sell such real estate.
A wooden house has its own specifics; there are a number of essential details that you should pay attention to when purchasing:
- appearance of the foundation;
- condition of the crown logs;
- damage to walls;
- quality of windows and doors;
- reliability of interfloor ceilings;
- floor condition;
- roof integrity;
- ceiling condition;
- presence and type of porch;
- state of internal communications.
You need to inspect the house carefully, paying attention to every detail. At the same time, you should not get hung up on little things, for example, torn wallpaper or cracked window frames. In any case, the finishing will have to be updated, and in case of repairs it will hardly be possible to do without replacing the windows.
Reconstruction progress
Repairs need to start from the base , that is, from the lower crown.
As a rule, it is he who is most susceptible to rotting. Some craftsmen partially destroy the foundation to install the jack, but this is not necessary. You can partially saw a rotten crown using a chainsaw, removing the log in parts. As a support, you can use a thick board, which is nailed to the corners of the building and removed after finishing the work.
To identify rotten areas, you need to hit the log and its sectors with a hammer. If the sound is dull, it is rotten inside.
Having taken out the lower crown piece by piece, the foundation is inspected for damage, and if everything is in order, you can lay a log or beam of the same diameter or thickness as the rotten crown.
It is imperative to spread a layer of roofing felt on the foundation ; the wood should not come into contact with soil or cement. The beams or boards are hammered in with a sledgehammer, the inter-crown cracks are caulked at the very end, when the layer has already been installed.
Alignment
To restore the original appearance of a rickety structure, use the following method. Take 2 thick beams along the length of the oblique wall. One beam is installed on the outside of the wall, the other on the inside.
Holes are made between the bars and the wall in 3 places:
- above;
- below;
- in the center.
Through these holes the bars are compressed, pinching the rickety wall between them. Instead of bars, metal corners are also used.
If the wall has only 1 hump facing the outside of the house, then it can be supported with a large beam or board. To do this, you need a board with an area capable of covering an arched wall. Place it on the wall and support it with a beam.
Removing fungus
Before insulating the inside of the house, you need to check the wood for blue stains and fungus . And if it may not be in the room where the room is heated, then under the floor or in the attic there will be at least one damaged board.
These elements are not façade, so there is no need to paint them; it is enough to coat them with an antiseptic and a fire-resistant compound. Each tree has its own composition, this must be taken into account when choosing an antiseptic.
Sealing cracks
Through cracks and cracks 3-5 mm thick must first be cleaned of dirt and dust, then using a caulk or spatula, push a polyethylene foam cord into the large cracks.
An acrylic-based sealant is applied on top. Do not use silicone sealant . It is not based on any other mixture. And if in the future you have to seal the same cracks, you will have to completely remove the silicone. Acrylic sealant is designed specifically for the repair of wooden houses.
Interventional cracks are sealed with tow according to the classic method. Outside the house it is moistened with resin. There is no need to use foam, putty or other materials that crumble over time. It should be borne in mind that the log is constantly in motion, sometimes expanding, sometimes narrowing.
The material used to seal the cracks must also be plastic.
Disinfection of the building inside
When the old insulation is removed, the internal walls must be disinfected in the same way as the external ones. Water-based antiseptics are sold for interior work.
They are not dangerous to people and animals and have no odor. Some compositions also contain fire-fighting ingredients. After the walls have been treated, you can lay vapor and waterproofing, as well as insulation, if necessary.
Bleaching and sanding of logs
If possible, it is better not to use bleach to combat fungus; it destroys the fiber structure and the log becomes loose. It should only be used as a last resort. When working with chlorine, you must wear a respirator, as it is a very toxic substance. After treatment with bleach, its residues are washed off with water.
Sanding the walls is necessary to remove the top layer of darkened wood . But it is worth remembering that the machine removes no more than 1-2 mm of the top layer, and the cyanotic fungus penetrates to the very core. Therefore, it is rational to use sanding only before painting or to eliminate blackening due to sunburn.
If removing the top layer is necessary for painting, then it is better to first remove the remaining old paint and varnish with a spatula and only then go over it with sandpaper to eliminate unevenness.
Biosecurity outside
Before painting, it is imperative to disinfect the external walls.
The lower crown is most susceptible to rotting, therefore, as a preventive measure, it must be coated with 2 layers of a fungicidal preparation that prevents the occurrence of pathogenic fungi and bacteria.
The remaining logs and especially the ends of the building
are treated with antiseptics, which come in 3 types :
- watery;
- oil;
- organic.
A water-based composition is not used for interior work, since it is easily washed off with water. Oily antiseptics are considered the best of all. Their oil base, created from petroleum products, is not washed off and remains on the surface for a long time.
However, such compounds are very toxic ; when treating walls, you must wear a respirator and gloves. Organic ones are as good as oil-based ones, but when they come into contact with metal surfaces, they cause corrosion.
Many antiseptics have a combined composition, which also includes fire retardants, but it is better to check this point with the manufacturer. If there is no such component, then the walls additionally need to be treated with fire-fighting mixtures.
Primer and painting
Primer is applied before painting in order to save paint. The paint adheres better to a primed surface; there are no drips or absorption into the porous surface. Wood primer is sold in several types :
- Acrylic is the safest and dries quickly, some compositions have antiseptic ingredients.
- Epoxy is the most toxic, water-repellent. It is used for houses built in climates with high humidity.
- Alkyd is also suitable for humid climates, but it is more used for painting baths; it dries up to 18 hours in warm weather.
- Shellac is suitable for repairs in wet weather because it contains alcohol, which helps the surface dry quickly.
The paint and primer should have a similar base for better adhesion. When choosing a paint, you must read the instructions, which will help determine the composition and compatibility with the primer. The paint should have a high degree of protection against UV rays and, if possible, not be too toxic. It is applied in 2-3 layers at the request of the owner of the house at intervals of several days.
Foundation restoration
The most important part of any structure is the foundation. The durability and reliability of the building as a whole depends on its condition. The foundation of an old wooden house is probably in poor condition, and it is possible that the house was built without one at all. Restoring the foundation is exactly where repair work needs to begin, otherwise accidents may occur, including the complete collapse of the building.
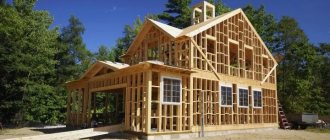
In most cases, restoring the foundation of a wooden house will require raising the entire building. For these purposes, strong beams are placed under the box and several jacks are used.
Note! The lifting of the building should be preceded by a detailed inspection of the condition of the walls; it may be necessary to dismantle the most damaged areas before starting repairs.
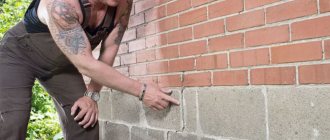
If the foundation is only slightly cracked or sagging, it can be restored using concrete mortar. It is enough to install the formwork, pour the concrete, reinforcing it with metal rods. If the base is partially destroyed, it can be reconstructed using brick, stone or cinder blocks.
A completely destroyed or completely missing foundation will have to be rebuilt. A good solution for a medium-sized house would be to use piles. You can make it more reliable and distribute the weight of the building over a larger area by creating a shallow strip foundation between the piles.
A renewed or newly created foundation must be allowed to stand. It will be possible to lower the building only after the concrete has completely hardened.
Reconstruction of an old wooden house: foundation
Old wooden houses are characterized by a strip or column foundation. It is very rare if the tape is poured to the freezing depth; basically, it is a shallow depression, which over time, under the weight of the structure, has sunk considerably into the ground. The scope of work depends on the condition of the foundation. To evaluate it, a thorough inspection of the above-ground part, if any, is carried out, and buried elements are dug up and examined. Portal user and part-time leader of a team involved in the repair and replacement of foundations of wooden buildings, Igor Bekkerev, classified the possible scope of work this way.
Igor Bekkerev FORUMHOUSE participant, foreman
The main task of the foundation is to transfer the load from the house to the ground. There are different foundation defects, and there are also different repair methods. This may be one type of work, or more often it is necessary to use a complex.
- Insulation of the foundation and blind area;
- Foundation waterproofing;
- Drainage works (water disposal);
- Strengthening the foundation with an armored belt from above;
- Strengthening the foundation with an external armored belt;
- Replacing the foundation with hanging the structure or moving the structure;
- Leveling a foundation or leveling a building on a foundation.
To gain access to the foundation, the box of the house is raised to the required height - it is hung, and less often it is moved. Hydraulic jacks are used for lifting; the walls are lifted one by one, or the entire box at once. Due to the ability of wood to withstand certain deformations when performed correctly, this operation does not compromise the integrity of the house. Based on the condition of the foundation and the intended work, jacks are installed directly on the base (strip foundation) or on the ground, on a previously laid thick board or other support. The number of jacks on the wall depends on the dimensions of the box; cuts are made under the jack in predetermined places.
Usually, a team of several people is hired for such work, but one skilled craftsman can raise a wooden house in a short time. Forum member Arty-CooL, who is engaged in the reconstruction of a log house, was lucky to have such a professional. The foundation under the house is in good condition, but it was decided to strengthen it, build it up and immediately pour a new contour for the extension.
Arty-CooLForumHouse Member
Today we completed raising the house and replacing the lower crown, the foreman worked alone, I tried to help after work, although I probably distracted him more from work. When replacing the crown, the floor joists were simultaneously cut into the new crown. I finished it in 3 days, that’s how the masters work!
In a similar situation, the family of the user GrNata managed without the involvement of craftsmen - their husband and sons were used as labor. The foundation was shallow, rubble, after hanging the box it was partially dismantled, a new wide strip was poured, and then the basement part was laid out with brick.
GrinataForumHouse Member
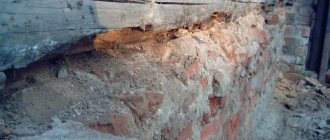
The foundation there is rubble, very shallow, 40-50 cm, on the outer corner the house apparently began to sag, the rubble was taken out from under the corner and replaced with facing bricks. When we took it out from there, it crumbled into small shards. The bottom two crowns are just rubbish, we raked out part of the rubble, put up the formwork, poured it and laid the brickwork.
To strengthen the foundation with an external reinforced belt, a monolithic reinforced concrete strip is poured around the perimeter. The depth of the tape exceeds the depth of the old foundation by the size of the sand and gravel cushion, the average width is 40-50 cm. The surface of the old foundation is thoroughly cleaned, all flaking elements are removed. To increase adhesion with the new solution, the foundation is impregnated with a primer with high penetrating ability. Reinforcing pins are used as a binder, driven into the old foundation at a distance of 20–25 cm, in several rows. The pins are welded or tied to the new frame, and the solution is poured into the formwork in layers.
The replacement of the foundation is carried out in stages or all at once; in the first case, the old foundation is dismantled in parts, with new fragments gradually poured in. In the second case, everything is dismantled at once, a monolithic tape is poured, pillars are cast or piles are screwed. A forum user under the nickname Andryukha052 was offered a phased replacement, but he preferred a simultaneous replacement, fearing possible problems with the foundation in the future.
Andryukha052 FORUMHOUSE Member
They suggested removing the logs between the pillars, digging trenches between the pillars and pouring a foundation there, laying masonry up to the frame between the pillars, and laying the house on the masonry. Then remove the pillars, dig trenches under the pillars and fill - connect the masonry. I didn’t really like this idea; the foundation would consist of several sections. If there is any movement in the ground, everything may crack. Even if nothing happens, I thought it was better to play it safe. Therefore, the house was suspended on U-shaped supports, everything was removed at once, a single strip was poured and a single masonry was made.
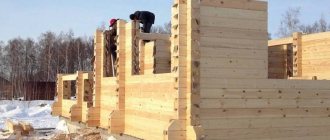
Wall repair
The most vulnerable part of the wall is the crown logs. It is in them that cracks most often appear; the wood in the lower part of the structure is most susceptible to dampness, and as a result, rotting; the wood loses its properties and breaks under the weight of the structure. If the condition of the lower logs causes concern, they must be replaced.
Repairs can be approached literally from two sides. You can completely disassemble the house, change the lower logs and put it back together again. This method will take a lot of time, but it has an undeniable advantage. The work does not require special equipment; in addition, during the disassembly, the condition of all parts of the house without exception will be checked, and damaged wall fragments will be replaced.
The other option will take less time, but its implementation will require special equipment and skills. In this case, the lower logs are replaced during the foundation restoration work. Raise the frame and remove the lower logs. The foundation is repaired, a new crown is assembled on it, and the box of the house is lowered onto it.
Advice! When choosing a material for a crown, you should not try to save money; it should be reliable and durable wood.
Larch is excellent. It is resistant to moisture, durable, although difficult to process.
Rotten or insect-infested parts of the walls are also replaced. If the log house is completely disassembled, this is not a problem - the logs are replaced during assembly. If the task is to repair a building without completely dismantling it, you can use a chainsaw to cut out damaged areas. You need to cut at an angle to ensure the reliability of the subsequent connection and make your work easier.
Reconstruction of the walls of a wooden house
In addition to crowns, other parts of the structure may need to be replaced when the wood is exposed to moisture. Most often this happens with the upper crowns if the roof leaks and water accumulates in the insulation. It is also common for the wall around windows to get wet, although the wood may appear intact from the outside.
EtanolFORUMHOUSE Member
One point that would be worth paying attention to is the logs under the windows. If the windows “cry” in winter, the logs could rot. Moreover, I have seen such a thing that a log rotted from the inside, but on the outside it was quite good wood, only the rot was diagnosed by drilling.
serwidFORUMHOUSE Member
This happened to me when I changed the windows in my house to plastic ones. After dismantling the old ones, I had to make inserts, since the log under the window had rotted and was not visible from the outside.
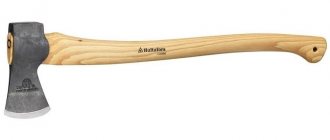
You can detect rot in seemingly normal wood by tapping it with the butt of an ax or a hammer - the rotten filling gives a dull sound, the whole log makes a ringing sound. As an alternative to drilling, an awl is used - it will not go more than a few millimeters into a normal tree; it will sink into a rotten one without resistance.
Replacing one element of a frame or part of a wall is carried out piece by piece - damaged ones are cut out, new ones are inserted, all cracks are necessarily sealed, the wood is pre-treated, as are the insertion points. To save time and money, one of the users did the following.
Alexey TsvetkovForumHouse Member
I cut out all the rot from the inside with a chainsaw down to the “living” tree, soaked it with an antiseptic 2 times and drove an antiseptic block inside, cut to the size of the “hollow” and stapled with flax, then fixed it with 150 mm self-tapping screws on both sides.
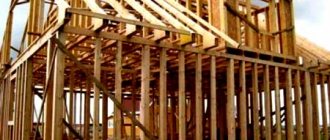
Roof repair
The roof of the old building will probably have to be completely redone. It doesn’t matter what it was covered with, if the building has served for half a century or more, the material is guaranteed to have lost its properties. The best repair option, unless we are talking about the restoration of a wooden house that has historical value, would be a complete replacement of the roof using modern roofing materials.
You can work on the roof only after the issues of foundation reliability have been resolved and the load-bearing walls have been completely restored. The work should begin by climbing into the attic and checking the condition of the rafters and sheathing. These structural elements do not experience excessive loads, but if the roof leaks, moisture could render them unusable.
Preparing for work
It is imperative to prepare for repairs in order to analyze what work will have to be done and how much money will need to be spent.
All preparation is divided into several parts:
- Remove unnecessary things and garbage from your home;
- Inspect for rotten wood (it is better to seek the help of professionals);
- Check the house for cracks in the walls and ceiling. They will need to be sealed using a special antiseptic;
- Check the floor - it will most likely have to be completely redone.
After a complete inspection of the building, draw up a detailed plan and estimate.
Replacement of doors and windows
In almost one hundred percent of cases, repairing an old wooden house will include replacing windows and doors. Surely, over many years of use, the frames have become unusable, and the size of the window itself is unlikely to suit a modern person. Even at the stage of wall repair, it would be useful to consider the option of increasing the size of the window. This will make it possible to let more light into the premises and give the old building the appearance of a modern building.
This kind of alteration is not particularly difficult; one of the significant advantages of wooden buildings is the ease of redevelopment; just a little work with a saw - and the building will take on a new look, modern windows.
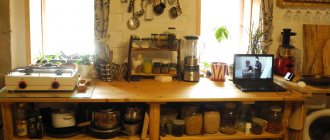
A little cheating in the interior
The family received almost all the furniture for free or practically free of charge: the doors and laminate flooring were left over from the sister after the renovation, an old chair was pulled from the balcony, where it had been collecting dust for years without use, something was found at a flea market and put in order.
Twin beds were once a bunk structure. The man simply sawed it and nailed the legs.
A solid wood double bed made to order from a village craftsman. It cost only 100 rubles.
The kitchen was made from MDF by a neighbor carpenter from Zarechan. Cost about 400 rubles.
The table was left over from the previous owners - it just needed to be cleaned and painted. Covered with a tablecloth, he looks completely fine.
We also got the interior doors almost free of charge; we only had to spend money on a metal entrance door and plastic windows.
As an example of prices for PVC windows for the home, here is the price list of the company Window Factory (Vindal), a link to their website.
Price per m2, excluding installation
Single-leaf window - from 6,700 rubles. Double-leaf window - from RUB 8,900. Three-leaf window - from 10,700 rubles. Balcony block - from RUB 15,700.
The paintings were painted with my own hands, all textiles were purchased at discounts and in inexpensive stores.
The guys also spent about $2 thousand on interior work. Of course, if it weren’t for the furniture donated by relatives and personal supplies of the owners, the amount could have increased significantly, but many people have such belongings. In addition, the flea market, where such interior items are often sold for next to nothing, exists for a reason.
Floor repair
The old floor of a log house, even one that is expertly made using high-quality materials, will also need to be replaced. Creaky floorboards are less of an evil that can lurk in an old wooden building. Moisture over many years of use has taken its toll; the boards are probably rotten and could break at any moment. The old floor will need to be completely removed. This applies not only to the floorboards, but also to the entire system that supports them.
Before making a new floor, you need to provide maximum protection from moisture. A wooden house is very demanding when it comes to waterproofing. In addition, it is important not to forget to treat the joists and floorboards with an antiseptic during repairs; this will ensure the longevity of the building and protect it from pests.
Ceiling repair with beams
The ceiling in our house is made of planks of five and insulated with a 15-centimeter layer of sawdust. The inside was covered with wallpaper (such interior decoration is a common occurrence in old houses), but the paper came apart at the seams and sawdust was already pouring into the room between the boards. The roof of the stove was leaking and the boards around the chimney simply rotted. Otherwise the ceiling was fine.
Interior finishing and thermal insulation
How and with what the house will be decorated inside depends entirely on the taste and capabilities of the owners. A significant advantage of building with wood is the wide choice of finishing options. Depending on the condition of the internal walls, they can be cleaned and varnished, upholstered with any sheet material and painted; a beautiful and unique interior can be created using lining, wooden or plastic panels.
In addition to beauty, it would be useful to think about preserving heat; no one likes to spend money on heating and feel cold at the same time. There are a lot of options for insulating a wooden house, the simplest is to lay a layer of mineral wool between the wall and the interior finishing.
Exterior decoration
To preserve the natural beauty of a wooden house, they refuse to use siding and other facing materials. Walls that have darkened over the years, with various deposits on the surface, are put in order - they are cleaned with a brush and impregnated with special bleaching antiseptic compounds.
It is most convenient to carry out the treatment using a grinder and a special attachment - a brush with iron bristles. All dirt and deposits cannot be removed from wood in this way, but it can significantly improve the appearance and reveal the structure. In the future, you can use wood varnish or paint: tints will level the surface, and new elements will no longer attract attention. Like cladding, paints and varnishes are not only decorative, they effectively protect the surface from external influences.
How users of the portal restore their wooden houses can be found in the section on reconstruction and repair of houses. The necessary technical information on foundations can be easily found in the foundation topic. How to turn an attic into a roof is described in the section on warm roofs. An article about choosing the right contractor will tell you how to save nerves and money during repairs or reconstruction. The material about the nuances of constructing an extension contains information on ways to connect buildings. Video about a combined house made of aerated concrete - for everyone who is planning to build.
Subscribe to our Telegram channel Exclusive posts every week
Heating a country house
It would hardly be surprising if the heat source in the purchased house is an old, cracked stove in the corner, which is not only inconvenient to use, but also dangerous. Something needs to be done about this. The ideal option is a gas connection. It's expensive, but convenient and safe.
Of course, in this case you will have to buy a boiler, pipes, radiators, and pay for the creation of the project. But as a result, the owners will receive warm housing with the ability to independently regulate the conditions in each room.
It often happens that the village is simply not supplied with gas; here it is worth thinking about creating electric heating or water heating with a solid fuel boiler.
Far from being the most useless thing in a country house is a skillfully built fireplace. It's beautiful and functional. The fireplace will make its contribution to creating comfortable conditions and coziness. You just need to be aware that open fire is dangerous, and doubly so in a wooden house. The construction of a fireplace can only be entrusted to professionals.
Mistakes when restoring an old log house
- Using putty to seal cracks. The putty will quickly dry and crumble, and the cracks will return to their original position.
- Mixing primer and paint on different bases. If the primer chosen is water-based, then the paint should be water-based. Do not mix water-based or acrylic primer with oil-based paint, etc. As a result, the paint will begin to peel off.
- Incomplete caulking of jute. When the remains of jute or tow sag between the crowns, they absorb moisture and transfer it to the inter-crown grooves and bowls, the tree begins to rot from the inside.
Wiring and internal communications
After the foundation has been restored, the walls have been repaired, the roof has been updated, you need to take care of the internal communications. The first thing to start with is to check (or better yet, change) the wiring. Of course, inspection and installation should be entrusted to a professional electrician.
Wiring needs to be given maximum attention. Old wiring in a wooden house is a time bomb. It will not allow you to use all the necessary electrical appliances, but this is not the worst thing. A short circuit can occur at any moment, the consequences of which can be the most disastrous.
The same applies to other communications; an old house means old rusty pipes, which are best replaced immediately with modern plastic ones. This applies to water supply and sewerage.
Floor installation and laying
The floor covering is usually laid on a concrete screed. To create it, you will have to dismantle the logs and clear the room of debris and building materials.
The concrete screed is laid in this way:
- a layer of sand or small crushed stone is poured onto the bottom;
- an insulating film is laid on top;
- then a layer of concrete mortar is poured.
Be sure to level the screed. For the concrete to dry, it will take up to one month at a temperature of + 20 degrees.
✦ We recommend that you read: Laying and installing warm electric floors under tiles - an expert shares tips
When the concrete has dried, they begin laying the flooring. The choice of material is large, although laminate is more often used. It is laid on a cork base. A gap of about 1 cm is left near the walls for the plinth.
If a board is laid as a floor covering, then screed is not performed. The boards are nailed to the joists. To prevent moisture from forming under the floor, a 20-centimeter layer of expanded clay is poured under the joists. Such backfilling is required when logs are installed on the ground.
After laying the boards on the joists, they go over the board with a sanding machine.
Ceramic tile
- reliable and inexpensive;
- suitable option for bathrooms and toilets;
- complex installation.
Another good answer to the question of how you can inexpensively and beautifully cover the walls of your home, if it is made of wood. Good - in terms of material costs and the final decorative effect. However, in order to lay the tiles evenly and correctly, you cannot do without special skills. Still, good specialists are worth it.
The tiles are glued to the base surface using tile adhesive, and after direct cladding, the seams are sealed with fugue - a special grout that prevents the appearance of pathogenic flora on the walls of a wooden house and, at the same time, by adding various dyes, also helps to emphasize certain shades in the interior.