Attaching timber to a wall is not a simple matter. Timber has always been popular in the construction of private houses. Currently, building materials with new properties are increasingly appearing and technologies are developing. The combination of timber with new building materials and installation systems sometimes raises questions - how will it be technically correct to attach timber to different surfaces?
Fastening material is required for fastening. Today there are many types of fasteners for any connection of elements. Their differences are the scope of application and technical characteristics, which regulate the permissible load on the fastening element and fastening technology.
Corner fasteners made of metal have holes for fastening with screws, nails or dowels. Metals for corners are used that are not subject to oxidation and are quite durable. The safety margin of the corner must be taken to be at least 2, that is, the corner must withstand a weight twice as large as the weight of the element that will rest on it. At the same time, you also need to take into account and calculate which structures will rest on this beam.
Wooden beams are attached to walls for different purposes - to strengthen hanging furniture, bookshelves or decorative interior elements, as well as household appliances on these walls. When installing door frames, for cladding outside and inside, for installing a canopy over the front door or a canopy for a veranda, you also need to attach the timber to the walls. The main thing is that you first need to decide on the material of this wall, and, of course, you will have to approach aerated concrete blocks, plasterboard cladding and a brick wall in completely different ways.
The choice of fastening method depends on the wall material and the features of the structure being created. Of course, in the context of aerated concrete, we are not talking about attaching purlins made of timber to walls made of cellular concrete or ceramic blocks; this is impossible without installing an armored belt or structures that reinforce the support, but only about attaching bars, for example, for sheathing under plasterboard.
Also, we are not talking about attaching timber to brick and concrete walls for the construction of floors or floors with logs made of timber, since in these structures the timber and its fastening must bear significant loads. The design of fastening the timber in this case is installation into the wall during the process of laying or concreting, or resting on an armored belt.
The end of the beam is additionally impregnated with a fire-biozacite composition before embedding or laying in the wall and protected with a layer of waterproofing material. Oil-based antiseptics are not recommended because they make it difficult for moisture to evaporate. The ends of wooden beams are cut at 70 degrees so that moisture evaporates better. The gap between the niche wall and the beam is required; thermal insulation is placed in it, since the beam rests on the outer wall.
When laying timber beams on an armored belt, they are secured with special anchor plates coated with an anti-corrosion compound.
Angle fasteners are used to fasten timber to concrete and brick structures. A reliable and durable connection is possible when using high-quality metal corners that can withstand the load.
- Before installing the corner elements, mark the position and contours of the beam on the surface using measuring tools. You can use a regular plumb line and a building level, but a laser level will allow you to quickly make markings both vertically and horizontally at the same time.
- Then the corner elements are fixed with dowels, self-tapping screws, and nails are used for lighter structures. The screws are not fully tightened so that the position of the element can be slightly adjusted.
- The timber is inserted into the corners and attached to them with self-tapping screws, then the fastenings of the corners to the wall are tightened completely. The corner is clamped with fasteners, if necessary, adjusting its position exactly according to the markings.
Fastening Features
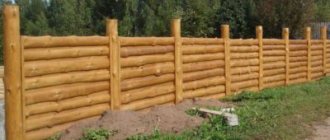
We will consider it as the house grows, starting with the foundation. After building the foundation, if you intend to build a log house, then you definitely need to think about fastening the casing and the first row of logs.
But the very first layer in this structure will always be a layer of waterproofing.
Why is waterproofing needed? The fact is that the foundation will come into contact with the ground and even possibly with groundwater. And water is the builder’s worst enemy. This so-called capillary moisture will be absorbed by the concrete and rise up to the walls of the building.
If you do not put a barrier in the form of two layers of roofing material, this will lead to very big problems. The wall will get wet and the humidity will destroy the material from which it is made, even brick or reinforced concrete.
Tools and accessories for installing floor beams
When working, ordinary carpentry tools are used. When using a connection in the form of perforated plates or angles, a screwdriver is required to fix them. For fastening to bolts and screws, you need a low-speed drill and a wrench with a ratchet or a dynamometer. It is also advisable to have a miter saw and a chain saw to speed up the process. The most desirable tool when installing beams is a crane. Especially for metal beams. Or at least make a tripod with a winch on top to make construction easier. It is also important to have collapsible scaffolding, trestles and other scaffolding at a construction site. It is impossible to use only a stepladder.
How to attach a wooden beam to a brick wall?
If you have to work on a brick wall, use only a drill. Drill carefully and slowly, evenly without loosening on the sides, to avoid splitting and scattering of the brick. If you hit concrete, it is better to use a drill with a hammer drill function, this will help crush it. Cases of hitting a hollow brick often occur. How can we be here? It is better to use a dowel that, when twisted, curls into a knot. Carefully screw it into the drilled hole so as not to break its parts.
It is better to screw self-tapping screws into concrete using dowels made of durable plastic. The dowel is laid between the concrete and the self-tapping screw. It can also be pre-lubricated with glue.
An anchor is also perfect for attaching a wooden beam to a brick wall; unlike nails and screws, it can handle any load.
Rules for choosing beams for interfloor ceilings
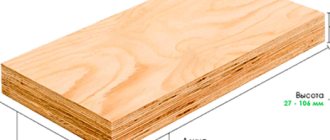
The beam must be made of dry wood. It is worth choosing it according to the project. When compiling one, calculations are made for strength and rigidity. The beam must have sufficient mass of its own to at least somehow dampen sounds and vibrations from the upper floor. As a rule, beams with a height of 200-300 mm are used for spans of up to 5 meters. Beams are laid every meter to prevent sagging of the floor joists of the upper floor. Typically, a full beam is a beam of rectangular cross-section, the width of which is 2/3-1/2 of the height. It fits on a narrow edge. The beam is many times more reliable than a carriage board laid on its edge as a beam.
the best choice for large spans is a metal beam. An I-beam will cost less than a powerful laminated timber of the same rigidity and length. And the metal will not have problems with fungus, insects, or fire resistance. When laying, the rolled products must be placed on cushions and good hydro- and thermal insulation against condensation must be ensured. If desired, they can be finished as wood.
Fastening timber to concrete
When thinking about how to attach wood to concrete, it is worth considering the types of fasteners. Even regular studs or dowels will do. For dense and durable concrete, dowels or studs are chosen; for not very reliable concrete, it is better to use dowels. Pins are a good choice, but to work with their hex head you will need a special tool with the right size heads.
Rules for choosing fasteners according to dimensions:
- Length - selected as follows: the base should include no less than the length found in the beam (preferably 2 times more). If there are 10 centimeters in the timber, there should be at least 10 in concrete, preferably 15-20 centimeters. Here it is worth remembering that it is better not to mount it to the floor slabs - the end of the fastener may peek out from the neighbors’ ceiling.
- The presence of a “neck” in a hairpin or dowel-nail - so that the thread begins not from the head, but below. An area without threads will allow you to pull the beam to the base.
- Diameter - as long as it is not small (choose from dowels provided in the required length).
You cannot skimp on fasteners - you need to ensure that the threads are clearly cut, the metal is not overheated, and is durable. It is also possible to use a quick-fixing nail anchor - a steel fastener that is fixed into a drilled hole, but there is no need for a plug (it is already there, since a metal shell is created around the rod; it expands when the nail is driven in, which holds the beam due to the expanding force) .
Fastening timber without drilling and fastening
Fastening a beam without fastening and drilling involves simply installing it on spacers. If this method does not seem reliable enough, you can use concrete fixation. Mix a semi-dry mortar of cement and sand of grade M250 or higher (take 2.5-3 parts of sand per part of cement), lay out in heaps along the walls where the logs will be mounted.
The pitch is chosen in accordance with the thickness of the timber. The larger its cross-section, the less support is required. For timber 5x5 centimeters, the step should be 40-50 centimeters, for 10x5 - step 60 centimeters, for 15 centimeters make 80 steps. The height of the cement should be higher than the level of the lower edge of the beam. Next, the timber is laid on the mixture, pressed down, leveled, and allowed to set. The beam is fixed and the logs are reliable.
Fastening with corners
This method is not very correct, but it works quite well and makes it possible not to sacrifice the height of the room. The timber is secured to the concrete with mounting angles made of high-quality steel with pre-drilled holes. The corners are placed on both sides of the beam (permitted in a checkerboard pattern or one opposite the other).
The corners are attached along the line to the floor, then the timber is level along the edges, then the middle is leveled. Here you will have to tinker: most likely, you will have to press down or lift the beam. After securing in the middle, it is easier to position the intermediate ones (if the beam is not twisted, but even). Having been placed on one side, the corners are mounted on the other, making the structure stable.
Application of specialized adhesives
Specialized adhesives are suitable for cases when you need to attach a thin block to a concrete wall or other surface - the weight of the parts should be small, and so should the load on the structure. Properly selected glue will fix any structure well.
What types of glue are suitable for fixing timber to concrete:
- The building composition “Liquid Nails” is an effective and inexpensive material in the following modifications: “Express”, “Universal”, “For panels”, “Super strong”, “Very durable”. The universal type will be the best choice for the wall, provided that the concrete is dust-free and clean. To work at minus temperatures, choose glue with a gripping force of up to 70 kg/m2.
- Moment glue - there is a wide choice, it is better to take the most reliable one. The "Epoxylin" modification is suitable - a two-component composition. After drying, the composition can be sanded or subjected to other types of mechanical processing.
- Moment Joiner adhesive is used for laying floor coverings.
Polyurethane foam
Only a composition of increased strength is suitable and is used in the installation of window sills, wall panels, and floor coverings.
The main advantages of using polyurethane foam:
- Reasonable cost.
- High level of strength after complete drying of the substance.
- Low level of thermal conductivity, which is especially important when finishing walls and floors.
- Hydrophobicity.
- Excellent soundproofing properties.
- Biological resistance.
- Easy to use.
The disadvantages of this installation option include the long drying time of the foam. For 5 minutes you need to hold the part in the desired position so that it does not move away from the concrete surface. To ensure optimal contact of the surfaces that are bonded to the foam, they need to be slightly wetted with water.
Installation of beams
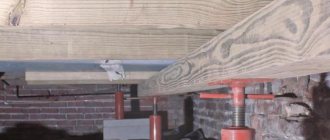
Separately, it should be said about how to support a wooden beam on a brick wall. This procedure is very important, since beams usually take on a large load or even serve as a ceiling. Therefore, embedding a beam into a wall (support) must meet certain strength and reliability requirements.
So, the installation of beams is usually carried out in special niches with a depth of at least 150 mm.
The process itself looks like this:
- The first step is to cut the ends of the beam at an angle of about 60 degrees.
- Then the ends of the part are impregnated with an antiseptic liquid, and after drying they are treated with resin.
- Next, the bottom of the niche is leveled and covered with several layers of roofing material.
- After this, the ends of the beam are wrapped with roofing felt and laid so that they do not reach the wall of the niche by about 40 millimeters.
- Then the remaining space in the niche is filled with concrete.
This completes the embedding process. It must be said that to add rigidity to the structure, additional fastening of the beam with an anchor is often performed. In this case, the anchor is installed during the process of laying the wall, and is located at a distance of about 12 cm from its outer surface.
Sealing scheme using an anchor
The other end of the anchor should protrude 20 cm into the room. In order to mount the beam, a hole is made in it corresponding to the diameter of the pin. This installation method is used in cases where it is necessary to obtain a particularly strong fastening.
Fastening methods
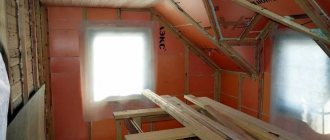
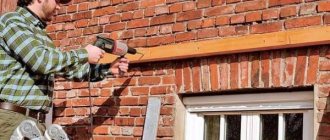
The photo shows the installation of wooden slats for installing wall panels
Over the long history of construction work, a large number of methods for attaching wood to concrete have been tested. Among the current and widely used methods, we note the use of specialized assembly adhesives and the use of fastening hardware.
Let's look at the features of implementing these methods and find out which materials are optimal for carrying out such work.
Application of specialized adhesives
Installation of wood on concrete stairs
If reinforced concrete was cut with diamond wheels, and now you have to install wooden parts that are small in size and weight, you can use special assembly adhesives.
A properly selected adhesive composition allows you to reliably fix not only baguettes or baseboards, but also overlays on stair steps. However, you need to understand that the range of adhesive compositions is wide, and therefore you should count on the optimal result only if you select the right product.
If you need adhesive for concrete and wood, pay attention to the following compositions:
- Construction adhesive “Liquid Nails” is a relatively inexpensive and at the same time effective solution for working with materials of interest to us. “Liquid nails” are presented on the market in several modifications, namely, “Universal”, “Express”, “Super strong”, “Extra strong”, “For panels”, etc.
Assortment of glue “Liquid nails”
If the question is how to attach a wooden block to a concrete wall, the best choice would be a particularly vicious and universal modification.
The universal type of Liquid Nails adhesive is an excellent choice for interior use. For example, with this tool you can successfully glue wall panels made of lumber to pre-cleaned and dust-free concrete.
But if you are interested in how to glue wood to concrete at sub-zero temperatures, you will need “Liquid Nails,” which are especially strong with a gripping force of up to 70 kg per 1 m². This glue will hold the wood even on uneven concrete at temperatures down to -17°C.
- Moment glue is a wide range of different compositions with different technical and operational properties.
The photo shows the two-component composition “Epoxilin Duo”
Of particular interest is the “Epoxylin” modification, which is a two-component composition that works with a wide range of materials including concrete and wood.
After drying, the composition not only reliably holds the glued surfaces, but can also be sanded or subjected to other mechanical processing without compromising the adhesion strength.
Another modification of the Moment glue, through which concrete can be joined to wood, is the Joiner Moment. This product has found wide application in the process of laying floor coverings made using lumber.
Polyurethane foam is a good option for simple and effective gluing
The photo shows the use of polyurethane foam
If necessary, high-strength polyurethane foam can be used as glue. This is a good solution for laying wooden floors, installing window sills, wall panels, etc.
This method of connecting two surfaces is characterized by a number of advantages, including:
- affordable price compared to other adhesives;
- high bond strength after complete drying of the composition;
- low degree of thermal conductivity, which is important when finishing floors and walls;
- excellent sound insulation qualities;
- hydrophobicity;
- biological stability;
- simple instructions for use.
However, there is also a significant drawback, namely the long drying time of the foam. Therefore, for 5 minutes the glued part will have to be held in the desired position so that it does not move away from the surface.
Important: To ensure optimal contact between the bonded surfaces and the foam, they must be slightly moistened with water.
Surface preparation is the key to success
Whichever of the above compositions you choose, before attaching wood to concrete, both surfaces must be properly prepared. In order for the installation work to result in a strong and durable connection, both surfaces must be as smooth as possible, dust-free and grease-free.
The main problem is the porous structure of the material, especially if diamond drilling of holes in concrete was carried out. This property causes excessive absorption of adhesives, and therefore the connection does not have time to gain the proper strength.
It is not difficult to make a coating from concrete that is predisposed to gluing; to do this, you need to reduce the number of pores. For this, deep penetration primers are used, which penetrate into the porous structure of the material and harden there. As a result, the micropores close, and the density of the concrete allows the use of glue.
Important: Wooden parts should be glued to pre-prepared concrete bases in strict accordance with the adhesive manufacturer’s instructions.
How and what to fasten
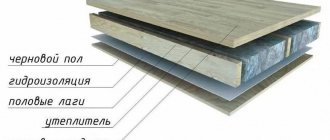
The beams are laid under a flooring made of plywood and treated boards. In order for the base to be firmly fixed, there are no cracks or movements, it is necessary to make a strong fastening to the concrete wall. If the house is an apartment building and there are neighbors below, it is recommended to consider fixation methods without fasteners so as not to disturb the sound insulation.
Rubber gaskets are used that absorb the resulting vibration. The layers help to align the position of the lags and level them.
There is no need to be afraid that the floor will turn out to be unreliable: when clamped with rubber, a tight fit is obtained, providing a sufficient level of fixation. Sheathing with flooring helps to tighten the structure; the ceiling is pressed against furniture and appliances.
It is necessary to use only dry timber in the work; it is better if the wood is dried using the chamber method. If it is wet, it will become deformed as it dries, may become covered with severe cracks, and the floor will be unsafe.
You can reduce the risk of destruction of the base if you use a composite beam made from two to three boards. To connect the elements, nails and self-tapping screws are used, which are arranged in a checkerboard pattern.
Fastening to a concrete floor is carried out in rooms with a poured concrete screed. More often, in private homes, where there will be no complaints about sound insulation. Any type of fastening can be used.
For work you will need power tools: jigsaw, hammer drill, drill. You need to immediately prepare anchor bolts, other hardware, screws, and a building level (you can use a laser and bubble level at the same time).
From consumables, it is necessary to prepare waterproofing, components for mixing concrete mortar, primer, and rubber gaskets.
Any tools and materials are chosen based on their technical parameters, the homeowner’s budget, and the recommendations of the master. The main thing is to buy products in certified stores and not save much: cheap raw materials will not last long.
Fastening the beam to the foundation with rigid fixation
If there is no confidence in the reliability of the overhead installation, use rigid fixation to secure the beam.
How to attach timber to a strip foundation
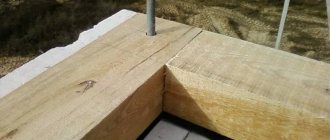
If the foundation is strip or slab, you need to make a decision in advance, because in this case, special bolts (studs for attaching the timber) must be poured into the grillage, and the crown will subsequently be attached to them.
Holes are made in the beams according to the location of the bolts. The foundation is covered with waterproofing. All unevenness in the concrete must be eliminated in advance. Then a wooden structure is placed on top so that the studs fall into the prepared holes and secured with locknuts.
Attaching timber to piles
To install the crown on a pile foundation, U-shaped brackets are used. First, the timber is cut and laid on piles to determine the size of the brackets. For accuracy, the latter are welded from corners and installed on the pile heads.
Waterproofing is laid, and a wooden crown is placed on top. It is worth taking a responsible approach to the issue of connecting corners. The staples are connected to the wood using self-tapping screws. Then you can proceed to the construction of walls.
Flat installation on masonry
To install the beams on a brick wall with a full fit along the plane, you need to prepare the following tools and materials:
- electric drill;
- hammer-in dowels with plastic plugs;
- drills and drills with a diameter corresponding to the size of the dowels;
- hammer;
- measuring devices;
- pencil.
First of all, you need to make a marking, determining the position of the block on the wall, and outline it with a pencil. Then mark on the surface of the timber the places for drilling holes, which should be at a distance of 20-30 cm from each other. Further actions are performed according to the algorithm:
- Select a drill according to the diameter of the plastic insert for the dowel and drill holes in the block.
- Take a drill whose diameter is twice the original and make indentations so that the fastener heads go into the “sunk hole”.
- Attach the block to the designated location on the wall and apply markings to the brick through the prepared holes.
- Place a drill bit in a drill and drill blind holes in the brickwork. Place the timber, insert plastic plugs and nail it with dowels.
The length of the dowels must be selected so that they plunge into the wall by at least 50 mm. If the load is significant, then the distance between the attachment points is made smaller (10-15 cm), and the recess into the wall is larger (80-100 mm).
Fastening to anchors is carried out in the same order, the difference is in a more careful selection of the diameter of the drill and careful drilling.
If the hole is too large, the shank of the fastener will rotate inside and it will not be possible to tighten the anchor.
Attaching the timber to the wall is done in different ways. In this case, the following parameters must be taken into account:
- wall material and decoration (aerated concrete, concrete, plastered, brick, plasterboard, etc.);
- beam section;
- the weight and scale of the structure that the beam must support.
These parameters determine which tools and fasteners need to be used to secure the beam to the wall. The following can be used as fastening elements:
- screws;
- nails;
- self-tapping screws;
- anchor bolts;
- metal and plastic dowels;
- U-shaped brackets;
- metal corner;
- wooden cotter pin.
Secure the timber to the concrete wall
Before attaching a beam to such a wall, it is worth assessing its dimensions, as well as the weight of the structure that it must support. If the beam is small and the structure is quite light, you can use technology using gypsum or alabaster mortar:
- a screw of the required diameter is tightly wrapped along its length with wire (it’s good if it’s copper);
- prepared holes in the wall must be filled with gypsum or alabaster mortar;
- quickly, without waiting for the solution to set, it is necessary to screw a screw wrapped in wire into the hole;
- after 10 minutes, when the solution has set but has not completely dried, carefully unscrew the screw;
- After the solution has dried, use this screw to secure the beam.
For more reliable fastening of powerful structures, this method is better suited:
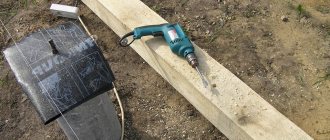
- In the places of intended fastening it is necessary to drill holes (0.5-1 cm in diameter). To drill concrete walls, you need to use diamond-coated drills, carbide drills or pobedit drills.
Attention! To make quality holes, you need to cool the drill from time to time by immersing it in cold water for a few seconds.
- Pre-prepared wooden plugs of suitable diameter must be impregnated with glue. Do not use water-based glue, otherwise the cork will become deformed and swell.
- Drive the plugs into the drilled holes using a hammer.
- Wait until the glue is completely dry.
Fastening joists to a concrete wall
The support of the beams does not always go to the floor: the base can be a protrusion of the foundation, or prepared supports pre-attached to the walls. To create support points, metal supports in the shape of the letter “P” are used.
U-shaped products are fixed on the walls of the house, the foundation with anchors and dowels.
To make it smooth, prepare. Measure the required height for placing the bars and immediately draw a single line along the level. Then, they hang the supports and put wood logs inside.
The principle of mounting the mount does not change. Markings are applied in advance, holes are drilled, and plates are mounted. When attaching to foundation walls, you will need to lay a piece of waterproofing between the support and the concrete, for example, a piece of roofing felt folded in half.
Hanging on corners
The most correct, reliable, working method is to install wood on metal corners. The height of the building under construction is preserved; other methods of fixation often conceal the space.
Thick-walled mounting angles with perforations for different diameters of hardware are recommended for use. The holes are located on the top parts of the product in an unstructured pattern.
The corners are mounted on both sides of the beams, arranged in a checkerboard pattern, often placing one element opposite the other.
A significant drawback is the complication of the process of leveling wood with a building level. First, the fixing products are attached according to pre-applied markings to the base under the bars. Then, the logs are placed along the edges and the horizontal is immediately adjusted.
Steel corners for beams
Then, they move to the middle, which is somewhat more difficult to set strictly horizontally. It will probably be necessary to raise and lower the wood. It is necessary to set the central log, the rest will already be installed according to the same principle, a single level.
Ease of work is observed if the wooden elements have smooth edges and are not twisted.
Place the corners on one side, then move to the other. It will not require a large investment of time; all that remains is to provide a sufficient level of stability. The horizontal position has already been leveled; the level is rarely checked, but it’s better to be safe.