Fences
A fence is a necessary part of any private home. With its help, owners delimit their territory. Unfortunately, not everyone can afford to install a beautiful and expensive structure. And then you can use material such as slab. At first glance, it is inconspicuous, but with proper processing, it may well turn out to be a beautiful slab fence.
Fence made from slab
Now let’s look at what it is – slab and how to install a fence using this material.
What it is?
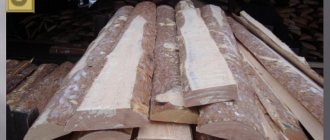
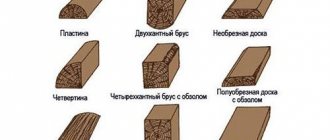
What material belongs to the slab? When dissolving a log into boards, first the side fragments with bark are separated - this is the slab. The shape of the top is most often semicircular.
Gorbyl
There is a similar material - unedged board, but it is completely different. It is similar in shape to a board, but has untreated sides. This material has a slightly higher price.
The slab has a cut on only one side, the other side remains unprocessed, which distinguishes it from other wood materials. Previously, in villages, it was used instead of fuel to kindle bathhouses and other stove equipment. Now summer residents have re-evaluated this building material and are successfully using it for the construction of fences.
Basic recommendations
When carrying out work on creating a fence structure from a slab, it is necessary to take into account important points. They will ensure the creation of high-quality fencing with an attractive appearance:
When making material calculations, you should take into account that after the wet boards dry, they narrow by 1.5 cm. To prevent this from damaging the appearance of the fence, it is necessary to install the wet boards overlapping. To construct a rigid frame, metal pipes should be used
It is best to choose a material that has a square cross-section with sides of 7 and 8 cm. The optimal wall thickness is 2-4 mm.
This is interesting: a fence made from unedged boards with your own hands.
When creating a fence from a slab with your own hands, you can combine the slab with other materials. For example, it combines well with natural stone or facing bricks. It can also be supplemented with concrete or metal.
When constructing a fence from a slab, all options for such structures need to be considered before starting work. This will allow you to choose the most suitable type of fencing. The use of high-quality material allows you to build a reliable structure. To make it look more attractive, you can decorate it. For this, stain or varnish is used. If desired, you can combine boards with other materials, for example, metal or brick.
Especially for you:
Everything you need to know about metal picket fences
Features and advantages of a sectional concrete fence
Drawings of forged patterns for decorating products
How to make a beautiful wooden fence with your own hands
Colored rivets for a fence made of corrugated sheet metal
Plastic (metal-plastic) fences and barriers
Advantages and disadvantages
It was not for nothing that the owners of summer cottages began to give preference to slabs.
- Firstly, it is affordable.
- Secondly, from the purchased material, you can select quite good boards that will look beautiful on the fencing structure.
If you calculate the cost of a fence made from this material, you will see that funds are spent only on the purchase and delivery of the material, and a small amount on construction nails.
Advantages of the slab:
- Quite easy to install. Installation can be done independently or by inviting one assistant.
Installation
- Reliable and durable.
- Resistant to atmospheric precipitation.
- By following the rules of timely wood processing, croaker can last up to 20 years.
- Since the material has a natural component, it does not release anything toxic into the air, which means it is environmentally friendly.
- A fence made from this material cannot be stolen as profit, because it is not accepted at any collection points.
The advantages of this lumber directly depend on the type of tree. But coniferous species are more suitable for building a fence.
Flaws:
- Because the material has an imperfect appearance, it requires some processing, only after which it can be used.
Processed
- To build a fence, it is necessary to sort the lumber. They should have more or less even edges and approximately the same width.
- It is precisely because of selection that the material is purchased with a reserve, which means that it requires overspending.
Attention! Before installation, it is recommended to treat with antiseptics. If this is not done, the operational period is reduced to 5 years.
Antiseptic treatment
Packaging and storage of slab
One of the effective ways to “get rid of” slabs is to sell them. The sale can be carried out both for heating (wood-burning slab), and for construction work or the manufacture of products from it. This method has one big advantage - you won’t need to tinker with it any further! To effectively store and sell croaker, it needs beautiful packaging. The neater and more beautiful the presentation of the slab, the more effective the sale will be. That is why packaging and storage play a very important role in this case.
Proper packaging and storage of wood waste.
Storing untied slabs leads to increased contamination of the area, increased risk of injury and unsaleable products.
How to choose?
By type, this material can be commercial or wood-burning.
- Wood-type material is not used in the construction of wooden structures because it has a poor-quality surface and due to the use of soft wood.
Wood type
- Business-type slab, quite suitable for cladding sheds, constructing formwork and household items. buildings If such material is sold in packs, then its price increases, because when stacking the material undergoes preliminary sorting.
Business
- The highest quality slab is considered to be calibrated. Its other name is block house. The price is significantly higher than the business type of croaker, but, unfortunately, it requires pre-processing (bark removal and grinding).
Calibrated
It is necessary to carry out mandatory rooting of the croaker, otherwise over time the bark will fall off on its own. In addition, it can serve as a refuge for bark beetles, which will ruin the entire tree.
After the material is freed from bark and has undergone the grinding process, it acquires an aesthetic appearance suitable for further work. Sanding can be done directly at the sawmill for a fee, but in order to save budget funds, you can do this work yourself. To do this you will need an ax and a grinder.
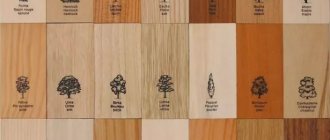
If you select according to the type of wood, then it is better to immediately abandon two species - birch (because it is a hard type of wood that deforms over time) and poplar (it is susceptible to rotting).
Advice! After purchasing lumber, it is necessary to carry out sorting and processing as soon as possible. If this process is delayed, the tree may be infested with bark beetles, which will very quickly reduce the strength of the material and make it unsightly.
If the croaker is heavy, it means it is not fully dried. To do this, it is necessary to dry it, otherwise it will subsequently lead. Drying is carried out in the open air, but in an area shaded from sunlight.
Drying
If you place it in the sun, the drying process will be more intense, which will cause the wood to delaminate (crack).
Secrets of working with material
The slab material is actually a waste product from the wood processing industry. They exist at any sawmill that cuts wood. This is a full-fledged wooden material, in no way inferior in its properties to a board. The main difference between them is their appearance. At first glance, croaker seems like an unattractive material, but with a little effort you can create an elegant element of yard decoration. That is why, before starting work, the croaker must be processed.
It is necessary to process the board (slab) carefully, paying attention to each element. Therefore, such work will take some time, but the result is worth it.
To complete the work, you need to select the required amount of material. When choosing boards, it is necessary to select them in size as accurately as possible. Naturally, it is almost impossible to select identical boards, but still their height should not differ by more than 25 cm. A smaller board size will lead to difficulties in work and will not allow you to create a complete structure.
The croaker must be cleared of bark, if any. This is very important, since there may be a rotting process under the bark. For such work, you can use a variety of tools or equipment: an ax, a grinder, a stapler. Experts recommend using a grinding machine. Thus, the bark can be removed and the slab can be given a beautiful appearance.
After completing the bark removal measures, the croaker should be inspected for defects. Dry the selected material to be used.
Croaker for the dacha needs sanding. Every material needs to be processed. Naturally, this is a labor-intensive process that takes a lot of time and effort, but without this work it will not be possible to create a beautiful look.
The selected material must be treated with special antiseptic substances. Modern means will reliably protect wooden products from insects, bacteria and fungi.
The smooth and beautiful slab is ready for installation and creation of an original fence.
Timber for poles
Based on how long the fence will be installed, the selection of timber for the posts is made. Therefore, for a temporary fencing element, it is better to use two slabs nailed together. This way you can save some money.
If you are installing a permanent fence at your dacha, it is better to use more massive lumber. Suitable for these purposes are 100x100 mm timber or 80 to 100 mm logs. You can use a slab as crossbars, with the flat side facing outwards, or a board.
Round timber for pillars
If it is necessary to build a high fence (above 2 m), for these purposes it is better to strengthen the frame of the structure, which is based on supports and crossbars. It is recommended to use iron posts with guides.
Introduction! What is formed after sawing a log?
At any sawmill, after sawing a log, the following positions are usually formed:
- High quality lumber.
- Lumber of low quality varieties.
- Business croaker.
- Wood croaker.
- Sawdust.
- Process chips are obtained only in cases where additional equipment is available.
Lumber is used for sale, wood chips and sawdust are used for heating or processed to produce products. Fortunately, the volumes of wood chips and sawdust can be so huge that they cannot be hidden from environmentalists or simply stored until better times, because this is very dangerous (chips and sawdust are self-igniting).
But slabs can often be stored and lie there for years, they are not self-igniting, very small volumes of them are formed, and that’s why it turns out that way—the slab lies like a “dead” load. On average, about 2 - 4% of slabs are produced from a sawmill line, depending on the sawing technology.
Some of the information is taken from my new book “Organization of sawmilling in a modern enterprise.” The book provides very powerful information about sawmilling in a modern enterprise and is based on personal experience. More details about it in the “My Books” section.
Fence options
The most common option for installing a protective structure is the vertical method of laying the slab. To do this, it is necessary to assemble a frame consisting of pillars and crossbars arranged horizontally.
Vertical installation method
The second option is less common, but still occurs. In this case, there is no need to assemble the frame. To attach the slab, you only need to install supports, and boards are attached to them in a horizontal position. The slab is stuffed end-to-end.
Laying horizontally
There is another option that requires the most material consumption - this is double-sided padding.
Double-sided installation
As a rule, two boards are fastened with the humped side facing the inside of the structure. That is, so that the flat side faces outward. But because it requires material costs that exceed the usual method, it is practically not used.
Photos
We have also prepared additional photographs of various products and structures made from slab, and also provided them with brief explanations.
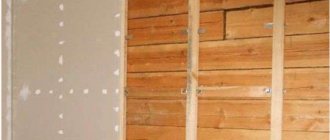
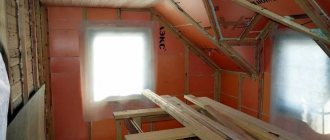
The first photo shows internal walls made of this material:
Such internal walls made of planed slab look very stylish in the interior, adding to the appearance of an Alpine chateau.
In the photo below we see the outer wall cladding:
Despite some unsightliness, such a wall of a frame house effectively protects the interior from wind and precipitation. If not only the outer walls, but also the roof and fence are made of this material, then an atmosphere of natural rural housing appears around the house.
The following photo shows an option for finishing the walls and ceiling of the bath:
If the walls of such a bathhouse are made correctly, then it will be in no way inferior to its log or brick counterparts. And the interior decoration of the bathhouse with a slab will make it even more comfortable. At the same time, the costs of the material will be noticeably lower than when using the closest analogue - lining boards.
The finished barn, built from slabs with your own hands, looks like this:
The unprepossessing appearance of the barn is fully compensated by the low costs of its construction, and properly assembled walls made of slabs are in no way inferior to walls made of boards or bricks.
A slab gazebo can take on interesting and bizarre shapes:
In such a gazebo it will not be a shame to welcome guests or relax after work, and slightly clumsy details from the slab will make the appearance of this structure even more attractive and unusual.
In finishing, this material is used in processed and unprocessed form. For example, a ceiling made from untreated slab looks like this:
In residential buildings, such a ceiling will look ridiculous, but in a bathhouse lined with wood, as in the photo, it will emphasize the overall atmosphere.
But the ceiling and walls made of processed slab look like this:
Such a ceiling will look harmonious in a house decorated with natural, minimally processed wood.
The photo below shows a greenhouse in the construction of which slabs are used:
Such a greenhouse is not only as functional as possible, but also looks beautiful, so you won’t be ashamed to show it to friends or acquaintances, and thanks to the low cost of the material, the costs of its construction will be minimal.
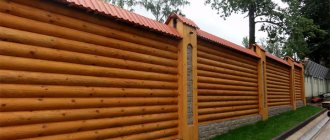
One type of fence that you can make from a slab with your own hands for a summer house or home is shown in the following photo:
One thing can be said about all the options for such a fence, and not just the one in the photo - cheap and stylish. Therefore, it would not be a shame to install it even around a rather expensive house.
However, it will be most compatible only with buildings made of minimally processed wood, that is, log houses and houses covered with natural boards.
The following is a formwork made from slab:
Such formwork is in no way inferior to its counterpart made from OSB or sawn boards, and will cost much less.
And finally, let's look at the pen built from this material:
A slab pen is not only functional, but also looks quite interesting. He seems to recreate a.
Calculation of material requirements
Some of the owners are so sensitive to their possessions that they do not like it when the views of strangers fall on their territory. It is for this reason that they erect fences that have no gaps and are up to 2 meters high.
The optimal distance between supports is considered to be 2-2.5 m. With such indicators, the fence has the greatest stability and reliability. To install the pillars in the ground, you need to take the timber with some reserve. For example, if the round timber rises 2 m above the ground, then you need to add the planting depth in the ground, which is about 1 m.
To calculate the required number of posts, you need to divide the total length of the fence by the space between the supports. At the same time, do not forget that two of them are installed on the gate at once.
Calculation of crossbars is made by doubling the length of the fence, plus 10% for consumables. The simplest calculation of the consumption of slabs on pickets is to calculate the cubic capacity. Of course, it will not be perfect, but only approximate. You can also calculate by dividing the length of the fence by the average width of the board.
Additional information and useful tips
It is preferable to use wooden supports for installation. If the material is homogeneous, then joints are better. However, other pillars can be used:
- channels;
- pipes;
- concrete;
- stone.
You can easily make such a fence by hand.
For installation you will need:
- grinding machine;
- ax and shovel;
- fasteners.
There are several installation steps. Everything can be done with your own hands. The first is the preparation of the material.
You can always easily buy lumber for your work at a sawmill for a nominal fee.
Wane can be sharp or blunt, edged or unedged. The sharp layer occupies almost the entire width of the side surface of the timber, and the blunt layer occupies only a certain part of the lumber.
A fence made of such material will be durable and high-quality, and if you make every effort, it will be quite beautiful and creative.
This is why a grinding machine or an ax is needed. After removing the bark, the wood planks need to be dried in the sun and sanded. This ensures a presentable appearance of the material. Then, in finished form, it is treated with an antiseptic and coated with drying oil and varnish. This treatment serves as protection against moisture from the atmosphere.
The slab is a board sawn from the side, and its other side has its original appearance. It has the texture of untreated logs.
The posts for installing the fence are buried 70 centimeters or even 1 meter deep. The territory is marked using a cord and pegs. This is how the places for installing support pillars are marked.
The price of such a fence varies depending on the type of wood, its size, and finishing method.
The wood must be treated before installation. It needs to be protected for a longer service life. The bottom is wrapped with thick roofing felt several times. The hole in which the post is placed is filled with broken brick material. You can use crushed stone or construction waste.
Concrete pillars simply need to be installed in the holes and backfilled with solid materials. Pits for installing metal and channels are used to fill with crushed stone and sand. After installing the support, concrete mortar is poured there. They are covered with a primer and two layers of paint to prevent corrosion.
You will need to sand and carefully finish every single board.
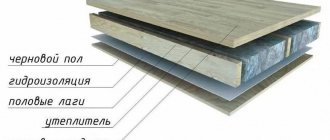
For brick and stone supports, a foundation is built under them. Next, the lags are installed. And then the slab is attached. If the fence boards are vertical, then the wooden logs are installed horizontally. Remember! They must be pre-treated and then attached to the support.
If the slab is horizontal, then it is mounted with a vertical beam.
Barked and polished croaker looks rich and prestigious.
Finally, finishing and decoration of the fence are performed.
Such a fence is installed not only because of cost benefits. It is often preferred by people who are attracted by antiquity, connections with past generations, nature and naturalness in everything. Such fences are most often installed at dachas. But this material is increasingly conquering the market, and today you can see corresponding fencing in many private sectors. People realized that it was not only profitable, but also very beautiful!
You are quite capable of cleaning the slab with your own hands - an ax and a grinder.
Few people are any longer confused by the seemingly rustic design of the mounted fence. If the finishing is done well, it ends up looking completely unique. A person with taste and imagination can turn the fence of his property into a whole work of art! Of course, there are countries where they don’t put up fences at all. However, the mentality of our people is difficult to overcome... And why? After all, a fence is not only protection from prying eyes and encroachments on one’s own territory, but also a barrier to strong winds, flying branches and debris.
Fence construction
How to make a fence with your own hands from a slab? The process is divided into several stages:
- Cleaning the bark and treating with antiseptic preparations.
- Determining the locations of future supports and the length of the entire fence as a whole.
- Installation of support structures.
- Assembling the frame and stuffing the slab.
It is better to carry out work related to the installation of a fencing structure in the summer, when it is warm outside and the earth is easy to dig. During cold periods of the year, the whole process can take a long time.
Any of the stages requires a long period of time to complete it, which means it’s good if there are assistants in the work. If you have several people, you can assign each a separate task - the work will go faster and much more fun.
Paths
Another use for rounded boards is garden paths and driveways. The croaker is placed across the path. Earth, sawdust or sand are scattered on top of the boards, which help compact the coating during rainfall. The path turns out to be slightly raised above the general ground level, does not get wet and does not hide under water during heavy rains. Wood always looks advantageous when decorating open garden spaces. Paths made of slab look quite harmonious in combination with a lawn or flower beds.
Debarking croaker
Anyone who is going to build such a fence needs to acquire a special tool that has a long history - a stapler. The shape is a rounded metal plate with wooden handles on both sides.
The name of the instrument is taken from the word scrape. In order to start working, you need to grab both handles and scrape. The shape of the tool should be a continuation of the slab, that is, the top looks up and the handles look down.
You can also remove the bark with other tools, such as a shovel or an ax. But the task will turn out to be more troublesome and will take much longer to complete. The debarking process can be divided into several stages:
debarking
- We install the slab in a vertical position so that it rests on some structure.
- Remove the bark from top to bottom.
- If necessary, you can use an ax and a plane to finish leveling the surface.
- The final stage will be coating with antiseptic agents and drying.
Processing of building materials
The trunks are cleared of bark with a bayonet shovel, an ax, or a scraper (a steel strip with two handles). The boards are placed vertically with a stop at the bottom, the bark begins to be removed from above, trying not to touch the wood. After this, the knots protruding on the sides are cleaned with an ax or plane. The treated surface is sanded with emery, or an electric tool is used.
Special deep penetration antiseptics are applied. A film is formed on the surface to protect against moisture, harmful microorganisms, and insects. Fire retardants are used to protect against fire. After processing by any means, wait a day for everything to dry.
Site marking
Marking the area for the fence is done as follows:
- We determine the extreme points of the barrier structure and drive in pegs.
- Pull the lace.
Marking
- Having determined the total length, we divide it into equal intervals, taking into account that the maximum distance between the pillars should not exceed 2.5 m. We mark with pegs or any other available means.
- In the marked places it is necessary to dig holes with a shovel or drill.
Features of the solution
A suburban area fence made of logs not only looks impregnable, but in fact is so. The main material for the work is natural or machined parts with a diameter of 10-15 cm. The length of the cylinders is selected in relation to the average height of the fence, which is 170-180 cm.
You can obtain parts for installing a fence in several ways:
- At logging sites, select small-diameter logs that are not in demand by loggers;
Purchase a rounded log of small diameter;
Fence logs in cassettes
- Smooth birch cylinders of small diameter can be purchased in unlimited quantities at plywood mills. They are formed when veneer is cut from a log. The maximum length of such rods usually does not exceed 160 cm.
A log fence can be of two main types:
the first of them involves vertical installation of parts; in the second, the cylinders are located horizontally.
Example of horizontally aligned cylinders
Each method has its own characteristics, which we will discuss below.
Vertical log fence
A palisade is a fence made of vertically placed logs. This is the most ancient version of the fence, which was used to protect ancient Slavic settlements. It not only made it possible to obtain a solid log wall, but also had an additional protective element - the sharp ends of the parts.
Palisade - ancient fortress wall
To make such a fence with your own hands, proceed as follows:
- Prepare the required amount of material for work. Calculating the number of logs is not difficult - you just need to divide the total length of the fence by the average diameter of the rods. So, to fencing an area of 15x20 meters, the number of rods with a diameter of 10 cm will be determined by the formula: (15+20)*2:0.1=700.
- The next stage is preparing the installation site.
It can be done in the following ways:
- driving in stakes pointed at the bottom;
- digging rods into a previously prepared trench;
- combined method.
Depending on the chosen option, stretch a strong cord around the perimeter of the site, remove the turf along it and dig a ditch, the depth of which should be at least 0.6 meters, the width of the bayonet of a shovel. Next, we begin preparing the logs.
- To protect the underground part of the wooden parts of the fence, our ancestors burned them over fires. The resulting coal reliably protected the wood from rotting, damage by fungi and insects and allowed the fence to stand for several decades. Of course, this method is still possible today, but there is a simpler and faster solution.
We are talking about bitumen mastics that have a viscous consistency and are completely ready for use.
It is only necessary to thoroughly cover the lower parts of the logs with bitumen to a length of 60 cm and let it dry. After this, you can proceed to the next stage of work.
- When installing a fence, install the logs in the ditch with the treated parts down as close to each other as possible. Over time, due to the evaporation of moisture from the wood, the density of the material increases, but its diameter may decrease slightly, which will lead to the formation of cracks in the fence. To avoid this, it is better to use pre-dried parts.
Installation of pole supports
Installation of pillars is carried out in several ways:
- Hammering of support elements.
- Installation followed by compaction of crushed stone.
- Pouring concrete.
When installing wooden poles, use the first two methods. To do this, it is necessary to make a protective coating at the ends of the beams from bitumen. After this procedure, the supports are driven into the ground.
The second method involves installation followed by wedging of the timber. Only after the support is securely installed is the clay liquid mixture poured.
The most common equipment that is useful for processing slabs
- Circular saw - circular saw. Used for cutting high-quality wood from slabs to width.
- Trimming. Cutting quality wood to length. The role of a circular saw and a trimmer can be performed by one machine - photo below.
Multi-saw machine - allows large slabs to be separated into smaller pieces of waste, from which healthy wood is then selected for processing. A good article about multi-sawing machines is on this page.
A single-shaft multi-saw does not have such a defect when cutting as a stitch.
Multi-saw machine with two shafts. The advantage is a higher cutting speed and a smaller thickness of the saw body.
Machine for receiving firewood.
Construction of a fence
The final stage of installing a slab fence is the installation of crossbars and pickets. If the supports have been concreted, then you need to wait for complete hardening and proceed to the following actions:
- A crossbar is attached to the posts. Before finally fixing the horizontal guides, they must be leveled if smooth lumber is used or by eye if the crossbar is made of slabs.
Installation of crossbars
- The crossbars are fastened either end-to-end or overlapping. The slab can be mounted on top.
- After setting up the picket fence, make sure the level is correct. It is better to secure with two nails at each attachment point.
- Subsequent pickets are pressed against each other, and the vertical level is also checked.
In order to extend the service life of the barrier structure, some craftsmen resort to a little trick - they stuff a horizontal bar over the ends. In this way, a kind of canopy is formed that protects the timber from precipitation. At this point, the installation process is considered complete.
A step-by-step guide to building a do-it-yourself slab fence
Step 1. Preparing the material. Debarking the slab is necessary, and it can be done with a shovel or a carpenter's hatchet. Next, the croakers should be marked, filed and sanded. After careful sanding, the wood is coated with any protective composition in two layers. To do this, you can use a spray bottle or a wide brush.
Debarking boards
Step 2. While the slab dies are drying, work begins on marking the holes and installing support pillars. The distance between them should be no more than 2.5 m. The slab can be mounted on both wooden and metal poles. Metal supports are dug into the ground to a depth of at least 50 cm and concreted. Wooden supports must be treated with bitumen mastic. We should not forget about crushed stone drainage. Backfilling is performed layer by layer followed by compaction. All pillars are leveled.
Pole installation instructions
Step 3. Attaching the slab. Even before the patch begins, it is worth deciding what the appearance of the fence will be. If the slab is attached vertically, then horizontal strips will be needed. Nails 150 or self-tapping screws, pre-lubricated with drying oil or machine oil, are used as fasteners. When installed horizontally, strips are not needed, since the slab is attached directly to the support posts or bars of the linings. It is better to mount the dies overlapping to avoid later cracks. Croaker is a heterogeneous material, but this gives it a certain originality.
Installation of slab
A canopy board can be nailed on top of the dies to provide protection from moisture.
Step 4. Decorating the fence.
How to decorate
There are several ways to turn an ordinary fence into a designer one.
- Shaped sawing of the edges of the dies.
- Painting, tinting with stain, varnishing.
- Partial firing, after which the dies are coated with varnish or drying oil.
- Brushing is scratching out the fibers with a brush, and then tinting. Before brushing, the croaker can be fired to provide finishing and protection.
Advice from experienced people
- The overlap of the boards when filling slabs with a herringbone pattern should be at least 1.5–2 cm, especially for poorly dried material.
- The optimal board width for such a fence is 20 cm. Wider boards may crack during use.
Video on the topic “How to build a fence from a slab”
A fence made from unedged boards is in some way an art object. If you approach the task with diligence and imagination, then it will delight you with its exclusive appearance for a long time. On average, a slab fence will last from 10 to 20 years.
- Author: Valeria Polyakova
Rate this article:
- 5
- 4
- 3
- 2
- 1
(6 votes, average: 4.5 out of 5)
Share with your friends!