Covering the walls of a wooden house with gypsum plasterboard sheets is the right solution for those who want to change the interior space of their home, reducing to a minimum the time and material costs of repair and finishing work. With the help of gypsum boards, all floors and partitions in the room become even and smooth, meeting all requirements.
Drywall is a building composite material that is increasingly used for renovations in private houses built of wood. This is due to the affordability of the slabs, ease of processing, environmental friendliness and complete safety for owners of country houses and their children.
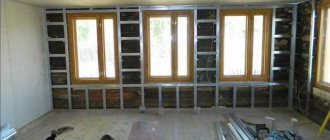
Drywall on the wall
Advantages and disadvantages of finishing a wooden house with plasterboard
This finish attracts the attention of many owners of wooden buildings, who are mostly supporters of environmentally friendly building materials. They do not always have the desire to change the appearance of the building’s facade, but the interior decoration often fully complies with the requirements of modern design.
The main advantage of gypsum plasterboard sheets over other modern finishing materials that can be used during renovations in a wooden house:
- Compliance when creating structures with complex geometric shapes.
- Affordability.
- There is no need to use expensive professional equipment and tools.
- The ability to hide significant unevenness and other wall defects.
- High-quality leveling in the presence of serious differences in height.
Plasterboard walls in a wooden house can be decorated with any decorative materials, which makes it possible to bring to life the most daring designs of designers. Paint and varnish products, wallpaper, tiles, panels, which are qualitatively and reliably fixed on a flat surface and lie on it in a smooth layer, will help to make the interior special and unique.
If we talk about the disadvantages of this finish, then it is worth mentioning first of all the need to combine the alignment of the walls with a change in the ceiling. The reason is differences in height, which can only be eliminated by placing the frame not only on the walls. Despite the fact that the slabs are a strong and durable material, they are quite fragile, and given the need to maintain a sufficiently large distance between the wooden walls and the gypsum plasterboard with which the frame is sheathed, you will have to use insulation and sound insulation.
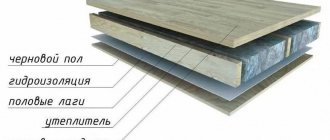
Insulation and vapor barrier for drywall
Heavy objects, audio and video equipment, and hanging cabinets cannot be mounted on such walls. A fragile structure that does not fit tightly to the surface of the walls can collapse at any time, unable to withstand the load. It is not possible to repair an individual panel. To repair the damage, you will have to dismantle the wall.
Interior and permanent (load-bearing) partitions made of timber are capable of expanding under the influence of changing temperatures and high humidity. Therefore, attaching slabs directly to the walls of the house, trying to reduce the distance between them to a minimum, is strictly prohibited.
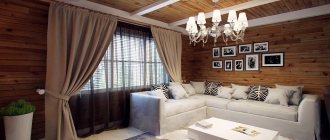
Beautiful examples
- Audacity and avant-garde. Walls finished with OSB without further coating create a bright interior with an interesting heterogeneous pattern. Extraordinary aesthetics are accompanied by cost savings. The fashion for such finishing is gaining momentum.
- Natural wall. Finishing the interior walls with timber-like boards allows you to create a monolithic interior with excellent aesthetics. Decorative beams are tinted in a dark contrasting color and highlight the light colors of the finish. The ceiling is covered with clapboard and painted in a light color or covered with matte varnish.
The interior decoration of a frame house is shown in the following video.
Stages of covering a wooden house with plasterboard
All work on wall cladding is carried out in a certain sequence. Preparation and installation of the frame play an important role. To achieve the desired result, you need to make a choice, deciding what the contour and sheathing will be assembled from.
Wooden frame
The frame, lintels and longitudinal guides can be either wooden, made from bars of large and medium sections, or from metal profiles, for fixing which you will need to stock up:
- suspensions;
- crabs;
- metal screws.
A detailed study of the structural features will help you make the right choice.
Metal or wood
When deciding from what material it is better to assemble the contour and sheathing for covering the walls in a house with plasterboard, you should take into account the characteristics of the material used in the construction of the building. Timber is not only capable of absorbing moisture and “walking” when expanding. There is a high risk of the need to actively combat insects and rodents.
Metal carcass
From this point of view, it is worth choosing a metal frame, which is easier to dismantle if necessary. However, qualified craftsmen strongly recommend giving preference to wooden blocks. The reason is high spatial rigidity and lower repair costs due to the absence of the need to purchase fasteners.
However, leading manufacturers insist that gypsum boards were originally created for mounting on a metal structure. The galvanized iron guide profile is not susceptible to the negative effects of moisture and temperature changes. Such a frame will not “walk” and cracks will not appear on the surface of the walls.
Frameless method
It is not at all necessary to install the frame: you can attach the drywall directly to the wall surface using a special adhesive. The advantage of this method is that it increases the usable area of the room.
Disadvantages of the frameless method:
- Suitable only for smooth walls, otherwise it will be difficult to install the sheets.
- There is no way to lay wires or hide communications.
- It is unacceptable to use an adhesive composition - it is not among the environmentally friendly materials.
- It is impossible to apply insulation.
If profiled laminated veneer lumber was used to build a house, all of the listed disadvantages will not be observed (except for additional insulation) - this is a rare case when the walls will be almost perfectly smooth, so you can attach drywall directly to their surface.
What is needed for finishing
Finishing the inner surface of the walls of a house with plasterboard requires careful selection of materials. The master will need to purchase:
- GKL slabs are moisture- and fire-resistant (GKLVO).
- A sufficient number of screws for wood or metal (depending on the chosen frame).
- Putty and composition for priming drywall.
- Silicone and polyurethane foam.
- Solutions for impregnating timber to provide protection against insects and rodents.
- Insulation boards and soundproofing materials.
Tools and materials
For installation and assembly of the metal frame, additional fasteners will be needed so that the structure can withstand increased loads; sheets of drywall should be sewn in 2 layers with an offset. You also need to stock up on vapor barrier, which will prevent moisture from the house from penetrating under the assembled structure and being absorbed into the wood.
Advantages of designs
The positive side of a plasterboard partition is that, unlike brickwork, it does not need to be plastered. The wall surface is smooth, ready for finishing. Additional advantages of the designs:
- quick installation;
- light weight reduces the load on the foundation;
- stability and reliability of the structure thanks to a durable metal frame;
- The wiring of electrical points is simplified as much as possible, without additional gating of walls;
- high noise insulation;
- gypsum, which is 92% in the slab, is an environmentally friendly material.
When installing structures there is much less dust and debris. The ease of assembly allows you to build them yourself. You just need to adhere to a certain sequence and follow the recommendations of specialists.
Options for partition construction and design
Preparatory stage
Drywall is a finishing material characterized by durability. It is this fact that makes us think about carrying out preventive treatment of all surfaces that will be hidden behind gypsum board sheets. The owner of the building can only find out that fungus has appeared on the surface of the main walls or mold has grown at the moment when the structure, erected several years ago, begins to crumble and collapse.
Natural wood is a fire hazard. Therefore, all surfaces should be thoroughly treated with antifungal agents. The gaps between the beams must be caulked with tow, impregnated with compounds that ensure the structure’s ability to resist fire. Silicone or foam can be used as an additional treatment.
Foaming cracks
All components of the structure are pre-cut or sawn into separate pieces, the length of which is determined after accurate measurements are taken. This applies not only to the contour. Longitudinal (rack-mount) guides and jumpers are prepared in advance.
Installation of metal and wooden frames
The main condition for creating a high-quality, strong and durable structure for wall decoration is the installation of a floating (sliding) frame. Such work is not always carried out in buildings that have shrunk. To avoid the destruction of new walls, you need to abandon the rigid connection of the ceiling and wall sheathing.
Even after shrinking, the timber continues to “walk”, absorbing and losing moisture. The seams at the joints between the sheets will crack and the finish will become unusable. Cable lines cannot be hidden behind casing. All electrical wiring must remain outside and accessible.
Features of fastening wooden frame bars
Wooden frame
Wooden blocks can be used as frame parts for drywall only in houses made of timber that have shrunk. All elements of the future structure must be treated with fire retardants and antifungal agents, and then dried until completely dry.
The principle of installing a frame made of bars is the same as when assembling metal parts. To ensure that the heads of the screws do not protrude above the surface, you should drill a hole at the desired point and make a hole around it, into which the top of the wood screw should be sunk.
Installation is faster than assembling a structure from metal components. The bars can be attached directly to the main walls, stepping back slightly from them or cutting a recess in the beam to install guides.
Metal carcass
The base for the construction of new walls (plasterboard sheathing), assembled from metal elements, is assembled in the established sequence. To perform all manipulations you will need to use:
- laser level (level);
- roulette;
- metal scissors;
- grinders with a thin disk;
- screwdriver.
The master will not need a drill with a hammer drill, so he will not have to work with high-strength materials (concrete floors). The base for cladding the walls of a wooden house, made of galvanized iron, is a more durable and reliable structure. It is important to place the guides at the same distance, using metal screws as fasteners and constantly monitoring the work with a laser level.
The order of work is as follows:
- To create a contour, a PN (guide profile) is attached to the floor.
- Using a plumb line, all the main points are transferred to the ceiling, where the same profile is attached.
- Next, rack-mount products are placed in the corners, and vertical supports are installed at a distance of 40 cm from them. The verticality of the racks is checked with a level.
The racks should not rest against the ceiling, so their length should be slightly less than the height of the wall.
Markings are made on the surface of the rack profiles installed in the corners. Points are marked in increments of 40-60 cm. These are the places for attaching the jumpers necessary to create the sheathing.
The jumpers are fixed using crabs, and the rack profiles are attached to the wall with direct hangers
Choosing timber for sheathing
If you decide to assemble a frame for drywall made of wood, then you need to approach the choice of material very carefully. The list is as follows:
The wood must be very well dried. In most cases, you can only buy raw timber at the sawmill, which you will have to dry yourself
The ideal option is considered to be a maximum moisture content of the construction timber of 14%. Each lath and beam must be inspected for defects: uneven and knotty material will create problems during assembly or sheathing. It is important that the lumber is of the same cross-section. For guides and frame posts, you can use the same type of timber 50×50, 40×40, 50×40 mm and others
It is advisable not to use smaller widths, because sheets of plasterboard will be joined and secured with self-tapping screws on the racks.
After purchasing the material, all slats need to be inspected again and treated with protective impregnations or at least painted
This will protect the forest from moisture penetration. It is important to remember that the timber and slats must be stored in a horizontal position, otherwise, over time, vertical storage will result in curved racks
Base sheathing
The assembled frame must be sheathed with sheets of plasterboard in such a way that the screws are screwed in in a checkerboard pattern.
The joint between the slabs lay in the middle of the rack profile
If there is a need to cut slabs, resulting in horizontal seams appearing on the surface, each of them should lie in the middle of the lintel.
Sheathing process
The sheathing does not reach the ceiling by 2-3 cm (depending on the degree of shrinkage of the house) and rises above the floor by 1 cm. The gaps will later be closed with ceiling and floor skirting boards. The size of the gap at the joints should be at least 0.2-0.5 cm. They are puttied and reinforced with serpyanka or fiberglass.
It is important to ensure that the sheets of drywall that cover the base do not fit tightly together. Otherwise, at the slightest shift of the frame, cracks will appear at the joints of the plates.
Docking material
Finishing
Wallpaper and paint, panels and tiles can be used to finish the walls in a wooden house. The choice depends on the characteristics of the room in which the renovation work was carried out. Before you start painting the walls or wallpapering them, you must:
- If necessary, deepen the cracks at the joints.
- Putty or paint the screw heads with oil paint.
- Apply the first layer of putty to the cracks (joints).
- Wait for the composition to dry completely and apply it a second time, reinforcing the seams with reinforcing tape or fiberglass.
- Glue sickle tape in the corners.
- The entire surface of the plasterboard boards is puttied.
As soon as the putty has dried (after 24 hours), begin sanding the surface using sandpaper with a stone of 120. The sanded surface is cleaned of dust, primed and waited for drying. Now you can begin applying the finishing putty if the walls are being prepared for painting, or directly creating a decorative covering from wallpaper.
All of the above work will be completed quickly and efficiently if the wooden frame has stood for several years and the house has completely shrunk. Having decided to sheathe the walls with gypsum plasterboard without waiting for this moment, it is important to remember the need to arrange a sliding frame and use a two-layer plasterboard covering, the sheets of which are attached to the base with an offset.
Surface marking
You need to decide on the shape of the partition, for this you can look for interesting ideas on the Internet, if something interests you, you can sketch out a similar shape on paper, add your decisions and preferences, and then start making markings. Also, think and decide whether you need to insulate the partition, because it allows it, but this is an additional expense. If insulation is needed, for example, in a private house, it will be very useful, since maintaining heat in it is much more difficult than in an apartment, then create a frame and, in general, the entire structure wider so that insulation can be placed in it.
If your work is related to sounds, perhaps you are a musician or a sound engineer, then it is better to use soundproof plasterboard to create a partition, which can effectively muffle most sounds that will no longer disturb both you and your neighbors. Also, it is possible to install spot lighting in the partition, which will create a unique atmosphere at night. In addition, such lighting will help you easily navigate around the apartment without turning on the main light, thanks to which you can save a little on electricity.
The selected form must be transferred to the wall and floor, that is, its projection must be made onto the surface on which it will be installed. The very first thing that needs to be applied is the contours of the product, which will indicate the installation location of the guide profile, which will significantly facilitate all further work. The profile that will be located inside must be marked on the wall in the same way. Be careful here, the location of the guide profile is marked both on the wall and on the floor and ceiling, since it will be directly attached to them. The rack profile is attached to the guide, and not to the surfaces, so its location can only be marked on the wall to make it easier during assembly.
If you are planning to create interior partitions from plasterboard using insulation, then remember that you will need to make much more frame to make room for the insulation itself. This means that when marking, it will be necessary to take into account the location of the insulation. Also, we note that it will be difficult to illuminate a thin partition, so light partitions serve more of a decorative role. Already in wider plasterboard partitions you can create niches, lighting, and insulation, so decide what you need more.