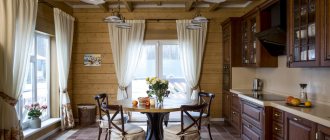
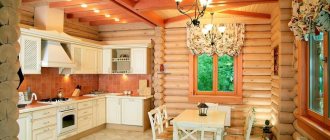
The question of how to make a shower stall in a wooden house yourself worries many residents of such a building. In order to properly arrange your shower corner in a wooden building, it is important to pay special attention to its waterproofing and ventilation system. Let's look at the technology for installing a shower in a wooden home and advise which design is best to choose.
A simpler option is a do-it-yourself shower
Features of installing a shower in a wooden house
The rules for installing showers in log houses or buildings made of timber are determined by the properties of building materials that are prone to deterioration in wet conditions.
It is important to provide:
- draining water outside the house in the absence of sewerage;
- a septic tank or cesspool capable of handling increased load;
- reliable waterproofing of all house structures - walls, floors, ceilings;
- sufficient exhaust ventilation and air flow from outside the shower room;
- protection against electric shock;
- moisture-proof cladding in addition to waterproofing wooden parts.
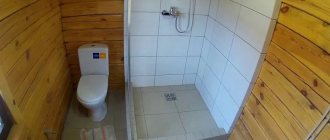
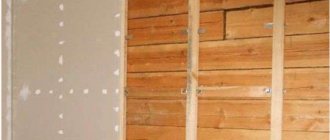
In buildings with wooden floors, it will not be possible to equip a pallet made of brick or concrete, so the base will have to be purchased separately or made from two layers of moisture-resistant plasterboard of the GVL brand. You can make the walls of the booth yourself.
Based on waterproofing requirements, roll-in showers are not suitable if the floor is made of wood.
Video on topic
Shower drains come in different designs: ordinary ones, which look like a round or square mesh in the floor, like a tray. There are more modern models - wall-mounted. A shower tray and a wall drain are necessary if you are making a cabin with a large flow of water. In this case, the conventional design may not cope with the drainage and more efficient models are required. And there can be two drain devices in the tray. Features of their installation in a video from one of the manufacturers.
And another type of waterproofing
Project preparation
Before construction of the shower room begins, a design is prepared. It reflects:
- room layout with dimensions;
- placing plumbing fixtures, a washing machine, a washbasin, cabinets and shelves in the space;
- method of supplying hot and cold water;
- placement of sewerage pipes;
- location of ventilation systems;
- electrical wiring for lighting and power supply of electrical appliances;
- method of finishing floors, walls, ceilings.
When planning, be sure to take into account the geometric dimensions of the allocated room.
For small rooms:
- choose hanging plumbing fixtures - the larger the visible free space on the floor, the larger the room appears;
- They prefer niches to shelves, this way you can save useful space;
- occupy space above the washing machine for storing household chemicals or clothes dryer.
If the size of the room allows you to place additional items, install a lounge chair, a table and a mirror for caring for the skin of your face and hands, cabinets and bedside tables for storing towels, linen, household chemicals, etc.
The communications project will help calculate the required amount of materials - mixers, water and sewer pipes, fittings for connecting them.
The design takes into account the dimensions of the cladding materials. For example, with a ceiling height of 2.5 m, it is advisable to purchase plastic panels with a length of not 3, but 2.7 m.
Layout
You need to start installing a shower stall with careful planning. First of all, you should think about where and what will be placed. If the bathroom is combined, then it is necessary to calculate that all the elements fit well together and there is enough free space in the room. Opposite the front door it is worth placing a sink with a mirror, the toilet is best installed on the side, where it will not be conspicuous, and the shower will fit perfectly into the far corner.
When it is decided exactly where the shower will be located, marks should be made. It is necessary to outline the appropriate area for the convenience of working above the shower. The same goes for the arrangement of other elements.
Premises requirements
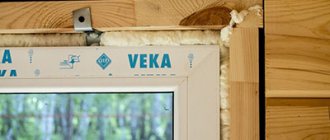
External walls in a bathroom in a wooden house are usually load-bearing. Exposure to steam and high humidity can cause their destruction. to rooms with high humidity :
- It is important to provide high protection from environmental humidity and temperature changes. To do this, all planes of the room are isolated from water. The best material to protect against moisture is a waterproofing membrane. At the junction of walls and ceiling, walls and floor, 2 layers of sealant are laid;
- you need to pay attention to the type of wood from which the walls and ceiling in the bathroom are made. Usually coniferous wood is used, as well as aspen and linden. These trees can withstand high and low temperatures and smell pleasant;
- A good ventilation system will also help stabilize the temperature in the bathroom. Circulating air in the bathroom will reduce humidity;
- it is necessary to prepare a water supply and drainage system. You can install a leak sensor.
Types of materials
To waterproof a bathroom, you should familiarize yourself with the materials intended for this procedure. When choosing a material, you should focus on what the house is built from: panels, wood, brick, foam block, wood concrete.
Roll materials
Roll (paper) waterproofing is in demand among craftsmen today. This type is made from fiberglass, polymers, cardboard, and composite materials. There may be no basis at all. The material itself is a polymer, bitumen or bitumen-polymer mass. The requirements for the characteristics of this type of insulation are specified in GOST 30547*97.
Installation of adhesive-type waterproofing
Interesting to know! Properly installed insulation remains waterproof for 2 hours at a jet pressure of 0.2 mPa.
Polymer roll material
There are 2 types of this material:
- built-up rolls - a torch is used for their application, this does not apply to residential premises;
- self-adhesive - easy to install, considered the most advanced option.
To use roll waterproofing, you need to carefully prepare the surface. Unevenness of more than 2 mm is unacceptable; the use of a bitumen-based primer is mandatory. The rolled material should be glued carefully, preventing air from entering.
Attention! Bituminous substances have a strong odor, so work with windows and doors open.
Installation example using the directional method
Such insulation for bathrooms is now rarely used, since you have to spend money not only on it, but also on mastic.
Coating material for waterproofing
Coating materials for waterproofing are no less popular. They are mainly relevant in particularly damp rooms and on surfaces that do not have a flat surface. A coating material is a liquid or paste-like product that is applied to a dry surface.
The material is sold dry and ready-made
The following shows the main types of such insulation:
| Material, photo: | Description: |
| Mastics can be made from water or solvent. They come in one-part or two-part forms that produce a chemical reaction when mixed. They are used as an independent insulator or for gluing rolled materials.
|
| This waterproofing is made from cement mixtures using mineral filler, as well as with the addition of acrylic.
|
When selecting coating mastic, it is important to study the purpose of the material, since many of them are not used indoors. All mastics are divided into hot and cold. For the bathroom, only the first option is suitable - they are bitumen-rubber or polymer. Such materials are manufactured in accordance with GOST 30693-2000.
Coating material from a famous world brand
In the construction market, manufacturers Knauf and Ceresit are the most popular. Knauf FLACHENDICHT material contains synthesized latex. It is suitable for all substrates intolerant to moisture. Can be used directly under laid tiles, has good adhesion to cement adhesives.
In a bathroom in a frame house, liquid rubber or liquid glass is suitable as a waterproofing material.
Characteristics of “Liquid Rubber”:
- The characteristics of the material depend on the manufacturer, but it has one common advantage - all components of liquid rubber are safe for health.
- Has good adhesion and is resistant to chemicals.
- It is odorless, so it can be used indoors.
The average price for 4 kg is 250 rubles
Liquid glass is a budget option, its service life is on average 5 years, after which the coating needs to be renewed, so we do not recommend buying it. It is better to take simple bitumen mastic.
- The material includes antiseptics. This is true for the bathroom, where there is a high probability of fungus appearing.
- The surface covered with the material is seamless, waterproof and water-repellent. Has good adhesion. Waterproofing is used not only in brick and concrete houses, but also in buildings made of wood concrete and wood.
- Lack of material is self-destruction after a certain time due to exposure to the environment. Therefore, the glass must be coated on top with paint or decorating material.
This information will be enough to make an informed decision.
Tips for choosing a shower cabin
To properly install a shower in a wooden house with your own hands, you need to choose the appropriate model.
When choosing a cabin, look at its dimensions. The minimum size of a shower for a bathroom is 80x80 cm. A smaller design will cause a lot of inconvenience during washing. The most popular sizes are 90x90 cm and 100x100 cm, but you can take a cabin up to 170 cm long.
The shower cabin comes with or without a tray. A shower without a tray is installed for small spaces.
Pallets are:
- acrylic. They have a pleasant appearance and anti-slip coating. Such pallets can withstand significant loads, are easy to clean, and are easy to transport;
- cast iron ones weigh a lot, so they are difficult to transport. When exposed to water they become slippery. The enamel may be damaged during use. The cost is high;
- steel. This is a short-lived material that bends under the weight of a heavy person.
Shower cabins can be open or closed. Open models have no ceiling. A good ventilation system is necessary for their arrangement. The accumulated steam rises to the top, and the air in the cabin cools down.
Closed models have a ceiling and a built-in fan. With its help, the air comes out. To install this shower option, you only need to mount the drain and attach it to the walls.
Shower cabins have a movable wall. It is made from different materials.
The best material for doors is tempered glass. It is strong, reliable, shockproof.
Regular glass is fragile. To prevent it from breaking into small pieces from an impact, it is covered with a self-adhesive transparent film. The thickness of ordinary glass for cabin doors should not be less than 6mm.
Acrylic and polycarbonate are also used for shower doors. The doors are framed with aluminum profiles. This is the most common option.
The movable wall can also be in the form of a plastic curtain.
Preparatory stage, selection of components
Before installing shower equipment, it is necessary to connect the house to an individual or central water supply system and install a sewer system. The structure should be placed next to communications.
Based on the area of the room where the cabin is planned to be installed, you need to choose a place to place it. This can be a corner part of the room, the center or a space near the wall. The final decision is made by the owner, based on personal preferences.
Waterproofing floors, walls and ceilings
Once the location has been determined, waterproofing work must be carried out. If this is not done, after only a month of using the shower, mold may form on the floor, and it is likely that the floor covering will need to be dismantled and replaced.
Sequencing.
- First, the flooring is disassembled, then sheets of moisture-resistant chipboard or cement-bonded particleboard are laid.
- Then cover the surface with polymer film, glassine or other moisture-resistant material. One layer is superimposed on the other to avoid possible cracks. You can also use special mixtures based on bitumen. They are mixed with liquid to a mushy state and the surface under the floor is coated with the resulting composition. This can also prevent dampness.
Next, a cement-sand screed is laid, reinforcing the base with a metal mesh. For insulation, you can lay a layer of foam plastic under it, but then the structure will become taller. After complete drying, glue the tiles. Once the coating has dried, plumbing work can be carried out. It must be taken into account that the floor in the shower room should be 2 or 3 centimeters lower than the rest of the room. This is done to prevent water from entering other rooms in the event of a leak.
If such a process is not possible, you should install a small podium yourself from brick, and then decorate it with ceramic tiles or mosaics.
You can protect walls from water in the following ways:
- cover them with moisture-resistant plasterboard or cladding boards treated with acrylic varnish, primer or antiseptic;
- paint with moisture-resistant paint.
The ceiling covering also needs protection from moisture. The finishing material must be fireproof, reflect light, absorb sound, environmentally friendly, and resistant to water.
Suspended ceilings are often installed in bathrooms. It is easy to care for and you can easily place lighting fixtures.
Don't forget about ventilation. A system with forced air circulation is preferable.
This will help reduce humidity levels and stabilize the temperature in the room.
Bathroom location
First of all, even at the design stage, you need to decide where the bathroom - or rooms - will be located. Why is this necessary?
- It is necessary to correctly calculate the load on the floors between floors and further strengthen them.
- To prevent the house from flooding in the event of force majeure, the floor in the bathroom area is made slightly lower than in other rooms.
- You need to carefully consider the communications and electrical wiring diagram, plan the location of risers, valves and plumbing.
A convenient location option is on the ground floor, not far from the kitchen, in order to organize a single water supply system and not distribute it along the entire perimeter. If the house is large and several bathrooms are planned on different floors, it is better to place them one below the other.
Instagram @designer_polina_s
Instagram @gala.interior
Design: Chenchow Little Architects, chenchowlittle.com
- Bathroom, toilet
7 designer bathrooms that meet modern trends
Installation of the structure
Installing a shower cabin does not require much effort. Often, instructions are included with the equipment . If you follow the instructions in it, the process will not take long.
- First you need to prepare the room. To do this, you need to install pipes for water supply and drainage. Wooden elements should be treated with an antiseptic.
- Some corner models do not have back walls. Such designs are designed for installation close to the wall.
- Next, you need to attach the legs to the pallet and install it, controlling the height using the adjusting screws. Horizontalness is checked at the building level.
- Install the lower guides for the sashes on the pallet. You fix them with screws and treat the joints with sealant.
- If there is a back wall, it needs to be secured. Then connect the plumbing equipment.
- Wiring in the bathroom should not be exposed. All elements are hidden under special channels.
- Then the vertical supports and door leaves are installed.
- Afterwards the joints are sealed. The hydro cabin is left open for a day until the smell disappears.
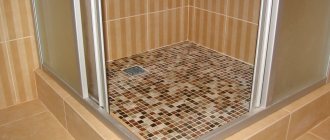
Shower with a ready-made tray - a simple and aesthetic solution
Installing the tray is extremely simple - just follow the instructions. Steel and acrylic pallets, in most cases, are equipped with special legs. But even in this case, it is better to place the pallet on a monolithic base with a support in the center - so that it does not sag or move.
The installation process includes five steps:
- Preliminary fitting of the pallet and leveling. In no case should you make a slope towards the drain - the design of the pallet already provides for this.
Connecting the assembled siphon to the drain hole and sewer system. The higher the siphon is from the drain hole, the faster the water will drain from the shower.
- Installing the pallet in place, fixing it with mounting adhesive to the walls and base (if there is one).
- Attaching a decorative panel to a pallet if it stands on legs and requires access to communications.
- Filling joints with sealant to ensure watertightness.
To simplify installation, instead of installing glass screens, you can attach a curtain bracket. To add originality to your shower, you can use non-standard brackets - oval, semicircular or even spiral.
Connection to sewerage and water supply system
Plumbing fixtures with and without a tray are connected to the sewer system in different ways. In the first case, the connection occurs through a coupling of the required caliber. The sewer outlet is mounted under the cabin, but to get rid of unpleasant odors it is better to use adapters.
If the shower structure is located next to the riser, then use flexible corrugation.
In the second case, it is still necessary to create a drainage system. Drain pipes are installed under the floor covering and connected to the sewer through a bend that is hidden behind the podium.
It is easier to connect plumbing to the water supply system yourself than to connect the sewer system. To ensure that the pipes are practically invisible, you need to create a plan for placing the shower in advance. The adapter for hot and cold water should be positioned so that the distance to the pipes is at least 15 cm, otherwise only hot water will flow out. The diameter must be selected in accordance with the pressure of the water supply. The optimal caliber is 27-30 mm, suitable for both standard watering cans and the “tropical” version.
Filling the tank and heating the water
There are usually no problems filling the shower tank with water. Sometimes they carry water in buckets - if you want to wash, you will carry it. It’s not very convenient, of course, but it happens... If there is a water supply at the dacha, fill it with a hose and install a supply pipe with a valve. You need to add water - open the tap, the tank is filled - turn it off.
How to auto-fill a tank
The most advanced ones do automatic filling. Then the water supply is opened/closed by a float system similar to the one in the tank. Only in case of breakdown should provision be made for draining excess water. And, preferably, when leaving the dacha, turn off the supply tap. Otherwise, you can turn your and your neighbor’s dacha into a swamp.
Water tank design with automatic level control
An approximate diagram of the implementation of auto-filling the tank is shown in the figure above
Please note: the water intake into the shower occurs close to the surface: this is where the warmest water is usually located. Only this pipe is placed at the opposite end from the cold water inlet, otherwise the water will still be cold
There are two pipes going into the sewer system: one is an overflow pipe (mustard colored). With its help, the tank will not overfill if the float mechanism breaks down. The second drain into the sewer for complete drainage (brown). It is useful when preserving the system - draining it for the winter, which is why a tap is installed on it.
Organization of heating
The simplest option is to use solar energy. Yes, it heats water through the walls of the tank. But the water thickness is too large for it to warm up quickly. That’s why people come up with various installations for solar water heating.
Method of heating water by the sun
As mentioned above, the warmest water in the tank is at the top. And the traditional feed comes from below. That is, we take the coldest water. To ensure that the warmest water flows into the watering can, a hose is attached to it, and it is attached to a piece of foam plastic, which I let float. So water is taken from above.
To speed up the heating of the water, they make a “coil” (in the photo above it is the right picture). At the bottom of the water tank and above, two pipes are welded into one of its walls. They are connected to a black rubber hose, which is folded into rings in the sun. If there is no air in the hose, the water movement will be quite active.
https://youtube.com/watch?v=xLOru2iOmKM
If the sun is not enough for you, but you can supply electricity to the shower, you can use heating elements (wet). They need to have a thermostat so you can set the required temperature. They are usually used in storage water heaters, so you can find them.
Diagram of a device for heating water with a heating element in a summer shower
When you pull the power line to the shower, do not forget to install a circuit breaker with an RCD. This is the minimum that will ensure your safety.
Shower cabin design
To make your shower unusual, “not like everyone else’s”, you can use black elements instead of classic chrome elements. They will look especially impressive against a light background of the surrounding space.
If you are planning to decorate your bathroom in a vintage style, then you should select antique-style accessories.
In a classic or baroque style, gold-plated details will look good.
You can also install a seating area in the shower, making it, for example, out of brick and decorating it with ceramic tiles. Relevant for families with elderly people. For greater comfort, you can additionally build a handrail.
Can be used as finishing materials.
- Ceramic tiles. The advantages of use are strength, resistance to water, variety of colors;
- Mosaic for finishing a homemade pallet or walls. Differs in many shapes and colors;
- Marble is a guarantee of beauty and durability. It will help make any interior unusual. The disadvantage is the high price;
- PVC panels are a budget design option, suitable for finishing ceilings and walls.
Electrics
In wet rooms, wires are laid in protective boxes. There should be at least 60 cm between the sockets and the tray.
The ends of the wires must be tinned before being secured to the terminals, which prevents oxidation in a humid environment.
The section of the network that supplies shower rooms and washing machines must be connected through a residual current circuit breaker or RCD (residual current device). The automation should operate at a leakage current of no more than 30 mA, the parameter is indicated on the product housings.
Doors
The design and material of the door to the shower room can be any. It is important to comply with the following condition: a gap of 20–30 mm must be left under the lower cut of the canvas; it is needed for the flow of fresh air.
Another option is to use doors with ventilation holes. Which option to choose depends on the design of the premises.
The gaps between the door and the wall are sealed with polyurethane foam and covered with platbands.
The doors to the booth are made of monolithic polycarbonate, tempered glass or ordinary glass with a thickness of at least 6 mm. In the latter case, a film is glued to the outer surface to prevent the formation of small fragments in the event of accidental breakage.
Ventilation in a log cabin bathroom
Many people believe that a full ventilation system in a wooden house is not necessary. The reason for this statement is the ability of wood to breathe and allow air to pass through micropores.
But wood not only has low thermal conductivity and high breathability, but also absorbs and releases moisture. In rooms with high humidity (bathroom, bathroom, kitchen), there is a danger of mold and mildew, and putrefactive processes that will lead to damage to the wood and destruction of the house.
To prevent the appearance of pathogenic microorganisms in a log building, additional air outflow is necessary. If the house is small, then a passive ventilation system is sufficient.
Air circulation in such a system occurs due to the difference in pressure and temperature outside and inside. Cold air masses enter the house, heat up and rise upward, exiting through exhaust holes in the wall in rooms with high humidity. The exhaust pipe should extend 50 cm outward. To prevent oxygen from entering during a fire, a fire damper is installed in the ventilation shaft in the shower room. Insulating the air duct from the outside will help prevent the formation of condensation.
There are ready-made solutions for shower cabins with built-in ventilation; you just need to connect the corrugated pipe and take it outside.
- To increase air exchange, use an exhaust fan.
- To do this, connect an electrical cable to the exhaust vent in the bathroom.
- Make markings for the fan.
- Mark the places where it will be attached to the wall.
- Drill holes for dowels.
- Attach the device body to the wall.
- Connect it to the cable.
- Close with a lid.
Wall and ceiling finishing
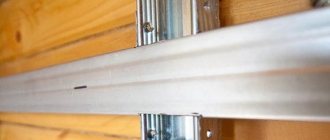
To finish the ceiling with plastic panels, first install a starting profile around the perimeter of the cladding. Instead of a profile, you can attach a plinth if it has a mounting groove. The plinth is attached to the ceiling with brackets.
Then the tenon of the first plank is inserted into the groove into the starting profile and pressed against it, fastened with self-tapping screws. Other plastic panels are attached in the same way. The last strip is cut and inserted into the starting profile.
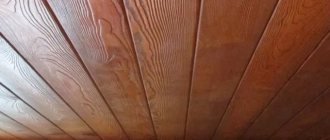
The ceiling and walls can be left wooden, or they can use tiles, marble, or mosaics for decoration. A sheathing is installed under the tiles and plasterboard is mounted, and cladding is installed on it. A frame is not made for plastic panels.
Pallet installation
Now let's talk about how to install a shower tray on a wooden floor.
It is optimal if the device is equipped with height-adjustable legs, brackets for easy fixation and a support frame.
To adjust the legs you need a wrench and a bubble level. With their help, the pallet is installed in the correct horizontal plane relative to the floor.
Devices made of steel, fiberglass and acrylic have one drawback: there is often no support under their middle part. It can be corrected by installing the bowl on a stable podium or support made of any durable and waterproof material.
Then it is possible to install the shower tray with your own hands on a wooden floor.
- First, head out to do the marking. The bowl is placed strictly horizontally using a bubble level. Then, with a marker, marking lines for the profile are marked along the walls, and on the floor for the drain hole.
- Then remove the pan, remove the outlet from it, connect the siphon to the outlet, and connect the corrugated drain pipe to the sewer socket.
- The pallet is put back into place - completely.
- Plans the drain: the outlet grille is attracted through a gasket to the outlet inserted from below. The assembly is spilled with water to check for leaks.
- Then it is possible to attach the enclosing structures of the cabin and connect it to all the necessary communications.
- Once the structure is installed, the final touch will remain. At the bottom, along the perimeter of the entire cabin, it is covered with a screen - decorative plastic panels.
- All joints between the elements of the cabin should be carefully insulated with silicone sealant.
Design options
On the Internet you can find many ideas on how to decorate a shower room in different styles, preferably so that they are in harmony with other rooms in the house.
- Nouveau style implies the presence of original forms of familiar objects in the design. For example, shell-shaped sinks, wooden heated towel rails. Designers recommend decorating spacious and bright bathrooms in this style. Tiles and other coatings are selected in natural color tones. Lines and transitions should be smooth.
- Classic involves the use of only natural materials. Any plastic and LED lighting are excluded. It is advisable to install lamps imitated with crystal, and plumbing fixtures made of natural stone or high-quality artificial materials that imitate stone.
- loft style will require large expenses for arranging a shower room. It is necessary to mount a base for brick or glass partitions and walls. The pallet and floor are finished with tiles imitating natural stone with rough relief.
- Ethno emphasizes the decoration of premises, characteristic of certain nationalities of Africa, Scandinavia, South America or Japan.
- Romantic Provence does not accept tiles and plastic finishing. Be sure to include a window and wood trim.
- Eclecticism is a mixture of different styles in design. You can combine different materials and textures, decorate the interior with vintage lighting fixtures and plumbing fixtures.
Drain arrangement
When talking about arranging a good and convenient drain in a shower stall, the closest attention should be paid to the drain. It determines how quickly the water will drain from the shower tray.
A high-quality drain prevents the spread of sewer odors.
The composition of the drain includes:
- outer grille;
- debris filter;
- outlet for drainage;
- pad;
- screw for the outlet pipe nut;
- water seal
When purchasing a shower cabin, drainage devices are included in the package. It is important to make sure that all drain parts are present.
When installing a shower cabin in a wooden house, you should take care to provide access to the drainage device if you need to clean it.
Connect the drain pipe of the shower cabin to a common sewer pipe. In order for the water to drain faster, the drain from the drain to the sewer pipe must be laid at a slope. For one meter of pipe the slope should be about 5 cm.
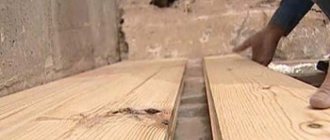
Making a pallet
Work should begin from the bottom of the cabin - the pallet. If you use a ready-made base, this will reduce installation complexity and time.
When making a pallet yourself, you must take care in advance to protect the room from moisture. To do this you will need to use roll waterproofing.
It all depends on what material the floor is made of. The treated surface should not allow moisture to pass through. The same applies to the bottom of the walls.
Next, the concrete is poured. In this case, the surface should be inclined in the direction of the drain by 2–3 cm per meter. Before pouring begins, drainage pipes are laid and a drain ladder is fixed.
Types of moisture protection products
All waterproofing materials are divided into two groups. The first is used to create a protective layer on the wood. The second type is used to impregnate boards, protect them from rotting and the spread of pathogenic microorganisms. The types of materials laid on the surface include the following:
- roll waterproofing impregnated with bitumen mastic;
- material based on cellulose fiber;
- viscous bitumen mastic;
- polymer substrates or films;
- polymer coatings.
The group of impregnations includes the following products:
- Oil compositions. Contain natural or synthetic components with hydrophobic properties.
- Varnishes, stains. The composition includes organic solvents, artificial resins, pigments. The products protect the wood from rotting.
- Hydrophobic compounds. When applying the solution, a film is formed on the boards, preventing water from penetrating into the thickness of the wood. The use of such a composition helps preserve the structure of the material.
Features of ceiling waterproofing
Rolled materials are extremely difficult to use; they are usually not used. More suitable for ceilings:
- coating waterproofing;
- plaster composition with moisture-resistant substances in the presence of a concrete ceiling;
- stretch fabric.
As a rule, the ceiling is first covered with plasterboard. Then they are treated with bitumen compounds or latex mastics. A bitumen-polymer composition is well suited for these purposes. It is used before finishing with tiles or other finishing materials. It is applied with a brush to a cleaned surface in 2-3 layers using reinforcing fiberglass. The interval between applying layers is 3 hours. When applied in two layers, one can weighing 5 kg is enough for 10 sq.m.
Installation of plastic panels on the ceiling
Before installing a shower stall in a wooden house, you need to take care of sealing the ceiling in the room. It will be much more difficult to do this later, so postponing is a very bad option. Fastening the plastic panels begins with installing the starting profile. It is screwed around the perimeter of the casing. Instead of a profile, you can use a ceiling plinth if it has a mounting groove.
It, like the profile, is attached to the ceiling using staples or screws. They are driven into the lower support strip of the plinth.
The tenon of the first panel (narrow mounting flange) is inserted into the starting profile on the ceiling. Then the ceiling strip is pressed against the profile and secured to the sheathing using brackets and screws. They are driven into the fastening field of a wide mounting shelf. The remaining planks are attached to the frame in a similar way.
Installation of the end panel is done as follows:
- measure the distance between the profile and the last plank attached to the ceiling; reduce it by 5-7 mm;
- using a pencil and tape measure, transfer the size to the bar;
- trim the edge of the panel;
- bring him into the starting profile;
- insert the tenon of the outer panel into the groove of the adjacent plank.
Many people, before installing a shower cabin in a wooden house, also install all the accompanying fittings. But we will still only do all the basic operations that must be performed. Everything that can be done later will be done later. Because a lot can still change.
A do-it-yourself shower cabin in a wooden house is labor-intensive to install. It requires accurate calculations, correct selection of materials, strict adherence to construction and finishing technology. Therefore, it is still better to entrust the work to experts.
Tools for work
You can build a shower in a wooden house using a simple set of tools:
- drill or hammer drill;
- screwdriver;
- Bulgarian;
- jigsaw or saw;
- spanners;
- building level and marking cord;
- roulette;
- tools for laying tiles;
- stapler for fastening plastic panels.
Depending on the composition of the equipment, other tools may be needed, which are purchased additionally.