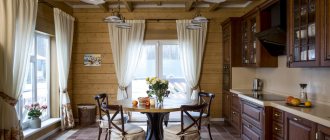
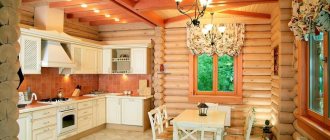
A modern homeowner, no matter what material the building is made of, does not want to give up the standard set of communal amenities. Traditionally, in wooden housing construction, the equipment of high humidity zones inside the house was critical. Baths and showers were placed in a separate building, eliminating the risk of damage to the natural fiber and premature damage to the structure of the main housing. A new generation of building materials has made it possible to safely operate rooms with high humidity. Today, the demand for installation of rooms such as a toilet, bathroom, shower room in a wooden house has increased significantly. The range of products on the market allows you to implement original, exclusive technical and design ideas.
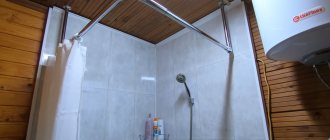
A shower in a wooden house is easy if you know the basic rules Source bygu.kokosome.ru.net
Features of installing a shower in a wooden house
The rules for installing showers in log houses or buildings made of timber are determined by the properties of building materials that are prone to deterioration in wet conditions.
It is important to provide:
- draining water outside the house in the absence of sewerage;
- a septic tank or cesspool capable of handling increased load;
- reliable waterproofing of all house structures - walls, floors, ceilings;
- sufficient exhaust ventilation and air flow from outside the shower room;
- protection against electric shock;
- moisture-proof cladding in addition to waterproofing wooden parts.
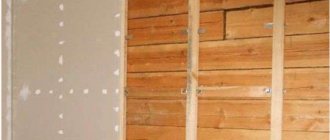
In buildings with wooden floors, it will not be possible to equip a pallet made of brick or concrete, so the base will have to be purchased separately or made from two layers of moisture-resistant plasterboard of the GVL brand. You can make the walls of the booth yourself.
Based on waterproofing requirements, roll-in showers are not suitable if the floor is made of wood.
Insulation gasket
Typically, in houses made of lumber, there are two ways to lay the floor - pouring a concrete screed and laying the base on logs. Regardless of the chosen coating method, you must first lay a layer of insulation to prevent moisture from entering. To do this, liquid bitumen mastic is usually applied, and then covered with coating or solid polymers.
It must be said that in this case it is advisable to use ordinary polyethylene film applied in two layers. This is an inexpensive but fairly reliable way to protect wooden floors.
After the work has been done, cement mortar or a sheet base of the floor should be applied. If the base coat is made of lumber, it would be a good idea to prime it with water-repellent and antifungal substances.
The finished floor surface is covered with bitumen mastic for waterproofing
Project preparation
Before construction of the shower room begins, a design is prepared. It reflects:
- room layout with dimensions;
- placing plumbing fixtures, a washing machine, a washbasin, cabinets and shelves in the space;
- method of supplying hot and cold water;
- placement of sewerage pipes;
- location of ventilation systems;
- electrical wiring for lighting and power supply of electrical appliances;
- method of finishing floors, walls, ceilings.
When planning, be sure to take into account the geometric dimensions of the allocated room.
For small rooms:
- choose hanging plumbing fixtures - the larger the visible free space on the floor, the larger the room appears;
- They prefer niches to shelves, this way you can save useful space;
- occupy space above the washing machine for storing household chemicals or clothes dryer.
If the size of the room allows you to place additional items, install a lounge chair, a table and a mirror for caring for the skin of your face and hands, cabinets and bedside tables for storing towels, linen, household chemicals, etc.
The communications project will help calculate the required amount of materials - mixers, water and sewer pipes, fittings for connecting them.
The design takes into account the dimensions of the cladding materials. For example, with a ceiling height of 2.5 m, it is advisable to purchase plastic panels with a length of not 3, but 2.7 m.
Selection of finishing materials and plumbing fixtures
To make a shower, purchase:
- GVL sheets for the pallet and for covering the walls if laying tiles is planned;
- OSB sheets for installation of finishing from plastic panels;
- tiles for the floor of the cabin and the entire shower room; materials for finishing the side are purchased with a reserve;
- waterproofing mastic;
- universal deep penetration primer;
- tile adhesive for damp rooms;
- antiseptic compounds to protect wood from rotting and fungal attack.
For plumbing you will need:
- mixers by number of points of use;
- toilet with flush tank;
- drain for collecting water from the pan.
- pipes and fittings for water supply;
- pipes and fittings for sewerage.
Based on the project, they buy materials for electrical wiring, including channels for laying cables, sockets, switches, protection and automation devices.
Valera
The voice of the construction guru
Ask a Question
In showers with opening windows, you can usually do without forced ventilation. In remote rooms you will need an exhaust fan and an air exhaust duct.
Premises requirements
External walls in a bathroom in a wooden house are usually load-bearing. Exposure to steam and high humidity can cause their destruction. to rooms with high humidity :
- It is important to provide high protection from environmental humidity and temperature changes. To do this, all planes of the room are isolated from water. The best material to protect against moisture is a waterproofing membrane. At the junction of walls and ceiling, walls and floor, 2 layers of sealant are laid;
- you need to pay attention to the type of wood from which the walls and ceiling in the bathroom are made. Usually coniferous wood is used, as well as aspen and linden. These trees can withstand high and low temperatures and smell pleasant;
- A good ventilation system will also help stabilize the temperature in the bathroom. Circulating air in the bathroom will reduce humidity;
- it is necessary to prepare a water supply and drainage system. You can install a leak sensor.
Lighting and electrical
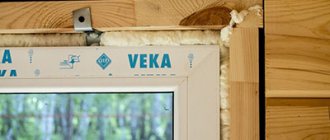
According to SNIP standards, natural lighting must be provided in the bathroom. This is dictated by several reasons, the main one of which is to ensure safety in order to reduce threats to people’s health and lives during a power outage. When choosing a place for a bathroom or shower room, you should remember this. As a rule, the number of openings in a wooden house is limited, and when designing a standard layout, a special window is not provided. It is better to lay it down during construction, and if the house is already ready, then it is advisable to do it.
Architects strongly recommend making a window in the shower Source krovati-i-divany.ru
The project lays out the routes for laying power cables. Special conditions become specific to the installation of the system, in particular the fire hazard of the base material. Wiring is done in armored hoses and special boxes that guarantee protection of the building from fire sources in emergency situations and short circuits. It is also preferable to purchase final output devices—sockets, switches, sensors—from the list of products with increased fire protection. A bathroom, toilet, shower in a frame house must be grounded. It is better to entrust the calculation of the energy supply system to a specialist, even if you plan to do the installation yourself.
Tips for choosing a shower cabin
To properly install a shower in a wooden house with your own hands, you need to choose the appropriate model.
When choosing a cabin, look at its dimensions. The minimum size of a shower for a bathroom is 80x80 cm. A smaller design will cause a lot of inconvenience during washing. The most popular sizes are 90x90 cm and 100x100 cm, but you can take a cabin up to 170 cm long.
The shower cabin comes with or without a tray. A shower without a tray is installed for small spaces.
Pallets are:
- acrylic. They have a pleasant appearance and anti-slip coating. Such pallets can withstand significant loads, are easy to clean, and are easy to transport;
- cast iron ones weigh a lot, so they are difficult to transport. When exposed to water they become slippery. The enamel may be damaged during use. The cost is high;
- steel. This is a short-lived material that bends under the weight of a heavy person.
Shower cabins can be open or closed. Open models have no ceiling. A good ventilation system is necessary for their arrangement. The accumulated steam rises to the top, and the air in the cabin cools down.
Closed models have a ceiling and a built-in fan. With its help, the air comes out. To install this shower option, you only need to mount the drain and attach it to the walls.
Shower cabins have a movable wall. It is made from different materials.
The best material for doors is tempered glass. It is strong, reliable, shockproof.
Regular glass is fragile. To prevent it from breaking into small pieces from an impact, it is covered with a self-adhesive transparent film. The thickness of ordinary glass for cabin doors should not be less than 6mm.
Acrylic and polycarbonate are also used for shower doors. The doors are framed with aluminum profiles. This is the most common option.
The movable wall can also be in the form of a plastic curtain.
Stages of arranging a shower room
The sewerage and water supply systems are installed at the initial stages of building a house. The ventilation system for the house as a whole is also planned and installed. Not only the bathroom, but also all living rooms should be well ventilated.
The process of arranging a shower in a wooden house can be divided into the following steps:
- Provide the shower room with a reliable ventilation system to remove moisture;
- Equip sewage water drains;
- Properly waterproof all structural elements of the shower;
- Install a shower stall;
- Carry out finishing work.
Preparatory stage, selection of components
Before installing shower equipment, it is necessary to connect the house to an individual or central water supply system and install a sewer system. The structure should be placed next to communications.
Based on the area of the room where the cabin is planned to be installed, you need to choose a place to place it. This can be a corner part of the room, the center or a space near the wall. The final decision is made by the owner, based on personal preferences.
Waterproofing floors, walls and ceilings
Once the location has been determined, waterproofing work must be carried out. If this is not done, after only a month of using the shower, mold may form on the floor, and it is likely that the floor covering will need to be dismantled and replaced.
Sequencing.
- First, the flooring is disassembled, then sheets of moisture-resistant chipboard or cement-bonded particleboard are laid.
- Then cover the surface with polymer film, glassine or other moisture-resistant material. One layer is superimposed on the other to avoid possible cracks. You can also use special mixtures based on bitumen. They are mixed with liquid to a mushy state and the surface under the floor is coated with the resulting composition. This can also prevent dampness.
Next, a cement-sand screed is laid, reinforcing the base with a metal mesh. For insulation, you can lay a layer of foam plastic under it, but then the structure will become taller. After complete drying, glue the tiles. Once the coating has dried, plumbing work can be carried out. It must be taken into account that the floor in the shower room should be 2 or 3 centimeters lower than the rest of the room. This is done to prevent water from entering other rooms in the event of a leak.
If such a process is not possible, you should install a small podium yourself from brick, and then decorate it with ceramic tiles or mosaics.
You can protect walls from water in the following ways:
- cover them with moisture-resistant plasterboard or cladding boards treated with acrylic varnish, primer or antiseptic;
- paint with moisture-resistant paint.
The ceiling covering also needs protection from moisture. The finishing material must be fireproof, reflect light, absorb sound, environmentally friendly, and resistant to water.
Suspended ceilings are often installed in bathrooms. It is easy to care for and you can easily place lighting fixtures.
Don't forget about ventilation. A system with forced air circulation is preferable.
This will help reduce humidity levels and stabilize the temperature in the room.
Waterproofing and floor finishing
After preparing the base of the shower floor, it is waterproofed. Initially, a roll or coating of waterproofing material is placed on the subfloor. Or ordinary roofing felt. Coating materials have an advantage over other waterproofing materials. They can be laid on uneven surfaces without additional treatment with a primer or bitumen.
Materials for airtightness are laid overlapping on the walls. To increase strength and service life, joints can be additionally reinforced with fiberglass mesh. The floor level in the shower room is mounted below the level in the other rooms by 2 cm and is necessarily separated by a small threshold. This is necessary to protect the rest of the premises in the event of a water leak. If you plan to install a shower cabin, then it is necessary to make a tray for the cabin. There is no need to buy it. The walls of the pallet are made of brick or filled with concrete. You will definitely need a drain for the shower. To install it, the floor is made at a slight slope. The water goes down the drain on its own.
Next, a sand-cement screed and finishing materials are placed on the floor. At this stage it is possible to install a heated floor system. A suitable material for finishing the shower floor is ceramic tile. You can also lay it with cork material or a special array of thermal boards. Wooden materials are more economical, are characterized by great strength, are pleasant to the touch, and give the shower a cozy and homely look. But they require additional preparation. It is necessary to carefully treat each board with antiseptic agents that protect the material from rotting, the development of fungus and mold.
Linoleum and laminate are not suitable for finishing shower floors. Linoleum is very slippery when water gets on it. Laminate is not suitable for rooms with high humidity, even after treatment with special products.
Installation of the structure
Installing a shower cabin does not require much effort. Often, instructions are included with the equipment . If you follow the instructions in it, the process will not take long.
- First you need to prepare the room. To do this, you need to install pipes for water supply and drainage. Wooden elements should be treated with an antiseptic.
- Some corner models do not have back walls. Such designs are designed for installation close to the wall.
- Next, you need to attach the legs to the pallet and install it, controlling the height using the adjusting screws. Horizontalness is checked at the building level.
- Install the lower guides for the sashes on the pallet. You fix them with screws and treat the joints with sealant.
- If there is a back wall, it needs to be secured. Then connect the plumbing equipment.
- Wiring in the bathroom should not be exposed. All elements are hidden under special channels.
- Then the vertical supports and door leaves are installed.
- Afterwards the joints are sealed. The hydro cabin is left open for a day until the smell disappears.
Suitable installation locations
When installing a finished shower stall, you need to choose the right location. Preference is often given to corner models. Pipes and electrical wires are pulled to the installation site. The cabin is located above floor level, which ensures efficient water drainage. When choosing a place to install a plumbing fixture, take into account the following nuances:
- The surface on which the cabin is installed must be strictly horizontal. Failure to comply with this rule leads to interruptions in the supply or drainage of water. If necessary, the pallet can be placed on supports.
- The floor covering must not have any recesses. The sections of the wall in contact with the cabin must form a right angle. Otherwise, during installation, the side elements of the shower may be damaged.
- The size of the outlet of the cabin drainage system must match the diameter of the sewer pipe.
- The siphon is placed above the level of the sewer line. This helps drain water from the pan faster.
- The drain is sealed after installing the sump pump. The shower hose is installed after all work is completed.
DIY shower.
Connection to sewerage and water supply system
Plumbing fixtures with and without a tray are connected to the sewer system in different ways. In the first case, the connection occurs through a coupling of the required caliber. The sewer outlet is mounted under the cabin, but to get rid of unpleasant odors it is better to use adapters.
If the shower structure is located next to the riser, then use flexible corrugation.
In the second case, it is still necessary to create a drainage system. Drain pipes are installed under the floor covering and connected to the sewer through a bend that is hidden behind the podium.
It is easier to connect plumbing to the water supply system yourself than to connect the sewer system. To ensure that the pipes are practically invisible, you need to create a plan for placing the shower in advance. The adapter for hot and cold water should be positioned so that the distance to the pipes is at least 15 cm, otherwise only hot water will flow out. The diameter must be selected in accordance with the pressure of the water supply. The optimal caliber is 27-30 mm, suitable for both standard watering cans and the “tropical” version.
Sewerage
When choosing and arranging sewer pipes, it is necessary to take into account the fact that wooden structures shrink over time. Therefore, it is better to choose pipelines made of polyethylene, dense plastic or metal-plastic. The pipes are located at a slight angle. To strengthen them, movable joints are used. Pipe diameter 50 mm.
Preparing the subfloor
- The area of the floor under the shower must be additionally reinforced with supports, which are installed during the construction of the house;
- The wooden surface of the floor is cleaned of paint, oil stains and dirt;
- Treated with water-repellent and antibacterial substances.
- The prepared surface is insulated with polymer mastic or a rubberized membrane is laid.
- Drain holes are blocked with ladders;
- The screed is made with a cement-polymer mortar up to 3 mm thick in two standing positions. Re-application is possible after 2-3 hours.
After 10 hours, as the top layer dries, finishing materials can be laid on the floor.
Shower cabin design
To make your shower unusual, “not like everyone else’s”, you can use black elements instead of classic chrome elements. They will look especially impressive against a light background of the surrounding space.
If you are planning to decorate your bathroom in a vintage style, then you should select antique-style accessories.
In a classic or baroque style, gold-plated details will look good.
You can also install a seating area in the shower, making it, for example, out of brick and decorating it with ceramic tiles. Relevant for families with elderly people. For greater comfort, you can additionally build a handrail.
Can be used as finishing materials.
- Ceramic tiles. The advantages of use are strength, resistance to water, variety of colors;
- Mosaic for finishing a homemade pallet or walls. Differs in many shapes and colors;
- Marble is a guarantee of beauty and durability. It will help make any interior unusual. The disadvantage is the high price;
- PVC panels are a budget design option, suitable for finishing ceilings and walls.
Design and finishing materials
There are several cabin design options. Preference is given to models with a pallet. In a small room you can install a stationary shower with a sloping floor. The pedestal, made of bricks or concrete, is tiled. The same material can be chosen for wall decoration. Plastic panels are considered a budget-friendly means of covering surfaces. Rarely used materials include:
- Mosaic. Used to create designs on the wall, ceiling or floor. The special structure of the tile allows you to cut out elements of any configuration.
- Marble. Durable finishing material is used to create exquisite interiors. The disadvantages are considered to be high cost and complexity of installation.
Plastic panels in the shower.
The moving part of the cabin is replaced with a plastic curtain. There are options for making the door from the following materials:
- Tempered glass. The material withstands shock loads well. It is easy to remove any dirt from tempered glass; it is not damaged by aggressive substances.
- Glass. It is allowed to use thick sheets, the outer sides of which are protected with self-adhesive film. This will prevent splinters from appearing if the glass screen is damaged.
- Acrylic, polycarbonate. Elements made from these materials must be finished with aluminum frames.
Electrics
In wet rooms, wires are laid in protective boxes. There should be at least 60 cm between the sockets and the tray.
The ends of the wires must be tinned before being secured to the terminals, which prevents oxidation in a humid environment.
The section of the network that supplies shower rooms and washing machines must be connected through a residual current circuit breaker or RCD (residual current device). The automation should operate at a leakage current of no more than 30 mA, the parameter is indicated on the product housings.
Shower room equipment
For the shower stall to function effectively, it must be equipped with the following components: a water drainage system, waterproofing of the floor, walls and ceiling, lighting fixtures, plumbing fixtures and household appliances, and a high-quality ventilation system. The cabin itself, depending on the selected model, can be equipped with additional functions. This can be an imitation of a hammam, “tropical rain”, hydromassage, contrast mode, aromatherapy, radio, lighting, telephone and other additions. When installing such a cabin, you need to make sure in advance that the pressure in the pipes is at least 2-3 atmospheres.
Doors
The design and material of the door to the shower room can be any. It is important to comply with the following condition: a gap of 20–30 mm must be left under the lower cut of the canvas; it is needed for the flow of fresh air.
Another option is to use doors with ventilation holes. Which option to choose depends on the design of the premises.
The gaps between the door and the wall are sealed with polyurethane foam and covered with platbands.
The doors to the booth are made of monolithic polycarbonate, tempered glass or ordinary glass with a thickness of at least 6 mm. In the latter case, a film is glued to the outer surface to prevent the formation of small fragments in the event of accidental breakage.
Conclusion
Installing a shower tray on wooden floors has its own characteristics. First of all, they are associated with insufficient moisture resistance of the material. To avoid problems in the future, the surface of the floors in the shower room, as well as the walls and ceiling, should be reliably protected from moisture (see also the article “Acrylic shower tray - the best choice for a shower enclosure”).
The video in this article will help you fully understand its topic.
Did you like the article? Subscribe to our Yandex.Zen channel
Ventilation in a log cabin bathroom
Many people believe that a full ventilation system in a wooden house is not necessary. The reason for this statement is the ability of wood to breathe and allow air to pass through micropores.
But wood not only has low thermal conductivity and high breathability, but also absorbs and releases moisture. In rooms with high humidity (bathroom, bathroom, kitchen), there is a danger of mold and mildew, and putrefactive processes that will lead to damage to the wood and destruction of the house.
To prevent the appearance of pathogenic microorganisms in a log building, additional air outflow is necessary. If the house is small, then a passive ventilation system is sufficient.
Air circulation in such a system occurs due to the difference in pressure and temperature outside and inside. Cold air masses enter the house, heat up and rise upward, exiting through exhaust holes in the wall in rooms with high humidity. The exhaust pipe should extend 50 cm outward. To prevent oxygen from entering during a fire, a fire damper is installed in the ventilation shaft in the shower room. Insulating the air duct from the outside will help prevent the formation of condensation.
There are ready-made solutions for shower cabins with built-in ventilation; you just need to connect the corrugated pipe and take it outside.
- To increase air exchange, use an exhaust fan.
- To do this, connect an electrical cable to the exhaust vent in the bathroom.
- Make markings for the fan.
- Mark the places where it will be attached to the wall.
- Drill holes for dowels.
- Attach the device body to the wall.
- Connect it to the cable.
- Close with a lid.
Waterproofing a bathroom
For high-quality waterproofing of a bathroom, you can use modern membranes, which help create hydraulic protection not only from water and moisture, but also from steam.
Many private developers use a waterproofing film, but it must be thick enough to prevent the formation of holes in the event of mechanical impact.
You can also use special mastic to waterproof wet rooms, but this is expensive.
Therefore, the membrane is the most optimal option, both in terms of reliability and price. At the same time, waterproofing work can be done with your own hands without the involvement of specialists.
Wall and ceiling finishing
To finish the ceiling with plastic panels, first install a starting profile around the perimeter of the cladding. Instead of a profile, you can attach a plinth if it has a mounting groove. The plinth is attached to the ceiling with brackets.
Then the tenon of the first plank is inserted into the groove into the starting profile and pressed against it, fastened with self-tapping screws. Other plastic panels are attached in the same way. The last strip is cut and inserted into the starting profile.
The ceiling and walls can be left wooden, or they can use tiles, marble, or mosaics for decoration. A sheathing is installed under the tiles and plasterboard is mounted, and cladding is installed on it. A frame is not made for plastic panels.
Pallet installation
Factory frame with legs.
Now let's talk about how to install a shower tray on a wooden floor.
It is best if the device is equipped with height-adjustable legs, brackets for easy fixation and a support frame.
To adjust the legs, you need a wrench and a bubble level. With their help, the pallet is installed in the correct horizontal plane relative to the floor.
Fixtures made from steel, fiberglass and acrylic have one drawback: there is often no support under their middle part. It can be corrected by installing the bowl on a stable podium or support made of any durable and waterproof material.
After this, you can install the shower tray with your own hands on the wooden floor.
Level the pallet, then mark.
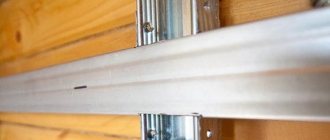
- First you need to mark up. The bowl is placed strictly horizontally using a bubble level. Next, marking lines for the profile are marked with a marker along the walls, and on the floor for the drain hole.
- After this, you should remove the pan, remove the outlet from it, connect a siphon to the outlet, and connect the corrugated drain pipe to the sewer socket.
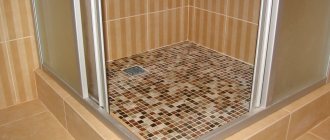
The photo shows the siphon connection.
- The pallet is put back into place - this is final.
- The drain is assembled: the outlet grid is drawn through a gasket to the outlet inserted from below. The assembly is spilled with water to check for leaks.
- After this, you can attach the enclosing structures of the cabin and connect it to all the necessary communications.
- Once the structure is installed, the final touch will remain. At the bottom, along the perimeter of the entire cabin, it is covered with a screen - decorative plastic panels.
- All joints between cabin elements should be carefully insulated with silicone sealant.
Design options
On the Internet you can find many ideas on how to decorate a shower room in different styles, preferably so that they are in harmony with other rooms in the house.
- Nouveau style implies the presence of original forms of familiar objects in the design. For example, shell-shaped sinks, wooden heated towel rails. Designers recommend decorating spacious and bright bathrooms in this style. Tiles and other coatings are selected in natural color tones. Lines and transitions should be smooth.
- Classic involves the use of only natural materials. Any plastic and LED lighting are excluded. It is advisable to install lamps imitated with crystal, and plumbing fixtures made of natural stone or high-quality artificial materials that imitate stone.
- loft style will require large expenses for arranging a shower room. It is necessary to mount a base for brick or glass partitions and walls. The pallet and floor are finished with tiles imitating natural stone with rough relief.
- Ethno emphasizes the decoration of premises, characteristic of certain nationalities of Africa, Scandinavia, South America or Japan.
- Romantic Provence does not accept tiles and plastic finishing. Be sure to include a window and wood trim.
- Eclecticism is a mixture of different styles in design. You can combine different materials and textures, decorate the interior with vintage lighting fixtures and plumbing fixtures.
Step-by-step instruction
Before construction begins, be sure to make a list of all the work and the sequence of their implementation so as not to miss one of the stages. Otherwise, you will have to return to significant and costly alterations. For example, the installation of a ventilation system is carried out before finishing the walls, since in this case it is impossible to remove the ventilation duct without damaging the coating.
In the standard case, the sequence of arranging a shower room will consist of the following steps:
- organization of ventilation;
- processing wooden bases - floors, ceilings, walls - and preparing them for subsequent finishing;
- production of a water drainage and supply system;
- construction of a pallet box;
- waterproofing the base and adjacent walls;
- finishing of floors, walls and ceilings;
- installation of electrical parts;
- installation of plumbing fixtures;
- fastening the door to the room and the cabin doors.
The sequence can be changed. For example, while the primer is drying in the pallet, you can begin installing the front door.
A new house made of timber or logs shrinks within 6–10 months. At this time, it is not recommended to install communications passing through the walls and make decorations fixed to the walls.
Organization of ventilation
Sanitary standards for air exchange in shower rooms and toilets in non-working mode provide for changing half of the air in 1 hour. In other words, with a room volume of 25 m³, the air exchange should be 12.5 m³/h. When used as intended, the exchange rate is 25. I.e. per hour, about 600 m³ of air should enter and be displaced (removed) into the same room.
In wooden houses, clean air enters through the cracks between the walls and frames of windows and doors, when ventilating rooms, through special supply openings in plastic frames.
While the shower is running, when a lot of water evaporates, force the air to be removed. For this purpose, exhaust fans are used, the power of which must correspond to the parameters of the room, namely 600 m³/h in the example used. The characteristics are indicated in the device passport.
The air is removed through a ventilation duct to the street or into a general exhaust hood, which must be installed in houses above one floor. The channel is led into the attic or outside the walls. To make a hole, use crowns and a drill. The gaps around the channel are sealed with polyurethane foam. To prevent cold air from being drawn into the house, install a lid with a valve.
The damper is opened manually, electrically or, in the simplest case, by air flow. When the fan turns off, the valve closes the hole under the action of a spring.
Preparation of wooden bases
All wooden surfaces of the shower room must be treated and coated with protective compounds.
Work algorithm:
- Remove old coverings.
- Inspect surfaces.
- Identified wood defects are removed to a clean layer.
- Surfaces are treated with protective and waterproofing compounds.
The ceiling and walls are impregnated with organic-based stains, which contain water-repellent additives. It is possible to use hydrophobic compounds that penetrate or form a protective film on the surface. Oil paints also protect wood for a long time from moisture penetration and destruction.
for floor protection :
- roll waterproofing impregnated with bitumen compounds;
- sheets made from cellulose fiber;
- liquid bitumen primers or more viscous mastics;
- polymer films, substrates, coating agents.
Before starting work, study the manufacturer’s instructions, which indicate the microclimate parameters under which it is possible to apply compounds or lay protection.
Arrangement of drainage and water supply
For water supply it is better to use polypropylene pipes . Unlike steel ones, condensation does not appear on them, which is important for hidden installation next to wooden walls. Select pipes with a diameter of 16 mm with an effective internal passage of 10 mm . This is enough to supply water to the shower.
Welding is carried out with a special soldering iron (iron). To connect mixers and taps, adapters with metal threads of the required diameter are welded.
For drainage, a drain is installed with an outlet into the sewer pipes.
Valera
The voice of the construction guru
Ask a Question
In a private house, the wiring can be done under the basement ceiling, which simplifies the installation and finishing of the shower. Holes in the ceiling can be made anywhere, excluding welding of additional corners and the presence of “extra” pipes that need to be masked.
You cannot drain directly to the street, since in this case, if the water seal breaks, cold air can enter the room. The sewer pipe to the septic tank must run in the ground.
Making a box
The side of the box is made of a wooden block of the required width, 40–50 mm thick. Subsequently, the timber is sewn up on all sides with moisture-resistant plasterboard of the GVL brand.
Fastening is carried out with self-tapping screws to the floor and walls. If necessary, use galvanized corners.
Waterproofing the pallet
It is not always possible to mount a concrete cabin base on a wooden floor, so waterproofing is carried out with two layers of moisture-resistant plasterboard , each of which is treated with a hydrophobic compound :
- Cut out the first layer, leaving a hole for the drain.
- The sheets are screwed to the wooden floor with self-tapping screws and treated with mastic.
- The sheets of the next layer of gypsum plasterboard should overlap the seams of the previous one.
- Sections of panels are also screwed to the sides of the pallet to the full height.
- Cover the entire surface of the pallet with primer, carefully treating the joints and seams.
- Protect the surface with hydrophobic mastic.
Before laying the tiles, the surface of the pallet is once again treated with a primer. This must be done when the ingress of debris from other work is excluded.
Finishing surfaces
Ceramic tiles or polymer film can be used
to finish the pallet To lay tiles or porcelain stoneware, use adhesives for wet areas. Polymer coatings are secured with glue recommended by the manufacturer.
The easiest way to cover the walls and ceiling In this case, OSB boards are suitable as a base.
The tiles are glued to moisture-resistant plasterboard.
Electrics
In wet rooms, wires are laid in protective boxes . There should be at least 60 cm between the sockets and the tray.
The ends of the wires must be tinned before being secured to the terminals, which prevents oxidation in a humid environment.
The section of the network that supplies shower rooms and washing machines must be connected through a residual current circuit breaker or RCD (residual current device). The automation should operate at a leakage current of no more than 30 mA, the parameter is indicated on the product housings.
Doors
The design and material of the door to the shower room can be any. It is important to comply with the following condition: a gap of 20–30 mm must be left ; it is needed for the flow of fresh air.
Another option is to use doors with ventilation holes. Which option to choose depends on the design of the premises.
The gaps between the door and the wall are sealed with polyurethane foam and covered with platbands.
The doors to the booth are made of monolithic polycarbonate, tempered glass or ordinary glass with a thickness of at least 6 mm. In the latter case, a film is glued to the outer surface to prevent the formation of small fragments in the event of accidental breakage.
Design options
On the Internet you can find many ideas on how to decorate a shower room in different styles, preferably so that they are in harmony with other rooms in the house.
- Art Nouveau style implies the presence of original forms of familiar objects in the design. For example, shell-shaped sinks, wooden heated towel rails. Designers recommend decorating spacious and bright bathrooms in this style. Tiles and other coatings are selected in natural color tones. Lines and transitions should be smooth.
- Classic involves the use of only natural materials. Any plastic and LED lighting are excluded. It is advisable to install lamps imitated with crystal, and plumbing fixtures made of natural stone or high-quality artificial materials that imitate stone.
- The loft style will require large expenses for arranging a shower room. It is necessary to mount a base for brick or glass partitions and walls. The pallet and floor are finished with tiles imitating natural stone with rough relief.
- Ethno emphasizes the decoration of premises, characteristic of certain nationalities of Africa, Scandinavia, South America or Japan.
- Romantic Provence does not accept tiles and plastic finishing. Be sure to include a window and wood trim.
- Eclecticism is a mixture of different styles in design. You can combine different materials and textures, decorate the interior with vintage lighting fixtures and plumbing fixtures.
Drain arrangement
When talking about arranging a good and convenient drain in a shower stall, the closest attention should be paid to the drain. It determines how quickly the water will drain from the shower tray.
A high-quality drain prevents the spread of sewer odors.
The composition of the drain includes:
- outer grille;
- debris filter;
- outlet for drainage;
- pad;
- screw for the outlet pipe nut;
- water seal
When purchasing a shower cabin, drainage devices are included in the package. It is important to make sure that all drain parts are present.
When installing a shower cabin in a wooden house, you should take care to provide access to the drainage device if you need to clean it.
Connect the drain pipe of the shower cabin to a common sewer pipe. In order for the water to drain faster, the drain from the drain to the sewer pipe must be laid at a slope. For one meter of pipe the slope should be about 5 cm.
Plumbing, water supply and sewerage
Fundamentally, this type of work does not differ from an identical operation in buildings made of other materials. Attention must be paid to the passage of pipelines through walls. It is necessary to protect the tree from inevitable moisture condensation in places of contact with water supply and sewerage elements. The problem is solved by complete or partial installation of a heat-insulating and waterproofing layer. Finished products of this class are available for sale in the form of linings for pipes made of foamed polymer. You can make a protective layer yourself. It is allowed to use all types of general purpose insulation and waterproofing, for example, mineral wool, expanded polystyrene, liquid compounds.
All modern types of plumbing are available to owners of a wooden house Source bg.decorexpro.com
Installing bathtubs, sinks, toilets, showers is not difficult. Having messed it up, it is sometimes easier to do this operation in a wooden house, since the wood is easier to process, cut, and drill. However, some recommendations will help you avoid common mistakes. Corner elements, including shower stalls, should be installed carefully. Due to the mobility of the house structure, fragile elements are at risk of destruction, so they are installed taking into account dynamic changes in the geometry of the room. Special fastenings with an elastic, movable connection will save you from trouble. It is safe to install a shower stall along one wall.
Selecting and decorating plumbing fixtures in a rustic style will look natural and interesting Source arxip.com
The method of removing water using a drain is popular today. You can successfully install such a system in a wooden house, but take into account the nuances of a structure made from this material. By ensuring reliable waterproofing, taking into account the mobility of the structure, you can enjoy the results of your work for many years. Together with the ladder, a heated floor system can be installed in wooden houses. The temperature during operation is safe for wood and this scheme looks even less dangerous than other types of heating.
Types of moisture protection products
All waterproofing materials are divided into two groups. The first is used to create a protective layer on the wood. The second type is used to impregnate boards, protect them from rotting and the spread of pathogenic microorganisms. The types of materials laid on the surface include the following:
- roll waterproofing impregnated with bitumen mastic;
- material based on cellulose fiber;
- viscous bitumen mastic;
- polymer substrates or films;
- polymer coatings.
The group of impregnations includes the following products:
- Oil compositions. Contain natural or synthetic components with hydrophobic properties.
- Varnishes, stains. The composition includes organic solvents, artificial resins, pigments. The products protect the wood from rotting.
- Hydrophobic compounds. When applying the solution, a film is formed on the boards, preventing water from penetrating into the thickness of the wood. The use of such a composition helps preserve the structure of the material.
Waterproofing
Unlike traditional houses made of bricks and building blocks, a wooden structure is more flexible. Dynamic changes in geometry are several times higher than those of conventional objects. Although the period of greatest shrinkage occurs in the first year, the design continues to change in subsequent years. Noticeable distortions of the design dimensions are observed due to the impact of seasonal, operational changes in temperature and humidity. High-quality protection of wood fiber from moisture penetration significantly reduces the risks of critical defects and fluctuations in geometric dimensions. When installing a shower in a wooden house, waterproofing the walls, floor, ceiling and other structural elements becomes a priority.
High-quality waterproofing is necessary for a wooden house Source pinterest.com
Types of moisture protection products
Means for protecting the structure of a house are conventionally divided into two types. Waterproofing materials that directly protect the structure of wood, and compositions for impregnating fibers and giving them the necessary qualities. The first category includes the following products:
- Rolled and sheet materials on a backing, impregnated with bitumen compounds. Cellulose fiber (roofing felt), polymer non-woven and mesh fabrics are used as a base.
- Bitumen coatings. The protective layer is created directly upon application. For a wooden house, brands applied thermally using a burner should be excluded.
- Polymer films, membranes. The industry offers products with and without a ready-made adhesive layer.
- Polymer painting and coating compositions. A wide selection of products, many of which are universal, but some are designed specifically for treating wooden surfaces.
Polymer films protect from moisture and are easy to install Source mybuilding.tips
See also: Contacts of companies that specialize in the installation and design of sewerage and water supply.
The above waterproofing materials are used to create a protective layer when finishing a shower with decorative materials. A significant disadvantage of this category is the coating of the natural texture of natural fiber. Wooden houses are loved for the interior they create, where the most important part of the decor is the beauty, color and structure of the building material. Impregnating compositions will help preserve the charm and charm. The range of products will allow you to choose the product of the right quality, revealing the best qualities of natural wood. The following product categories are offered:
- Oil impregnations. A method of protection proven over centuries. Today, products are produced using both natural oils, for example, flaxseed, and synthetic analogues.
- Varnishes, stains. A large category of goods under the general name includes products based on polymer resins, organic solvents, and fillers. The choice of colors will help in creating an original decorative protective film. Varnishes are offered both colorless and specially tinted to imitate valuable wood species.
- Hydrophobic compounds. The principle of action differs from the above products. Interaction with the surface occurs at the molecular level. The best option for wood. The resulting film repels water, and the treated surface completely preserves the structure of the wood.
Oil impregnation has been used for waterproofing in wooden houses for centuries Source travelerscoffee.ru
A variety of products from manufacturers in many countries are distinguished by a wide range of performance characteristics and application technologies. When working, you should strictly follow the instructions and recommendations, maintaining time modes, sequence of operations and using the proposed tool.
Installation of plastic panels on the ceiling
Before installing a shower stall in a wooden house, you need to take care of sealing the ceiling in the room. It will be much more difficult to do this later, so postponing is a very bad option. Fastening the plastic panels begins with installing the starting profile. It is screwed around the perimeter of the casing. Instead of a profile, you can use a ceiling plinth if it has a mounting groove.
It, like the profile, is attached to the ceiling using staples or screws. They are driven into the lower support strip of the plinth.
The tenon of the first panel (narrow mounting flange) is inserted into the starting profile on the ceiling. Then the ceiling strip is pressed against the profile and secured to the sheathing using brackets and screws. They are driven into the fastening field of a wide mounting shelf. The remaining planks are attached to the frame in a similar way.
Installation of the end panel is done as follows:
- measure the distance between the profile and the last plank attached to the ceiling; reduce it by 5-7 mm;
- using a pencil and tape measure, transfer the size to the bar;
- trim the edge of the panel;
- bring him into the starting profile;
- insert the tenon of the outer panel into the groove of the adjacent plank.
Many people, before installing a shower cabin in a wooden house, also install all the accompanying fittings. But we will still only do all the basic operations that must be performed. Everything that can be done later will be done later. Because a lot can still change.
A do-it-yourself shower cabin in a wooden house is labor-intensive to install. It requires accurate calculations, correct selection of materials, strict adherence to construction and finishing technology. Therefore, it is still better to entrust the work to experts.
Tools
To equip the shower you will need the following tools:
- Measuring instruments;
- Spatula and trowel;
- Containers for stirring grout, solutions and glue;
- Hammer, drill, screwdriver;
- Hammer and screwdrivers of different sizes;
- Grinder, hand saw or jigsaw;
- Spanners.
Waterproofing issue
When constructing any shower tray, care must be taken to ensure reliable waterproofing, so that water cannot enter the lower or adjacent room. Moisture seeping through the pan causes the appearance of fungus, an unpleasant odor and destroys the structure.
Insulating materials for shower tray:
Methods for waterproofing a shower tray.
- roll film coverings;
- roofing felt;
- viscous compounds.
- liquid water emulsions (they are almost odorless);
- liquid glass - fills the pores and cracks of concrete and increases its strength;
- waterproofing additives - more suitable when pouring a concrete pallet, they grow in the solution and turn the entire layer into a hydrophobic one;
- one-component mixtures, for example Ceresit CR 65.
It is recommended to make 2 layers of insulation, for example:
- Rolled bitumen-polymer. Glued to a concrete base.
- Cement-polymer. On top of concrete that has settled for 3 weeks.
Before carrying out work, the ladder grating is sealed with masking tape. Rolled materials are laid on a flat surface, excluding differences of more than 2 mm and sharp chips. Insulation with canvas is carried out on bitumen mastic with an overlap of 15-20 cm. When bubbles form, the material is cut and pressed forcefully to the surface. Viscous insulating compounds are applied with a brush, single-component products are applied with a spatula.
Sealant Stern. Antia sealant. Somafix sealant.
The selected product is treated in 2 layers on the pallet and the walls near which it is located, at a height of at least 30 cm. Particular attention is paid to:
- the area near the drain hole;
- joints;
- corners;
- sides.
The best shower sealants contain at least 45% hydrophobic filler, silicone-based rubber, catalysts and fungicides. Somafix, Stern, Antia sealants are effective. Aquarium silicone can be used at joints and for sealing. It is recommended to combine some products, for example, Expanding Plombizol and Penetrating Plombizol, Elastopaz mastic and floor primer.
Elastopaz mastic is recommended to be combined with a floor primer.
When the second layer of waterproofing is completely dry, finishing work begins.
Design and design options
The design of a shower room in a wooden house can be very different. At the same time, the style of the shower room must correspond to the leading style of the interior space of the house. For example, a shower room in the avant-garde style can combine the use of different materials - wood, porcelain stoneware, metal. The colors used are mostly soft, muted and calm. Unusual lighting and color contrasts can be used as accents. The loft style is distinguished by the ability to create a special atmosphere of naturalness and carelessness. Wooden beams can be roughly processed, and communications are carried out over the finish. It would be appropriate to use vintage plumbing fixtures and elements of the industrial era. A high-tech shower room will look very impressive: a combination of wooden furniture, plastic panels and glass, in addition to modern technologies, will create a completely unique look for the room. Also, a shower room in a wooden house can be made in Provence, country or minimalist styles. The main thing is that the design is in harmony with the general space of the house and is liked by the household members themselves.
Arranging a shower room in a wooden house has many construction nuances that need to be taken into account. If installation technology is not followed or low-quality materials are chosen, natural wood can over time suffer greatly from high humidity in the room. Therefore, it is recommended to seek help from qualified specialists in order to avoid unexpected difficulties later.