It should be taken into account that although shrinkage of the house actively occurs in the first year, the process does not stop in the next five years.
What should you take into account when doing DIY work?
Requirements for installation in a log house
During the initial measurement, the characteristics of the material from which the house is built are taken into account. Wood is characterized by its tendency to contract and expand due to its moisture regime, which varies depending on the season. Therefore, they pay attention to the installation rules.
How to insert correctly? When performing work, you must first take measurements. Measurements are taken taking into account the width and height of the opening. They take into account the existing depth, which is also affected by the presence or absence of finishing both inside and outside the room.
Note. One last point needs to be taken into account. It is advisable to completely complete the finishing work on the side of the rooms and the facade. Only in this case is a full installation in the window opening carried out.
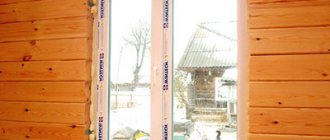
When manufacturing and installing windows, you need to take into account the requirements of GOST 30971-2002 :
- The glass unit should be several centimeters smaller than the window opening.
- The use of polyurethane foam is not allowed, and mechanical fastenings are used instead.
- The error limit cannot exceed 1.5 mm per 1 meter of window structure length.
- The installation seam on the outside should create good waterproofing.
At the next stage, plastic or wooden windows are selected. Special attention is paid to the choice of fittings, which must be of high quality. Preference is given to German products.
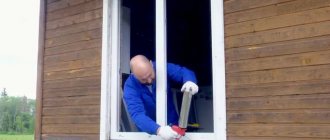
First working stage: cutting out the opening
Alignment of walls
After the marking is completed, cutting out the opening begins. During this seemingly simple operation, the following rules must be observed:
- the cutting plane must be strictly perpendicular to the longitudinal axis of the logs;
- The cutting line should run in such a way that there are no distortions and spontaneous falling out of the logs.
After cutting the opening, it is necessary to check the condition of the end of the frame to ensure that the vertical axis is maintained. If deviations are noticed, then the next stage of work is leveling the wall.
This is done with the help of special devices that pull the logs into one line.
This screed is temporary and is dismantled after installation of the casing.
Please note that in cases where an increase in wall distortions is detected, it is advisable to install a U-shaped version of the frame.
Rules for measuring an opening in a timber building
Measurements of the window opening should be carried out not only from the inside, but also from the outside of the wooden house. Such actions allow you to accurately determine the depth of the opening, which is the most important indicator for purchasing and installing windows.
When taking measurements, you must be guided by the following rules:
To carry out measurements and subsequent calculations correctly, you must have not only an analytical mind, but also spatial thinking.- At least minimal experience in installing window structures is desirable.
- Before taking measurements, all preparatory work is completed - the old finishing is removed, the opening is put in order, and, if necessary, it is expanded and strengthened.
Important! To take correct measurements, change the distance along the window width and height. In most cases, you will not need to know the perimeter. The window should not be fitted end-to-end, as the window may simply not fit into the available space.
Installation of the pigtail
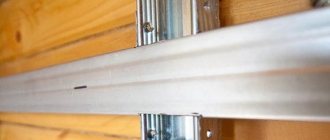
We begin installing the frame into the opening from the bottom crossbar (window sill). Then the top is inserted into the opening, under which we place the side posts one by one, placing them with grooves on the tenons.
We fasten the elements of the frame together with self-tapping screws and, if desired (not necessary), coat the joints with sealant. We caulk the gaps around the casing with ordinary tow, but without much fanaticism, so that the parts do not bend.
We close the upper shrinkage gap with soft insulation such as Rocwool or holofiber. This operation is best done after installing windows and external trim.
Now you can begin installing the window.
Required tools and materials
To install windows in a wooden house you will need the following materials :
- board;
- beam;
- flax wool for insulating the sides;
- high quality insulation to create a thermal barrier in the upper part;
- thermal and waterproofing tape - provides protection against heat loss and moisture penetration.
You will also need galvanized screws, sealant for sealing seams, and pads for installing windows.
The choice of polyurethane foam deserves special attention. With its help, the space between the casing and the frame is sealed. But you need to act carefully when choosing consumables. The best are professional compositions called “wood glue-foam.”
In addition, the selection of construction tools to install the structure is important . These include an ordinary and chain saw, an angle grinder, a building level and tape measure, a spray foam gun, a screwdriver, a furniture stapler, and a painting knife. You will also need a regular and rubber hammer.
How to install in casing step by step?
When installing windows in a wooden house, two main options are used - with and without casing. The first option is required if fixation is carried out in a log house. The second option is relevant if the frame of the house is made of timber.
Important. But it is important that each element corresponds to the one below and above. Only in this case is it possible to ensure precise installation, which will not lead to distortions of the window structure.
The instructions include the following sequential steps:
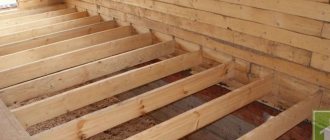
Execution of casing.
A wooden house is not stable, so a casing is made of dry boards, which are installed around the perimeter. This step can be skipped if the house is made of dry wood, such as rounded timber, which shrinks minimally even in the first year.Straight planks are made on four sides, a tenon is made on the inside of the plank, and a groove is cut out in the logs.
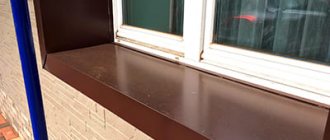
- A window sill is installed, which will act as a support for the future structure. A cut into the tree is made at least 0.8 cm. Fastening is carried out using self-tapping screws.
- The window is being prepared. To do this, remove the fittings and double-glazed windows.
- Frame fixation. The structure is placed in a frame, and wood chips are placed at the bottom to securely hold it. Check the level and then fix it with self-tapping screws. After this, the sashes are put on.
- The frame is fixed along the contour. Leave a gap of 10-20 mm.
At the final stage, a mandatory check of the operation of window structures is carried out. First of all, the doors are opened wide open or ventilated, depending on the type of doors. The fit of the sashes to the frame is also adjusted depending on the season.
Once it becomes clear that the window is functioning correctly, you can install platbands. The difference from a city apartment is the installation from both the inside and outside. Overhead models are fixed using self-tapping screws, and telescopic models are fixed in the slot holes between the window structure and the wall.
Installation of platbands is mandatory. These elements provide protection against heat loss, noise penetration and cold air. They also protect the room from contamination.
Note! After completion of work, careful quality control must be carried out. If a joint is used, it must be completely dry. Only in this case can you avoid the consequences that appear when the house shrinks or changes in humidity levels.
More details on how to install plastic windows in a wooden house:
Where to start?
When expanding an existing opening or cutting out a new opening, you should begin by calculating the size of the opening.
As a rule, the initial dimensions are taken as the dimensions of the future window, to which are added:
- thickness of the socket (taking into account the tongue-and-groove joint);
- thickness of the sealant layer (increase the size by 5 mm);
- compensation gap (additional 60-100 mm when determining the total height of the opening).
Please note that the bottom casing strip in windows is often a window sill, the thickness of which may be greater than the thickness of the boards used to make the casing frame.
What is casing
Next, they begin to mark the contours of the openings on the walls of the log house. During this operation, we recommend that you adhere to the following rules:
- the upper and lower edges of the opening should pass through the center of the log (or cover 1/3). This is necessary for the normal operation of the casing and to prevent problems with insulation;
- It is advisable to mark horizontal lines using precise level gauges;
- Make vertical markings only along a plumb line.
If you plan to do the work yourself, you should take care in advance to prepare the appropriate equipment.
The main tool used when arranging window and door openings is a chain saw (or its electric version).
If there are many windows, and you plan to chamfer for installation of platbands, we recommend making a special device based on an angle grinder, with the help of which the time spent on this operation will be reduced significantly.
How to avoid mistakes?
A wooden house requires strict adherence to window installation technology, regardless of the frame material. It is important to avoid common mistakes that can lead to serious problems in the future :
| Installation of windows immediately after construction of the house | The wooden box should dry well. During the first year, maximum shrinkage occurs. But this process can continue for several more years, so you need to constantly take measurements of this process. |
| Direct fixation of plastic windows into a wooden opening is not allowed | You must first build a frame, which is a rough frame. Otherwise, the geometry of the glass unit may change, and the sashes will stop opening or closing. |
| Purchasing polyurethane foam with low resistance to deformation | It is important to choose polyurethane foam that has high deformation properties. This is due to the fact that even when windows are installed a couple of years after the house is built, serious shrinkage is possible. |
| Refusal to install external or internal platbands | If the house is wooden, platbands are not only an aesthetically attractive element. They protect against cold air penetration and heat loss. |
Note. Also, wide window sills should not always be installed. This follows from the design features of a wooden house. If you install a window sill, the curtains will not fit well. But you can find a way out by installing roller blinds made of thick fabric along the length of the window.
Jigsaw for plastic windows
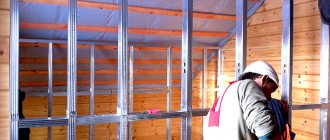
Structures and buildings made of natural wood tend to move, that is, shrink. This characteristic imposes restrictions on the installation of windows and doors in light openings.
If you do not use special techniques in the form of casing or frames, the installed window or door will be deformed, broken, and gaps will appear between the frame and the wall.
To avoid such problems, additional framing of the light opening, which is called casing, is widely used. In essence, this structure is a wooden product - a box that is placed on the walls and to which window and door profiles are attached.
This simple design ensures the independent position of windows and doors relative to the walls, and therefore, when the house begins to sag, the casing becomes mobile - it moves along the opening, moving the frames with it without deforming them.
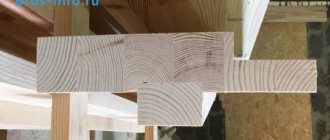
There are two options for making a pigtail, or rather its profile. Highlight
- tenon-groove - where grooves and tenons are cut out in the parts being fastened for joining and fastening;
- monolithic, or finishing, which also have a tongue and groove, but the counter part of the beam is made of solid wood timber. In this case, laminated veneer lumber is not even recommended due to the characteristics of the glue’s reaction to changes in humidity.
It is important that when making one type of casing or another, it should not sit tightly on the walls of the house in any case, since in this case mobility will not be ensured.
Since the frame consists of sidewalls, a top and a bottom (or threshold), it is very important to leave a larger gap between the top and the wall - up to 12 cm, which is intended to compensate for the shrinkage of a wooden house. Such gaps, of course, are processed: they are insulated and closed with platbands.
In order for the casing to serve for a long time and reliably, before installation it is important to treat it with an antiseptic and follow the installation order: first the bottom, then the sides and finally the top with insulation and platbands.
Types of pigtails:
- Photo 1 – Finish (with a quarter).
- Photo 2- Power “SPIRE” or “GROOVE”.
The difference between the two options is the slope for a PVC window
Vocabulary and material for the pigtail:
Carriage (side posts) - timber material, according to the thickness of the house timber (deck):
- Minimum 150mm*150mm(100);
- Maximum 360mm*150mm(100);
Top (upper part of the pigtail) – 150 mm*50 mm;
Insulation:
- flax batting (jute);
- mineral wool;
Antiseptic – protection of wood from exposure to atmospheric and biological factors;
Measurement of window frames (house wall thickness 150 mm) and PVC (plastic) windows.
- Distance from the floor 80-90 cm.
- The width of the casing is 12-14 cm greater than the width of the window.
- The height of the casing is 14-18 cm greater than the height of the window.
- Installation of a frame and a plastic window.
- Preparing the opening to fit the size of the frame.
- I cut “SPIRE” or “GROOVE”.
- Antiseptic treatment.
- Roll seal (flax batting (jute)).
- Installation of the CARRIAGE (the side parts of the pigtail) is carried out without fastening elements (screws, nails)
- The top (top part) is put on the side elements.
- The upper gap of the window frame is 8-12 cm. At the rate of 10 cm per 1 p/m of window.
- Laying insulation (mineral wool) + steam-waterproofing on both sides.
- Installing a PVC window like in a box (the gap is filled with foam).
Source: plastikovokna.ru
When should the old structure be dismantled?
If windows are installed in a wooden house, circumstances often arise when it is necessary to dismantle them and then install new window structures. This can happen in various ways :
- It is necessary to replace old frames that have lost the necessary performance characteristics and do not protect against cold air.
- It is necessary to install new window structures with a wider opening.
- Installation is required without changing the dimensions of the opening or dismantling the casing.
- Installation is carried out with alteration of the casing if it was initially performed incorrectly.
In order to perform the job correctly, it is necessary to carry out an initial quality control check of the previously carried out installation. In some cases, old windows can be adjusted using eccentrics, by replacing sealing elements or fittings.
If this does not help, perform a complete replacement with dismantling of the installed structure. You will need to act carefully so as not to disturb the joint. Otherwise, even with new windows, you may encounter cold air entering through the opening.
Replacement features
If you plan to dismantle old windows in a wooden house, some changes in the procedure will be required :
Dismantling of old window structures.
Progressive disassembly will be required to preserve the casing frame. First you need to remove the old glass and frames. A check is carried out for additional fasteners - fastenings carried out on anchor plates.After dismantling, clean the opening from dirt.
- Taking measurements. Even though the procedure has been previously performed, measurements must be taken. Provide gaps of 10-20 mm on each side.
- Double-glazed windows are being prepared. Installation must be performed separately, so the double-glazed windows and frames are removed. Next, we check how well the frame fits the window.
- Fixation in casing. The power assembly is carried out using self-tapping screws or anchor plates.
Reference. At the final stage, the glass units are assembled. Waterproofing and finishing with platbands is carried out. It is possible to install a window sill of small width.
Average prices in the Russian Federation for specialist services
It is important not only to choose high-quality window designs, but also to perform the correct installation work. It is not always possible to cope with this work on your own, since the process causes certain difficulties and requires the selection of specialized tools. Particularly serious problems arise when installing on the second floor or attic slopes.
When performing work, the following average payment is established in accordance with the type of activities performed :
- Creation of a window opening – 170 rubles per linear meter.
- The subsequent trim of the opening is 540 rubles per linear meter.
- Window installation – 1600 rubles per sq.m. m.
- Installation of windows in the attic - 8,000 rubles per piece.
- Installation of slopes – 430 rubles. per p.m.
- Installation of a window sill made of wood or plastic – 320 rubles. per p.m.
- Installation of platbands - 220 rubles per linear meter.
- Painting of platbands, slopes and window sills - 180 rubles per linear meter.
- Coating of platbands, window sills and slopes with varnish – 120 rubles per linear meter.
The total cost will depend on the specifics of the specific project. In many cases, a complete set of windows is installed in a wooden house. In this case, you can immediately paint or varnish adjacent wooden structures, which provides greater protection from moisture or drying out.
To obtain accurate cost information, it is necessary to make preliminary calculations . To do this, it is better to invite professional measurers who will not only do a better job, but also offer a functional or economical result.
How long does a house shrink?
Here everything depends on the time of year when the craftsmen assembled the timber. For example, if the assembly was carried out in the summer heat, you will have to wait 1 year, but furnishing your home in winter will not require more than 8 months. That is why builders recommend that future owners assemble houses in the winter season.
In winter, excess moisture evaporates gradually, which means that deformation and changes occur evenly and calmly. If you are in the off-season, a house built in November will complete the shrinkage process by the beginning of summer. And only then can you begin installing window openings, double-glazed windows, and entrance doors. Finishing work on the design of the building must begin in the same period; haste can provoke the appearance of cracks in the cladding. The factor of low cost of assembly in winter is also important - the cost is almost 20% less than summer installation.
The most intense period of shrinkage occurs in the first 3 months; it is possible to say that the house has completed the process only 3 years after construction has stopped.
What is the difference between a shrinkage house and a turnkey building? Construction readiness. The first option does not provide for the presence of door leaves, windows, cladding material on the inner surface, or floor coverings.