Houses made of wood will never lose their relevance. After all, wood is a unique building material. In addition to the fact that it can store the energy and warmth of nature, it is also beautiful. There is one more feature: it does not lose its attractiveness for a long time. Absorbing time, it ages gracefully.
In addition, wooden walls are warm, quiet, and cozy. Therefore, the idea of covering rounded logs or profiled timber with another type of finishing is somewhat barbaric. But in a private house there are several wooden walls that sometimes still have to be leveled: the bathroom and the kitchen. In the bathroom you need to get a flat surface for tiles, in the kitchen - for wall cabinets and an apron. Another thing is old houses, with untreated, cracked logs. Here, the alignment of wooden walls for a different type of finish is dictated by necessity.
Pros and cons of methods
Each technology has its own advantages and disadvantages. It is up to the owners to decide which method to choose.
Plaster
“Wet” plaster is one of the most common methods of leveling any surface. Many years of practice have revealed all the strengths and weaknesses of the method.
Pros:
- strength. But this only applies to cement mortars. You cannot screw a self-tapping screw into clay, lime, or plaster;
- durability - all types of plaster have a minimum service life of 30 years;
- fire resistance - prevents the fire from spreading to the walls if there is a fire inside;
- the heat and sound insulation of the house is improved;
- hardness - the surface is difficult to damage even in clay with light impacts, not to mention the CPR;
- environmental friendliness - can be used in the bedroom or nursery;
- the ability to restore damaged areas.
Minuses:
- high cost of work;
- high labor intensity of filling shingles;
- the technological process is extended in time due to the drying of each layer - up to 30-45 days;
- the need to install communications only on top of the finishing - grooves for wires and cables cannot be cut;
- complex technology - difficult for a beginner to understand.
Panels
The panels have their own advantages :
- no finishing is needed - they give room for imagination when decorating the interior;
- simple installation;
- work is completed in a short time;
- affordable for people with below-average income;
- have a long service life;
- make it possible to carry out additional thermal insulation with basalt wool or expanded polystyrene;
- easy to clean;
- You can hide wires and cables.
Several disadvantages greatly limit the scope of application:
- steal the volume of the room. If it is unimportant for the living room or bedroom, then it is critical in the bathroom;
- Heavy objects cannot be secured (hanging cabinets, quartz and ceramic heaters, etc.). Therefore, it is not recommended to use it in the kitchen.
Sheet material
The advantages and disadvantages of sheet material largely overlap with the strengths of panels. Let us briefly recall:
- there is no dirt, as with “wet plaster”;
- for performers of work there are minimum requirements for experience and qualifications;
- high sheathing speed;
- the ability to hide communications;
- surface leveling is combined with heat and sound insulation.
The disadvantages include :
- complexity of material delivery;
- the need for finishing;
- problems with fastening cabinets and various shelves - you need to provide for the installation of load-bearing panels or buy special butterfly dowels (each dowel is supported on one sheet of plasterboard 12.5 mm thick up to 25 kg, on a double sheet - up to 40 kg);
- useful area is consumed;
- low moisture resistance of most materials.
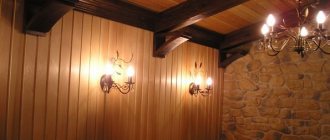
Lining
The list of advantages of leveling walls with clapboard:
- easy installation - easily cut to size, assembly is carried out using the tongue-and-groove system;
- possibility of additional finishing in some places;
- good design;
- long service life - 40-50 years;
- acceptable price;
- excellent sound and heat insulation properties.
In addition to the listed strengths, there are several specific advantages :
- conifers release substances beneficial to the human body into the air;
- the smell of forest has been in the house for several years, which calms the nervous system after a difficult day;
- Due to the hygroscopicity of the material, a comfortable microclimate is maintained.
Disadvantages of the material:
- risk of deformation during operation if drying technology is violated;
- sensitivity to high humidity;
- does not like sudden changes in temperature.
Fiberboard
You can also level the walls with fiberboard. The technology has many advantages :
- no frame is needed, therefore the reduction in the volume of rooms is minimal;
- work is completed quickly;
- simple technology allows a beginner to perform the work;
- applying gypsum plaster on top makes it possible to take advantage of all the benefits of plaster (see above);
- allows you to use wallpaper, painting, or liquid wallpaper as a finishing touch;
- financial costs are the lowest compared to the above methods of wall leveling.
There are three drawbacks , but one significant one: after a few years of use, waves will appear on the wall - there is not enough rigidity, no matter how often you hit nails or screw in self-tapping screws. Besides:
- cables and wiring will have to be secured to the finish;
- There are some difficulties when attaching shelves and cabinets.
Required materials and tools
Each technology requires its own materials and tools.
Plaster
To level walls with “wet plaster” you need to buy:
- ready-made plaster or components: cement and sand;
- fiberglass;
- PVA glue;
- liquid soap - slows down the rate of hydration, makes the solution more plastic;
- wooden slats (shingles);
- plaster nails;
- wood primer;
- metal profiles;
- self-tapping screws;
- special clamps for fixing beacons with self-tapping screws.
The following tools and devices should be on hand:
- ladder;
- concrete mixer;
- hammer;
- screwdriver;
- hand saw for wood;
- roulette;
- Bulgarian;
- trowel;
- falcon;
- rule;
- plaster ladle;
- grater;
- grater;
- ironer;
- fry;
- plumb line;
- strong twine for hanging walls;
- construction pencil.
More information can be found here.
Panels
To install the panels you will need:
- siding or PVC panels;
- guide profile (PN);
- ceiling profile (PS);
- pendants;
- dowel-nails;
- "bugs";
- self-tapping screws with a press washer;
- liquid Nails;
- ladder;
- screwdriver;
- Bulgarian;
- level or laser level;
- roulette;
- construction corner;
- knife;
- plumb line
Drywall
To install gypsum boards, you will need the same materials and tools as for the panels. Exception: liquid nails are not required. Additionally you need to buy:
- serpyanka;
- gypsum putty;
- self-tapping screws for fastening drywall sheets.
You also need a narrow and wide spatula. The need for materials and tools is described in more detail in the work “How to level walls with plasterboard with your own hands?”
Lining
To install clapboard cladding you will need:
- well-dried lining boards made of coniferous or hardwood;
- wooden beam for sheathing;
- direct hangers, the same as for installing gypsum boards;
- brackets for fastening boards;
- wood screws;
- finishing nails;
- hand saw for wood;
- screwdriver;
- hammer;
- plumb line;
- roulette;
- level;
- pencil.
Fiberboard
You need to collect the least amount of tools and buy materials when leveling walls with fiberboards. You will need:
- fiberboard sheets;
- fiberglass reinforcing mesh;
- wood primer;
- gypsum plaster;
- gypsum putty;
- small nails - length 20-30 mm, thickness from 1.0 to 2.0 mm;
- hammer;
- a hacksaw with a fine tooth (can also be used for metal);
- putty knife;
- rule;
- grater;
- level.
Reasons for wall deformation
Before leveling the walls, you need to familiarize yourself with the reasons that may cause defects. At the time of installation of a house, a person stocks up building materials for future use. It is not possible to check all received timber for defects. Lumber must be made so that the core of the log is strictly in the center of the product. If this rule is not followed, drying will occur unevenly and deformation of the timber during construction or shrinkage of the building is inevitable.
Important! The best solution is to alternate multidirectional elements so that the elements compensate for each other's curvature.
Another reason for deformation of enclosing structures is considered to be incorrect calculation of loads. When compressed, any element of the building structure will bend. It is necessary to seek help from specialists who will help make important calculations and identify excess pressure in the structure. To redistribute the forces on the wall, you will need several additional racks.
The last reason for the deformation of enclosing structures is considered to be improper installation of inter-crown insulation, which can squeeze out the timber. There is no need to dismantle the wall; you need to remove the thermal insulation material and caulk the resulting gaps.
Preparatory work
In all materials recommending how to properly level walls in a wooden house from the inside, preparatory work for any type of surface leveling is carried out according to the same algorithm:
- electrical wiring, lamps, sockets, switches, and various fasteners are removed from the walls;
- the wood is cleaned of dirt, especially greasy stains. If it doesn’t work with household chemicals, radical means come to the rescue - a plane or an ax;
- areas damaged by rot or fungus are removed mechanically - combed off;
- cracks in the corners of the house and between the crowns are additionally caulked - the operation is mandatory;
- cracks in cracked wood are treated with an antiseptic and then sealed. The technology and materials used can be viewed here;
- the fastening of door and window blocks is strengthened;
- strongly protruding places are removed with an ax or plane;
- the wood is impregnated with antiseptic materials. In this case, the solution is not just splashed, but carefully and carefully applied at least twice.
Two ways to remove curvature
It doesn't matter which method suits you best. Before starting work, the timber will have to be heavily moistened. Ideally, the moisture content of the material should be 50%. Actually, to summarize, there are 2 ways:
- Pulling - the board is actually stretched between adjacent guides, that is, the board is forced to fit into the place of the crossbar in the letter “H”. When tensioning, some temporary fasteners are used at the ends of the board and a fixing stand in the middle of the straightened beam.
- Unwinding - one end of the beam is securely fixed. A lever and a partner are taken. In this case, you cannot do without an assistant. While one straightens the beam using a lever and holds it, the second one fixes the other end of the beam. That is, the task is to fix both ends when the beam is straight.
The material is kept in a fixed position until completely dry, only after which all fasteners are removed.
Work procedure
Leveling walls in a wooden house with your own hands is done using different technologies - each has its own instructions. It all depends on the type of leveling material.
Plaster
When plastering a wooden house, the following rules must be observed:
- Start leveling the walls 2-3 years after construction - otherwise, when shrinking, the plaster layer will simply crumble;
- The humidity of the walls should not exceed 12% - anaerobic mold may appear, despite various impregnations.
The technology itself does not cause difficulties:
- the wall is primed. This, firstly, will help protect the mortar from water loss - wood species actively absorb it, and secondly, improve the adhesion of the mortar to the walls;
- shingles are packed perpendicular to each other, at an angle of 45o to the floor;
- beacons are installed;
- spray is applied;
- The main layer of plaster - soil - is laid on top of the set but not completely dried spray;
- The process is completed by applying a covering. Grouting is carried out before painting.
Details on the rules for filling shingles, installing beacons and the recipes for various plaster solutions can be found here.
Panels
You can also level the wall with panels. You need to start with the installation of wooden sheathing. Experts recommend putting wooden slats under the panels and lining - it’s easier and faster than assembling a metal structure.
The lathing technology is standard:
- horizontal slats or vertical posts are marked. It all depends on how the panels will be mounted. If it is horizontal (siding), then the slats are attached vertically. For PVC panels the opposite is true - the cladding is vertical, the arrangement of the slats is horizontal. Step approximately 40-50 cm;
- The strapping beam is attached to the ceiling. This can be done using a metal corner or a long self-tapping screw through the beam. But then you need to drill the rail with a slightly smaller diameter drill. Otherwise, you can break the notch at the head of the hardware;
- using a plumb line, locate the place where the harness is attached to the floor;
- the lower beam is attached;
- work on forming the strapping by attaching the block to the walls is being completed;
Important: for tying, take a 50x100 mm beam, for a transverse or longitudinal beam - 50x50 mm.
- Internal bars are attached to the harness. To do this, take metal corners;
- To impart rigidity to the structure, internal slats are additionally attached to the wall every 60 cm using direct hangers.
Sheathing diagram for PVC panels.
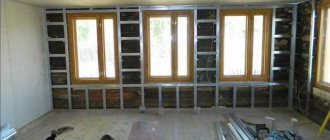
The process of installing the sheathing is completed by tying the window and door openings. With relatively flat walls, you can do without a frame. In this case, the supporting slats are placed directly on the wall, without strapping.
Panels are mounted on the frame. This is done in the following sequence:
- special moldings are attached to the edges of the sheathing;
- the panels are cut to length so that the strip at the bottom fits completely into the groove of the molding, and halfway at the top - this makes installation easier;
- The first panel is inserted into the grooves of the molding (from below, from above, and then from the side). Work should be started from the most illuminated corner so that the completion is less noticeable. There the panels can be cut in half;
The same scheme is for the wall.
- the first panel is attached with nails or self-tapping screws to the inner bars of the sheathing;
- the second panel is mounted, etc.
Attention: for better sealing, experts recommend lubricating the spikes with silicone.
Instead of nails and screws, you can use glue. Details of the technology are here.
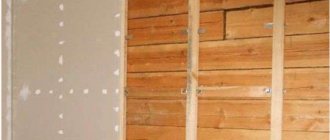
Drywall
Leveling the walls in a wooden house with plasterboard is carried out using the same technology as on brick or concrete walls. Therefore, we will not increase the volume of the article and will send those who wish to study the corresponding instructions for the material “How to level walls with plasterboard with your own hands?”
For general information, let us briefly recall what we are talking about:
- a metal profile sheathing is installed;
- plasterboard sheets are attached to the sheathing;
- drywall is primed;
- joints are sealed with sickle and putty;
- the entire surface is puttied under wallpaper or paint.
Lining
The lining is mounted on a wooden sheathing. Connected to each other by a tongue-and-groove system. Attached to the sheathing or with special fastening devices designed for hidden fastening or with finishing nails.
Fiberboard
About 40-50 years ago, owners of wooden houses, without further ado, tried to straighten the walls of wooden houses for wallpaper using fiberboard. They nailed the sheets to the full height and glued their trellises. But after a couple of years, waves appeared on the walls - this is how the finishing material reacted to the breathing walls. They stayed for many years - there were simply enough other jobs in the village.
The idea of using fiberboard to level walls was just an idea for a long time, until modern materials appeared that completely changed the technology. The work is performed in the following sequence:
Important: with wood-fiber boards you can level walls with a small difference in height - up to 2 cm. And it’s even better when you simply remove the grooves between the crowns.
- the wall is primed;
- Fiberboard is cut across the sheet into strips. The width should be enough for one whole crown and half of the upper and lower logs or beams. The lower and upper stripes are slightly wider - they should cover 2.5 logs;
- the strips are nailed along the edges and in the middle with small nails. Step - 10-12 cm. A gap of 4-5 mm is left between adjacent slabs - a guarantee that there will be no waves;
- The reinforcing mesh is cut to size, with an allowance of 10-15 cm - it is laid overlapping;
- a thin layer of gypsum plaster is applied;
- fiberglass reinforcing mesh is pressed into the solution;
- using a spatula, the reinforcement is covered with a mixture of already applied plaster;
- After the first layer has dried, a thin second layer is applied. For wallpaper this is enough; before painting you need final leveling of the gypsum plaster. What it is, you can see in the article “Gypsum plaster”.
Step by step - simple, affordable - inexpensive.