Wooden lining is used as ceiling lining in rooms for various purposes. Wooden coverings will last quite a long time if they are installed in compliance with technology and operated under proper conditions. A lining ceiling can be found in a country house, in an attic residential floor, on a balcony or loggia, in a utility room. Sometimes deformations, gaps and cracks appear on such a ceiling. If your ceiling lining is deformed or comes apart, you will learn what to do from our article.
The main reasons why lining drys out
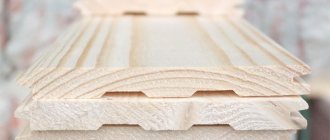
A board that is properly processed and dried according to the rules will never crack along its plane. The lining cracks only in the places where the planks join each other. Under the influence of changes in humidity and temperature, the lamellas begin to bend, increase or decrease in size, deform and bend. The drying process is more often noticed in rooms without heating or where radiators and electric heaters heat too much. The board loses the remaining moisture and the opposite process to swelling of the lining occurs, when the lamellas simply no longer fit in their place.
Most often, lining made from poorly dried boards drys out. During installation, the dies are laid according to the rules, with a small gap between the tongue and groove. During operation, under the influence of high temperatures, the lining dries and decreases in size, forming cracks.
A common reason why linings made from boards of normal humidity and not exposed to temperature changes dry out is improper installation. If, just in case, the gap between the dies is left too large, the natural drying of the wood will expose the seams.
Option No. 2
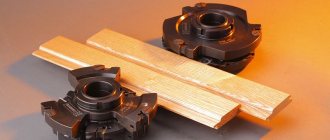
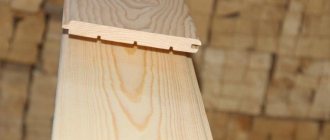
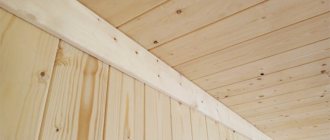
A decorative overlay at the joint is considered the simplest way to connect wooden cladding along the length. You simply fit 2 rows of planks and nail a piece of wood on top. The configuration and dimensions of the slats can be any, and most importantly, there is no need to adjust the slats too precisely; the slats will cover the entire defect.
To decorate the joint on the Blockhouse lining, a planed board with chamfers is usually used
Craftsmen use wooden T-shaped slats, they are also called mushrooms. There the rail is inserted into the gap, which must be precisely adjusted to the size of the fungus. Plus, this joint must be on the supporting lath of the sheathing.
The gap between the slats should correspond to the thickness of the fungus stem
Methods for repairing a lining ceiling
It is not enough to simply repair the wooden ceiling lining. It is necessary to identify the cause of the problem and eliminate it so that gaps between the boards and swelling of the material do not appear again in the future. Only after this can you begin repair work.
Elimination of material swelling
Since a common cause of bulging is related to improper installation of the roof pie or ineffective ventilation of the space behind the sheathing, this problem must first be addressed. It is enough to redo the roofing pie and use high-quality insulation and vapor barriers. If there is no ventilation behind the boards, the covering is completely dismantled and reinstalled on a sheathing of slats, which will provide the necessary ventilation gap.
If the lining on the ceiling is swollen, expert advice will tell you how to level the lining:
- If the problem is related to the ventilation of the space behind the covering or firmly screwing in the fasteners, then the only way out is to completely remove the casing and install it in compliance with the technology. A frame of slats must be constructed, and all fastenings of the lining are not screwed in completely, so that the material can shrink and expand when the microclimate in the room changes.
- If swelling is observed only in certain areas, then only a few boards can be dismantled. Before installing them back, a pair of lamellas is cut in width or length so that after installation the coating does not swell and there is the necessary gap between adjacent elements.
Methods for repairing dried out lining
Now let's talk about what to do if the lining on the ceiling has dried out. Repair methods are directly related to the scale of the problem and the nuances of the operation of the premises.
To eliminate the deficiency, you can use one of the following tips:
- If gaps between the elements appear only in the hot season, when the boards dry out, then solid oil is used to solve the problem. It is a mixture of turpentine, rosin and linseed oil. The composition is usually used for treating plank floors, but it is also suitable for repairing ceilings. Oil is used to lubricate boards that crack during the warm season. Thanks to this, the material will not actively absorb and release moisture, which will lead to the stability of the geometric parameters of the board and the absence of cracks.
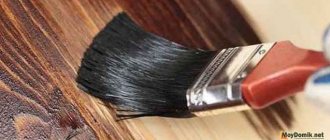
- Oil alone will not be enough to solve the problem of large cracks and crevices. To repair the defect, you will have to use wood putty. The composition carefully seals all cracks and cracks. After it has dried, the treated areas are sanded with sandpaper and finishing is carried out (painted or varnished).
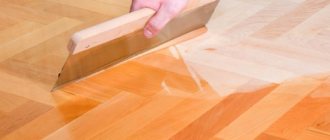
Instead of putty, cracks can be eliminated with a mixture of polyvinyl acetate glue and sawdust. Since the expansion coefficient of such a composition is as close as possible to that of wood, the seal will not crumble, because it will shrink and expand along with the lining. PVA glue in this mixture can be replaced with wood varnish.
Just keep in mind that the mixture of varnish and sawdust sets quickly, so prepare the composition in small quantities and apply in small portions using a spatula. Using a tool, carefully compact the repair compound between the lamellas. When the mixture is completely dry, the surface of the boards is sanded with sandpaper, and then varnished or painted in a suitable color.
Wooden finishing slats - the material is so versatile that it is used for cladding almost any living and working premises: in the country house, in the bathhouse, on the balcony and in the bedroom. However, in order for such a finish to last a long time, it is necessary to choose the right material and secure it correctly.
Tool preparation
All of the described methods for sealing holes in wood will require the use of tools that every owner should have.
- Putty knife;
- Hacksaw with blade for metal;
- Hammer (preferably a wooden mallet);
- Wood drills or milling cutter;
- Sandpaper.
Safety precautions have also not been canceled, so we definitely arm ourselves with gloves and eye protection.
The popular bookmaker has launched a mobile application for Android, you can follow the link absolutely free and without registration.
Causes of defects
Wood is a special material. Its properties appear depending on the direction of the fibers. For example, wood absorbs moisture over almost its entire surface, but condensation accumulates inside along the direction of the fiber, which allows it to be removed painlessly.
This remarkable property provides excellent fresh, clean air in rooms lined with wood - from the living room to the bathhouse. But it also makes the material sensitive to the amount of moisture, temperature and method of fastening.
The lining often swells on the ceiling, usually in the form of a wave and, as if on purpose, closer to the center, where the defect is more noticeable. Why is this happening?
High wood moisture is one of the most common causes. Slats with varying degrees of humidity are available for sale. Wood obtained by natural drying does not always achieve the required 8–12% moisture content. In fact, the finish dries already in assembled form, and, accordingly, changes in volume - it shrinks. But if during the construction of a log building this feature is not forgotten, then when installing the lining it is easy. The lamellas, accordingly, swell as they dry in a fixed form.
Rigid fastening is the second common mistake. Why wood cannot be fixed rigidly is clear from the description of the inherent property of wood: to change in volume with changes in temperature and humidity. If the lamellas are joined tightly, without a technical gap of 1–3 mm, and the screws are reliably deepened, then the material is firmly fixed.
A change in volume cannot be prevented in this way, but instead of the usual swelling, in this case swelling and warping begins. Most often this happens in a bathhouse, since here the effect of moisture and high temperature is especially strong.
- Accumulation of condensation - the lining swells even if the ceiling or roof is installed incorrectly. Lack of hydro- or vapor barrier, leakage, lack of insulation - there can be many reasons and the true one can only be established by disassembling a fragment of the ceiling. It makes sense to take some action to eliminate the defect of the lamellas only after eliminating the cause of moisture accumulation.
- The second case, similar in nature, is insufficient ventilation. One of the reasons why paneling is mounted on sheathing is to provide air passage between the wall or base ceiling and the trim. If there is no ventilation gap, and the room is also reliably insulated - insulated doors, metal-plastic windows, then condensation will inevitably accumulate and the lining will deform.
What to do if the trim is blistering?
There aren't many options. The fact is that if the material is already deformed, then it cannot be returned to its original state. Rigid fastening, which is sometimes used in such cases, will not help much: the wood will either tear out the screws and nails, or simply split. This option absolutely cannot be used in a bathhouse, since the metal heats up additionally and contributes to further drying out of the wood.
The first method involves completely removing the finishing from the sheathing and re-attaching it, taking into account deformations, if they are not too noticeable, and observing the rules: the presence of a technical gap, the tightness of the joint, the obligatory preservation of the gap between the lamella and the wall, etc. The second method is somewhat simpler. Only those lamellas that are swollen are dismantled and cut in width and length so that they can be installed in place, but in compliance with the installation conditions
Here it is important to calculate exactly how much and how to trim the boards, otherwise you can aggravate the problem.
If the lining swells due to dampness of the raw materials, then the material should be dried before re-laying. This is easy to do: just place the boards in the garage and dry with the heaters on. It is advisable to use those models that strongly dry the air. Why? It is dry air that is needed to reduce the moisture content of wood.
Ceilings in rooms for various purposes are often lined with wood paneling. This material is used in living rooms, on balconies, loggias and utility rooms. If the installation of the boards is carried out in compliance with the technology, and the surface of the material has undergone protective treatment, then the service life of the coating will be impressive. But it also happens that the material becomes deformed, cracks, and gaps form between the lamellas. If the lining on the ceiling is swollen or split, what to do and the reasons for this phenomenon will be described in detail in our article.
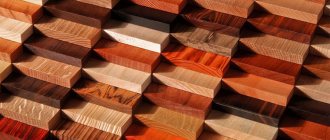
What do you use to cover it with?
This kind of cladding is now made from 3 materials:
- Plastic.
- MDF.
- Tree.
Plastic and MDF cladding are often of the same type, but with wood it is a little more complicated; in addition to wood species, the lining is also divided into classes and types.
Plastic lining
The width of the planks varies from 100 to 380 mm, and the length from 2000 to 6000 mm. The thickness varies around 10 mm.
PVC lining is most often used; it has a wide range of models and a reasonable price, but there is one serious drawback: polyvinyl chloride fades in the sun. Acrylic panels are more expensive, but they do not fade, plus the colors are brighter and the material itself is stronger.
MDF planks
MDF planks are used only for interior decoration, but unlike plastic, they cannot be installed in wet rooms.
Modern MDF lining differs from laminate flooring in its density, but otherwise these materials are similar.
Wooden lining
This cladding is regulated by two standards:
- Domestic GOST 8242-88.
- European DIN 68-126/86.
Methods for repairing a lining ceiling
It is not enough to simply repair the wooden ceiling lining. It is necessary to identify the cause of the problem and eliminate it so that gaps between the boards and swelling of the material do not appear again in the future. Only after this can you begin repair work.
Elimination of material swelling
Since a common cause of bulging is related to improper installation of the roof pie or ineffective ventilation of the space behind the sheathing, this problem must first be addressed. It is enough to redo the roofing pie and use high-quality insulation and vapor barriers. If there is no ventilation behind the boards, the covering is completely dismantled and reinstalled on a sheathing of slats, which will provide the necessary ventilation gap.
If the lining on the ceiling is swollen, expert advice will tell you how to level the lining:
- If the problem is related to the ventilation of the space behind the covering or firmly screwing in the fasteners, then the only way out is to completely remove the casing and install it in compliance with the technology. A frame of slats must be constructed, and all fastenings of the lining are not screwed in completely, so that the material can shrink and expand when the microclimate in the room changes.
- If swelling is observed only in certain areas, then only a few boards can be dismantled. Before installing them back, a pair of lamellas is cut in width or length so that after installation the coating does not swell and there is the necessary gap between adjacent elements.
Methods for repairing dried out lining
Now let's talk about what to do if the lining on the ceiling has dried out. Repair methods are directly related to the scale of the problem and the nuances of the operation of the premises.
To eliminate the deficiency, you can use one of the following tips:
- If gaps between the elements appear only in the hot season, when the boards dry out, then solid oil is used to solve the problem. It is a mixture of turpentine, rosin and linseed oil. The composition is usually used for treating plank floors, but it is also suitable for repairing ceilings. Oil is used to lubricate boards that crack during the warm season. Thanks to this, the material will not actively absorb and release moisture, which will lead to the stability of the geometric parameters of the board and the absence of cracks.
- Oil alone will not be enough to solve the problem of large cracks and crevices. To repair the defect, you will have to use wood putty. The composition carefully seals all cracks and cracks. After it has dried, the treated areas are sanded with sandpaper and finishing is carried out (painted or varnished).
Instead of putty, cracks can be eliminated with a mixture of polyvinyl acetate glue and sawdust. Since the expansion coefficient of such a composition is as close as possible to that of wood, the seal will not crumble, because it will shrink and expand along with the lining. PVA glue in this mixture can be replaced with wood varnish.
Just keep in mind that the mixture of varnish and sawdust sets quickly, so prepare the composition in small quantities and apply in small portions using a spatula. Using a tool, carefully compact the repair compound between the lamellas. When the mixture is completely dry, the surface of the boards is sanded with sandpaper, and then varnished or painted in a suitable color.
Wooden lining slats are in deserved demand among owners of apartments and country houses. But the slightest violations of installation and operating conditions lead to deformation of the coating. The lamellas lead, heave, and if the lining on the ceiling comes apart, what should you do? Let's look at the reasons and possibilities for eliminating defects with our own hands.
Wooden plugs
Wooden plugs are cylindrical blocks that can be purchased at any hardware store. They are usually used as guide elements when joining boards at the ends. To seal a hole using this method, you need to drill it out to the diameter of the plug, which is usually 8 mm. Then we moisten the plug with wood glue and hammer it into the hole, after which we cut off the remains with a hacksaw.
Types and causes of deformation of lining on the ceiling
Wood lamellas are not uniform, so the manifestation of qualities depends on the direction of effort. For example, moisture from the air is absorbed faster across the trunk and removed along the trunk - this ensures sufficient ventilation of the log house, but interferes with the timely drying of the lining.
The following factors can be the causes of defects:
- Failure to comply with the technology for laying lamellas. If the lining is fitted tightly, without gaps, then during natural expansion/shrinkage cycles, the wood will swell.
- Type of wood. For example, poplar and birch lamellas warp much more often than aspen and linden.
- Cutting point. The blanks are cut from different parts of the trunk, which affects the ability to remove moisture and the drying speed. When cutting tangentially, the lining expands by 9-15%, when cutting radially, no more than 7%.
- Drying degree. The higher the humidity of the lamellas when installing the cladding, the faster it will “lead”.
There are few types of deformation of dies: shrinking with separation at the seams, twisting, cracking, swelling. However, even such a few defects can reduce all the owner’s efforts to install the decor to zero.
Causes of lining swelling
This deformation looks like a wave of lamellas, usually closer to the center or near the wall itself. Eliminating the problem requires finding the cause - without removing the provoking factor, replacing the dies is pointless; they will swell again.
Here are some reasons for swelling of elements:
- Insufficient drying. Natural moisture lining is not used for cladding. Wood will begin to respond to minimal increases in humidity conditions, but dried wood has a resource reserve for gaining a certain amount of moisture without changing the stability of its shape.
- The fastening of the dies is too strong. And here there is a peculiarity: by screwing in the hardware until it stops, the user does not give the lamellas any room to expand, but a loose fit will interfere with installation. That is why it is preferable to place the dies on clamps - there is a power reserve when the wood expands and the fasteners will not be torn out.
Advice! If you try to fasten the loose dies again, the wood will crack.
A lot of water has accumulated behind the casing. This happens more often at dachas, in unheated summer houses. The installation of the simplest roofing pie, the lack of 2-3 layers of waterproofing and other factors lead to the accumulation of condensation. Before changing the ceiling, you will have to seal the roof.
Advice! Lack of ventilation also causes wood to swell
It is extremely important to leave a small space between the roofing pie and the plank ceiling - this will make it easier to remove moist air and dry the tiles
The lining came apart
If the lining on the walls and ceiling of the room has dried out and come apart, exposing the seams, the problem is a violation of the installation technology.
The most common mistakes:
- Violation of the evenness of the sheathing frame. The level of the timber must be the same, otherwise the lining will move due to natural deformations.
- There are no ventilation gaps.
- The lining is laid unevenly.
- When tapping to adjust the lamellas, the integrity of the die is compromised. This error is the most difficult to see: the master taps on the ends, the plane and creates tension in the board - the distortion instantly responds with cracking of the wood inside, and during operation the internal defect will come out.
- There are no compensation gaps around the entire perimeter of the board covering.
- Bad fasteners. And again he returns to the fact that for internal cladding it is better to use clamps, and for external cladding - nails and self-tapping screws. Without screwing the latter in tightly.
Important! One of the main factors in the manifestation of cladding defects is insufficient drying of the material. The use of such lining in 100% of cases will lead to deformation of the coating in the first two years of operation of the building
How to install panels if they are short?
When using short sheets to create a continuous coating, you will have to join them together. To do this, a method is used in a checkerboard pattern, with seams staggered or along one line of the ends of the strips. Each of these methods has its own differences, which require either additional equipment or good skills in working with wood.
- In the first case, the seams are located chaotically , which slightly distracts from the integrity of the canvas and creates the impression of an idea. Here the main difficulty lies in finishing the end of the lining of each contacting material. The smoother the cut, the less noticeable are the gaps and cracks at the joint.
- In the second case, a special additional device will be required to connect different lengths of canvas . If the strips are connected without an H-shaped profile, then they can even be positioned offset, but covered with thin wooden slats or planks. However, installation of continuous decoration of seams is a simpler and less labor-intensive process.
Eliminating the consequences of drying out the lining
Depending on the extent of the damage, the dried out lining can be returned to its normal state. Small cracks will most likely disappear on their own in the spring, when stable warm weather sets in outside. If you don’t have time to wait, you can repair the lining using the following methods:
Solid oil based on flax oil, turpentine and rosin. The composition developed for floor boards helps the lining that has just begun to dry out.
The oil saturates the wood and prevents it from drying out, while at the same time preventing the absorption of excess moisture, which is useful for preventing swelling. If the process has worsened and, no matter why, the lining has dried out too much, you can use putty. A special composition for wood is applied to the cracks, rubbed with sandpaper and covered with a paint coating in the color of the finish.
The method is not suitable for rooms that are not heated during the cold period. Temperature changes will cause the putty to discolor and fall out. The most difficult method of repairing cracked lining is to fill the cracks with a solution of wood shavings and PVA glue. Sawdust of a small fraction obtained by sanding with sandpaper is suitable. The thick mixture is applied to the dry areas, dried and painted. Due to the presence of wood in the composition, the grout will expand and contract almost like the lining itself, while remaining inside the cracks.
If you take a radical approach to the issue and find out exactly why the lining is drying out, you can disassemble and reinstall the finishing, taking into account previous mistakes and the characteristics of the room.
Seal holes with toothpicks or matches
This method is the simplest and to perform it we will need regular PVA glue, matches or wooden toothpicks. Next, put together the required number of toothpicks so that they fit into the hole as tightly as possible, then dip them in PVA glue and insert them into the hole. Then take a hammer and easily hammer them into the hole until the end, leave until the glue has completely hardened. We cut off the remains sticking out of the hole with a stationery knife or a hacksaw, then clean it with sandpaper.
The aesthetic aspect of this method leaves much to be desired and may well be used in places where the hole will be hidden from view.
Why was the lining on the ceiling deformed?
Before you begin repairing a ceiling lined with clapboard, you need to understand the reasons for this problem. Various surface damage and deformations occur even in rooms with a normal microclimate. There are many reasons for damage to the ceiling surface lined with clapboard. Let's look at the reasons for such problems.
Causes of swelling of wooden lining
In order to understand how to repair a swollen lining ceiling, you need to understand why this defect appeared. Wave-like deformations of wooden ceiling coverings occur more often in the central part of the ceiling. It is less common to encounter such a defect on the edge.
When the humidity in a room changes, any natural wood materials expand or contract slightly. As a rule, such linear changes in size are insignificant and invisible to our eyes.
However, there are several reasons why such deformations become significant:
- If wood with natural humidity was used to make the ceiling lining, then when the microclimate changes, the changes in linear dimensions will be pronounced. The boards will begin to shrink greatly when the humidity in the room decreases or, on the contrary, swell greatly when the humidity rises. Because of this, the entire coating will be deformed. Such processes are clearly visible in an unheated room or a seasonal home.
- If the lining on the ceiling swells in a room where normal humidity and temperature are constantly observed, then the cause of the deformation lies in a violation of the installation technology. Experts do not recommend screwing in the fasteners all the way so that the board can freely expand and contract with changes in humidity. If the hardware is screwed in very tightly, then when the board expands they will simply be torn out of the base, which will lead to swelling of the coating. Many home craftsmen believe that tightly screwing in the screws will protect against deformation, but in fact the opposite is true.
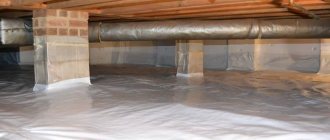
- Also, swelling of a wooden surface can occur due to accumulated moisture. As a rule, this problem occurs in attic ceilings above which there is a roof with poor insulation or insufficient vapor barrier. Swelling can be caused by the lack of a waterproofing layer or the use of low-quality materials.
It is recommended to leave a ventilation gap behind the wooden paneling to eliminate the possibility of condensation. If such a gap is not made during installation, the wooden covering may become deformed due to moisture. To prevent this from happening, the lining must be mounted not on a vapor barrier film, but on spacer slats fixed on top of this film
It is especially important to install such a ventilation gap on the ceiling, because natural air circulation in this place is difficult.
The lining came apart
Dry areas of the coating and cracks appear due to the fact that the wood unevenly releases moisture throughout the entire board. Moisture evaporates most actively at the end of the panel. Moreover, the greater the changes in temperature and humidity in the room, the more the material will deform. This leads to cracking of the lamella and its deformation.
If the lining on the walls and ceiling of the room has dried out, then there may be several reasons for this phenomenon:
- If such a defect appears on the ceiling of a heated room, then it is most likely associated with the installation of material with natural humidity. Insufficiently dried boards after installation begin to release moisture into the room, which helps to reduce their geometric dimensions. As a result, gaps appear between the individual lamellas.
- If such a problem arose in an unheated room where well-dried boards had previously been installed, then the cause of the defect lies in seasonal changes in humidity and air temperature. In winter, the boards become saturated with moisture and swell, and in summer the wood releases moisture and shrinks. Sudden changes in linear dimensions lead to the appearance of cracks.
Conclusion
Each of the above-described options for joining the lining along the length is available to the amateur. To make everything work out beautifully, the video in this article provides general instructions on how to traditionally cover a room with wooden clapboard. There the process is shown more clearly.
- Author: Maria Sukhorukikh
Rate this article:
- 5
- 4
- 3
- 2
- 1
(0 votes, average: 0 out of 5)
Share with your friends!
The main reasons for swelling of the lining
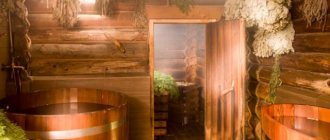
A tree is a self-sufficient system that can maintain its own moisture. Absorbed across the trunk, it is immediately removed along it, so houses made of timber are not subject to swelling or deformation due to humidity. Lining, like any sawn board, is devoid of these natural properties, therefore, when exposed to high humidity, its fibers expand. This is the main answer to the question why the lining in the bathhouse swells due to high humidity.
Externally, the swelling of the lining looks like waves along or across the room, squeezing the lamellas out of their place and disturbing the geometry of the masonry. Why does the lining swell in waves? Causes of deformation include:
- Wrong choice of wood. For finishing wet rooms, hard varieties (linden, aspen, cedar) are needed. The decision to sheathe with cheaper spruce or pine is the reason why the lining in the bathhouse swells.
- The degree of dryness of the wood is a parameter that affects the amount of moisture that the lamella can absorb. The better the wood is dried, the less likely the lining will swell; it is better to opt for forced drying in a chamber.
- Violation of the technology for laying waterproofing and steam removal layers on a wall or roof.
Installation technology
The width of the canvases is very easy to join, since they have corresponding grooves and protrusions. As a result of fastening to the sheathing or wall, various devices are used :
The latter allow you to obtain an even, continuous coating without visible traces of fixatives. This is achieved by the technology of fasteners, which are placed on the inside of each groove at several points on the canvas. They are attached to the wall surface or sheathing with studs, leaving the groove accessible for joining with the adjacent panel.
The advantage of this method is the excellent aesthetic qualities of the coating. Of course, if category B or even A lining is used, then marks from special nails are almost invisible , but in the case of Extra class material it is worth ensuring a clean surface without any damage or marks. This increases the strength and protective characteristics of the material, since high humidity causes areas with a damaged fiber structure to be most susceptible to rotting and darkening.
By lenght
To join boards along the length, different techniques can be used:
- a continuous stripe in one straight line;
- in a checkerboard pattern;
- offset by equal distances or arbitrarily.
Features of the material
Wood is heterogeneous in its structure. This means that the manifestation of certain qualities depends on the direction of effort. For example, moisture from the air is more actively absorbed across the trunk, and removed along the trunk, which allows the log house to do without ventilation - this role is performed by the tree itself.
Lamels - boards cut from a trunk, mostly lose this feature, but even the thinnest lining can remove excess moisture from the room.
However, when wood absorbs moisture, it changes in volume, unevenly, and along the grain. Hence the first strict requirement when installing products.
Moisture absorption and removal rate depend on many factors.
Wood is not the only material that changes in volume as temperature changes. In all such cases, laying involves non-rigid fastening so that the material has room to change in length.