Let's look at what stencils for wood carving are, how they can be used and what they are. Today this ancient craft fascinates many, but it is a rather complex and painstaking task that requires not only talent, but also artistic skills. If everything necessary for this task has been acquired and you know how to work with each of the tools, then determine the drawing.
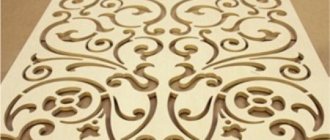
Stencil pattern for applying a design to wood
But it is not always possible to choose and draw the one you need. In this case, purchase stencils for wood carving, which help the novice craftsman do everything correctly.
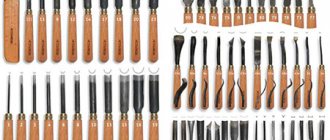
Tools for work
Truly high demands are placed on specialized carver tools. The skill of the performer plays an important role. But only with correctly selected and carefully sharpened tools will a master be able to demonstrate his skills in full force.
And if a professional easily and at first glance determines the quality of devices for work, then a beginner is invariably lost and can make a mistake.
First of all, you should purchase:
- quality knives;
- chisels (several pieces);
- needle files;
- hacksaws cutting metal;
- clamping device;
- sandpaper of different grain sizes;
- drill and several types of drills;
- wooden bars.
Knives
It is best to buy knives in a specialized store of goods for creativity and hand-made goods. They must be made from high quality steel. If funds are limited, you can temporarily buy simpler knives, but sharpen them well.
Experts speak positively about tools from the Tatyana, Narex and Kogatana brands.
Chisels
At first, instead of chisels, you can use a sharpened screwdriver and file.
When purchasing chisels, pay attention to the following types:
- Flat - a chisel in the shape of an elongated rod with a cutting edge at the end; it is needed during the initial processing of wood.
- Semicircular is one of the most popular types; it can be of varying degrees of roundness: medium, round or sloping.
- V-shaped - necessary when making geometric threads.
Machine
Carving on a machine has enormous potential, simplifying this work and turning it into pleasure. Modern models are not cheap at all, but professionals characterize them from the best side.
The machines can simplify many labor-intensive operations familiar to carvers:
- surface treatment at different angles;
- drilling recesses, grooves and grooves;
- milling;
- the actual carving.
There are huge differences in the sizes of machine models and in the technology of their operation:
- manual;
- milling and engraving;
- laser;
- CNC machines.
To simplify many operations of artistic carving, professionals advise purchasing a CNC machine. But if a novice craftsman just wants to try himself and see if this hobby is suitable for him, a manual machine is quite enough.
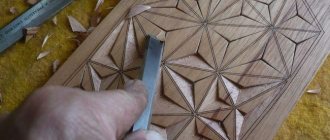
Technique
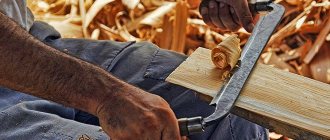
First, you need to master the basics of geometric carving: how to form simple grooves, and then triangular elements. Typically, the carver first pricks the triangle with a Y-shaped cut, and then removes three slivers. This method is quite justified if the pattern is quite large, however, if we are talking about miniature carvings, such pricking does not make any sense - it is easier to immediately cut out the element.
It is most convenient to hold the knife in the same way as you hold a ballpoint pen - the accuracy of the movements will be the highest. A special thrill is cutting the end surfaces of wood. They are very soft, and the knife moves like butter. But be careful, you do not have the right to make corrective cuts due to the possibility of chipping.
In parallel with the practice of carving, special attention must be paid to drawing. Actually, this is where real art begins. Try drawing, for example, a square and divide it into triangles, building a pattern. After a dozen drafts, you will begin to understand what you like and what you don’t.
Use a compass - it makes it much easier to make patterns. After hundreds of drafts, your own style will begin to form. My style is miniature and minimalism. The cut element can be less than a millimeter, and the pattern must be a harmonious combination.
View this post on Instagram
#zencarving #kunst #wood #design #craftwork #woodcarving #carving #wood #design #handmade #craftwood #woodart #woodcarving #zenart #handmade #box #holz #holzschnitzerei #holzkunst #chipcarving #spooncarving #miniature #minimalism #minimalism #woodwork #handarbeit #zen #decor #decor #jewerly
Posted by Alexey Kobzev (@zencarving) Nov 13, 2022 at 3:53 PST
Some tips:
- Try combining star-shaped elements with long, elongated strokes.
- Use curved lines. They are more difficult to cut, but the curved elements add dynamics to the design.
- Leave spaces and add emphasis (for example, depth).
- Play with the size of the elements.
- If your skill level allows, try the so-called three-dimensional geometric carving, when in one cut out element you cut out another.
A small box can contain more than 1,000 carved elements. This activity requires a lot of patience and perseverance. For example, a chip can ruin the whole work, so special concentration and accuracy are required. All this makes carving one of the most meditative hobbies.
Wood carving for beginners
In order to master the skill of turning objects from ordinary wood into works of art over time, you need to gradually go through lessons, moving from simple to complex.
To learn how to create decorative wooden elements, you need to know the technology of work and possess the necessary tools, without neglecting safety precautions.
Masters advise beginners, especially children, to first master the basics of contour carving. For it you will need:
- wooden canvas or object for decoration;
- set of chisels;
- blunt knife;
- pencils;
- sketch (drawing);
- sandpaper.
First, using a sample, you need to check how to work with each of the chisels, see what it is needed for, and practice.
Then the sketch from the paper needs to be transferred to the workpiece.
Only after studying the basic principles of working with the tool can you proceed to testing the products.
The most common are sketches with images of flora and fauna, and landscape sketches.
After applying the pattern, the wood must be sanded and varnished.
Cutting out signs
The signs tend to be irregular in shape. The contours of the product emphasize the curves of the letters, so you will have to tinker with the workpiece, cutting out excess fragments in certain places. The letters can be drawn by hand using a pencil and ruler, or you can download a ready-made inscription from the Internet. Making signs is very simple, so this option is ideal for beginning carvers. All you need for the job is a blunt knife and the Bogorodsk set “Tatyanka”. After cutting, the plate is sanded and covered with stain. When the composition dries, the recesses are additionally emphasized with a second layer. The inscriptions on the signs for the bathhouse are complemented by clouds, oak or birch leaves, ladles, basins with brooms. For the street, use a beautiful, even font and neat curls along the contour, since drawings would be inappropriate here. In the same way, you can make an original sign for a retail store or pub, for example.
Mistakes and how to avoid them
It takes a lot of time to master carving. And it goes not only to learning how to work with a tool, but also to coping with the consequences of failures and mistakes that are made due to inexperience.
Professionals advise paying attention to these “little things” that can ruin the final result:
- Only well-dried wood should be used.
- You should not hastily delve into the surface of the workpiece; all movements should be made smoothly and with minimal pressure on the tool.
- It is necessary to take into account the specifics of different types of wood, having studied it additionally, with different types of wood and you need to work differently.
- You can’t start working without a sketch; a beginner should give up improvising.
- You can’t grab onto everything at once and try to complete complex tasks; you need to gradually move from the simplest tasks to more complex ones.
Types of thread
There are many techniques for processing wood, with the help of which craftsmen create real works of art from it.
As such, a strict classification has not yet been created, but conditionally all techniques can be divided into several types.
Flat socket carving: a flat wooden surface acts as a background. The pattern is formed using notches of various shapes.
Flat grooved threads are:
- Geometric has a pattern in the form of a bizarre combination of various geometric shapes.
- Contour forms a pattern in the form of a rigidly drawn outline, as if pressed into the surface.
Flat-relief carving highlights a convex pattern on a background deepened with the help of a tool.
Flat relief carving can be:
- Oval - the pattern on it is located in the shape of an oval, often filling the entire space of the canvas with small recesses.
- With a selected background, a large ornament appears against the background of the space scraped out by the tool.
Relief carving: three-dimensional paintings, practically devoid of a flat background.
Relief carving can be:
- The bas-relief has protruding figures of medium height (about half of their volume).
- High relief - the background is deeply recessed, the figures are very voluminous and protrude greatly.
- “Tatyanka” - a convex pattern fills the entire space of the product, the elements merge, turning into each other (usually the theme is botanical).
The slotted thread can have the appearance of flat-relief or relief. The pattern is made by completely removing wood fragments and leaving through voids between the elements of the pattern.
The slotted thread is:
- Openwork: has protruding parts combined with cut holes, widely used for decorating furniture sets in the Baroque and Rococo styles.
- Overlay: made up of figures cut through and with protruding elements, processed only on the front side.
Sculptural carving - the depicted objects are separated from the background and represent a full-fledged sculpture.
House carving is the creation of elements used to decorate wooden buildings.
Templates of carved window frames - photo gallery
Window trim template - 1 Window trim template - 2
Window trim template - 3 Window trim template - 4
Window trim template - 5
Window trim template - 6 Window trim template - 7
Window trim template - 8 Window trim template - 9 Window trim template - 10 Window trim template - 11 Window trim template - 12
Window trim template - 13 Window trim template - 14 Window trim template - 15 Window trim template - 16 Window trim template - 17
Window trim template - 18 Window trim template - 19
Window trim template - 20 Window trim template - 21 Window trim template - 22
Window trim template - 23 Window trim template - 24
Window trim template - 25 Window trim template - 26
Sketch of window trim - a rooster Sketch of window trim in the form of a cockerel on a spire
Sketch of window casings - horse Sketch of window casings - horse Sketch of window casings - boat Sketch of window casings - butterfly Sketch of window casings - leaf Sketch of window casings - maple leaf Sketch of window casings - pattern with a fish (right) Sketch of window casings on the windows - a pattern with fish (left)
Sketch of window frames - pattern with a bird (left)
Sketch of window frames - pattern with a bird (right)
Sketch of window frames - pigeons
Sketch of window frames - ornament with goldfish Sketch of window frames - acorns
Sketch of window casings - flowers Sketch of window casings - flowers Sketch of window casings - roses Sketch of window casings - ornament of weaving leaves (right) Sketch of window casings - ornament of weaving leaves (left) Sketch of window casings - ornament of weaving leaves leaves-2 Sketch of window casings - an ornament of interlacing leaves-3 Sketch of window casings - ornament with grapes Sketch of window casings - ornament with flowers Sketch of window casings - plants Sketch of window casings - sunflowers
Sketch of window casings - a beautiful ornament Sketch of window casings - a beautiful pattern
Pattern of carved window frames - 1
Pattern of carved frames for windows - 2 Pattern of carved frames for windows - 3
Pattern of carved frames for windows - 4 Pattern of carved frames for windows - 5 Pattern of carved frames for windows - 6
Pattern of carved frames for windows - 7 Pattern of carved frames for windows - 8
Pattern of carved window frames - 9
Pattern of carved window frames – 10
Pattern of carved frames for windows - 11 Pattern of carved frames for windows - 12 Pattern of carved frames for windows - 13 Pattern of carved frames for windows - 14 Pattern of carved frames for windows - 15 Pattern of carved frames for windows - 16
Ornament of carved platbands on windows and doors Carved patterns for platbands on windows - 1 Carved patterns for platbands on windows - 2 Carved patterns for platbands on windows - 3 Carved patterns for platbands on windows - 4 Carved patterns for platbands on windows - 5
Carved patterns for window frames – 6
Slotted thread
One of the most visually impressive is the slotted carving. It is great for interior and exterior decoration of houses. Decorating a piece of furniture, window frames or decorative cornices with it means attracting everyone’s attention and admiration to them. For many, this type of carving is associated specifically with Russian culture and applied art.
It is generally accepted that cutting through patterns on a large scale and developing this art began mainly with the advent of thin and wide wooden panels on an industrial scale. After all, before this, such blanks had to be cut out by hand with great difficulty.
Before cutting through the pattern, you need to make a design on the surface. You can come up with it yourself, or you can use a ready-made diagram from the Internet.
To make a slot, the board is drilled in several places from the inside out with a special drill or chisel. A jigsaw file is inserted into the resulting hole, which is used to make a slot according to the drawn diagram.
If the pattern element is small, then special files with small teeth are used for the same purpose. The remaining elements can be further decorated with patterns for decorative purposes.
After completing the drawing, the product is processed with sandpaper and a file.
In order to protect and make it more decorative, the wood can be additionally varnished.
The slotting technique is the type of carving that beginners in this business are advised to start with. Of course, complex ornate patterns won’t work out at first, but this is a great way to practice and make something truly beautiful!
If a novice master wants to learn the craft of wood carving, he should be patient and learn all the nuances. But only with the help of constant training and making products of varying degrees of complexity can you achieve impressive success!
Master class on printed cookie cutters
To make a printed cookie cutter, you first need to cut the blank. The width and length of the blank depends on the size of the future confectionery products. You can focus on generally accepted standards and try on ordinary anniversary or coffee cookies bought in a store. As for the choice of wood, larch, beech, and oak are suitable for these purposes. The workpiece is cut out of the board using a jigsaw. Next, it is fixed on the working surface and a pre-prepared sketch of the image is transferred. All details of the composition on the cookies should be convex, so there is no need to process the background. The set of tools for the job varies depending on its complexity. To make cutting easier, you need to select a source picture drawn with halftones. Then it will be easier for the master to navigate the cutting depth of the elements. For printed cookies, they often choose inscriptions, simple landscapes with trees and birds, animals, flower arrangements, and “bouquets” of ears of corn.