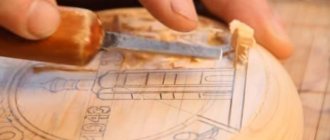
There is such a type of thread as through or openwork - it is divided into, in fact, through and overhead, it has two subtypes: slotted thread (through sections are cut with chisels and cutters) and kerf thread (actually the same thing, but such areas are cut out with a saw or jigsaw ). The most productive tool, of course, is the jigsaw. It makes it easy to do slotted carving, which is great for woodworking!
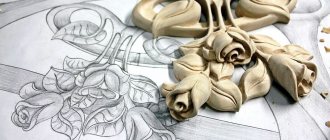
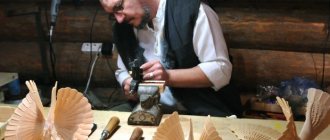
Openwork carving is called openwork, because, as you can see in the photographs, products made using this technique look incredibly light, like the most delicate lace. The essence of slotted carving is to saw through a pattern in a thin piece of wood. This type of carving has gained incredible popularity in the field of design and interior decoration. The most striking examples of carved carvings can be considered house carvings - decorations for frames on windows and doors, carved railings, pediment decorations have been created in Rus' since time immemorial and many of them have survived to this day.
The main difference between slotted threads is that the background of the product is completely removed. But sometimes, for better perception of the pattern, it is nailed or glued to a solid background of a contrasting color. This technique is called overhead threading.
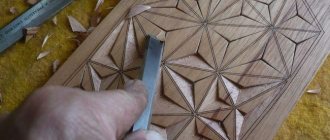
Slotted carving technique
Experts believe that through-threading requires the use of sophisticated equipment. Through elements made of thin lumber or plywood require care.
The fact is that any sudden movement can ruin the entire composition.
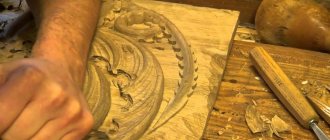
- There are several types of such art. In some techniques, the slotted elements can remain flat, while in others they are made convex and embossed. Thanks to chisels of different widths and lengths, it is possible to control the depth level and size of the slot.
- Modern tools allow the master to perform complex elements without much effort. More than 30 years ago, drilling techniques were used to make patterns. For this purpose they chose a brace. Thanks to him, it was possible to achieve slots of different sizes.
Today the work begins with the processing of holes. To do this, use a special drill, complete with various drills.
Cutting can be done using a jigsaw. Some experts prefer to work with a knife, chisel and thin file. The advent of power tools can reduce operating time.
Basic forms of carved ornaments
Depending on the nature of the composition, location and shape, the following types of ornaments are distinguished:
Carved ornaments for wood carving
- Ribbon ornament and border. A carved detail that borders a product or runs along its edge.
- Garland. Wave-shaped pattern with plant motifs.
- Socket. A separate symmetrical type of ornament of regular shape: circle, polygon, oval.
- Palmetta. It is a fan-shaped carved decor.
- Arabesque. It makes up a complex ornate pattern of geometric or floral patterns.
- Wreath. Carving element with plant motif.
- Network. A pattern with interlacing elements - stems, ribbons, stripes, etc.
- Panel. A pattern enclosed in a carved frame or ribbon.
- Openwork ornament. It is made using the saw-cut carving technique, the peculiarity of which is the creation of a through background of the pattern.
Feature of slotted thread
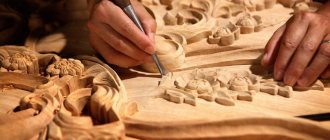
To create an image you will need a sketch. In this case, you can use a ready-made template or create an exclusive design for the future element.
To create a slotted image, it is important to choose the correct hole size. A set of drills and chisels ensures smooth lines.
- Previously, through cuts are made in several parts of the part, which are subsequently processed with a chisel or drill.
- If the drawing combines small and large parts, then in this case you cannot do without using a jigsaw.
- Experts recommend purchasing a set of special files for the job.
- They differ from each other in size and cross-sectional area. When choosing a tool, it is necessary to take into account the density of the wood.
The edges of the slotted hole require additional processing using sandpaper. In this way, it is possible to get rid of rough boundaries. To do this, choose a needle file with fine teeth or sandpaper with fine abrasive chips.
Useful tips
It should be noted that using large saws can result in a ragged outline, so it is still better to prefer fine-toothed saws. Drilling is recommended to be done with feather drills, and this should be done on both sides of the wooden workpiece, having previously drilled a through hole with a thin drill.
An excellent way to avoid torn edges and scuffing of wood is to glue thick paper to the back of the piece.
It must be remembered that the main factor ensuring clean cutting is the sharpness of the tool, so you should take care of this aspect of the issue in advance.
When choosing an ornament, beginning carvers should focus on simple images with large details and a minimum of “heavy” angles. By choosing the right design, you can reduce the amount of work, resulting in a beautiful product.
Types of slotted threads
The slotted pattern differs in the structure of the through gap. It can be flat or convex. With the help of carpenter's knives, it is possible to give volume to wood and emphasize its texture. Relief carving in the professional sphere is called lace.
- Some technologies involve gluing several parts together to create the desired pattern.
- They are mounted on a wooden base. In this way it is possible to create a three-dimensional bas-relief. In this case, the decor is called overhead.
- It is chosen for interior and exterior decoration.
Lace bas-relief does not provide for the presence of a large number of small structures. Typically, the design combines flowing and streamlined elements.
Openwork platbands
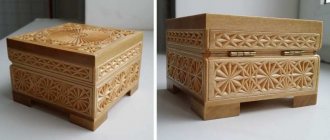
Carved shelves, lampshades, photo frames, various candy dishes and tea houses, boxes, office supplies (paperweights, paper holders) - this is not a complete list of cute little things that will create comfort and a special atmosphere in the house.
Elements for external decoration can also be made independently. So, for cornices or trim, as a rule, solid pine is used, but plywood of sufficient thickness (up to 12 mm) is also suitable.
Armed with a jigsaw for carving and a trim template, they get to work. Beginner carvers should prefer simple motifs, with a minimum number of closed areas. However, if there are such in the template, then you will need a drill. Procedure for cutting out complex elements:
- A drill or a brace is used to make a hole inside the area with a closed contour.
- Unscrew one of the wings on the jigsaw and release one end of the file.
- The blade is inserted into the hole and secured in working position.
- The cutting line is carefully brought to the contour and circled completely.
- Having untwisted the lamb again, the file along with the cut element is carefully pulled out of the design.
- The unnecessary part is removed, the file is returned to its place and work continues.
What tools and materials are used
For work, use a set of wooden boards and thick plywood. When creating images, it is recommended to take into account the density of the wood and the location of the fibers. The main requirement is the minimum percentage of moisture in the structure of the material. You can purchase a wooden base in hardware stores or home departments.
Experts say that each type of array has its own characteristics and requires the right approach to work.
These include:
- Working with conifers requires perseverance and patience. A soft base has many disadvantages. They lie in the resinousness of the structure and its plasticity. Pine or spruce are very rarely used to create complex patterns;
- Aspen is considered a soft material. When working with it, it is necessary to control the pressure on the surface and avoid sudden movements. With the help of chisels and needle files, it is possible to achieve the desired result;
- Linden and ash have good density and suitable texture. Boards from this solid wood are regularly used to create slotted carvings;
- Solid plum combines density and strength during processing. It is chosen for convex large parts.
Before starting work, it is necessary to assess the humidity level. If the chip crumples in your hands, but then returns to its original position, then the average moisture coefficient is observed in it. If sawdust and shavings crumble, then this phenomenon indicates an overdried base.
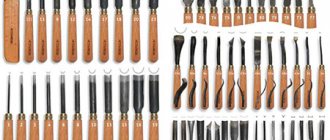
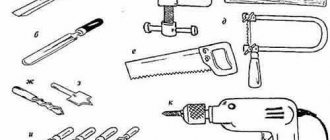
What do they use for work? Experts prefer to work with the following tools:
- Jigsaw. In this case, it is recommended to choose equipment that comes with files of different lengths and widths;
- Electric drill. It is better to give your preference to products that have several metal attachments;
- Sandpaper;
- Needle file;
- Several wood knives;
- Chisels.
Do not forget that a ready-made sketch allows you to reduce work time. For beginning craftsmen, it is not recommended to choose complex compositions that combine convex and flat parts. Initially, it is better to start with the overhead method.
Types of carved ornaments
Carved ornaments have been used to decorate wooden products since ancient times. The ornament is a pattern characterized by a rhythmic arrangement of details made in the form of various visual elements.
There are many different ornaments: geometric and floral patterns, images of animals, humans and birds. Often complex carving elements are simplified and stylized into parts that are more accessible to visual perception and manufacturing.
Geometric ornament
Geometric patterns consist of simple details, the combination of which can sometimes create fantasy pictures of amazing beauty. Carved wooden decorations and compositions are usually presented in the form of ornamental stripes, rosettes, stars or borders. Individual elements can also be used independently:
- Dot. Rarely used as an independent element, but when repeated it acquires a decorative effect.
- Lines. A frequently used element, most often used to distinguish individual motifs.
- Broken line. Zigzag is a symbolic sign of water.
- Square and rhombus. Often serves to limit the space filled with motifs.
- Hexagons and octagons. Traditional element in oriental motifs.
- Crosses. Ancient symbols of various structures.
- Spirals and twisted cords. Beautiful elements with a curvilinear geometric structure.
- Circle. It contains a pattern or is an independent part of the composition.
Geometric patterns are used in various types of wood carving, but especially in geometric and contour techniques.
Floral ornaments
A floral or foliage pattern can be made in the form of a border or strip of an ornament with repeating elements, or it can be a separate composition depicting trees, fruit-bearing plants, flowers, and so on. Representatives of the flora are either depicted very naturalistically or stylized and simplified.
How to choose a stencil or template
Experts say that a correctly selected pattern is considered a guarantee of a successful result. You can find an image on the Internet or purchase a special pattern in handicraft departments.
The size of the finished craft is important. To do this, the sketch is printed in full size. Professional craftsmen only need several types of patterns to create a luxurious composition.
After this, the images are transferred to the surface of a wooden board using a pencil and tracing paper. This reduces the number of errors that can ruin the final result.
Rules for drying wood
It should be remembered that for slotted and other types of carvings, you should use only well-dried wood, so as not to watch with regret later how the finished carved product, as it dries, warps and cracks. Drying of workpieces should not be carried out in the sun or near heating devices. The wood should dry randomly in a warm room with good ventilation. It is better to place the boards on their ends, placing strips under them to ensure air access to all sides. By the way, you can dry small pieces in the microwave in several sessions.
Photo of slotted wood carving
Finishing slopes with plastic panels
Finishing of window slopes inside can be done using plastic ceiling panels or multi-layer sandwich panels. The installation of this material is so simple that it is possible to finish the inside of plastic windows with your own hands. How to make slopes for plastic windows in a house will be described below.
PVC panels are most often used to finish slopes from the inside.
Sandwich panels are better than ceiling panels due to the presence of a layer of insulation inside. However, ceiling ones also have thermal insulation qualities due to the air chambers between the internal stiffeners.
Installation and repair of slopes inside a building using these finishing materials is possible due to their qualities:
- PVC slopes are durable;
- the use of panels for finishing window slopes gives them an attractive, neat appearance;
- finishing options can be very diverse thanks to a wide range of colors,
- which have external surfaces of panels;
- it is possible to install plastic on arched structures;
- Repairing plastic slopes is not difficult;
- ease of installation - window openings are finished with your own hands, and installation does not take much time;
- PVC is easy to process;
- slopes lined with plastic on the inside are easy to maintain;
- finishing window openings with this material increases the energy efficiency of the window system;
- The interior decoration of windows prevents them from fogging and freezing.
Installation
How to install internal slopes for windows made of PVC panels is shown below.
- remove excess polyurethane foam using a stationery or construction knife;
To remove the remaining foam, use a stationery or construction knife along the perimeter of the window opening near the frame using self-tapping screws and fix a wooden block;
A wooden block is secured around the perimeter of the frame; we attach the starting profile to the block;
A starting profile is attached to the block along the outer perimeter of the window and a rail is installed;
The rail is fixed along the outer perimeter of the frame, first it is better to insert the side elements;
The side panels are installed first, then we insert the top panel, bend it, foam it a little and fix it in the required position;
A small layer of foam is blown between the upper slope and the PVC panel
fix the side parts in the same way; After the structure has dried, the corner parts are decorated with decorative elements - corners or platbands.
Corners are covered with platbands
Sandwich panels can be installed in the same way or without a starting profile. In this case, the panel is placed in a groove cut in the mounting foam. This installation method is relevant when it is not possible to place the block around the perimeter of the window frame.
Operating procedure
- We are preparing a rough sketch of the house;
- We calculate the required amount of material, select the type of material and prepare boards of the required size;
- We make the necessary templates for house carvings. To do this, you should think carefully about the ornament; the elements of the composition must certainly be repeated;
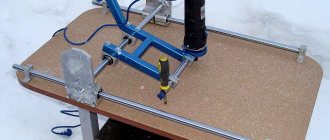
- Prepare machines for carving.
You can’t start carving without becoming familiar with its technique. You need to start with the execution of geometric patterns.
Templates can be made to order by a craftsman. For this purpose, provide your sketch, drawing or photo. Many craftsmen make their own tape stencils for carving.
Article on the topic: Applications from leaves on the theme “Autumn” for schoolchildren with photos and videos