The foundation on screw piles is considered the most universal: it is suitable for most soils. And in difficult areas - swampy, with uneven terrain or heaving soils - it is preferred as the most stable and economical. But when it comes to the construction of fences or not very important outbuildings, most homeowners think about how to make a screw pile themselves and save on buying factory-made products. In what cases is this desire justified and how to realize it, this article will tell you.
For areas with a slope, a pile-screw foundation is the fastest and least expensive option Source svaisad.ru
What you need to know about screw piles
Piles are not only steel screw, but also concrete. In some cases, especially during the construction of large and heavy structures, preference is given to the latter, as they are more reliable and durable. But before you make a pile foundation with your own hands from concrete, you should carry out geological surveys and engineering calculations to ensure that the decision made is correct.
However, such costly measures are usually carried out when building a house made of bricks, concrete blocks and other massive materials. Lighter wooden, panel and frame buildings can be placed on a base of screw piles on any soil except rocky.
But if we are talking about a permanent structure, calculating the parameters of the piles is still necessary. It can be neglected only when constructing secondary structures - gazebos, sheds, bathhouses, fences. And only for such structures can you use homemade screw supports.
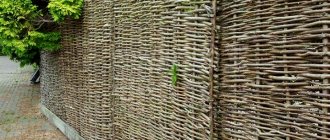
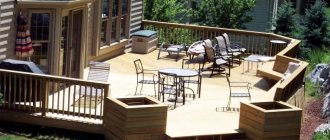
Metal fence on screw piles Source spravka-region.ru
Pile components
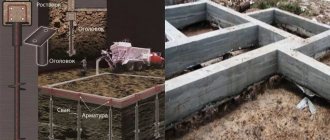
Externally, the screw pile resembles a garden drill and consists of the following parts:
- steel pipe barrel;
- sharp cone-shaped tip;
- blade (screw);
- head.
The main difference from the drill is the perpendicular position of the blade relative to the trunk, which allows it to enter the soil without loosening it or disturbing its density.
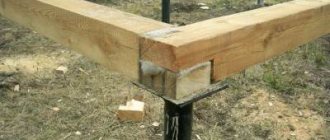
The second difference is the cap in the upper part of the structure, intended for tying all installed elements and grillage installation, since it is impossible to make a pile foundation without such support platforms.
In factory conditions, piles are made either by casting or welding using professional equipment. They can be of different lengths, differ in blade diameter, trunk diameter and thickness. These parameters are selected depending on the calculated load on the foundation and the depth of dense soil layers.
In addition, during production, all products are coated with a layer of anti-corrosion coating, which prevents the destruction of metal that is in constant contact with a humid environment.
Factory-made pile Source www.balticdom.ru
Differences between handicraft and factory designs
The production of foundation piles is regulated by regulatory documents. In particular, GOST 8732 determines the quality of the metal for the barrel, and GOST 9.307-89 determines the quality of the zinc coating. They specify the grade and thickness of steel, its chemical composition and other characteristics. When deciding how to make screw piles with your own hands, it is advisable to study these documents in order to obtain high-quality products.
Not having the opportunity to manufacture them themselves, but wanting to save on supports, some developers buy them from “handicraftsmen” - craftsmen who produce metal structures in conditions far from factory ones. Of course, they do not give any guarantees, and it is impossible to verify the quality of such products before construction begins.
In particular, both homemade and handicraft products may not have the necessary strength, the blades may be deformed or torn off when screwed into dense soil, and the lack of high-quality anti-corrosion treatment can lead to destruction of the metal and weakening of the foundation.
The destruction of just one support will lead to weakening and distortion of the foundation Source tverstroy.rf
However, the question of how to make screw piles yourself remains relevant for many due to the high cost of certified products. Experts allow the use of homemade supports, but only when erecting lightweight buildings, the reliability and durability of which are not of decisive importance. The foundation for residential buildings, permanent outbuildings, brick and stone fences must be built from factory piles produced in accordance with regulatory requirements.
See also: Catalog of companies that specialize in foundation repair and installation of metal structures of any complexity
Self-installation
You can also screw the pile into the ground yourself. The most common device for this is a metal pipe pre-inserted into the loops. They are made from reinforcement with a diameter of 10 mm. This pipe is pushed, resembling a lever, thereby screwing the pile into the ground.
Sequencing:
- Marking of piles on the territory, according to the rules for calculating the foundation. The distance between the piles is no more than three, but not less than two meters.
- All pipes are installed strictly vertically, with the tip with the spiral pointing downwards.
- We insert a special crowbar into the hinges and use a lever to screw them into the ground. The minimum depth is 1.5 meters.
- If the soil is clayey or soft, we screw it in until the last moment until the pile rests on a hard surface.
Manufacturing process
Before you make foundation piles with your own hands, you need to stock up on all the necessary materials.
Choosing a barrel pipe
The base of the screw pile is made of a hollow steel pipe with a thickness of at least 4 mm. Steel grade in terms of strength – St. 20 or more.
Note! The thicker the pipe wall, the stronger the trunk will be. But when manufactured in artisanal conditions, it will not be easy to form a sharp conical tip from thick metal.
The trunk is made of durable steel pipes Source minteko.net
The length of the trunk is selected based on the depth at which dense, non-freezing layers of soil lie at the construction site. Such data can be obtained from the local geological survey service or by asking nearby neighbors who built houses according to a project tied to the area. Another option is to do test drilling.
To this value you need to add 30-50 cm for penetration into the load-bearing layer and the height of the trunk remaining above the ground. It is advisable to make a larger reserve, otherwise if there is not enough length, the pile will have to be increased by welding a piece of pipe to the upper end, which will weaken the structure.
Please note that industrially manufactured extension cords do not have this drawback. A 20-25 cm coupling is welded to a pipe of the appropriate diameter in the factory, which is placed on a screw pile installed in the ground, then the joints are additionally welded and primed to avoid corrosion. Due to the design features, the connection point is thicker than the pipe itself, so if you have a task to build up screw piles, it is better to use factory-made extensions.
Anzhelika Avdeeva
Head of Sales Department, KZS LLC
It’s easier to cut off the excess length by leveling all the piles after installation Source vladimirsvai.ru
The diameter of the trunk is also important for the strength and load-bearing capacity of the foundation. It is regulated by building codes and regulations. In order not to waste time studying specialized literature when figuring out how to make a pile foundation with your own hands, focus on the following values:
- posts for light fences are made from pipes with a diameter of 47-76 mm;
- more massive fences, bathhouses, gazebos and other outbuildings are installed on a base of piles with a diameter of at least 89 mm;
- for the construction of a frame country house or a building made of timber, supports with a diameter of 108 mm or more are used.
It is not recommended to make more massive products, since it is impossible to ensure proper quality for them at home.
Video description
The process of making a pointed tip is shown in the video:
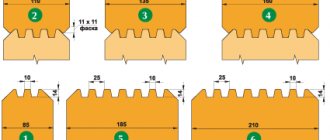
A paper template - a sheet of paper the length of which is equal to the circumference of the pipe - will help you accurately mark. This length is divided into 4-6 parts depending on the number of segments, their height is determined and the designated points are connected. The cut out “crown” is applied to the pipe and traced along the contour.
An example of a finished cut for further production of a cone Source kzs.ru
After removing excess metal with a grinder, the remaining petals are bent towards each other using a hammer. It will be easier to bend them if you make small horizontal slits at the junction of the petals, which will also need to be boiled later.
And this is an example of welding a previously made workpiece into a pile cone Source kzs.ru
Making a screw
Another type of material that must be purchased before making piles with your own hands is sheet carbon steel grade St.3, the thickness of which must be at least 5 mm. The main working element is made from it - a spiral blade.
For normal passage through the ground, one turn of the spiral is enough, so the blank for making the screw will be a circle cut out of steel with a hole in the center. Its outer diameter is selected in accordance with the diameter of the trunk. The dependence of these parameters is reflected in the table.
External screw size depending on the diameter of the pile shaft Source remont-book.com
Cut the stripes
With the help of competent design of steel strip cutting, the amount of waste can be significantly reduced.
The width and length of the strip must be a multiple of the outer diameter of the blade blank:
- It is necessary to lay a large template along the width without any allowances. For example, in the case where we have a diameter of 200 mm, the strip width should be 200 mm;
- The strip must correspond in length to the diameter of the template multiplied by the number of blanks (and without any allowances for the gaps between the blanks).
In order for all the blades to be the same size, it is necessary to correctly draw the strip: for this you need to draw the horizontal axis along its length, and the vertical axis, in turn, with a step that will be equal to the diameter of the blade. Moreover, the first vertical must be marked from the short side of the strip at a distance that will be half the diameter of the workpiece.
Using templates, circles are marked. Moreover, these operations can be performed in any order - first large (external), then small (internal) or vice versa.
In the event that you decide not to apply axes to the strip, you need to start marking from the outer contour of the workpiece.
Video description
The following video shows in detail the screw manufacturing process:
The finished blade is welded to the end of the pile, trying to ensure that the plane of the screw is perpendicular to the trunk. Apply a suture on both sides, without gaps. The strength of the entire structure depends on its reliability.
Final processing
After completing the welding work, remove scale from the seams and grind them thoroughly. Then the entire product is cleaned of rust, degreased and an anti-corrosion coating is applied. This can be a high-quality metal primer or ship paint. They should be applied in at least two layers, allowing each to dry before applying the next.
Paint will protect metal products from corrosion Source i.ytimg.com
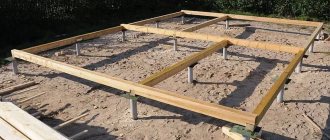
Foundation structure
To screw the screw support into the ground, two holes are cut opposite each other in its upper part by welding. A crowbar or a pipe of suitable diameter is inserted into them, forming levers for rotation on both sides of the pile.
When screwing in, it is necessary to constantly monitor the vertical position of the support in the ground. After screwing in all the piles, they are cut at the same level so that the ends protruding above the ground lie in the same horizontal plane. Then a concrete solution is prepared and poured into the pipe cavity.
Correct cone design
In the construction of screw piles, the design of the cone is important.
Using the template, you need to mark 4 sectors. After this, you need to cut them out from the body of the pipe using a grinder.
The triangles that remain on the pipe must be carefully knocked down using a sledgehammer, and in the direction of the center of the cross section until they are completely closed. Then you need to carefully weld the joint lines using a continuous seam. The quality of the weld is of great importance. In this case, the number of sectors can be increased.
Video description
How to prepare concrete and how to pour piles under the foundation with your own hands is shown in the video:
After the concrete hardens, caps are welded onto the piles - metal platforms on which the grillage will be attached. There are two ways to do this.
- Weld triangular gussets to the end of the pipe on four sides, and secure the pads to them by welding.
- Make heads from scraps of pipe of larger diameter, put them on the ends of the piles and weld them in a circle.
Overhead heads with a platform drilled for fasteners Source svai-kirov.ru
Stages of performing the required work
Due to the fact that quite a lot of piles are required to build a foundation, it would be impractical to mark each of them using a compass. It is prudent to spend some time making the required templates.
You need to create 2 templates:
- A large circle that will have a diameter equal to the outer diameter of the screw;
- A small circle with a diameter equal to the outer diameter of the pipe.
It is advisable to mark the central axes on the templates. This will make it easier for you to orient them on the steel strip during the marking process.
After completing the templates, you can proceed to the next stage.