Pile-screw foundations are in demand in various fields of construction.
Often this base option is used for low-rise construction. To increase the reliability and strength of the foundation on piles, timber strapping is used. This procedure has many features that will need to be taken into account during construction.
We will tell you in the article how to tie a pile foundation with timber.
What is the harness for?
After installing the piles, they are often tied.
This procedure makes it possible to ensure the most uniform distribution of the entire load that falls on the piles during the operation of the structure. If the strapping is not done, there is a risk of shrinkage of the foundation, which can cause deformation of the supporting structure of the house. In addition, the harness is needed to solve the following problems:
- increasing the stability of the pile foundation;
- effective protection of the pile from soil influence;
- reducing the risk of deformation of screw piles;
- increasing the safety margin of a screw foundation.
Is strapping necessary during construction?
Very often, future owners of private houses wonder whether they need tying screw piles or not. A foundation on piles is a structure of supports buried in the ground. The installation of these supports is carried out very carefully, but even so they will not be able to meet the maximum strength requirements and will not be fully reliable. The floors may well become distorted during the subsequent use of the house, and the strapping will definitely not allow the foundation of the building to lose strength, which will make it very strong, and, therefore, the house will last for many years.
Important: it is necessary to use very strong building materials. The timber will fully allow you to get a fairly strong foundation that can withstand impressive loads.
Why is it needed?
To understand why the foundation is tied with timber, you should clarify the technological features of installing a pile foundation.
Such foundations are often used for lightweight frame buildings with a low specific gravity. The pile foundation significantly benefits in terms of money, is reliable, and is not inferior to its other analogues.
Piles are represented by pillars immersed in the soil, located from each other at a certain distance. But no matter how reliable the supports are, they do not provide a 100% guarantee of strength and the elimination of distortions. In this case, you have to perform a strapping that allows you to ideally solve these problems.
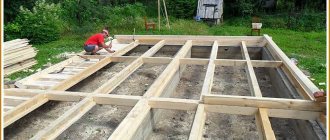
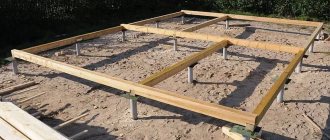
The process of tying a pile foundation with timber with your own hands should involve the formation of strong fasteners, with the help of which the installed supports are connected into a single structure.
With the help of this working stage, a reliable foundation is obtained, which allows you to equally distribute and withstand load impacts. Tying piles with timber is called a grillage and is recognized as the most effective auxiliary element.
Features of the harness
Before you begin tying the pile-screw foundation with timber, the wood should be treated with antiseptic compounds to reliably protect it from the formation of fungi and mold. An additional precaution would be to treat the timber with anti-foaming agents, which reduce the wood's flammability.
While the treated wooden elements dry out, caps are installed at the end sections of the piles - steel structures welded onto the screw shafts. The shape of the head resembles the letter “P”, and the gap between its legs is determined depending on the size of the timber section. It is also recommended to prepare holes for fasteners in advance.
To get a more reliable harness, it should be done in a double row. In this case, cuts will not have to be made, which will have a positive effect on the strength indicator. For the second row, a beam with a smaller cross-section is used (15 by 10 versus 20 by 20 cm). Installation of the second level is carried out on the edge; the connecting areas of the lower row must overlap.
The bottom trim is most often made of coniferous material, which has certain advantages:
- long operational period;
- good strength indicator;
- low moisture content;
- reasonable cost.
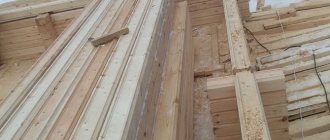
When purchasing lumber, check it for cracks so as not to reduce the quality of the assembled structure. In addition, in calculations of demand, an additional ten to fifteen percent of the total volume should be included.
Let's figure out what is better to use for tying on a pile foundation - timber or boards.
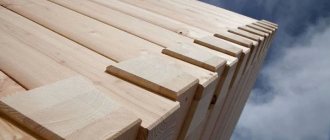
Standards approved in the construction industry allow the use of solid timber with a cross-section of 15 by 15, 15 by 20, 20 by 20 cm, or a timber prepared by connecting several boards and having a cross-section of dimensions 5 by 20 cm. A stacked analogue perfectly replaces a solid element, according to certain indicators are even considered more reliable. Three boards combined into one can replace a beam with a section of 15 by 20 cm, and four - 20 by 20 cm.
The timber material, the size of one side of which is 20 cm, is mounted on the pile heads with a smaller edge, and the height of the strapping belt in this case is 200 mm.
Each of the options is popular and considered correct. Note that after studying all the advantages and disadvantages of materials, developers in most cases use boards sewn together.
The solid form of timber is considered a heavy type of building material, and if the number of workers on the site is limited, it will be difficult to transport such elements to installation sites. In addition, solid beams have poor bending resistance, which reduces their practicality. But the boards have to be joined before installation, which entails additional costs.
Stages of work execution
Let's look at how to properly make a timber frame for a columnar foundation. To do this, certain types of work must be performed.
Quality of timber for strapping
Experts recommend choosing products made from wood harvested in winter. They must be free of cracks, chips and places damaged by pests.
Strapping beams with a humidity higher than 18% cannot be used without preliminary drying, as they become deformed after drying. Drying is done indoors, as wood cracks in the sun. Larch is considered the best material for the first crown laid on the foundation, since it does not rot and is not afraid of moisture.
The prepared material must be treated with a fire retardant to increase fire resistance. Especially if it is made of pine, which contains flammable resins. Impregnation with an antiseptic will protect against fungal infection and rotting.
Preparing pile heads
To make it more convenient to tie a columnar foundation with timber, it is necessary to equip the pile tops with square plates, the dimensions of which are 25 by 25 cm.
They are prepared as follows:
- drill three to four holes, with the help of which the process of fastening the wooden beam with self-tapping screws is simplified;
- A waterproofing layer is installed on the heads using roofing felt or bituminous composition. When cutting pieces of rolled material, it is recommended to leave a two-centimeter margin on each side, which facilitates the fixation process.
Due to the waterproofing layer, the wood is protected from the negative effects of water, the source of which is considered to be condensation that appears on the cool surface of the metal after changes in temperature. Therefore, every effort should be made to keep the wood dry.
Installation of heads
But in the case of tying with timber, given its strict dimensions, it is advisable to install flanges (the letter “P” upside down). The distance between the “legs of the letter” depends on the parameters of the workpieces, since they will be placed between them (the minimum cross-section of the timber for strapping is 150 mm). Naturally, the holes for fasteners are prepared in advance.
We fasten the beam
To facilitate installation work on tying the screw foundation with timber, wooden elements are first laid out along the perimeter of the foundation being built. This will allow you to comply with the dimensions determined by the design solution. The laid out beams must be joined to each other at right angles; perpendicularity is checked by measuring the diagonals of the corners, the dimensions of which must be the same.
Watch this video on YouTube
Installation work:
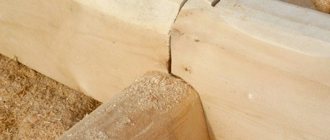
- installation begins at the intersections of the beams;
- the timber is joined “in half a body”. Sometimes the “claw” connection option is used, which is more reliable. To ensure a tight fit of the beam, its end sections are cut evenly. It is recommended to coat the wood at joints with adhesive;
- The beam is attached to the soles with self-tapping screws. It is better to use hardware with hexagonal heads - it is more convenient to screw them in from below. To facilitate such work, small-diameter holes are pre-drilled and the screws are tightened with a socket wrench;
- inside the grillage perimeter, the beam cuts into “half the body.” Before this, the timber is equipped with grooves at the connection points. Then part of the end is trimmed so that the beam is immersed in the main frame.
Load calculation
When installing a pile foundation on screw supports, you have to work with the base for a light load. This scheme is well suited for small sheds, garages and bathhouses made from timber. The weak support will be more than compensated by the significant speed of construction and very low costs. The foundation on screw piles is constructed from supports installed vertically and piping horizontally. There are usually four supports for the entire system, although there may be more.
The piping in this case is represented by a grillage. It is created from a material suitable for creating a beam. It can be either concrete, wood, or metal. Wood is used as the base of the beam, a corner is made from metal, and blocks are made from concrete. The lashing of screw piles connects the beams to each other and to the grillage. The success of the process directly depends on careful compliance with all requirements of the installation and installation instructions.
The pile heads must be on the same horizontal line, which is controlled when the supports are immersed in the ground. The width of the beam should be one and a half times greater than the diameter of the piles. Another mandatory requirement is that the axis in the center of the supports must go only through the center of the beam. Screw pile tying connects supports and beams with a threaded connection, either welded or clamped.
Differences between the grillage and the lower frame of the foundation
The horizontal frame, which connects the support pillars to each other, scans the plan of the first floor of the house and is at the same time a supporting platform for the walls of the house, is called a grillage. It performs two functions at once - it makes the pile field a single support system and creates a platform for the construction of external and internal walls.
Additional diagonal and transverse beams, called the bottom frame, serve to evenly distribute the load and ensure stability of the supports.
This building element is used in the following situations:
- when the foundation is built on a complex rugged terrain, where the piles have different heights above ground level;
- when the structure is raised above the ground by more than 1 meter;
- for massive structures;
- for structures on moving soils.
The introduction of the lower frame increases the rigidity of the bundle of individual piles and at the same time increases the strength of the grillage.
Application of channel and I-beam
On lightly loaded structures, you can build a grillage from a channel. Such structures include, for example, bathhouses and sheds. A grillage made of piles and metal is tied together by welding. The base and structural elements are attached to a circular seam. The assembly procedure involves installing the channel on the pile heads. The element can be strengthened in such a way that the side edges will “look” down. The channel tying of screw piles is also carried out in the opposite direction, in which case the edges are directed upward.
When the channel is positioned along such a system, the resistance to loads on the transverse parts of the structure is much better. The result is formwork, which must be filled with mortar, this is how the wall masonry for the reinforcing belt is formed. To ensure high strength strapping, an I-beam of equal dimensions is used instead of a channel. When channels and beams are joined at the corners, then welding is used. After tying the supports, the grillage is coated with an anti-corrosion agent.
Wooden
A beam with a cross-section of 200:200 mm is used, or a pack of edged boards 50:200. The beams are installed around the perimeter of the house (under the external load-bearing walls), along the lines of the internal load-bearing walls, and also connect the remaining supports in order to equalize the loads and tie all the trunks to the common system .
Corner joints are made into the wood floor, fastening to the ends is done through a double layer of roofing material for waterproofing.
The advantages of this solution are:
- Ease of processing, availability of material.
- The wood has sufficient strength and relatively low weight, which does not load the foundation.
- Installation is possible in the field, without the use of construction equipment or even without power tools.
The disadvantages of wooden types of strapping can be considered:
- Features of wood, tendency to warp or crack, need for high-quality waterproofing, etc.
- Fire hazard of wood.
- Possibility of material damage by insects or rodents.
Despite the obvious disadvantages of wood, a timber grillage is a common and popular option.
Application of the board package
The construction of a grillage made from a package of boards has its own characteristics:
It is recommended to use boards 50*200 mm, good quality, dry, soaked in an antiseptic solution
It is important that the width of the boards is absolutely the same. Boards of different widths will lead to nonlinearity in the height of the grillage plane when forming a package. During installation, it is important to follow the correct sequence in the arrangement of elements
The package is installed over the pile heads, as in the case of timber, a layer of roofing material must be laid on top of the pile heads. The outer boards are installed first along the outer axes of the foundation with a 50 mm support on the side. They are attached to the heads from below using self-tapping screws through holes in the plate. Then the middle boards of the internal axes are mounted end to end with the outer boards and secured with nails. After this, the middle boards are installed along the outer axes and the outer ones along the inner axes, fastened with self-tapping screws to the heads and nails at the joints. SP 31-65-2002 in paragraph 6.2.11.1 recommends using galvanized nails or plates when tying with timber or boards. The last to be mounted are the inner boards along the outer axes, fastened with self-tapping screws. The result is a grillage 150 mm wide from a package of boards installed on an edge. This should create a corner connection while following the technology of laying out the boards in a package. To increase rigidity, the boards are pierced with nails on both sides of the package every 50-60 cm along the entire perimeter of the grillage. It is recommended to install staples at the joints, internal corners, and tightening screws around the perimeter of the package. Connections are made only within the support plate of the head arms. General view of the grillage from a package of boards. Pay attention to the joints.
Timber tying
A timber grillage is used when a frame or timber house is planned. In this case, the strapping can be done independently by a couple of people. Do not forget that you should pay attention to the strength of the selected wood. It is better if it is oak, larch or cedar - these are the strongest and most resistant species.
The work is carried out in the following order:
- the timber is mounted on the heads, which are treated with antiseptic impregnations before installation - the wooden parts must be completely dry;
- After installing the piles, steel platforms 4 mm thick with a size of 20x20 cm are welded onto them, holes with a diameter of 8-10 mm are made to fix the beams;
- then the welding seams and caps are coated with nitro paint or anti-corrosion agents;
- Bicrost or roofing material is laid on metal platforms;
- the first crown - a row of timber is laid on them, the ends are placed paw to paw;
- using a measuring tape, the accuracy of the geometry of the structure is checked, after which the beam is fixed to the piles with platforms with screws 150 mm long and 8-10 mm in diameter; additionally, fastening with bolts can be carried out by drilling through the beams.
The height of piles can be measured using a hydraulic level. Only after checking all the parameters can further construction be carried out.
board
If the future house is planned to be framed, or it will be a log house, then tying the pile foundation with a package of boards is used in most options. The following types of trees are used for tying:
- Spruce;
- Cedar;
- Pine;
- Larch.
You should immediately pay attention to the advantages of using boards as a grillage:
- It does not deform or crack, unlike timber. The massive cross-section of the latter often leads to the appearance of cracks during installation;
- The beams are difficult to connect into one long beam;
- The weight of the finished timber is significant and more workers are needed to move, install and adjust its position. The boards are lighter, the beam is assembled directly at the installation site. Therefore, the number of workers does not increase;
- The boards do not require pre-drying;
- A beam assembled from individual boards can support more weight than a beam of the same thickness.
There are two ways to tie a board:
- Half a tree. Each board is coated with glue and connected to another board. Then the finished beam is additionally fastened with screws and nails. If thin boards are used, then additional plywood sheets are laid between them. The finished beam is placed on its edge and secured to the site with screws.
- Herringbone. The piping is preliminarily divided into three contours: middle, outer, inner. Assembly takes place one by one, as does fastening.
Whatever method is chosen, waterproofing must be present to reduce the presence of moisture in the wood.
Wooden beam strapping
Tying screw piles using timber is popular due to the ease of processing, availability and versatility of the material. A grillage of this type also allows you to increase the load-bearing capacity of the foundation and is suitable for wooden and frame houses, cottages, summer buildings and bathhouses.
The main stages of constructing a wooden grillage include:
- coating wood with a special antiseptic composition to increase resistance to external environmental factors;
- applying a bitumen waterproofing layer to give the wooden support water-repellent properties;
- horizontal alignment of blade pipes;
- installation of heads;
- cutting out recesses between logs at the joints to tightly connect the frame;
- installation of the frame along the contour of the structure;
- sealing joints with plaits;
- aligning the frame and carefully checking the corners;
- fixing the heads with self-tapping screws.
For the construction of wooden frames, coniferous trees are most often used - pine, larch, spruce, which have undergone atmospheric drying. It allows you to reduce the risk of wood deformation during its operation.
Basement siding
The easiest and cheapest way to cover a building on screw piles is with this material. Cladding has the following advantages:
- low cost (even taking into account components);
- ease of installation with your own hands;
- durability;
- wear resistance;
- resistance to rotting and mold;
- wide range of colors;
- ease of operation.
Basement siding
But along with its advantages, siding also has a number of disadvantages. For example, it will not be suitable if it is necessary to insulate the basement of a house on screw piles.
Installation technology
It is quite simple to do house cladding; you just need to know the order of work and the nuances of their implementation. The construction of the plinth is carried out in the following order:
- Installation of sheathing under siding. First of all, fix the bottom bar. It is located parallel to the ground. The distance from the soil surface is set to 150-200 mm. This gap is necessary to raise the skin above the ground. The distance from the panels to the ground after installation should be 50-70 mm. This layer compensates for soil heaving in winter. In warm regions or on coarse foundations, the gap can be made smaller.
- Wooden boards are attached to the piles. To do this, special brackets must be welded to the heads in advance. You can also use a metal profile as a frame, which is welded to the foundations without additional elements.
- Similarly to the first, a plank is attached to the upper part of the base of the house on a screw foundation.
- A vertical sheathing is sometimes made between the longitudinal guides. The need for it depends on the height of the base. When the building is raised high from the ground, it is worthwhile to provide additional elements as reinforcement.
- Siding begins to be installed from the bottom starting strip. Base panels are installed on it. The elements are fastened to the sheathing using self-tapping screws. To install corners, special profiles will be required.
- To remove precipitation from the basement part, flashings are installed on the siding.
- The finishing of the lower part of the house is completed after completing the gap between the ground. The space must be closed so that air can enter, but small debris, insects and other living creatures do not have access.
All wooden elements are treated with antiseptic compounds before starting work. This is necessary to prevent damage by fungus, mold and rot. As an additional measure, fire-fighting treatment with fire retardants can be performed.
Siding is the most common option. In this case, finishing the building is easy and quick. The installation should begin after the construction of the house is completed, when all communications have already been completed. To prevent pipes from freezing in a ventilated underground, they are wrapped in heat-insulating material. Most often, mineral wool is used for these purposes. You can use ready-made thermal insulation elements for pipes, or you can make insulation using mineral wool mats (wrapped in rolls).
Pay attention to the soft waterproofing of the blind area
Siding will be an excellent option to cover the space under the house. To attach the panels to the sheathing, you need to prepare self-tapping screws.
Metal channel grillage
Channel tying is used in the construction of brick, frame, log and timber buildings. Such a structure is especially stable and reliable. But a profile pipe or a standard I-beam profile with a cross-section of 20 mm can also be used, which provides even greater structural rigidity, especially if heavy construction is planned.
To work with a channel, a U-shaped profile with a cross section of 30-40 mm is used. During such work, the caps are not installed on the piles, and the steel element is simply welded to the support.
The strapping technology includes the following steps:
- after installing the support piles, all pillars must be strictly aligned to the zero mark;
- after measuring the grillage parts, the channel is marked and cut into pieces of the required length;
- all metal elements are treated with anti-corrosion compounds in two layers;
- profiles are mounted on poles and cut at right angles at the joints;
- The grillage is secured by welding, after which the seams are covered with a primer mixture.
In some cases, a professional pipe can be used, which is fixed using a similar method. This material is lightweight and affordable. However, it should be borne in mind that this product is more susceptible to mechanical stress, so the stability of the entire structure will be much lower.
A solid-rolled metal channel is chosen, since it can withstand greater loads than elements made by bending.
Finding out which piping is better - of course, this is installation using an I-beam grillage or channel, but, on the other hand, a lot depends on the type of building.
Reinforced concrete grillage
Reinforced concrete tying of piles is labor-intensive and the most time-consuming. Its installation will take 1-2 months. However, such a frame is cheaper than a metal frame, while at the same time not inferior to it in strength.
Monolithic reinforced concrete reinforcement has the following advantages:
- durability;
- resistance to temperature and humidity changes;
- ability to withstand high load levels.
It is worth considering that due to the characteristics of the concrete solution, it is difficult to carry out construction work at subzero temperatures. Therefore, this tying format is suitable for the warm season.
The construction of a reinforced concrete frame is carried out in several stages:
- screwing bladed pipes into the ground at the same level;
- creating formwork from boards;
- installation of wooden masonry on pile structures;
- creating a double-circuit frame using ropes and wire;
- fastening reinforcement with horizontal jumpers;
- placing the frame in the formwork;
- welding of blade pipes to the frame;
- pouring the formwork with concrete mortar.
After the mixture is poured, you need to wait a few days to strengthen the concrete and remove the formwork.
Reinforced concrete piping of screw piles
Reinforced concrete piping is used in situations where it is necessary to save financial costs on the construction of a building or structure.
This is due to the fact that a reinforced concrete frame is now much cheaper than a similar structure made from metal beams or angles. It should not be forgotten that the process of strengthening piles using a reinforced concrete frame takes much more time. It may take from one to two months. Key steps in creating a reinforced concrete frame to strengthen the foundation of a house:
- first, the bladed pipes are screwed into the ground;
- then a formwork system is created from the boards;
- wooden masonry is installed on pile elements;
- a double-circuit frame is created for additional reinforcement;
- the reinforcement is secured with horizontal jumpers;
- the frame is placed in the prepared formwork;
- the blade pipes are securely welded to the frame;
- The formwork system is filled with concrete mortar.
An important feature of the process is the need to carry out work in the warm season, since at sub-zero temperatures the concrete mixture too quickly loses its useful and unique properties. If you follow this rule, then with such a strapping you will get a strong and reliable reinforcement of the piles, which has several important advantages:
- resistance to temperature and humidity changes;
- ability to withstand heavy loads;
- durability of the entire structure supported on piles.
Types of dressings
Currently, several types are known, such as:
- wooden beam;
- metal channel;
- I-beam or beam;
- reinforced concrete.
The connection of pillars with tape can be performed both above the ground (from 15 to 30 cm above the soil level; used on heaving soils), lying on the soil, and immersed in the ground (at present this type is almost never used).
Tying a pile foundation with timber
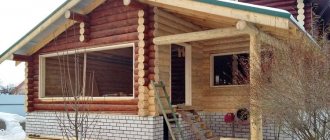
When building a low-rise house, outbuilding, or bathhouse with your own hands from medium-heavy building materials (frame or panel), tying it with wooden beams would be an excellent solution.
The grillage rests on top of pillars or piles; the most common size of timber workpiece, 150x150 or 200x200, is used, since the cost of such species is several times cheaper than hardwood, and the strength indicators and service life of products from different species are absolutely identical.
Before installation, the surface of the wooden product should be treated with an antiseptic to prevent rotting of the workpiece, and then covered with waterproofing (bitumen mixtures are most often used). Tying the foundation with timber must be done in the correct sequence:
- after screwing the piles, they must be set to the same level;
- a head is mounted on each pillar;
- timber units should be waterproofed;
- the bars are connected to each other by grooves;
- the tree is installed around the perimeter of the entire foundation on the heads of the pillars in such a way that the bars are fastened at the points of the heads;
- you should check the correctness of the angles and the level of the timber grillage;
- The timber is fastened to the screw piles using special self-tapping screws.
Tying screw piles with a channel
This type of dressing has an increased load-bearing capacity than wooden blocks; metal products are used both for the construction of residential wooden buildings and buildings made of foam and cinder blocks, as well as gas silicate bricks.
Most often, an I-beam or channel serves as a grillage. The exact selection of a specific profile pipe size depends on the calculated parameters of the base itself. A lintel made from an I-beam copes well with compressive loads and provides greater rigidity in the fastening of pillars, so it is more expedient to use it than other types of lintels.
When the pillars are tied with an I-beam, a strip of the same section should be laid along the entire length of the base; products with section No. 20 are standardly used. It is customary to lay the channel under the main walls with section No. 30, under others - No. 20.
Iron lintel installation technology:
- the pillars should be aligned in height;
- the top layer of the metal workpiece must be coated with a composition with anti-corrosion properties;
- iron products are mounted on poles, the joints of the workpieces should be laid on piles; when using an I-beam as a strapping material; joints in corners must be cut at an angle of 90 degrees;
- in places of corner joints, the channel must be cut so that when joining, an angle of 90 degrees is obtained;
- the beams must be secured by welding to the posts, the joints should also be welded.
Reinforced concrete floor
Concrete strapping will cost 30-35% less than a grillage of the same foundation made of a channel or I-beam, and it will be superior in strength and reliability to iron blanks.
Reinforced concrete floors should be erected according to the following rules:
- piles should be set at the same level;
- it is necessary to build a wooden box for the concrete so that the solution does not run away; the inside of the formwork must be lined with parchment paper;
- the grillage frame should be constructed from corrugated reinforcing wire with a cross-section of 10-12 mm; the main horizontal rods must be fastened with connecting partitions (vertical and longitudinal); skeletal elements need to be tied with special wire;
- the reinforcement frame is placed in the box so that the distance from all edges of the formwork is 6-7 cm;
- the iron skeleton of the grillage is attached to the pile reinforcement using a welded joint;
- M-300 class concrete mortar should be used for pouring;
- the formwork is disassembled only after the concrete has completely set, no earlier than 30 days from the moment of pouring. For more information about installing a reinforced concrete grillage on screw piles, see this video:
Using reinforced concrete
The creation of reinforced concrete piping is carried out in stages.
Procedure:
- Formwork assembly. Horizontal panels (bottom) are laid on the surface of the heads, the side walls are attached to them and are firmly connected at the top by crossbars. The internal dimensions must correspond to the parameters of the grillage.
- Laying waterproofing. The bottom and inner walls of the formwork are tightly covered with a film or layer of roofing felt. The joints of the material are overlapped by 10 cm and the joint is sealed with tape. The canvas must completely cover the entire surface of the bottom and walls of the formwork and fit tightly to the surface, keeping pace with it.
- Assembly of the reinforcing belt. Reinforcement with a diameter of 10 mm and smooth rods of 6 mm for vertical elements are used. The arm belt is knitted using soft wire, after which it is installed inside the formwork in the desired position. It is necessary to ensure that the horizontal rods are buried 2-5 cm inside the concrete.
- Pouring concrete. It is performed in one step, without long breaks (more than a day). Concrete should be poured from several points so as not to wait for the material to spread throughout the formwork. After pouring, the surface is covered with polyethylene or burlap and left for 28 days to gain structural strength.
- The formwork is removed 10 days after pouring.
- After the end of the exposure time, the surface is waterproofed and proceed to further work.
NOTE! To pour concrete lining, it is necessary to use dense grades of concrete from M200 and higher.
Using clamps
This fixation is used in systems using piles without a flange. In this case, a rectangular platform is welded on top of the pile head, and a grillage beam is placed on it. A U-shaped clamp is laid on top of the beam; its width should be equal to the width of the beam. The edges of the clamp that will hang down are connected by welding or a threaded connection to a vertical support. In the corners of the beam, the connection is made using a metal angle.
Corner
Using a metal corner is considered the most economical way to create a harness. At the same time, if all the work is done correctly, then the reliability of the resulting structure will not be inferior to the channel. There are two important conditions that affect quality:
- How is the corner attached to the pile?
- What is the distance from the ground to the bottom of the harness?
There are several rules used for tying with a corner:
- It is necessary to constantly monitor the distance between the ground and the bottom of the structure. The height should be maintained at least 10-15 centimeters. Failure to comply with this condition can lead to damage to the harness fasteners. In winter, under the influence of low temperatures, soil heaving occurs, which negatively affects installed structures;
- Correct fastening of the angle to the pile. The profile is placed between the axes, under the heads;
- If the foundation is located above one meter, then a diagonal brace will be needed.
The corner that will be used to tie the pile foundation must be equal-flanged, the width of one side is 50 millimeters. The metal itself is at least 5 millimeters thick. The resulting material is reliable.
However, when using a corner, experience is needed; if this is not available, then problems arise with the diagonal brace. It is unknown how much material needs to be cut to make the corners even. There are two options here:
- Measure several times, only then trim. This way you can determine what profile size is needed.
- A rectangular plate is taken (it can be cut from a corner), welded to the pile, maintaining the direction along the axis. Then, a corner is welded to the already installed plate.
Step-by-step installation instructions
Let's consider the procedure for installing a pile-screw foundation for a bathhouse. We’ll skip the design and calculation process and go straight to practical actions.
The work is carried out in stages, the following operations are performed:
Preparation
The area is cleared of unnecessary objects, plants and other obstacles. It is necessary to provide access routes for equipment if mechanical installation of piles is planned. Purchase and delivery to the site of the required number of trunks of the required size.
You will need the following materials and tools:
- Shovel.
- Roulette.
- Scrap metal and two pieces of pipe, 1.5-2 m each, into which this scrap fits freely, but without unnecessary play.
- Grinder with cutting wheel.
- Welding machine with electrodes.
- Heads for the pile size used.
- Cement and sand for making concrete.
- Pegs for marking.
- Laser level.
- Coating for metal parts, protection of welds.
- Channel, I-beam, strapping rail.
Marking
Using pegs, the installation locations of the piles are marked according to the design data. You should start marking from the corners, immediately checking the equality of the diagonals. Until they are aligned, marking cannot continue.
The installation points of the piles are marked with pegs. After marking the corners, they move on to the intermediate piles and mark their position. Then, using a shovel and personal courage, small depressions up to 30 cm deep and a width equal to the diameter of the blades are dug at these points.
This will allow the piles to enter the ground more easily and provide less deviation from the vertical.
Dive
Screwing of piles is carried out according to a certain pattern. This is done so that already installed trunks do not become an obstacle to other supports.
This is especially important when installing by machine, where the equipment must come close to the immersion point
Usually they start from the center and move sequentially to the edges in a spiral or snake.
When driving piles, it is necessary to constantly monitor the vertical
It is especially important to do this at the initial stage, when the barrel swings quite freely and can be installed at an angle
It is forbidden to twist the pile back for leveling; it is prohibited to install it at this point a second time due to the violation of the strength of the soil after contact with the blades. All corrections are made at first, when the barrel is immersed to a shallow depth.
Trimming, tying, pouring concrete
After installation of all piles, trimming is carried out. A laser level is installed to mark the horizontal plane at the required height, and cutting lines are marked on the surface of the piles with chalk or a white marker.
Use a grinder with a cutting wheel to cut off excess pieces of pipe.
After this, the strapping is performed. All piles are connected to each other in the longitudinal and transverse directions by welding. Pieces of channel, I-beam or other type of rolled metal cut to size are used.
After connecting the piles into a single system, you should immediately paint all welding areas with a protective layer of paint, kuzbasslak or other material.
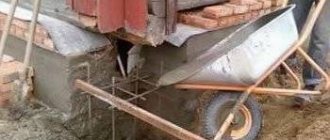
Then the internal cavity of the piles is filled with concrete. This gives the trunks additional rigidity and resistance to lateral heaving loads. It is necessary to use thick stamps, starting from M200 and above.
Heads are installed and fixed onto the filled piles, forming platforms for installing a grillage and intermediate (internal) supports.
Grillage
For a bathhouse, a wooden beam with a cross section of 150: 200 or 200: 200 mm is usually used. The beams are laid on the head platforms, having previously placed a double layer of roofing felt on the metal. The corners are connected halfway through the tree.
They carefully check the equality of the diagonals, align the beams along their axes, and then fasten them to the heads using specially created mounting holes. Wooden beams should be immediately covered with waterproofing material to protect them from moisture.
Types of strapping
If we consider the location of the strapping belt relative to the soil surface, the following types of strapping are distinguished:
- recessed - immersed in the ground so that the upper surface is at the same level with the ground;
- elevated – placed on the soil surface;
- high - raised above the surface by fifteen centimeters or more.
The latter option is recommended for use in areas with heaving soil compositions. The buried type is used little and only on low-heaving soils.
Based on the materials used, strappings are divided into four groups:
- channel;
- I-beam;
- reinforced concrete monolith strip;
- lumber.
Metal strapping is more durable, but it is difficult to install. Reinforced concrete grillages are not inferior to their metal counterparts in terms of reliability; they can be built with their own hands, but they require a lot of labor. It should be added that they will increase construction time, because the concrete will need time to reach its final strength.
When building a private house from light building materials, it is recommended to use wooden beams as a frame - a durable, inexpensive and easy-to-install material.
Subtleties and tips
This process has its own little tricks that make the work process and the final result even better. Select larch or other coniferous species as the material for the beams. With the participation of various moisture-proofing compounds, this material will much better resist the negative effects of atmospheric moisture. And larch, moreover, becomes even stronger from its influence.
When you complete all welding work, treat the remaining seams with special anti-rust compounds. When welding, the anti-corrosion compound with which each element was coated at the factory deteriorates. If there is no grillage, the foundation is strengthened with the participation of metal jibs.
Method of bundling with a profiled pipe
A profiled pipe has a structure similar to a channel, but in terms of strength it is much inferior to it.
This is due to the less durable metal used to make the profile pipe, thinner walls and other features of the material. To achieve maximum strength, corner joints are made overlapping or overlaying.
As an option, the ends are trimmed at 45°, welded, followed by strengthening the joint with an oblique angle for bolted joints.
Procedure:
- Trimming piles, installing caps.
- Laying beams along the outer perimeter, connecting corners.
- Laying internal beams, welding with external elements.
- Tying the remaining supports to obtain maximum rigidity.
- Applying a layer of protective anti-corrosion coating.
IMPORTANT! If possible, all connections are reinforced with metal gussets installed on bolted connections.
Thermal and waterproofing when closing the base
All types of basement finishing require the installation of a heat- and waterproofing layer, which is covered with asbestos-cement slabs, decorative thermal panels mounted on a sheathing of boards or a slate slab, or bricks. All these materials have their pros and cons:
- Asbestos-cement boards do not look very attractive and are characterized by increased fragility, but they are inexpensive.
Asbestos cement slabs - Decorative panels, cement-sand or clinker tiles are resistant to atmospheric influences, and some types of them can even easily withstand high humidity. However, to lay them, a perfectly smooth and even surface is required, so the base around the perimeter will have to be covered with sheet material, for example, asbestos cement.
Clinker tiles - It is advisable to use brick laying or pouring concrete only when the height of the above-ground part of the base is at least 30-40 cm, which allows you to equip a real basement floor.
Decoration of the base with decorative bricks.
Tying and closing screw piles is a very important stage in the construction of a house, which determines how soon it will need major repairs.
Thermal insulation
Protecting the internal space under the house where the pile-screw foundation is installed is a paramount task. The presence of cold air moving freely under the floor increases heat loss, and the cost of heating the home increases accordingly.
It is enough to make a false base and insulate the fence. The result is to prevent cold air from penetrating under the house.
The base is insulated with polystyrene boards; penoplex or extruded polystyrene foam is also used. These materials have a low thermal conductivity, which makes them ideal for insulating a home. The second advantage is their durability, resistance to precipitation and low weight. This means that there is no additional load on the foundation due to the insulation.
Procedure for insulating the foundation:
- Waterproofing work is carried out for the pile heads and grillage. For this, roofing material is used;
- Then a false base is made of bricks or special decorative panels are used;
- Under the grillage, a brick wall is exposed. The brick itself is laid edgewise so that the thickness is half a brick.
Serious approach
A “heads-up” approach to foundations on screw piles is unacceptable. When ordering a project, ask to link it to a specific site with calculations made based on the type, diameter, and depth of screw supports. The weight of a small winter house exceeds 10 tons. But the bearing capacity of piles and weak soils is not unlimited. Advertising is not always honest. Piles made of steel pipe with a diameter of 57 with a wall of 4 mm will only support a summer gazebo.
A pipe with a diameter of 108–325, a wall and a propeller blade with a minimum thickness of 8–12 mm of industrial production will provide the necessary stability for the house being built. Without familiarizing yourself with the results of hydrogeological surveys in the construction area, you will not know whether it is enough to drill only to the freezing depth, what area of blades to choose is determined by the bearing capacity of the soil and its resistance.
When installing a pile field, errors in pile placement are possible. It will be necessary to re-drill with an increase in depth by 1–1.2 m. The soil is loosened, it will not be able to hold the mass of the building at a given depth - it will “go on a spree”, so increasing the depth is necessary. If you do not correct the error, over time it will be pushed off the axis. Then consider that this pile did not exist at all.
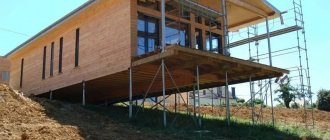
The house hangs in the air
The foundation is finally installed, the internal cavities of the pipes are filled with concrete, and the piping of the frame house is awaiting its turn. It is quite possible to attach the strapping bars to the heads aligned at the level. But this foundation has a peculiarity: each of the piles lives its own life. Over time, it is advisable to tighten some of them. But this is backbreaking work. (See previous photo.)
The piles tied together with a grillage will redistribute the load evenly. The rigidity of the structure is enhanced by struts that relieve stress from supports above 40 cm. A rise above 70 cm requires tying with a profile pipe. The channel is preferable from rolled metal. I-beam is less desirable. And fastening the beams around the house is easier and more convenient.
Preparing the base of the heads
For the convenience of subsequent construction procedures, the tops of the piles are equipped with special square plates (heads) measuring 250x250 cm.
They must be prepared accordingly:
Drill several holes (usually 3-4 pieces). They facilitate the procedure of attaching wooden frames with plumbing screws. The size of the screws is 10x120 mm.
To attach the harness to the heads, holes are made for self-tapping screws Source svaybur.ru
Waterproof the caps with roofing felt or innovative bitumen material. When cutting pieces for each head, make a margin of 20 mm per side: this makes fixing easier.
Thanks to waterproofing gaskets, protection is provided for wooden framing elements from the damaging effects of moisture. Its source is condensation that forms on a cold metal surface during temperature fluctuations. Every effort should be made to keep the wood dry at all times.
The waterproofing layer between the sole of the head and the beam prevents condensed moisture from penetrating the frame. This significantly increases its service life and prevents rotting. To prevent the waterproofing sheets from moving, the base of the cap is coated with bitumen mastic.
Waterproofing between the head and the timber is mandatory, otherwise, due to exposure to moisture, the strapping can quickly “wear out” Source stroy-dom-pravilno.ru
Service price for screw piles
Not every owner can independently tie a foundation with a channel, especially without experience in construction. To build a reliable and durable foundation, you can seek qualified help from specialists.
The cost of such work for most cities differs significantly and is:
- Moscow - channel tying with a width of 120 - 300 mm from 800 to 2000 rubles. for 1 m;
- St. Petersburg - channel tying with a width of 120 - 300 mm from 1100 to 2500 rubles. for 1 m;
- Kazan - channel tying from 500 rubles. per linear meter;
- Ekaterinburg - from 500 rubles. for p/m;
- Nizhny Novgorod - from 550 rubles. for p/m.
The price of the strapping depends on the size of the channel and the amount of installation work.