Houses made of timber are in demand. Many people want to live in environmentally friendly buildings, while enjoying all the benefits of civilization. Therefore, a large number of private developers today give their preference to timber as the main material for building their own home. But today we will figure out how to lay timber. And in this case, we will be interested in the process of laying on the foundation.
Timber laying technology Source okarkase.ru
Basic information about the construction of a sauna log house
Construction of a bathhouse, especially the walls for it, can be quite expensive
. The modern construction market offers a huge range of materials, both traditional and modern, which are widely used in the construction of buildings for specific purposes. But wood for a bathhouse is the most popular product for many reasons. These include long-standing traditions in construction, wide distribution, relatively low price, environmental friendliness and ease of use.
In this case, timber is a much simpler material to work with, and also does not require additional processing if you buy it and do not make it yourself.
In order not to incur additional costs for wall insulation, it is worth taking timber with a cross-section of 150 x 150 mm. This thickness of wood walls is optimal and will allow you to use the bathhouse throughout the year. To make the connection between the beams more dense, and the appearance of the finished wall to be aesthetic and pleasant, each beam must be properly planed.
One of the main positive qualities of timber is that walls made of this material do not require; they look self-sufficient, you just need to carefully process the beams. If you plan to decorate the external sides of the walls, then it will be enough to plan the material only from the side oriented towards the interior space of the bathhouse.
The first step in building a bathhouse from timber is installing a strapping crown on the prepared foundation
. The best option for choosing timber timber for the strapping crown is hardwood ash, oak and larch. Be sure to treat the building material with antiseptic substances.
Quality of timber for strapping
Experts recommend choosing products made from wood harvested in winter. They must be free of cracks, chips and places damaged by pests.
Strapping beams with a humidity higher than 18% cannot be used without preliminary drying, as they become deformed after drying. Drying is done indoors, as wood cracks in the sun. Larch is considered the best material for the first crown laid on the foundation, since it does not rot and is not afraid of moisture.
The prepared material must be treated with a fire retardant to increase fire resistance. Especially if it is made of pine, which contains flammable resins. Impregnation with an antiseptic will protect against fungal infection and rotting.
Loghouse construction technology
In order to build such a house yourself, you need to familiarize yourself with the technology of its construction:
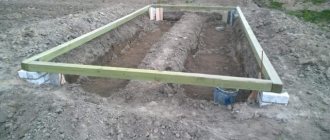
- Before you make a log house, you need to decide where it will be located. It is necessary that there is a decent amount of unoccupied space near the construction site, where it will be possible to install the components of the log house. Then you need to mark the future structure using pegs and rope. The corners must be straight.
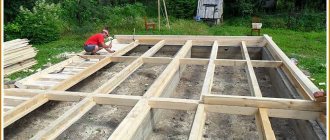
- Next comes the installation of the temporary foundation. It is made using meter-long aspen logs.
- Installation of the log house is the main part of the work. The structure will be stable if you are more careful and careful in connecting the longitudinal and transverse walls, as well as the logs with each other. To prevent the house from cracking in the future, it is necessary to make a cut along the entire length of the log.
- Before making a log house, you need to start laying the frame crown logs. They are located opposite each other. The side of the house located inside and the other side that is in contact with the foundation must first be hewn. The notches should have a width of more than 15 cm. Then sufficient stability of the crown and walls of the entire house will be ensured.
- Before you start laying logs under the foundation, you need to lay down boards that have already been treated with bitumen. The lining must have a thickness of more than 5 cm. A heat-insulating layer is placed on top, for example, it can be felt or tow.
- Next comes the turn of installing the walls. They are placed in horizontal rows - crowns. A home built from timber with your own hands should not have skewing walls, so alternate tops and butts are performed. Grooves are made in the logs in their lower parts, through which the rows are connected to each other.
- If you decide to make a beam with your own hands, then do not forget that wood shrinks when it dries, so you need to make a rough version. The frame needs to be marked and disassembled. Place the logs in a dry room. The final assembly of the structure must begin after 1 year. When you carry out the draft version, do not forget to make the holes for the tenons 2 cm deeper than the designed values, and the log house itself - 10 cm higher. You need to leave gaps above the openings of windows and doors, which will then be hidden with thermal insulation material.
- Having erected the walls, caulk all the seams on the outside and inside of the structure along its entire perimeter. You cannot caulk the entire wall at once: this can lead to the house being skewed. After a year, it is advisable to repeat the caulking. Replace the thermal insulation material near windows and doors with wooden blocks.
You can build a log house from timber for the purpose of either permanent or temporary residence. The log house is built from a building material such as timber, or glued laminated timber is also possible. If you plan to live permanently in a house made of timber, then the building material must be planed, but if it is for temporary use, it is not necessary. In any case, the timber is laid with the planed side inward.
Scheme of types and cross sections of timber.
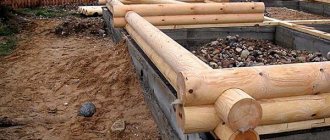
Laying the first crown
The first beam is laid not on concrete, but on wooden planks 15 mm high, located across the foundation strip every 30 cm. This is done in order to prevent contact of the first crown with the waterproofing. Some builders prefer to use a special backing board instead of slats, but the benefits of such technology raise reasonable objections. Opponents of the board claim that it rots faster than timber, and at the same time forms an additional inter-crown gap in the most vulnerable place of the wall.
After laying the beams on the slats and checking the horizontality, the resulting gap is filled with ordinary mounting foam. The corners of the first crown are connected with metal staples. It is not necessary to attach the timber to the foundation: the weight of the entire structure is enough to provide the house with the necessary stability. In some cases, it is possible to attach the first crown to anchors located at the corners of the foundation.
An important nuance: the joining angles must correspond exactly to 90 degrees. Otherwise, the diagonals of the intersection will be broken, which in turn will lead to unwanted deformations of the building.
Methods of fastening the beams of the first row
The lower crown of timber for a log house or frame-panel structure requires replacement most often, so the installation is carried out in such a way that repairs can be easily carried out.
Anchoring scheme
The following materials are used to connect the beams to the foundation:
- hairpins;
- pins.
It happens that builders do not attach the first crown of timber to the base. Due to the significant weight of the structure, they believe that the erected structure will not move.
The studs are laid when the base is poured with concrete. At the same time, their height reserve is taken such that the first row of timber can be tightened using nuts without problems. To secure the lumber, holes are drilled in it for studs.
Pins are reinforcing pins. They are also embedded in the foundation slab or tape at the concreting stage, in order to then lay the beams.
On screw piles with U-shaped or plate heads, the crowns located below can also be changed if they use up their resource.
Anchored, rigid fastening does not allow the structure to be repaired in the future.
Metal corners, staples, and nails (including wooden ones) are also used to secure laid beams to each other. These fasteners are used in conjunction with groove joining.
Finishing
After completing all the activities described above and laying the roof, the log house must stand until it shrinks completely. The standing time ranges from one and a half years (for raw, even timber) to six months (if glued dried raw materials were used).
After the required time has passed, you can begin finishing:
- Houses made of profiled material do not require cladding either inside or outside. To ensure their durability, it is enough to treat the walls with an antiseptic or paint them with a composition for external use.
- In buildings made of even timber, cracks inevitably form during the shrinkage process. These cracks must be sealed, after which it is necessary to provide cladding that protects against blowing.
The durability of the future construction depends. This is a fundamental, basic issue, and it must be taken with the utmost seriousness, because the cost of error is too high.
Base insulation
Before laying the first crown, the upper foundation surface is leveled even if there is a centimeter deviation of its level from the horizontal plane. Afterwards, waterproofing material must be laid.
The upper surface of the base must be without slope, drops, and perfectly leveled. They check this with a laser or water level, or a construction level. Leveling is often performed with cement-sand mortar. It can also be used to close a gap if there is one between the lower crown and the foundation surface. Recently, construction foam has been mainly used for these purposes. After hardening, its excess is cut off with a knife. At the end of the work, the sealed area is covered with a decorative strip or ebb.
As a moisture-proofing coating, roofing felt is often used simultaneously with glass insulation. The materials are laid on the base so that they protrude beyond its edges by approximately 0.25 m. It is recommended to make a waterproofing coating of two layers. Boards are placed between them. In the corners, roofing felt or other material used is overlapped.
What materials are used for waterproofing?
The following types of waterproofing materials are distinguished:
The last type is most widespread because it allows you to create the most durable water barrier. It consists of a layer of coating material, on top of which roll insulation is laid. Coating allows you to fill all the unevenness of the concrete surface and simplify the laying of the rolled material.
Most often, viscous liquids based on bitumen are used as coatings. Roll material (roofing felt) serves as the main water barrier. In addition to waterproofing, roofing felt creates a damping layer between the not always perfectly smooth surface of concrete and timber.
Rolled waterproofing is rarely used as the only protection. Dense roofing material or glass insulation used for these purposes can contribute to the appearance of moisture both under and above the waterproofing layer. This happens due to the low elasticity of materials that are unable to provide a tight fit to concrete and timber.
Coating mastic waterproofing is also not able to guarantee the creation of a reliable barrier to moisture. Under the weight of the wall materials, it will be squeezed out and points of contact between unprotected wood and concrete will arise. Coating materials perform best when used as waterproofing for the lower part of the foundation in contact with the ground.
Strapping and frame
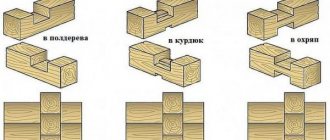
There are many different options for connecting beams (see photo), we will use the simplest ones: at the corners in the paw, and the end connections in half a tree without leaving a trace.
Step 1.
Once again we check the distance between the columns, if there are problems, we trim it a little.
Step 2
. It is highly advisable to treat the first crown (or better yet, two) with antiseptic agents. We lay them on two or three layers of roofing material. We mark the position of window and door openings on the first crown. We lay the first row, be sure to fasten it with dowels in the corners, it is advisable to put intermediate dowels as well.
In the photo - waterproofed columns and the first crown laid
Prices for roofing material
roofing felt
Step 3.
Place the beams of the lower floor, the distance between them is 1.2÷1.5 meters, the connection is half a tree without any residue. Pay very close attention to this stage; correcting the mistakes made will be very difficult, and often impossible. You'll have to take it apart and do it all over again. The corners do not need to be filed; for a small bathhouse this is not necessary; just place the ends of the timber in these places in a checkerboard pattern.
Step 4.
For inter-crown insulation, you can use modern tape insulation or traditional tow. It is, of course, easier and faster to work with tape. Each crown must be checked according to its spatial position.
Step 5.
We install wooden or metal dowels through the row, the distance between them is about a meter. In the corners of window and door openings, dowels should be placed at a distance of no more than 20 cm from the edge.
Nagel – photo
Step 6
. Install ceiling beams. They need to be placed without reaching two rows to the end of the log house. The approximate height of the bath is two meters, but if you get a little more or a little less, there’s nothing to worry about, it’s not critical. Ceiling beams are sawn down into half a tree without leaving any residue; for our small bathhouse it is enough to install two ceiling beams.
Step 7
Lay down the top two rows of timber.
Step 8
. Lay a temporary ceiling, use any boards for this, grab them only in a few places, and remove them after completing work on the roof.
Video - Beam connections
The main task when constructing any building made of timber is to get it under the roof as quickly as possible; all subsequent work can be done slowly. We will go this way too.
Technology for laying timber on various types of foundations
The timber is laid on the foundation with or without securing it. If structural elements are joined to locks, then if dismantling is necessary, the entire dismantling process becomes much more complicated.
Fixing beams on piles
The joining of beams in the corners is carried out in the following basic ways:
- in half a tree with a tenon, when on one beam the upper half is cut off (the length of the width of the lumber being joined), and on the other - the lower half;
- into the paw, while the cut out connecting parts of the logs are connected without including their end parts.
The latter option has received the greatest practical distribution. The photo below shows, in addition to the main ones, rarely encountered methods of connecting beams without and with residue.
Options for joining beams together
The sequence of actions showing how to correctly lay timber on a strip or slab base is as follows:
- determine the evenness of the tape or slab;
- if necessary, level their surfaces;
- choose the optimal method of joining lumber;
- With a smaller diameter than the studs used, holes are drilled in the beams;
- anchors are concreted;
- lay the lower crowns;
- fix them with nuts, having previously placed washers under them;
- use nails to connect the corners of the structure;
- check the level of the laid row;
- Use a plane to cut off any irregularities.
If, when pouring the base, fastenings were provided for the lower beam, embedded in concrete, then this greatly facilitates the entire process, speeding it up. In this case, the studs are inserted into the not yet hardened solution a third of their length every 50 cm. The minimum number of bolts (fasteners) for each crown should be two. The lumber is pre-prepared by drilling holes of the required diameter with the required pitch. Do not tighten the nuts too much to avoid distortion.
To secure the crowns to the piles, caps (for example, U-shaped) are mounted, which have holes on the sides for fastenings. The supports are first coated with roofing felt (2-3 layers). The beams are mounted in grooves, connecting in the chosen way in the corners. They are connected to the supports using pins or screws.
If the heights of the piles differ slightly, then timber is cut out in the required places.
The technology of overhead installation involves the absence of fastening of lumber to the base. The entire installation process is carried out similarly to the option involving rigid fixation, only without the use of fasteners.
The crowns must be connected at an angle of 90 degrees. Otherwise there will be problems with the further construction of the building. If you follow the technology, checking the geometry of the structure being built, then the likelihood of deformation of the building will be minimized over time.
The installation process of the first row of timber is shown in the video below.
Various methods of laying the first crown of timber on the base have their supporters and opponents. There is no clear opinion on this issue. Most experts recommend that the first row be secured because of the possibility of foundation movement. The rigid mount will take over the movements. Only under heavy loads can the harness move, tearing out the anchor. Reliable fastening will give stability to the constructed structure.
How to properly lay the foundation for a log house
Principles of strip foundation construction
Figure 2. Scheme of arranging the foundation with ventilation.
The first step from which the construction of timber begins is laying the foundation. Before carrying out work, a soil analysis is carried out at the construction site, which boils down to geological research related to searching for the level of groundwater and determining the soil composition.
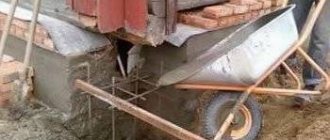
For each type of terrain with a certain soil composition, special types of foundations are provided that will serve for decades, and the presence of groundwater will not have a destructive effect on them. Before laying the foundation for a log house, it is necessary to dig a trench for the future structure. This is due to the removal of the fertile soil layer. First, sand is poured into the trench, which is compacted by filling it with water. After this, stone is poured into the trench to begin reinforcing the foundation.
Reinforcement using reinforcing bars can be done both in the upper part of the foundation and in the lower part. This will give the highest strength to the entire future structure of the log house. Reinforcement is carried out using concrete; if you do it yourself in a concrete mixer, it will not cost as much as if you buy ready-made concrete at a hardware store. Concrete delivery is carried out by such a type of transport as a mixer truck, and it can only enter areas with the largest area, otherwise the concrete will have to be unloaded in another way.
The best option would be to use a concrete mixer installed on the site. This will allow you to independently prepare a concrete solution for reinforcing the foundation, but the quality of the composition will not be as high as that of ready-made concrete. Reinforcement is placed at the bottom of the trench with sand and stones, and then this space is filled with concrete. The entire foundation strip, if it is a strip foundation, is filled with concrete to ground level. The foundation can also be constructed using formwork, and a columnar type of foundation is also suitable for a certain soil composition.
Figure 3. Diagram of the reinforcement cage for the foundation.
When using a concrete mixer, it should not be covered in the place where its motor is located, since it requires constantly circulating air to cool it after and during operation. Before the construction of a log house from timber begins, after the foundation is completely installed, it should take from a week to a month for the structure to fully stand.
For a certain type of soil, for example, swampy, it will be necessary to make a spatial frame. Only after this the formwork is created and a concrete solution is poured into it. If the foundation is laid in warm weather, then its surface must be lined with sawdust or other material, for example, moss or roofing felt. You can simply fill its surface with water. The thickness of the formwork boards should be about 40 mm. You should select formwork panels of the required height and length.
Construction of the foundation plinth
The initial size of the shields is usually taken to be the distance between the center lines of the base. The shields are assembled directly on the ground using special pads. The assembly diagram of the panels for the plinth is shown in Fig. 1. The smooth side of the panels should face the inside of the base.
The foundation base should have special windows for ventilation, which are located at a distance of 15-20 cm from the ground surface. They are located on opposite sides of the base structure, each opposite the other. To create them, you can use asbestos-cement pipes adjacent to the ends of the shields, as shown in Fig. 2. This position of the pipes will prevent the ventilation holes from being filled with concrete mortar.
Figure 4. Methods for connecting timber.
The reinforcement frame of the plinth is located in the upper part, this is shown in Fig. 3, after this the concrete screed is poured. Reinforcing bars should be laid in an overlapping manner, tying them with wire.
Using this method, you can obtain a rigid structure that is firmly connected to the foundation of the future building. When starting to pour the concrete solution into the formwork, you should mark the pouring line at the top on the boards. When the base of the log house is ready, they begin to lay the first crown.
To ensure proper installation of the top trim, two layers of roofing material are laid on the plinth, taking into account the entire perimeter of the structure. To do this, a strip of roofing material is bent lengthwise and then laid on the base. To make the strapping, use smooth beams that are free of cracks, various jumps, and rot.
Preparing to lay the first crowns
To build a house from timber, shallow strip or pile types of foundations are most often used. It is possible to build such a house on a monolithic foundation, but this is only justified if the construction is carried out on moving soil. In other cases, the cost of constructing a monolithic foundation is not justified purely economically.
Scheme of laying timber on the foundation.
Monolithic and strip foundations serve as a grillage for the log house. When using a pile foundation, the grillage is formed from the first laid crowns. Attaching the beam to a monolithic or strip foundation can be done in two ways:
- rigid fixation;
- overhead installation.
The first option is much superior to the second both in reliability and complexity of implementation. Therefore, in practice, the second option is often used as it is easier to implement. But, regardless of the chosen method, the following tools will be needed to carry out fastening work:
- hydraulic level;
- plane (it is preferable to use an electric one);
- hand saw;
- large wooden mallet;
- a set of wrenches (for a rigid mounting option).
Scheme of fastening the beams to each other.
After the foundation has hardened, but before laying begins, you need to check it horizontally using a hydraulic level. Such a horizontal plane of the foundation must be absolutely flat, since the quality and reliability of the future log house directly depends on this. The difference on the tape of one wall should not be more than 1 cm. If any bulges are found, they should be cut off with a grinding machine, and the depressions should be filled with cement mortar and given time to set securely.
Immediately before laying the crowns, you need to waterproof the foundation. It is performed in at least two layers, with a lining board laid between them. The backing board, and accordingly the second and subsequent layers of waterproofing, should be approximately 25 cm wider than the foundation strip along its entire perimeter.
Two layers of roofing material are most often used as an insulating material, and recently, for greater reliability, it has been customary to add a layer of glass insulation on top. When performing waterproofing work, it is necessary to take into account that in the corners of the foundation the layers of roofing material must be overlapped.
Insulation used for laying between the crowns
As mentioned above, flax-jute fabric is the most optimal material for providing insulation between the crowns. Now you can buy it at any construction supermarket. This insulation is available in rolls of different widths, depending on the size of the selected log or beam, which greatly simplifies the choice, and it is also very easy to cut into strips according to the selected length. This material is made from natural fibers of jute and flax, the composition is maintained in strict proportions.
During the production process, a fabric of high density and uniform thickness is obtained, in which the fibers are fastened together using special barbed needles.
By laying flax-jute fabric between the beams as insulation during the construction of walls, you will save yourself from the need for additional caulking, and after the shrinkage of the timber is completed, the walls will take the form of a solid monolith. Such a fabric will not unravel due to the loads imparted by the crowns, will provide uniform insulation along the length of the seam, and is resistant to moisture, wind and dust, temperature changes and other climatic disturbances.
Installation of basement drip sill
The gap formed at the place where the casing is laid on the waterproofing layer poses a serious danger to the entire structure; atmospheric moisture stagnates in this part. This drawback is eliminated by installing metal ebbs around the perimeter of the log house. On a strip of iron 20-25 mm wide, a bend is made at an angle of 120 degrees, the structure is fastened with self-tapping screws, and the area adjacent to the beam is treated with sealant. For the manufacture and installation of the drip sill, all the tools are available in the household.
In general, we just now asked ourselves a question... We ordered a 6*9 house... The foundation is 6*9. Tape width 300.
It turns out that the beam will lie along the outer edge of the foundation... Is this normal? Is the norm load distributed over the foundation? Where can I read about this issue, maybe someone has experience. Which is correct?
P/s don’t worry about the water, we’ll sew it all up with siding, insulate the tape and sew it up with a flashing and blind area. The load on the tape is important.
Choosing the right timber for the first crown
The timber must be selected and prepared in advance so as not to be distracted by small details and shortcomings during the construction process. To install the first crown, you should choose high-quality material, since the integrity of the structure during operation depends on it:
- the timber must be perfectly flat;
- there should be no knots or chips on the surface;
- the main condition is the maximum density of the timber rings; to make such material, the middle part of the tree is taken;
- timber with traces of blue on the surface of the wood is categorically unacceptable not only for the first crown, but also for the entire log house.
The finished timber produced at the factory is usually already processed and completely ready for use, but additional processing will not hurt, especially for the construction of a bathhouse. Thoroughly coat the timber with mastic, which is pre-mixed with the waste. Impregnation based on this composition is perfectly absorbed into wood. The ends of the timber do not need to be processed; they should remain bare and release moisture during drying and shrinkage of the structure.
It is how carefully you process the timber that determines how long the lower crown, and therefore all the walls of your bathhouse, will serve faithfully.
Preparatory stage
The preliminary stage before laying the first crown of timber on the foundation is to prepare the material and tools.
Everything you need for the job is presented in the table below.
| № | Tools and accessories | Materials |
| 1 | large mallet, tape measure, square, marker | wooden beam |
| 2 | ladders or trestles | anchors, staples, nuts with washers, dowels, studs, nails, metal corners |
| 3 | levels of different systems (water, laser) | antiseptic compounds |
| 4 | wrenches, plane | polyurethane foam |
Wooden products must meet the following criteria:
- be free from knots and also free from jagged edges;
- the surface of the beam must be flat;
- For work you need to use lumber from the heartwood of trees, which does not give off a blue tint.
It is recommended to give preference to lumber with a large number of annual rings.
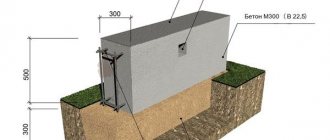
For a log house, the height of the strip base above the ground surface should be at least half a meter. Additional construction is often done with bricks.
The material for row 1 can be treated with waste oil, and the rest with antiseptic compounds.
Before starting construction, it is recommended to check all lumber for minor defects by marking these sides. They will place the timber up or down. The sides with bulges should be lateral.
The beams should be processed carefully so as not to miss any area. Otherwise, it will serve as a source of spread of the putrefactive process. The quality of the selected material is of paramount importance in ensuring the durability of the building.
Ready-made log houses for baths
How to assemble a log bath? Making a log house yourself from scratch is a difficult job that requires refined carpentry skills, and it is better to entrust it to professionals. The highest quality processing of corner joints will be required: Russian, Norwegian or Canadian cutting can be used, but in any case the joints must be smooth and of the highest quality.
Then the log house is disassembled and the logs are delivered to the site itself. This option has several advantages:
Preparing for the construction of a bathhouse
How to assemble a bathhouse from a log house yourself? A number of works must first be completed. Construction begins with a project. If you want to order a ready-made log house, any organization can offer various options for baths.
The classic option is a rectangular structure 4x6 meters. In such a bath there will be space for a dressing room and a washing room, which will serve as a steam room. If the bathhouse has a large area, the space of the soap and steam room can be divided.
How to assemble a bathhouse from a log house with a dressing room? The layout should take into account the location of doors and windows: they are usually made small in order to maximize heat savings in the room.
The standard door height is 160 cm, width is 60-80 cm. The owner must determine the location and size of the windows in accordance with personal lighting preferences.
It is important to choose the right place for the bath. In a small area it is usually located in the opposite corner from the building to ensure compliance with fire regulations
If the size of the plot allows you to choose, the place for the bathhouse is chosen away from the gate and the house itself; it should be located so that you can relax near the bathhouse without disturbing anyone.
Loghouse installation technology
Lower junction to the foundation
After the material has been selected, purchased and delivered to the site, you can figure out how to build a log frame. And we will start work from the foundation - installation of the casing crown.
What do the instructions from experts in working with wood advise us to do?
Before laying the first crown of timber, it is necessary to perform high-quality waterproofing of the base. Whatever our foundation, we lay either two layers of roofing felt or a special waterproofing membrane on its upper surface.
- We lay a lining beam on top of the waterproofing layer around the perimeter of the entire base. To make this, this tree is characterized by maximum resistance to moisture.
- The thickness of the lining beam must be at least 100 mm, and the width must be at least no less than the width of the main wall beam.
- Sometimes a profiled beam is used as a lining, cut in such a way that it rests on the base not with the tenons of the castle, but with a plane. In this case, installation of an additional lining is not required, but the waterproofing properties of the structure will suffer somewhat.
- At the corners of the structure we connect wooden beams “in half a tree”. This allows you to achieve maximum joint strength.
We thoroughly impregnate the backing beam or the first profiled blank with an antiseptic agent (Tikkurila, Senezh, etc.). In principle, if finances allow, it will definitely not be possible before installation begins.
We lay a jute sealing tape on top of the timber. If you are choosing how to lay the timber, you should keep in mind that too thick material is just as ineffective as too thin: in both cases, the risk of blowing increases. For a flat beam, a tape thickness of 10 mm is sufficient, and for glued profiled timber – 5 mm.
To avoid displacement, we fix the jute on the beam using a construction stapler.
We attach brackets to the inside of the lower crown, on which we lay the floor joists. The lower plane of the logs should rest on foundation elements or special cranial bars.
In principle, logs can be embedded into the crown, but if we are talking about how to build a bathhouse from timber or build a house on relatively moist soils, then it is better to act according to the first option. This will make it easier to replace a rotten log with a new one.
Timber fastening technologies
After the first crown has been erected, you can begin laying the beams for the set of walls.
There are several nuances to consider:
In principle, high-quality dried glued laminated profiled timber can be mounted without any connecting elements at all, fastening it into a lock only at the corners (we will talk about corner connection technology a little later). But, nevertheless, to increase strength it is better to connect the workpieces.
- For connections, dowels are used - metal, wooden or plastic pins. It is best to use wooden walls, and even those with the same humidity as the wood itself.
- A hole for the dowel is drilled to connect no more than two beams: the upper beam is “stitched” through, and a nest of half its thickness is formed in the lower one.
- The diameter of the hole should be equal to the diameter of the dowel - so that the fastening element is driven into the wood with slight force by blows of the mallet.
Cutting corners
Corner connections of timber can be made in several ways.
Some of them provide for the protrusion of the workpiece beyond the plane of the wall (connection with the rest), others do not.
- The parts are connected to the rest by cutting out a recess in the workpiece - a bowl. A second beam is placed in this bowl, which can be either solid or with a corresponding cutout. The most popular connection schemes with the remainder are “into the bowl” and “into the bowl”.
- The most common technology for joining without residue is the “half-tree” joining. In this case, protrusions are formed at the ends of the beams, the thickness of which is equal to half the thickness of the parts being connected.
Another method of corner connection is the so-called “warm corner”. This technology involves cutting a vertical groove on the side surface of the beam, into which a corresponding sized tenon is inserted at the end of another element.
Windows and doors
Speaking about the construction of walls, do not forget about window and door openings:
- The openings themselves are either cut out in already laid walls, or are provided for in advance by the design (if we purchase the material as part of the so-called house kit).
- In order to maintain the shape of the openings during shrinkage, we cut special strips into their side surfaces - the so-called ribs.
- Above window and door frames, we must leave a shrinkage gap of at least 50 mm.
Briefly about the main thing
The timber that will be laid on the foundation must be of high quality - without knots, blue stains, with tightly lying annual rings. Antiseptic treatment is required.
The smoother the foundation on which the timber will be laid, the higher the quality of the work as a whole.
The timber is attached to the foundation with studs, dowels or anchors. The choice of method depends on the skills of the master.
The beams are attached to each other in different ways - depending on whether it is an angle or a longitudinal connection. Popular methods are root tenon, dovetail, bowl, oblique lock and others.
Material for assembling a log house with your own hands
It is not possible to create this type of house from every type of tree. If you want this structure to stand for many decades, you need to select tree species that are especially durable and not very expensive. Coniferous trees such as pine, larch, as well as linden, willow, oak, aspen and birch have such measurements.
Here it is necessary to take into account the fact that the construction of a log house will be carried out from logs whose diameter is not less than 20 cm, but not more than 26 cm. You must use even logs, of the same thickness along the entire length and without cracks.
You can make a log house from timber from 2 materials:
- profiled timber;
- rounded logs.
These two materials have a number of advantages. Profiled timber has a square or rectangular cross-section. It is processed on a special machine. After which the sides of the beam, located on the sides, turn out to be flat, and the bottom and top are embossed, in the form of grooves.
The creation of a rounded log is made by processing an ordinary log into a shape in the form of an ideal cylinder. In this case, a special machine is used. It is capable of removing the very top, not very durable layer of the log.
Tools and materials
As with any other work, certain tools and additional materials are required. In addition to the usual set of tools for construction, there should be tools intended exclusively for carpentry work:
- ax (large and small);
- saw (hacksaw);
- chisels and chisels;
- planers;
- drills (for wood, concrete, metal).
As for additional consumables, the following should be available:
- anchor bolts and studs;
- roofing felt;
- cement and sand.
Also, various measuring instruments should be available - a level, a water level, a plumb line, cords for controlling the diagonal.
Builders' mistakes are typical and gross.
As Alexey Markin notes, the most common mistake when making a log house from chopped logs is the small areas of contact between log and log (small width of the inter-crown groove). The thermal characteristics of such a house will be low. The head of the Domostroy-SK enterprise, Oleg Valuev, adds that in some cases the crowns may not be adjacent to each other at all (photo 1). Huge cracks will have to be caulked regularly, which will require considerable additional costs. However, the appearance and thermal characteristics of the house cannot be radically improved.
Photo No. 2
– The log house cannot sit properly due to incorrectly placed racks.
It happens that builders build a house in such a way that it simply cannot sit down.
As Oleg Valuev explains, if you plan to make a veranda under the roof, then between the upper end of the post and the upper crown you need to install a special jack for shrinkage (photo 3). This will allow the log to sit evenly. Instead of a jack, you can put several planks that will need to be knocked out periodically. By the way, shrinkage jacks are clearly visible in the first illustration (Fig. 1) to ours.
Photo No. 3
– Jack for shrinkage (photo by Domostroy-SK).
Another mistake that prevents the shrinkage of a log house is an attempt to fasten adjacent crowns with nails. The log lies unevenly on the nail head, and an inter-crown gap appears. Due to a loose fit, the log may begin to “spin” during the drying process.
The problem of poor-quality waterproofing of the lower crown of a log house has somewhat lost its relevance. As a rule, the installation team performs this operation efficiently
However, the customer should pay attention to how the foundation and wooden walls are connected. If the foundation is strip or grillage, then the surface of the strip should be leveled, and between the foundation and the lower crown there should be 2-3 layers of roofing material, or a waterproofing layer of similar effectiveness
However, excess moisture can enter the wood not only through the foundation. If you lay floors and hang ceilings in a house before the frame has settled and dried, this will impede air circulation and lead to “steaming” of the house - mold or mildew may appear on the internal walls.
The head of the Domostroy-SK enterprise, Oleg Valuev, notes that in the washing room there is also no need to make baseboards on the floor. Moisture collects under them and the process of rotting also begins.
Photo No. 4
– Mold on unventilated wooden structures.
Preparing the foundation for the casing
A layer of roll waterproofing on a bitumen basis is applied to the basement - upper surface of the strip foundation. The material is laid in 2-3 layers and filled with bitumen mastic. A thermal insulation layer is laid on the hardened waterproofing. Jute tape or construction felt is used as a heat insulator. It is best to place the waterproofing material on a dry base and carry out the work in dry weather. Before installation, it is recommended to dry the surface of the plinth with a gas burner.
When installing a pile foundation, the places where the grillage is laid on the racks are subject to waterproofing. The secrets and tricks of experienced craftsmen include the use of backing boards to minimize the consequences of seasonal movements of the structure. A hardwood board 40-50 mm thick is laid on the waterproofing layer. The bottom and side parts of the board are treated with bitumen mastic, and a heat-insulating lining is laid on top of the board.
Tools and materials used for applying waterproofing:
- Ruberoid or rolled bitumen-polymer membrane;
- Bitumen-latex mastics for hot and cold use with antiseptic and herbicide additives;
- Gas-burner;
- A brush with metal bristles, a corrugated metal spatula, a construction knife.
Foundation
We choose columnar concrete.
| Step, No. | Description |
| We make markings on the ground. In plan, the dimensions of the bathhouse are 3x3 meters, the distance between the columns is 1.5 meters. The partition between the rooms is not load-bearing; there is no need to build a foundation underneath it. Drive pegs around the perimeter and stretch ropes between them. Along the ropes, mark the position of the intermediate posts. | |
| Step 2. | Dig holes 50–60 cm deep, approximately 40 cm wide, and at the bottom make a sand cushion 15–20 cm thick. |
| Step 3. | If the soil is clayey, there is no need to make formwork; pour concrete directly into the holes. Give the concrete time to set approximately two weeks. |
| Step 4. | Mark the location of the stove; according to our project, it will be located between the combined steam room with a washing room and the rest room - this location will allow you to heat two rooms at once. You need to make a deeper foundation for the stove, preferably to the depth of soil freezing. But if the stove is not very complex and massive, then a depth of 1 m is enough, make a sand cushion 25-30 cm thick. If you are still afraid that the foundation may “undermine” in winter, lay foam plastic slabs 2-3 cm thick around the perimeter of the pit. They will absorb the swelling forces, the foundation will remain motionless under any climatic conditions. How to lay a stove is a large and interesting topic; a separate article is needed to consider it. |
| Step 4. | We recommend not pouring them, but walling them with concrete blocks measuring 20x30x60 mm. First, level the concrete a little at the base, use a hydraulic level and cement-sand mortar for this. Next, place the outermost column, use a cement-sand mortar to level it in height and place intermediate columns. At the same time, use blocks to “pull up” the foundation under the stove; it should be higher than the columns by the height of the beams, floor beams and floorboards. |
Columnar foundation (with the first crown)
Walling
The technology of building a house, a bathhouse made of timber, involves reliable waterproofing of the walls of the future house.
To do this, roofing material is laid on an established foundation in several layers, fastened together with hot bitumen. Next, they make the outline of the future house - the bottom trim, that is, they knit the first crown. At this stage, it is advisable to make a double strapping in order to strengthen the future house as much as possible; to do this, you should put logs on the first crown.
Then the process is practically repeated - the construction of walls follows. When building a house, you need to take into account that there must be at least seventeen such crowns; for a bathhouse, sixteen is enough. During the construction of a house or bathhouse, insulation must be laid between the beams.
Installation of doors and double-glazed windows
In the places where doors and windows are installed, cut out an opening of the appropriate size. The doors and double-glazed windows themselves can be installed only after the wood has completely shrunk.
At the end, all you have to do is complete the finishing work at your discretion, connect the necessary communications, arrange furniture, appliances and interior items.
Good luck!
Video - Do-it-yourself log house
We propose to build the simplest and cheapest, but quite convenient small bathhouse, the dimensions of which allow it to be placed anywhere on the site, and the available technology and low price make it possible for anyone to have such a bathhouse if they wish. The dimensions of the building are only 3x3 meters, the height is 2 meters, the bathhouse has a combined steam room and washing room with a stove and a relaxation room. All construction work should be carried out taking into account the requirements.
For a small bathhouse, we choose cheap but quite satisfactory quality materials. What do you need to prepare?
Table of building materials
| Materials | Quantity | Illustration |
| Cement M400 | 150 kg | |
| Sawn timber 150×150 mm | 3.5 m3 | |
| 0.3 m3 | ||
| 25 m/p. | ||
| 0.5 m3 | ||
| 0.3 m3 | ||
| 500 pcs. | ||
| 10 m2 | ||
| 30 pcs. |
Nails and self-tapping screws of various sizes, metal corners for the rafter system, construction fittings, windows and doors. You can make windows and doors yourself (cheap, but time-consuming, and quite difficult) or buy ready-made ones (quick and will cost less in the end). You will need insulation, electrical cables and fittings.
We specially provided all materials in reserve. Firstly, during any construction it is impossible to do without unproductive waste. Secondly, lumber and hardware are always useful on the farm. If you have the opportunity and desire, you can make a water supply and drainage. There is no desire or opportunity - the bathhouse will “function” anyway, only the water will have to be carried into a boiler installed in the stove (for hot) and into a barrel (for cold) in buckets. We choose the simplest option - we will not deal with engineering water supply systems.
Customer errors
A minor mistake made by builders during the construction of a wooden house can dramatically worsen the thermal characteristics of the house or shorten its life. But customers can also make mistakes. Conscientious builders always dissuade private owners from purchasing log buildings that have stood on the production site for a year or more. As a rule, their lower crowns have already begun to rot or are affected by fungus. To give it a marketable appearance, the log house can be bleached, but this will also have a bad effect on the durability of the wood.
Another problem with old log houses is that there is a possibility that the cutters who made the box are already working in another place, and the assembly of the log house will be carried out by other people. The hired team will easily shift the blame for poor quality assembly onto unknown cutters. They say they made an open marriage, and it is impossible to collect it qualitatively. The assembly of the log house should be trusted only to those who manufactured it. Otherwise, there will be no one to ask for quality.
By the way, not only chopped logs, but also other materials deteriorate due to improper storage.
Director Alexey Markin talks about another mistake often made by customers.
Another piece of advice that protects you from mistakes can be considered naive, but in some cases it will come in handy. Builders strongly advise against contacting companies that promise to build a log or timber house in a month. The construction of a building from wood of natural moisture or even dry wood is always carried out in two stages - the construction of a log house with a roof, and after about a year's break, windows, ceilings, and floors are installed to allow the log house to shrink. Only houses made of laminated veneer lumber do not need shrinkage. Previously, the portal Repair.Divandi talked about.
Photo No. 1
– A log house with huge cracks.