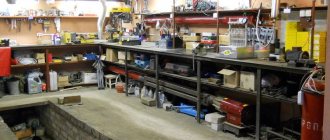
This article discusses homemade machines and devices for the home workshop. Here we describe in detail the features of the most popular and necessary DIY tools, as well as tools for a workshop or garage, step-by-step technologies for their manufacture and other useful recommendations on this topic.
Many home workshop owners create the equipment they need with their own hands.
Homemade machines and devices for the home workshop: general information
Each owner of a garage or workshop, depending on his needs, selects the equipment himself. Many of them know how to make homemade machines and devices for garages, so they make do with their own resources when arranging the premises, customizing the technical features of the structures to suit themselves.
So, when creating a metal workbench with your own hands, the drawings and dimensions of the product on them can be adjusted to the parameters of the room and other conditions. Even for a small home workshop, you will need to allocate enough space to accommodate at least the design of a universal folding workbench and a minimum set of tools. The required area for this is at least 3-5 m².
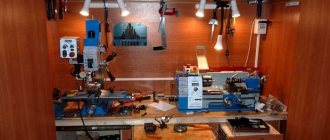
A workshop set up in a specially designated room
Manufacturing of tools storage devices: shelves, racks
In fact, it is very difficult to achieve optimal operating conditions. It is desirable that the size of the room be at least 6.5 m. To equip a workshop, you can make an extension to the house or garage. This solution will be the most profitable in any case.
Before designing a drawing of a folding workbench with your own hands, which has the largest design (therefore its dimensions are taken into account first), it is worth deciding on some points:
- indicate what types of work will be performed in the workshop;
- determine a list of necessary tools and equipment.
By mounting the tool on the wall, you can significantly save useful space in the workshop. Shelves or racks are perfect for this. You can successfully arrange these structures, achieving the most rational distribution of area.
The home workshop should be located so that noise from working tools does not disturb residents
In order to save space, you can get a special device for a circular saw with your own hands, made on the basis of a conventional drill. Such a universal machine can perform several functions at once, combining the following capabilities:
- circular saw;
- grinding machine;
- sharpened;
- mini lathe for wood;
- cutting machine.
The work table can be combined with a vice for a carpentry workbench and equipped with drawers to store small tools.
DIY tool shelves: popular designs
Metal structures are more durable and reliable, while wooden ones are affordable. There are several options for rational storage of tools:
- wall shelves;
- DIY tool racks;
- suspended ceiling shelves;
- Shelves-boards for hanging small tools.
Perforated steel shelf for hanging small tools
Technology for making a shelf for tools with your own hands (shield):
- A shield is cut out of a plywood sheet, and the places where the shelves will be installed are marked on it.
- Using a jigsaw, shelves with side walls are cut out. The length of these sides must match the length of the shield.
- Shelves for tools are assembled and fixed to the surface of the shield using long self-tapping screws.
- Hooks are being installed. Holes are made in the shield where dowels are installed. You need to screw special hooks equipped with threads into them. First, you should distribute the entire tool and mark the points where it will hang.
- Brackets or lugs are installed on the rear wall of the structure.
All that remains is to fix the shield shelf on the wall. To prevent the lugs from sliding off the anchors, it is recommended to fix them with special washers.
Diagram of the device with installation dimensions of the tool rack in the workshop
Gluing and protective and decorative coating
These are the main operations after the manufacture and assembly of the parts themselves.
And for their implementation certain conditions are required. A barn is not a house; it is not heated. When I started carpentry, I realized that I couldn’t glue or paint it, because it was already winter outside and the workshop was too cold; I couldn’t even store materials at that temperature. At the same time, it is uncomfortable to work in a cold workshop. This, of course, upset me very much, because insulating the barn would have been quite expensive. I recommend that you either immediately take care of insulation, or during the cold season, do gluing and painting in other warm rooms.
Making a carpentry workbench with your own hands: drawings, videos, technology
The drawing of a carpentry workbench should include the following details:
There are several modifications of workbenches:
Having familiarized yourself with the structure of a carpentry workbench, you can begin to manufacture it.
Technology and drawings of a do-it-yourself carpentry workbench: how to make a simple design
Step-by-step technology for manufacturing the structure:
- To make a lid for a wooden carpentry workbench, you will need to take thick boards. The size must be selected so that, as a result of their connection, a shield with parameters of 0.7x2 m is obtained (the length can be less than 2 m). Long nails should be used as fasteners, which must be driven in from the front side and bent from the back.
- You can finish the lid by securing a beam with a section of 50x50 mm along its lower perimeter.
- Depending on the size of the carpentry workbench (its cover), vertical supports are located. To make them, a timber (12x12x130 cm) is taken. At this stage, it is necessary to take into account the height of the working surface, because it should be comfortable. The upper limit of the support should be at the level of your lowered arms. Subsequently, due to the installation of the cover, about 8-10 cm will be added to this indicator. Markings for installing the beams should be applied to the ground and these elements should be dug to a depth of 0.2-0.35 m.
- Next, we install the frame part and the cover of the wooden workbench with our own hands. The installed support bars must be connected in pairs. For this, wide boards are used, fixed at a height of 0.2-0.4 m with long screws. The cover is secured to the ends of the supports using the same fasteners.
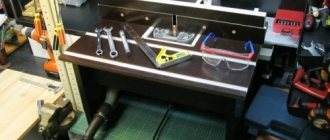
Setting up a workbench for carpentry work
Technology for making a universal wooden workbench with your own hands
Despite the fact that the technology for creating this design is in many ways similar to the previous version, for the manufacture of a composite carpentry workbench, drawings with dimensions will be required. But in this case, bolts are used instead of screws.
In addition, you can install drawers for storing tools in a folding universal workbench with your own hands.
Technology for making a folding workbench with your own hands:
The dimensions and parameters of equipment created by yourself can be completely adjusted to your own needs.
DIY carpenter's vice design for a workbench
Usually workbenches are equipped with a vice. Many garage workshop owners know how to make such a device with their own hands. For a homemade design you will need special studs. Such fasteners are sold in hardware stores.
For beginners, experts recommend using additional materials to create a vice with your own hands: a video on how to make such a tool can be easily found on the Internet.
To work, you will need a special screw pin. This threaded part is the main operating component of the structure. The minimum pin diameter is 2 cm, the cutting length is 15 cm. The longer this part is, the wider the vice can be spread. If you take into account exactly these dimensional parameters in the drawings of a vice with your own hands, you can get a design that is set apart by almost 8 cm.
Assembly diagram of a vice for a homemade carpentry workbench
The jaws of the tool are made from a pair of boards. One part of the part will be fixed. To make it you need to take pine. The second part measuring 2x1.8x50 cm will move. In each of these boards you need to drill a hole for a screw. Using a drill with a diameter of 1 cm, holes for the studs are formed in all boards at the same time. To prevent the holes from moving relative to each other, you can connect them using nails.
After all the holes are made, the screw and all the studs are inserted into them along with the washer and nut.
Additionally, you can use the video below to create a vice with your own hands.
The diameter of the hole is larger than the diameter of the screw
Here's another unusual situation.
For example, you need to screw a self-tapping screw into a hole that has already been drilled earlier. But it is larger than the diameter of the screw, and the fasteners simply dangle in it.
Here an ordinary match will come to our aid. We insert a match into the hole, break off the excess, and then calmly screw in the self-tapping screw.
If you approach the problem more carefully, then instead of a match it is better to make a wooden chopstick and drive it tightly into the hole. It will be more reliable this way.
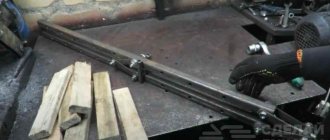
Making a metal workbench with your own hands: how to make a metal structure
For plumbing work, it is better to make a metal workbench with your own hands, because a wooden one will not be suitable for this. The fact is that wood is not that durable. In addition, when working with metal workpieces, a tabletop made of this material will be constantly damaged and will quickly become unusable.
In the general drawing of a do-it-yourself bench, you can identify five main components of the design:
- For longitudinal rigidity of the product, horizontal beams (3 pieces) measuring 6x4 cm are used. Length – slightly exceeds 2 m.
- Rack-mounted small-sized beams (9 pcs.) made of profiled pipes measuring 6x4 cm. They are used to assemble the frame part of the cabinets. In the corner area there are welded spacers made of steel strips. Due to all these elements, the frame is rigid and very durable.
- Rack beams (4 pcs.) 9-10 cm long (section 6x4 cm). To do this, it is better to use metal profile pipes with thick walls (more than 2 mm).
- Corner No. 50 (4 pcs.), which will be used as vertical posts. The height of these elements is 1.7-2 m. Working tools will be attached here.
Dimensions of the bench:
| Workbench options | Size, cm |
| Structure length | 2200 |
| Structure width | 750 |
| Structure height | 950 |
| Width of cabinet with drawers | 750 |
| Clearance between cabinets | 700 |
Do-it-yourself workbench manufacturing technology: how to assemble
Making a universal workbench with your own hands begins with assembling the frame. To do this, you need to take a couple of short and a couple of long beams. During the welding process, these elements may become twisted.
To prevent this, you must:
Installation diagram of a metal workbench
Then the rear vertical racks and the rear beam (long, one of three) are attached. You definitely need to check how evenly they are placed in relation to each other. If there are any deviations, the beams can be carefully bent using a hammer. At the end, the remaining vertical rack elements are assembled, as well as elements that provide rigidity.
When the frame is ready, corners can be welded to it to strengthen the structure. The tabletop is formed from wooden boards. They must first be soaked in a fire-resistant liquid. Then a sheet of metal is laid on top.
A plywood tool shield can be mounted on the vertical rack elements. The same material is used to sew up the cabinets. For boxes, you can use metal boxes or make wooden structures.
You can use the video below to understand in more detail the technology of making a workbench with your own hands:
Veneering
Previously, this term was used to describe the procedure of gluing carpentry products with plywood - thin sheets of wood of other, more valuable varieties.
Nowadays we understand “plywood” as multi-layer laminated boards, and we call thin wood sheets “veneer”. Accordingly, instead of “veneering” today many people say “veneering”. Using veneer, you can give a beautiful, even sophisticated look to products made from “simple” types of wood that grow in our latitudes. For example, oak veneer can be used to cover birch furniture. By the way, today many examples of furniture, including “elite” foreign ones, are actually covered with veneer of more valuable species and are sold as made from solid wood, at much higher prices. I don’t recommend that beginners start gluing veneer right away, since this is a non-trivial task that requires skill, patience, and in the case of large parts, also serious equipment in the form of powerful presses or vacuum bags for uniform gluing of veneer.
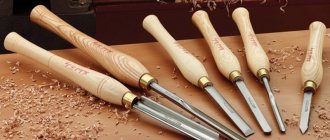
Features of creating a wood lathe for a home workshop
In the technology of making a wood lathe with your own hands, the bed occupies a special place. The operation of other parts, as well as the stability of the entire structure, directly depends on this part. It can be metal or wood.
To create a wood turning and copying machine with your own hands, you can use an old manual milling machine, which is no longer needed. This tool is placed on a plywood platform 1.2 cm thick and 20x50 cm in size. You must first make holes in it for the cutter and fasteners. Stops made of bars will also be mounted here. They are necessary to ensure that the cutter is in a fixed state. The router itself is secured with two nails between the clamps.
In fact, it is absolutely not difficult to make a copy design of a homemade wood lathe with your own hands - video - there are enough materials on the Internet.
The main parts of a simple lathe (on the left - only with a leading center, on the right - with a leading and driven center): 1 - frame; 2 - drive; 3 - leading center; 4 - workpiece; 5 — stop for the cutter; 6 - tailstock; 7 — driven center (center-bolt); a - height
An example of a homemade wood lathe with your own hands
For the base, it is better to take a steel profile with thick walls. To make the structure reliable, it is recommended to use two supports. A frame will be installed on top of them. To fasten parts, a groove type of connection is used. First you need to make support platforms intended for the headstocks (rear and front).
List of parts for a wood lathe (it’s easy to understand how to assemble the structure yourself based on this list):
Drawing for making a homemade lathe
As supporting information, you can use a video detailing this process to assemble a wood lathe with your own hands.
The second example of a DIY woodworking lathe
An alternative solution would be to make the design of a simple mini wood lathe with your own hands based on an electric drill. This example of technology can be used as a test before building a more serious tool.
This type of machine is suitable for processing small-sized wooden workpieces. The material for the frame can be wooden beams. The return headstock can be replaced by a combination of a shaft mounted on a support bearing. To fix the workpiece, you will need to take out the appropriate attachment for the drill.
This design has its drawbacks, they are associated with:
- high probability that errors will occur in milling;
- low level of reliability;
- inability to process large-sized wooden workpieces.
A simple DIY mini woodworking lathe
But you shouldn’t give up this option, because it forms the basis for technologies for creating more advanced and complex turning tools. To correctly calculate the design, determine for yourself the necessary operational properties and technical characteristics.
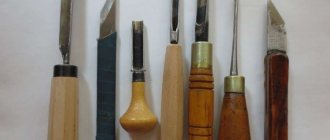
The principle of making cutters for a wood lathe
The technology in this case is complicated only by the correct choice of workpieces, which not only must have a level of cutting edge hardness that meets the requirements, but also be correctly installed in the clamp - the holder.
Recommended types of blanks:
Turning cutters: A - with a semicircular blade for rough turning; B - with a straight blade for finishing turning; B - shaped; G - machine passage
The machine can provide the ability to change cutters. For this purpose, a special modification of the housing is made with the necessary mounting parts. These elements must be strong enough to withstand the loads during operation and at the same time maintain the original location of the edge part.
When the cutter is made, it is sharpened and the cutting edge is hardened. After the cutting part is heated, the cutter must be dipped into machine oil. Using slow hardening technology, the surface of the product can be made as hard as possible. In this case, the heated workpiece should cool naturally.
DIY knife sharpening devices: drawings and recommendations
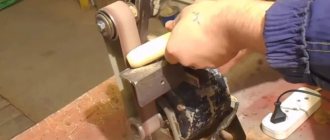
To make a sharpener from a washing machine motor with your own hands, you can limit yourself to a motor from an old Soviet design, for example, SMR-1.5 or Riga-17. A power of 200 W will be enough, although you can increase this figure to 400 W by choosing a different engine option.
The list of parts needed for a DIY sharpening machine includes:
- tube (to grind the flange);
- a nut for fixing the stone on the pulley;
Homemade knife sharpening device
- metal for making a protective casing for a sharpener with your own hands (thickness 2.-2.5 mm);
- whetstone;
- an electrical cable cord having a plug;
- starting device;
- a corner made of metal or a block of wood (for the frame).
The diameter of the flange must match the dimensions of the bushing on the motor. In addition, a sharpening stone will be placed on this part. On one side, this element is threaded. The indentation should be equal to the thickness of the circle multiplied by 2. The thread is applied with a tap. On the other hand, the flange must be pressed onto the motor shaft using heat. Fixation is carried out by bolting or welding.
The working winding of the motor is connected to the cable. It has a resistance of 12 ohms, which can be calculated using a multimeter. The starting winding for a DIY knife sharpener will have 30 ohms. Then the bed is made. It is recommended to take a metal corner for it.
Assembly drawing of a homemade universal knife sharpener
Some people need a chainsaw chain sharpener. You can make such a structure with your own hands from a frame with 3 supports, two spindles, a stepper motor (2 kW) and pipes used as holders.
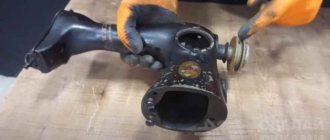
Cyclone for carpentry workshop based on a vacuum cleaner
And at the end of the material, we offer our readers a photo selection of homemade cyclones, which are a necessary device for carpentry work.
Option 1
zalman3000 (FORUMHOUSE User):
My first cyclone failed and I decided to make a new one. It took 20 minutes to do everything. To make it, I took a used putty bucket and polyethylene pipe fittings. They hold better and tighten quickly, ensuring the tightness of the assembly.
An oil filter from Moskvich was used as a filter element.
This is what happened in the end.
Instructions for creating a stationary circular saw with your own hands
Creating a table for a hand-held circular saw with your own hands is the most important stage in creating the machine, since this structure will house the main parts of the equipment in the form of:
- power unit;
- control block;
- cutting component;
- other components.
The support bed on the hand tool table doubles as a guide for your DIY circular saw. It controls the direction in which the cut is made and fixes the workpiece.
Construction of a table for a hand-held circular saw is the most important stage in creating a machine
The sawmill is a modification of the circular saw. The only difference is that the disk is located at the bottom. The design of the table for a circular saw with your own hands is assigned the function of a bed. The power unit, block, fixing disk and control system are also installed here.
At the design stage for DIY circular saw drawings, you should take into account some factors:
Diagram of a stationary circular saw
How to make a circular saw from a grinder with your own hands
First, the tabletop is made from sheet material. Markings are applied to it in accordance with the dimensions of the instrument. Using these markings, cutouts are made to install the saw.
Next is done:
For a DIY circular saw machine you will need legs. They are mounted taking into account the dimensions of the tabletop made of wooden beams with a section of 4x4 cm. The use of steel corners is allowed. To provide additional stability, stiffeners should be installed between the supports. A control unit is placed next to the workplace. You should not refuse to install RCDs and devices that protect the engine from overloads.
Variant of a circular saw from a drill. Layout diagram: 1 - drive (electric drill); 2 — work table (duralumin, sheet s5); 3 - circular saw; 4 — rack (St3, strip 20?5, 4 pcs.); 5 — support holder of the mandrel shaft; 6 — mandrel; 7-electric drill holder; 8 — base plate (furniture chipboard, s30)
Technology for creating a wood cutting machine
Manufacturing technology of a homemade cutting machine:
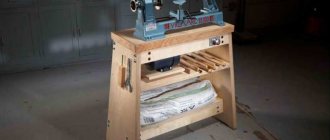
Simple cut-off machine design for home workshop
All that remains is to mount the motor on the short arm of the rocker arm. The cutting element is placed on the long arm. The shaft and motor are connected using a belt drive. For the tabletop you can use a sheet of metal or a planed board.
Assembling a drilling machine with your own hands: video on how to make a structure, recommendations
A good drawing of a drilling machine from a drill with your own hands is the main condition for acquiring the necessary tools. To create such a machine, you do not need to use special materials or buy additional components.
Components for the construction of a homemade drilling machine with your own hands:
- bed (base);
- rotation mechanism (drill);
- device for supplying;
- vertically located rack for fixing the drill.
To create a drilling machine from a drill, you do not need to use special materials or buy additional components
In mastering the technology of making a drilling machine from a drill with your own hands, video material can provide invaluable help.
Guide to creating a drilling machine with your own hands (how to make a simple design):
A self-made mini drilling machine requires a feed mechanism for a rotary tool. The classic design scheme involves the use of a spring and a lever. The spring is fixed between the block and the stand.
There are many devices for sharpening drills with your own hands; the video material will help you understand this topic.
Can't unscrew the screw
It happens that the slots on the screw head are ground off, and it is not possible to unscrew the screw using the standard method.
Well, let's act outside the box.
We glue a piece of PVC electrical tape onto the head of the self-tapping screw (preferably in 2 layers). We try to unscrew it - everything works. And there is no need for any dancing with tambourines.
Features of DIY CNC milling machines
Software is considered an important component in a DIY wood CNC router. Drawings of a conventional design, taking into account this condition, must include additional elements for it:
- LPT port;
- CNC block.
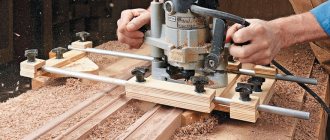
Assembling a wood milling machine for a home workshop
At the first stage, drawings are drawn up for a wood milling machine with your own hands, which include information about the placement of all structural components, their dimensions, as well as methods of fixation.
Diagram of a CNC milling machine
Next, a support frame is assembled from pipes pre-cut into parts of the required size. For fastening you need to use a welding machine. Then the dimensional parameters are checked in order to begin manufacturing the working surface.
You need to act within the following scheme:
Be sure to test the machine before work. When the router is turned on, it should not vibrate too much. To compensate for this drawback, it is recommended to additionally install stiffeners.
The most important requirement for workshop machines is operational safety
Assembling a metal milling machine with your own hands
Step-by-step instructions for making a homemade metal milling machine:
Diagram of the milling machine device (a - general view, b - kinematic diagram): 1, 5 - guide rulers; 2 - gear sector; 3 - cutter; 4 - fence; 6 — control panel; 7 — additional spindle support; 8 — bracket; 9 — handwheel for lifting the bracket; 10 — belt tension handwheel; 11 - electric motor; 12 - spindle; 13 — handwheel for adjusting the spindle height; 14 - bed; 15 — spindle speed switch; 16 - switch; 17 - table
After this, you need to attach a cone (Morse 2) to the spindle and install a collet or drill chuck on it.
Subtleties in drafting projects
When all preparations are completed, it is time to design. The result of your efforts should be a document that is a project for the future workshop. For construction, there is no need to draw up construction drawings according to all the rules; detailed sketches indicating the actual dimensions of the future premises and the dimensions of the main and auxiliary equipment specified in the second list are sufficient.
There should be several sketches. It is difficult to indicate all the elements of a structure on one projection. Therefore, your sketches should include all the details down to the smallest detail. External and internal dimensions of the room and its elements are indicated without observing scale, but must reflect the actual position of objects and building elements.
An approximate calculation of the required area for a workshop will be the product of the area of all equipment, shelving and cabinets and a coefficient equal to 1.5-2. Still, if computer graphics looks like unplowed virgin soil to you, then the visual layout of the carpentry can be done using the old-fashioned method. Take a sheet of graph paper, draw on it the premises of the future carpentry on a scale of 1:20, agreeing with the approximate calculation and pre-made drawings.
From the same paper, cut out rectangles of equipment and auxiliary structures to scale, but according to real dimensions. This will make it possible to correctly place them in the workshop, taking into account workplaces and aisles. If necessary, you can move the rectangular layouts to determine the perfect workshop layout:
- On a sheet of graph paper, draw two lines perpendicularly, indicating the walls.
- We draw the door of the room. The size of the doorway should be slightly larger than the largest equipment. Then there will be no problems during its transportation. We arrange the equipment;
- We draw the remaining walls;
- We determine the location of the window openings and put them on the drawing. It is advisable to equip the eastern and southern walls with windows. This will allow you to get more sunlight and heat;
- Measure all dimensions and, taking into account the scale, apply them to the workshop layout.
This will be your guide to further actions.
Features of making a thicknessing machine with your own hands
Do-it-yourself thicknesser drawings with a complex design involve the use of expensive components:
- bearings with increased wear resistance;
- rolled steel sheets;
- cog;
- pulleys;
- powerful electric engine.
As a result, the cost of producing a homemade surface planer increases significantly. For this reason, many try to limit themselves to the simplest design.
Instructions for a homemade thickness planer for wood:
| Design element | Data |
| bed | Frames (2 pcs.), made using welding based on a corner (4-5 cm). The frames are connected using studs (ground hexagons - 3.2 cm). |
| Broach | Rubber squeezing rollers from a washing machine. They are machined to the size of the bearings and put on an axle with a diameter of 2 cm. It operates through rotational manual movements. |
| Table | The sanded board is attached to the frame using a bolted connection; the heads must be countersunk. The boards need to be treated with oil (already used). |
| Engine | for 3 phases, power – 5.5 kW, rotational speed – 5000 rpm. |
| Protective cover | Made of tin (6 mm) placed over a frame corner (20 mm). |
Assembling a thickness planer from an electric planer with your own hands
To create a homemade thickness planer, you need to place the plane on the block, secure it with a device such as clamps, not forgetting to leave a gap.
The scheme for making a surface planer from a plane with your own hands is very simple:
- the support beam is fixed on a convenient surface;
- the required gap size is selected by adding layers of plywood;
- The surface planer structure made from an electric planer is attached to the resulting base with clamps.
Two clamps hold the base on the table, the other two hold the plane. After making sure that this fastening is secure, you can start using the tool.
Diagram of a homemade thickness planer
Scheme for creating a wood grinding machine with your own hands
Recommendations for making a consumable belt sanding machine with your own hands:
- The optimal width of the sanding belt is 20 cm.
- The sanding cloth of the tape is cut into strips.
- The abrasive tape is applied end-to-end.
- To strengthen the seam, you need to place dense material underneath.
- It is not recommended to use low-quality glue, as it will cause the material to tear along the seam.
- The diameter of the tape shaft in the center should be 2-3 mm wider than at the edges.
- To prevent the tape from slipping, it is recommended to wind it with thin rubber (a bicycle wheel).
Calibrating - wood grinding machines belong to the group of drum structures. This category is broad and includes many varieties of equipment.
To make a drum sanding machine for wood with your own hands, you can choose the following designs:
- surface grinding – the workpiece is processed within one plane;
- planetary - with its help a flat plane is formed on the workpiece;
- cylindrical grinding – it is used to process cylindrical workpieces.
From the video below, you can learn how to make a grinding machine with your own hands.