What is needed for a router
The tool is used to perform various operations: facing, cutting grooves and holes, incl. on curved surfaces.
For each case there is a special device.
Rip fence for cutting
Due to frequent use, this product is included with all hand-held milling cutters. It allows you to guide the tool along the base surface, which is most often played by:
- edge of the table;
- side face of the workpiece;
- guide rail.
The emphasis consists of the following parts:
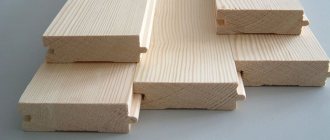
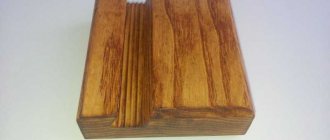
- Metal rods. They are inserted into special holes on the router.
- Set screw. Clamps the rods in the holes.
- Fine adjustment screw. It is used to set the distance between the cutting edge of the tool and the base surface.
- Support pads. This is the main part of the stop: when performing an operation, it slides along the base surface.
The rip fence allows you to guide the tool along the reference surface.
In some models, the distance between the support pads can be changed.
To make curved cuts, a block with a round or angular notch on one side is placed between the base surface and the stop. It is oriented so that the straight edge is pressed against the support pads. This method does not provide a firm grip on the tool, so use it with caution.
Guide rails
This type of equipment is used in situations where the tool needs to be moved in a straight line at an angle to the edge of the workpiece. The guide can be equipped with additional structural elements:
- Markings and fasteners. They are used for milling several holes with equal spacing.
- Adapter (shoe). Before performing the operation, the router is screwed to this part; it is embedded in the guide so that it can slide along it.
- Clamps for fastening to a workbench or workpiece. In their absence, clamps are used.
Copy rings and templates
The copy ring is a sleeve that is screwed into the router base or screwed to it so that the cutting tool is inside. This device is used in conjunction with templates. The sleeve is guided along the edge of the pattern, as a result of which the cutter follows its outline.
Copy rings are bushings that are screwed into the base of the router.
The closer the diameters of the cutting tool and the ring are to each other, the more accurately the groove follows the shape of the template. But the sleeve should not touch the cutter. If their diameters are very different, the pattern is cut out to adjust for this difference.
Using a copy sleeve, it is convenient to make curved grooves and also round corners.
The template is attached to the workpiece with clamps or double-sided tape.
Compass
This device is designed for cutting a groove in a circle or ellipse. In its simplest form, it is a narrow plate with a through channel in the middle. A pin with a fixing screw is threaded into it.
At one end the plate is attached to the router. Next, fix the pin at the required distance and insert it into the hole that serves as the center of the future circle.
A design with 2 “legs”, reminiscent of a school compass, is more convenient to use.
If the radius of the circle along which the groove needs to be cut is less than half the width of the router, use another product. It is screwed to the base of the instrument with screws.
The compass is designed for cutting a groove in a circle.
For milling along an elliptical or oval path, a mechanism with the following components is used:
- A fastening screw or suction cup for fixing to the workpiece.
- Two intersecting guides with shoes.
- "Legs."
- Bracket for mounting the router.
Nozzles and tenoning devices
The router allows you to quickly create structural elements for the tongue-and-groove connection. Special devices are also used for this. Among them, the most practical are universal ones - capable of making a groove with a dovetail, straight, T-shaped, etc. profile. They have a copy ring and a template in which it moves.
For fast and high-quality slot milling
There are attachments that allow you to cut grooves with a router on narrow edges, for example, for door hinges or lock elements. The product consists of a plate (screwed to the tool) and 2 guide rods, between which the workpiece is placed. If it is necessary to cut a groove offset from the midline, a sleeve of the required diameter is put on the corresponding pin.
There are attachments for fast and high-quality milling of grooves.
In the absence of a nozzle, bars are attached on both sides of the workpiece so that the edges of all 3 elements lie in the same plane. This will turn the narrow surface into a wide one, allowing you to cut the groove using the rip fence.
How are bodies of revolution processed?
The factory kit does not include a device for a router that allows you to cut grooves in cylindrical and conical workpieces. But home craftsmen have learned to make them themselves.
The product consists of the following parts:
- Cases.
- Movable milling carriage.
- Disk for adjusting the angle of rotation.
- Clamp for fastening the workpiece.
- Set screw.
The mechanism can be turned into a lathe by connecting an electric drill or screwdriver to it.
How to make templates with your own hands
The pattern is a flat part. Its dimensions are selected taking into account the difference in the radii of the cutter and the copy ring.
Ready drawings
There are many patterns posted on the Internet for different tasks and sizes of the copy sleeve. Most publications are provided with formulas into which you need to substitute the dimensions of your workpiece. All that remains is to calculate the dimensions of the template, draw it on graph paper and transfer it to sheet material.
Drawing of a copy sleeve.
Examples of drawings are shown below.
What you need
Stencils are made from the following materials:
- tool steel (the most durable option);
- duralumin;
- plastics;
- plywood;
- plexiglass.
Sheet thickness – from 2 to 10 mm.
Tools needed:
- drill with a set of drills;
- jigsaw or hacksaw;
- file;
- grinding wheel.
To make stencils you need a drill with a set of drills.
Manufacturing process
Proceed in this order:
- Draw the outer contour of the groove on the sheet stock.
- Calculate the difference between the diameters of the cutter and bushing and divide it by 2.
- From the drawn outline, retreat a distance equal to the number obtained in step 2 and draw a parallel line.
- Cut out a template using it.
- File and sand the edges of the product.
A curved template is cut in this way: first, a series of small holes are drilled along the contour, then the material between them is removed with wire cutters or another suitable tool.
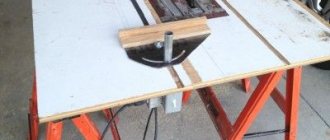
Guide rail
use a piece of chipboard
First you need to find out the distance from the edge of the milling base to the center of rotation, and it is always the same. To do this, you need to screw a guide to the unnecessary part of the material and make a test cut. Then you should measure the gap from the edge of the cut to the tire, to which the radius of the cutter is added. As a result, it will be possible to obtain the required value. For example, it is 59 mm, and the diameter of the groove cutter is 14 mm, that is, its radius is 7 mm.
Then you should draw a line for the cut, from which we retreat a distance of 52 mm (59-7), and draw another one. We fix the guide along it and make the cut.
DIY accessories for a router
Most products can be made independently. The manufacturing procedure for the most popular ones is outlined below.
Tenoner
Proceed like this:
- On both sides of the plywood strip, install identical racks of blocks with notches in the middle.
- Attach router guides equipped with stops to them on the top, bottom and sides.
- Install a movable element on the plywood base to regulate the size of the edge of the part, equipped with a wing nut or other lock.
Tenoners are used to perform precise operations.
An alternative device is a conductor.
It consists of the following parts:
- grounds;
- stops;
- movable slide.
The product is used to perform small operations that require high precision.
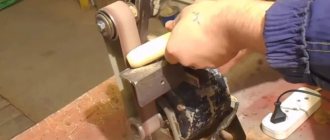
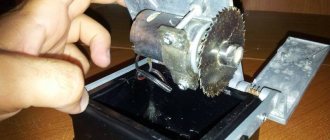
Copy sleeve
The preferred material is tool steel. But in private workshops, due to the lack of professional metalworking equipment, bushings are most often made of simple steel or duralumin.
Procedure:
- Cut a circle from a metal plate with the same diameter as the hole in the router base.
- Take a piece of pipe with an internal cross-section 2–4 mm larger than the cutter and cut it off.
- Sand the bushing with oil sandpaper.
- In a metal circle, cut a hole in the middle with such a diameter that the sleeve fits tightly into it.
- Weld the flange to the sleeve or connect them by riveting the ends and pre-seating them with glue.
Another option is practiced, for which you need:
- steel or duralumin washer;
- plumbing extension cord;
- nut with the same thread as the extension.
The copying sleeve is made of tool steel.
They do this:
- Cut the nut to make a ring and grind it through.
- A circle is cut out of steel or aluminum 2 mm thick.
- The metal is removed along the edge on a sharpening machine.
- Place the circle on the base of the router.
- Place the tool vertically.
- Markings for fastenings are applied through the holes in the sole.
- Drill holes with a thin drill, then enlarge them with a tool of the required diameter.
- Put on the washer and screw in the nut.
- Holding the workpiece in a vice, gradually remove the thread with a grinder so that it is flush with the nut.
- The product is trimmed.
- Align the bushing on the grinding wheel and attach it to the router base.
Guides for working with a router
The simplest homemade guide looks like a rail attached to the workpiece with clamps. You can fix several parts at once and make a groove in them in 1 pass.
A more complex option is a structure made from a board and a sheet of plywood that serves as a base. With this design, it is easier to accurately fix the guide on the cutting line.
If milling cutters of different sizes are needed to process the workpiece, use the option with a folding bar. It is attached to the board base using door hinges.
Circle milling
To perform tasks at home, a device that can make it easier to cut round blanks may be useful.
For example, a compass is often used, which you can create with your own hands.
This device is made according to the following scheme:
From available elements, a piece of plywood, self-tapping screws, a wooden wing and a bolt with a nut are used to make the device. You will also need a router, saw and screwdriver. A small marking is made on a piece of plywood. A platform is outlined on it, the length of which is 15 cm and the width is 5 cm.
It is important that the length exceeds the processing radius, and the width exceeds the size of the router pad. Holes are made for the mounting bolts (their diameter is 2-3 cm). Perka is used for drilling. A groove is cut through the middle strip
It is necessary to ensure that its width does not exceed the size of the axle bolt. A recess is made at the bottom of the plywood sheet to accommodate the nut and washer. Another nut is secured in a wooden wing. Now you can assemble the main axis. Instead of a stud, use a bolt with a sufficient length, having first sawed off its head. The compass is installed on the router and the functionality is checked.