841 0 0
Natalya August 5, 2019
Phil B from instructables.com shared his experience converting a handheld circular saw into a circular saw. Further from his words.
When working in the workshop, I sometimes need to cut long pieces. This is best done with a stationary circular saw, but I don't have one.
But there is a Porter-Cable hand-held circular saw model PC15TCSMK, which I decided to convert into a circular saw. Moreover, the alteration allows you to use it in 2 versions, as well as a collapsible workbench, which I also assembled in this project to save space in the workshop.
Preparing materials and tools
The following materials were used in the work:
- 19 mm plywood 740x960 mm.
- Steel rod 6 mm.
- Threaded rod 6 and 8 mm.
- 32 wood screws, 40 mm long.
- Various nuts and washers.
- Water pipe 3/4 inch.
- Iron corner from an old bed.
- Steel electrical boxes and covers for switch and socket.
- Three Romex connectors.
- Dual 15A receptacle and 15A toggle switch.
- Electrical plug with three prongs.
- Electrical cable with rubber coating.
Tools used:
- A circular saw.
- Radial hand saw.
- Disc for cutting grooves DADO.
- Building level.
- Manual frezer.
- Hand drill.
- Drilling machine.
- Welding machine.
- Angle grinder with cutting wheel and grinding wheel.
- Hammer.
- C-clamps.
- Pliers.
- Screwdriver.
Making a tilt controller
To cut workpieces at a certain angle, I make a tilt regulator. It can swivel just over 45 degrees to the left or right.
- To do this, I first made a base from a steel plate, in which I cut a semicircular base for the lock nut.
- I screwed a steel strip on the back side of the plate - it serves as a guide for the control unit and moves along the groove in the tabletop of the circular saw.
- I attached a T-shaped stop made from scraps of plywood to the wide edge of the base. To recess the screw heads, I countersunk them.
- I made a rotary handle from a water pipe - I welded a nut into it with which I can lock the tilt regulator.
Circular saw device
Being a truly useful tool, the circular saw has a fairly simple design. Its main components:
- bed – frame on which the main units are mounted;
- tabletop with a slot for a disk;
- engine with rotation transmission system;
- cutting tool, disc with teeth.
Optionally, the device can be supplemented with a pusher, which ensures progressive movement of the workpiece towards the disk, and various lifting mechanisms that regulate the cutting depth.
The principle of operation of a circular saw (circular saw) is that the rotation of the electric motor shaft is transmitted to the cutting tool, a disk with sharply sharpened teeth. The center of the disk is located below the level of the tabletop, only a segment of it is removed from it. The workpiece is brought to the rotating disk, the teeth bite into the wood, creating an even cut.
Making a mounting plate
- To maintain as deep a cut as possible with a hand saw, I selected a 6 mm sheet of metal from which I made a mounting plate.
- I cut holes in it for the saw blade with a width sufficient to activate the tilt of the blade.
- To install it, I cut a hole in the tabletop using a hand router.
- I attached the plate to the circular saw fence with screws and placed it in the tabletop.
In fact, it turned out that the mounting plate was below the plane of the tabletop. This does not create problems for cutting long workpieces. But when sawing small parts, where accuracy is important, this position is unacceptable.
- Bring the mounting plate level to the rest of the countertop by applying several coats of automotive body putty to the steel plate. Then I sanded it thoroughly.
Building a home circular
According to reviews of many home-made carpenters, the easiest way is to convert a manual model of a circular saw into a stationary one, or, more correctly, an easel one. In this case, you can kill at least three birds with one stone:
For your information!
The main advantage of the above circular saw circuit is the well-chosen engine torque and its speed, which ensures maximum performance of the device. On a 225mm diameter drive, the offset, or height of the drive above the workbench, is only 40mm. This is more than enough to cut a magpie board into a plank or batten, cut out any shaped parts and solid wood. In addition, a spring-loaded protective cover is installed on the body of the circular saw, covering the cutting edge in the non-working position.
Perhaps this device is useful and necessary for protecting fingers and hands, but it only interferes with work, since the thin cutting edge of the disk is not visible. Therefore, when remodeling, it is often dismantled or fixed to the body of the circular saw in the open position.
Converting a hand-held circular saw into a stationary version
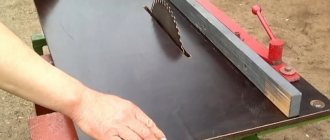
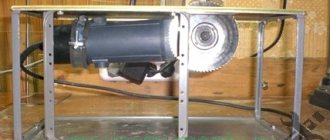
All that needs to be done to convert a hand saw to a stationary version of a circular saw is to make a table or box-shaped body and attach the saw to the back of the table top so that part of the cutting edge of the disk protrudes above the plane of the table, photo.
The size and shape of the circular table are selected based on the width and length of the lumber. For small boards, a one and a half meter table, 60-70 cm wide, will be optimal. The supporting part of the circular saw can be welded from a steel angle with a shelf width of 25-30 mm. Horizontal struts from reinforcement or angle are welded into the upper and lower parts of the legs. This solution allows for maximum frame rigidity.
For the tabletop you can use laminated chipboard or OSB, plywood 15-20 mm thick. In this case, the tabletop itself does not have to be positioned symmetrically relative to the steel support frame. When cutting a board on a circular saw, you have to work with both hands. With one hand we feed the material forward longitudinally, and with the other we press the board to the table. So, the main thing is that the location of the motor and the pressure point are not very close to the edge and do not create a tipping moment for the entire structure.
The plane adjacent to the cutting tool can be covered with metal or plastic to make it easier to move the solid board across the table of the circular saw.
The only drawback of this modification is the need to modify the controls: the start button and the hold lever. Most hand-held circular saws are equipped with a holding lever or trigger in addition to the start button. While you press the trigger against the handle of the saw with your fingers, the engine of the device is operating in normal mode. As soon as you release the trigger, the engine stops. A very necessary thing if, while cutting, you unexpectedly dropped a working circular saw from your hands.
Therefore, the first step is to make changes to the control system of the hand-held circular saw. To do this, the contacts on the button and trigger are connected to an external electrical package mounted on the body. Of course, such modifications can be performed for power tools for which the warranty period has long expired.
In rare cases, it becomes necessary to remove the instrument from the table and use it in its original manual form. In this case, instead of resoldering the contacts, the button and trigger are fixed with a clamp or simply wrapped with electrical tape, and the power cord from the tool is included in a carrying case with an on-off button.
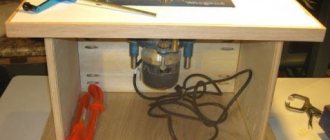
The simplest option for remaking a circular saw is shown in the photo. For a tabletop circular saw, a box-shaped body is made from plywood. The tabletop with the circular saw installed is turned over and secured to the frame.
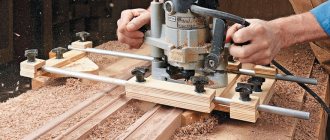
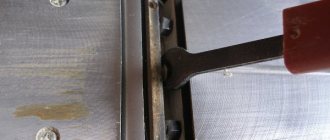
Making a guide ruler
When working with a circular saw, it is important to be able to not only cut a board, but also cut a plank or slatted strip of a given width exactly to size. To do this, a guide ruler is installed on the tabletop of the saw, which can be moved relative to the plane of the disk, and thereby select the width of the cut.
The ruler is made in the form of a steel angle. Using screws, the ruler can be relatively easily moved along the slots in the tabletop, and thereby change the size of the cut.
A simpler version of the ruler is made of pine boards, 40 mm wide and 20 cm longer than the table size. Along the edges of the board, two furniture nuts with metric threads are pressed into the lower part. Using screws, L-shaped hooks are attached to the ends of the ruler. After installing the ruler, the hooks are tightened with screws, the hooks rise and firmly fix the guide bar on the tabletop.
Finishing the bottom side of the mounting plate
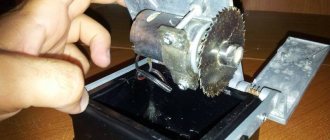
The first photo shows the studs for attaching the saw. The criss-cross molded base secured to the base of the saw leaves no room for a nut.
- I added a square steel washer that I made so that the nut could work properly.
- The second mounting pin is located near the hole at the other end of the saw base. In the lower left corner of the photo you can see the stud and nut that secures the steel mounting plate into the plywood. The mounting plate fits very tightly to the plywood, especially on one side.
The second photo shows two wooden blocks for setting up the saw, attached with studs and nuts.
- A mechanical screw passes through each of them so that their tips touch the base of the saw.
- Any screw can be turned one turn to move one end of the saw base a few mm.
I'm making a base
To assemble the base, I used pieces of plywood and corners from an old bed frame. The green pieces connecting them are the remains of a garden fence.
- I screwed them to the countertop from the back side and welded them using a welding machine.
- I welded a handle to one of the crossbars for ease of carrying.
- I attached electrical boxes and a power switch to the plywood below.
- I use folding construction sawhorses as legs.
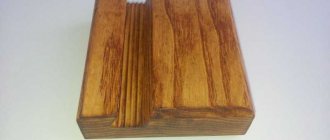
Why does chipping occur when sawing with a circular saw?
Again, plywood is simply multi-layer veneer glued together. The layers of veneer in different layers are directed alternately: a layer with one fiber direction, a layer with a perpendicular fiber direction. If you cut plywood along the direction of the grain, then you most likely will not have problems. But if you cut across, the top layer of veneer chips. The disk rotates so that the teeth move from bottom to top, and they just lift up the top layer of veneer.
As seen. The length of the chips reaches 2 cm. Sometimes even more.
In the case of a circular saw, this is due to the fact that there is a gap of a couple of centimeters between the disk and the sole (platform) of the circular saw. It is precisely because there is nothing pressing the layer of plywood on top that these chips occur. Thinner discs (for example, for laminate) did not suit me either - the result is exactly the same.
I am calibrating the saw
I install the tilt regulator in the guides and carry out its alignment and calibration. To do this, I use a metalworker's square and a water level.
I'm cutting
I make a small test cut. To do this, I first made a pencil line that intersects the diagonal edges of the two triangles on the workpiece. Then he clamped it with clamps and sawed it along the line.
How to saw with a frog (manual circular saw) without chipping
In our workshop, one of the technological stages is sawing 1.5*1.5 meter sheets of plywood into blanks for further processing.
We use plywood in three thicknesses: 4, 6 and 10 mm. We don't have our own cutting machine. We did not plan to buy it due to the fact that cutting is an auxiliary function and in fact takes little time. We are not yet ready to spend 50 or more thousand rubles on a format machine, so we use hand tools. Those who have ever cut sheet material (especially laminated plywood) with a jigsaw or a hand-held circular saw know that the resulting cut is of poor quality—the edges chip off. The same format machine would solve this problem, since it comes with 2 saws - a scoring saw and a main one. But for now we’ll use what we have. How to cut without chipping with a jigsaw - read this article. But a jigsaw is very inconvenient here - each saw 1.5 meters - with a jigsaw it will take a very long time, so we decided to use a manual circular saw (frog). Our circular machine is a Metabo brand, but the principle and appearance of all of them is approximately the same.
We also have a circular saw that cuts much smoother. But it has a small working area, and it won’t be possible to complete a large table for it - there simply isn’t enough free space to place a table on which you can cut a sheet of 1.5 * 1.5 meters. Those who think that you can put a sheet of 1.5 * 1.5 meters on a small table and saw it on it, holding the sheet in the air with your hands (even with two people) - you are very mistaken, take my word for it.
I make sleds
Made a sled from some old bed frame steel and a piece of wood to get a clean edge. I screwed the bar to the corner with several screws.