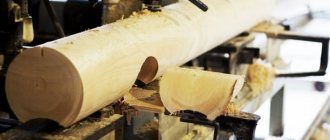
Hand circular saw
Typically, gardeners think about buying a hand-held circular saw after they had to manually saw a couple of boards along their two-meter length or so. In other words, dissolve the boards.
For these purposes, there is a hand-held circular saw. Once you get used to working with it, you can no longer avoid the temptation to use a circular saw wherever it can replace a regular handsaw.
A couple of months after purchasing the saw, I realized that for any household needs it is enough to buy only wide boards of the required thickness. And from them you can “cut” any blanks. For benches, stools, various country furniture, garden trellises and a host of other things useful in the country.
For the frame of a small lightweight woodshed, it is quite enough to make 75x50 posts, which can be easily obtained from a standard 150x50 board. It’s easy to cut slats from it for decorative “chlamys” in the garden for climbing plants. Believe me, the savings are very significant.
Further more. Having learned how to select a quarter using a circular saw, you can quickly and efficiently make profiles for finishing door and window openings and lining external corners.
The blanks will look good, not like store-bought items that can be broken with just your fingers. At the same time, costs will be reduced threefold, or even more, taking into account the “exclusivity” of the product.
So, I won’t try to persuade you – a circular saw is an extremely useful household item!
Operating a circular saw is quite simple, but requires skill and care. I tried to demonstrate the general principles of adjustments in two interactive flash drives:
I would like to dwell in more detail on some of the features of working with a circular saw. I think that these points will help with choosing a tool.
Depth of cut. Always set the depth of cut equal to the thickness of the board you are cutting. Make this a rule for yourself. You can do less if you need to make a groove, but you shouldn't do more. Not only for security reasons. For example, you can saw by placing the board directly on the workbench. Barely noticeable grooves on the surface of your workbench after such cuts will not interfere with your work for many years.
The nominal cutting depth of the saw is selected based on your individual needs. In practice, to cut a 50 mm board at an angle of 90 0, you need a cutting depth of 50 mm. Anything larger than this size will only work for miter cuts. So, to make a cut at an angle of 45 0, you will need a saw that has the characteristic we are interested in at the level of 71 mm. Based on this, draw conclusions. How often will you have to cut at an angle?
Other structural elements. Lower saw blade guard (openable). Keep in mind that the guard will open the saw blade on its own only if nothing interferes with it. For example, as in option A, when the end of the board is like a canopy.
If the board is lying on a workbench, then an attempt to “automatically” open the casing can end disastrously: realizing that the casing is “in the way,” you will try to pry it off by lifting the back of the saw; the disc will enter the material when the saw is “in the air” , without emphasis. It can easily be thrown away, which in itself is unsafe. And you'll ruin the board.
In this case, you need to carefully manually move the protective cover aside. It’s good to get used to doing this in such a way that your left hand and saw firmly hold the tip of the latch of the retracted protective casing. Safety first!
First, think about how all the elements involved in the sawing process will behave, taking into account the specific situation - then act!
How to cut a board into thin bars
Align the front end of the striker plate with the marks where to start sawing, and press it firmly against the board. Please note that the disk does not touch (!) the workbench when turned on; for this purpose, the rear part of the support plate can be slightly raised. Turn on the saw, pick up the speed and feel free to start making cuts.
The ideal option with a board on a workbench: when the edge of the board, from which the cut begins, protrudes a few centimeters beyond the edge of the workbench.
along a board that is in a very “suspended” state (it even bends!) .
The “riving knife” is used to prevent the disk from getting pinched and to prevent you from “crashing” the disk into the board while moving it in the opposite direction. And you are almost guaranteed to receive a noticeable backlash, similar to what happens in similar situations with an angle grinder, a chain saw, and other “rotational-cutting” tools.
Parallel fence, or guide. If you have markings and the appropriate skill, you can make an even cut without a parallel stop, but I see the point in this only in those rare cases when you need a board of this shape:
In all other cases, the rip fence is indispensable:
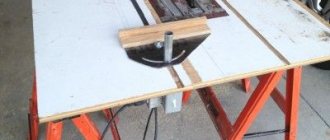
Fixing the workpiece. In all cases, the workpiece must be securely fixed. It is unacceptable when the workpiece begins to move with the saw or deviate somewhere to the side. Having secured the workpiece, before you start sawing, you must mentally go through it with a saw. It is important that there are no obstacles along the entire path of the saw’s future movement! The stops you use and other possible fasteners should not be anywhere in the path of the tool or its element.
In the photo above, I give only an example from my practice, although there are a lot of possible options. I think in this regard you should not blindly use other people’s recommendations. Take them as a basis (from various sources) and adapt them for yourself as a belt, tightened to your individual size.
On one side (blue color) I have a rail attached to the workbench, which serves as a counter so that the board does not move sideways. It protrudes slightly below 2 cm, that is, less than the thickness of the boards that I usually process on this workbench. To prevent the sawn board from sliding forward, it is pressed against the second stop (green). This stop is tapped from below to the required height, so that in turn it also does not interfere with the saw when completing the wiring. I have developed this work scheme over several years, and it is convenient for me. In this configuration, you can use a plane and a router (for rough work). I don't pay attention to the grooves from old cuts. The workbench is already 7 years old and it always winters in the open air. I fastened the upper boards from below, so that the blade of the saw blade could never run into the screw.
READ Proportion of oil and gasoline for a chainsaw
board follows closely behind the solid wood being cut , without reliable fixation:
In the border zone, the board can be twisted or dangerous chips can be torn out of it, and the saw can be thrown back. This, for example, can happen when, as in the case of my “green” stop A, if the saw blade runs into it.
How to cut a board into thin bars
In some difficult situations, when it is necessary to select a quarter for the profile, I additionally secure the workpiece with screws, which I tighten in places where the disk will not run into them, and which will then be cut off during the final trimming of the workpiece. A little advice: during “in-line” production, change the screws more often. Their quality is poor, the head wears out quickly, you can easily screw it in and not unscrew it.
When preparing the board for cutting, make sure that there are no internal stresses in it that could jam the disk.
Wiring. The saw should be driven gently, without overloading the motor. Try to rest the saw when making many long rip cuts. a manual for several hours , it is easy to “burn out” the motor even in a reliable professional-grade saw.
After finishing the cut and lifting the saw up, hold it with the blade away from you, even if it is already covered with a protective cover. Place the saw on the floor or workbench only when you are sure that the blade has completely stopped and is “covered.” Cultivate a similar “habit” in yourself to the level of a reflex.
Despite the huge selection, almost 90% of commercially available circular saws represent one “medium” weight category. These are the most popular saws, capable of cutting the most popular boards in construction, up to 50 mm thick. The diameter of the discs used is from 180 to 200 mm. This saw is universal. The typical power range for such saws is 1100-1800 watts.
The simplest way to cut lumber with a hand-held circular saw in the country
It makes sense to take smaller saws for regularly performing specific work. When you don't need to make deep cuts. Then you will be able to realize the absolute advantage of such a saw - its lighter weight.
Among the very “small” saws – “SUVs” – that have proven their reliability, we should especially highlight the Skilsaw with a power of 500W, although it is now already available in an 800W version. This model is, in fact, very convenient for working with lining, picket fences, OSB boards, and laminate. This is a super lightweight circular saw. So light that you quickly start using it with one hand, firmly “turning off” the lower protective casing, losing your vigilance in front of its insidious charms. Which is unacceptable! But perhaps this is its only drawback.
Therefore, let's return to middle-class saws.
External inspection - take the saw in your hands and feel how convenient it is for you. A saw is a dangerous tool. Prolonged work with a tool that is not comfortable in your hands is very tiring. When moving a circular saw, a person is always very focused on a subconscious level, and experiences incomparably more tension than running an “iron” along the same board, which can be much harder. Therefore, I put the ergonomic factor of a circular saw tool first.
This should also include an inspection of the quality of the instrument itself and the materials from which it is made. For example, a plastic top guard is not a good sign, but that's in my opinion. The lower protective cover should open and close smoothly and without play. At the same time, it should not look so that it can be easily bent if you do not “throw” (accidentally, of course) the saw on the floor too carefully.
Brand. A high-quality circular will cost from 4 to 6 thousand rubles. In this range, you can choose a worthy copy of a well-known brand with a reputation, and tailored exactly for you.
For some it will be Metabo, for others BlackDecker, for others Makita, but, in fact, a specific brand among “equals” as a decision-making factor will be less significant compared to ergonomics.
Other adjustments and features.
Please make sure that all settings are easy for the saw you like. For example, loosen the cutting depth locking lever, change the cutting depth and try to lock the lever in different positions. I won’t point fingers, but there are popular saws that have problems with this lever. In the minimum cut position, it is easily tightened firmly, but in the maximum position, it begins to rest against the sole, and it will not be easy to tighten it. If you try to correct this by changing the position of the lever on the slots, you will experience inconvenience when locking in a different position.
The lower protective casing can cause significant inconvenience when cutting at the maximum possible angle (45 0), or even simply prevent such a cut from being made due to the fact that it will simply protrude outward from the bottom of the sole, along with the saw blade.
In fact, the design of the saw is not simple. There are many elements that rotate in different planes - so carefully evaluate for yourself the convenience of each of these elements.
The most important thing is that after you have installed and fixed the saw in the desired position, the resulting structure does not “creep” in different directions due to work loads.
Convenient and easy access to brushes for independent replacement is important, which is especially important for powerful saws.
Possibility of permanent installation - for some this may be a useful option.
Electronics. Nowadays such modules are fashionable. In addition, for certain purposes they can be very useful. For example, an electric brake on the saw blade in case of jamming. It will not prevent a kickback, but will reduce its consequences (in this regard, a slip clutch works more effectively, ensuring free rotation when the saw blade is stationary). Otherwise, the same electronic bells and whistles are typical for circular saws as for all power tools.
This is a soft start system (solves the problem of “starting current”), a system for maintaining a constant speed under load, a speed control system (for example, to reduce speed and cut plastic without it melting), and an engine overload protection system.
There are many saw blades. I will limit myself to those designed for sawing wood. Often, the best saw blade is the original one. As a rule, this is a strong, durable and versatile disc (of course, this only applies to brands with a well-deserved reputation). But sooner or later it wears out and requires replacement or sharpening. Sawing with a dull disk is extremely undesirable for many reasons. This puts excessive strain on the engine. This “rips” the wood instead of making a straight cut. And this is dangerous due to the higher probability of a kickback when blunt teeth become jammed in the array.
READ Husqvarna Chainsaw Starts and Stalls Cause
Almost all modern saw blades have carbide-tipped teeth, which provides them with a long service life.
The fewer the teeth (and they are, accordingly, relatively larger), the faster such a disk cuts, but the cut is rougher. Such discs are better suited for longitudinal sawing of wood.
Discs with more teeth are used for clean finishing cuts. These discs best reveal their advantages when cutting wood crosswise, although longitudinal cuts made by such discs also do not cause any complaints.
The inclination of the teeth can be positive or negative.
To better understand how this works, imagine peeling a potato or sharpening a peg by changing the angle of the knife. Obviously, the blade works differently, and the chips produced are not the same. Most wood blades have a positive tooth angle. A negative angle is useful for finishing cuts in plastic, laminate, and aluminum. Also, a slight negative tooth angle may be required for those discs that are installed on miter and plunge-cut saws. There, the trajectory of the “introduction” of the saw into the wood differs from the classical one. Accordingly, there is a different distribution of loads.
Compensation slots on the disks serve to prevent thermal deformation of the disk in case of overheating. This reduces noise and vibration, as well as the load on the engine when the saw is running. The friction and beating of a disk, even slightly bent by a propeller, is very unpleasant.
Not only the number of teeth and their inclination, but also their shape and sharpening geometry have a great influence on the speed and quality of sawing. In most cases, the subtleties of sharpening come down to the principles of setting a regular hand saw. But there is a peculiarity, rather a marketing subtlety. If the disk has become dull and you decide to try to sharpen it yourself, or take it to a workshop, then not all sharpening methods can be reproduced “makeshift” without special equipment. These are little tricks of saw blade manufacturers who benefit from you buying their blade again rather than sharpening it all your life.
When choosing a disk, you should also pay attention to such points.
The topic of saw blades is well discussed on the Internet, not only in an advertising sense, but also in an informational and educational way.
The simplest way to cut lumber with a hand-held circular saw in the country
And one more thing: as a rule, manufacturers that respect themselves and the buyer place all the information about the disc on its packaging and directly on its surface.
Speaking about hand-held circular saws, one cannot fail to mention one rather interesting variety of them - plunge-cut circular saws.
Not all manufacturers have them in stock. Less common than miter saws. With the help of such saws it is much more convenient to cut rectangular holes in solid wood or plywood without touching the edges. I suggest looking at the operating principle and features of using such saws on the catalog page of the manufacturer of the same name. Grizzly. Those who are interested in this can go to the corresponding website using the link at the bottom of the picture.
And now the most important thing! A hand-held circular saw is an extremely dangerous tool. This needs to be repeated constantly. I suggest watching videos that clearly demonstrate the possible consequences of disrespectful handling of circular paper, everything is more than clear:
I think what you see will force you to once again carefully study the instructions and safety recommendations from the manufacturer of your tool. And I wish no one to see this in reality!
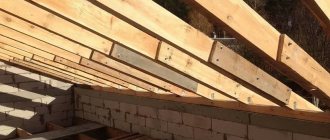
Extension with composite rafters
There is another very interesting way to connect and increase the length of the rafters: extension using two boards. They are sewn to the side planes of the extended single element. Between the extended parts there remains a gap equal to the width of the top board.
The gap is filled with scraps of equal thickness, installed at intervals of no more than 7 × h, where h is the thickness of the board being extended. The length of spacer bars inserted into the lumen is at least 2 × h.
Extension using two extension boards is suitable for the following situations:
- The construction of a layered system along two side girders, which serve as a support for the location of the joining area of the main board with the attached elements.
- Installation of a diagonal rafter that defines the inclined edge of hip and half-hip structures.
- Construction of sloping roofs. The strapping of the lower tier of rafters is used as a support for the connection.
Calculation of fasteners, fixation of spacer bars and connection of boards is carried out by analogy with the methods described above. For the manufacture of spacer bars, trimmings from the main lumber are suitable. As a result of installing these liners, the strength of the prefabricated rafter significantly increases. Despite the significant savings in material, it works like a solid beam.
Sawing with a manual circular saw
A hand-held circular saw is sometimes called a “grinder”, which is not entirely correct. The grinder was initially designed for sawing hard materials using special cutting sanding discs. A circular saw is structurally designed for sawing wood using a toothed circular saw. Several simple ways to work a manual circular saw for a beginning craftsman. There are two main technological applications for a circular saw: sawing wood along the grain and trimming across the grain. In any case, the movement of the saw can only be linear.
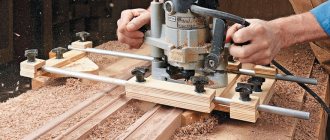
For precise straight sawing of sheet materials, it is advisable to make a simple device. It consists of a piece of plywood 6 mm thick. and a guide ruler made of a wooden block 15 mm thick, 50-60 mm wide. The length of the structure depends on what you plan to saw. This can be a platform from 1200 mm to 2500 mm
We saw perfectly straight boards with a circular saw FROM AND TO
First, we saw off a strip of plywood to the required length, 50-60 mm wide. greater than the width of the circular saw base. We attach the guide bar from above, flush with one of the edges. We place the rail on the glue and tighten it with self-tapping screws from below; the heads of the screws must be recessed immediately.
We place the device on the sawhorse or the edge of the table and saw through the outer edge of the plywood, moving the circular saw close to the guide rail. This way we will get an even edge exactly along the cutting line of the saw. Now we don’t need to calculate the direction of movement of the saw every time. The outer edge of the fixture will match the cut line of the mowing line.
We saw perfectly straight boards with a circular saw FROM AND TO
We are preparing a workplace from two sawhorses with longitudinal bars. We lay the material on the bars, with our device on top. We align the edge of the plywood with the cut line and clamp the guide with clamps to the sheet material.
When sawing sheet material, make sure that the saw does not hit the work platform bars. The simplest thing is to lay 3-4 bars of equal thickness on the sawhorses, and when marking, make sure that the saw passes between the bars. Four bars are convenient because the sawn material will not fall and the corners will remain intact.
To cut long boards to width, you can use the standard stop that comes with the circular saw. We lay the board on the sawhorses and secure it with a clamp. Then we mark the width of the part to be sawn and set the guide stop to size. Sawing with such an emphasis is somewhat more difficult than with a ruler; you must constantly control the progress of the saw, avoiding distortion. Other woodworking tools.
When cross-sawing or trimming boards, material often breaks out. To reduce chipping, set the depth of the saw based on the thickness of the board plus the length of the saw tooth. This way the saw will enter the array more hollowly and chipping will be reduced. There are other methods of sawing without chipping, for example, sawing the part on both sides to half the thickness of the sheet. But this does not always give a good result; more often than not, the saw teeth tear out the material at the exit from the massif.
Construction of door and window openings
In a log bathhouse, openings for windows and doors are made in two ways. The first is after the construction of the bathhouse is completed. After shrinking the structure in the right places, openings of the required size are cut out using a chainsaw. The first and last logs are cut to 1⁄2, which will subsequently facilitate the process of trimming. This method is applicable to simple and rounded logs. If the bathhouse is made of laminated veneer lumber, then be careful because of the possible chipping and peeling of the glued boards.
Second option. Openings for windows and doors are cut out in the log during the set of bathhouse crowns, at intervals of 3–4 crowns. This is done to prevent possible extrusion of the crowns. After the construction of the log house is completed, these “crossbars” are removed.
The first method does not require any special costs and is simple to set up, so it is most often used in practice. When making window and door openings in a chopped bath, do not forget to make a frame to protect them from distortion. The casing is carried out in the form of a prefabricated frame.
Proper operation of a circular saw
A handheld circular saw is one of the most important tools in woodworking. It significantly increases the speed of working with wood or plastic, sheet material, boards and timber. Most often it is used for cross cutting, but this tool can also be used for sawing along the grain of wood. In this article we will talk in detail about the range of uses of circular hand saws, setting them up before work, operating techniques and safety rules.
READ Handheld Circular Saw Techniques
The advantage of sawing logs with a chainsaw
Cutting into boards can be done using tools such as an electric chainsaw and additional accessories designed to simplify the work. When choosing certain products, you need to focus on the amount of work expected. Stationary sawmills are expensive and are purchased only if you plan to organize a business to create boards.
The most accessible tool for the job is a chainsaw. Such devices have several advantages over electric ones:
- the chainsaw can be used anywhere, regardless of the availability of an electrical outlet;
- the tool is suitable for working in conditions of high humidity;
- professional chainsaws are significantly more powerful than electric ones;
- You can use the chainsaw continuously for an hour.
To cut logs into boards, a special frame is used together with a chainsaw, which is attached to the device and allows you to create boards of the same thickness. A device is also needed to secure the log in one position. In addition, you will also need a guide.
Since household gasoline saws are not designed for heavy loads, it is worth using professional tools for sawing logs. When choosing, you should pay attention to devices with a power of more than 7 horsepower. Before work, the fixed frame is adjusted in accordance with the selected width of the boards. To create a frame, you can use legs from a school desk or metal corners.
READ How to Cut a Rail with a Hacksaw for Metal
What can you do with a hand-held circular saw?
Manual circular saws are suitable for performing a whole list of jobs:
- trimming several wooden blanks at once that lie in the same plane;
- trimming wide boards for which you cannot use a pendulum saw (you will need a rip fence);
- trimming boards when laying floors;
- trimming workpieces at an angle (you can use a guide or do without it);
- longitudinal cutting of workpieces at an angle;
- sampling a quarter in a board or beam;
- cutting sheet materials using a guide;
- cutting organic glass and plastic;
- using a hand saw as a stationary one by mounting it to a table.
Preparing the workplace for work
You need to remove all unnecessary items from your desktop. There should be no tools, keys or consumables. In addition, you need to ensure a free approach to the table. The floor in the work area must be dry to avoid accidental slipping. The machine must be grounded.
There are also requirements for the operator’s work clothes. Clothes need to be tucked in so that there are no flapping ends. If you have long hair, tie it up and hide it under a hat. Wear safety glasses and a respirator. It is recommended to use hearing protection as the noise level can be quite high when using a circular saw.
Before starting the saw, you need to check it for defects in the saw blade and make sure that it is securely fastened. Check to see if the riving knife is installed correctly and then check that the guard is working properly.
If your saw has a short cord, you may need an extension cord to help you move comfortably around your work area. It is advisable to use a circular saw with a soft start feature so that the tool does not jerk when starting.
Is it possible to fasten without cuts?
The rafters are fixed without preliminary cutting using a rigid or sliding method. The sliding method gives one of the ends of the rafter system a certain degree of freedom. Rigid - provides for complete fastening of the rafters without any possibility of temperature shifts.
Sliding fastening of the rafters to the rest of the roof base is also done in open and closed ways. The closed method involves the use of a corner with an eyelet in the form of a slot. The corner is fixed to the Mauerlat, and a steel component with holes is inserted into the slot. Using these holes, the corner is fixed to the rafter. It can move, relieving the wall from deformation.
There are several ways to rigidly fasten rafters. On a single- or multi-slope roof, the rafters are secured with corners or LK parts. LK parts are suitable for any rafter size, they are made of 3 mm steel, which allows you to firmly grip the roof elements. For a saw-free connection, angles are used that differ from those used in saw-off joints - the flanges are designed for more powerful screws and a larger number of them.
The sawless unit is also used in the complete absence of a mauerlat - floor beams are used instead. The number of paired rafters of a gable roof is equal to the number of these beams. This method is good for completely wooden buildings built from logs or timber.
To learn how to cut rafters at the desired angle, see the following video.
How to cut a board straight with a circular saw
Unlike a pendulum saw, which is stationary, it is more difficult to make an even cut with a circular saw. This will not be a problem if the board or beam is narrow, but when sawing a wide workpiece or when making longitudinal cuts, you need to know how to make the cut as precise as possible. To do this, you need to follow the following sequence of actions:
- There should be nothing underneath the piece of material you will be sawing. The circular saw blade should not be cutting anything else. For example, never place a board on a concrete floor—use a sawhorse or a cutting machine table instead.
- Mark the line along which the saw blade will go. Use a tape measure, ruler or square for this.
- Adjust the cutting depth. The blade should barely protrude beyond the workpiece. For example, if the thickness of the workpiece is 40 mm, the cutting depth should be 45-50 mm.
- Check the condition of the protective cover. It should rise gently when the saw is lowered onto the workpiece, and immediately close the working part when it is raised.
- As you begin to cut, look at the front right edge of the blade and align it with the mark on the material.
- Look at the right-hand guide kerf of the circular saw for right-angle cuts, and the left-hand guide for 45-degree cuts.
- Start cutting the material. Always keep an eye on the guide to make an even cut.
- Keep the saw blade flat on the material at all times.
- Push the saw just enough to get it to cut, but don't push it too hard to overload the motor. The hardest woods should be cut with minimal force.
- After finishing cutting, ensure that the safety guard is returned to the closed position.
Description of equipment
DIY circular saws can be stationary or portable. The design of the simplest circular saw will include a metal or wooden supporting frame, inside of which are mounted an electric motor, an electricity supply control unit, a table top and the working saw itself, which is mounted on the circular saw shaft or installed through gears and a trunnion mechanism. The saw is located in a slot in the tabletop, which makes it easy to cut lumber, performing high-quality wood processing.
The table top can be made from lumber or you can use ready-made metal blanks for this. Smooth easel tables are made from wood; the top of such a table top will need to be covered with a durable metal sheet. Otherwise, without metal protection, the wood will begin to wear out quickly, and the equipment will last several years during active use, after which complex and expensive repairs will be required.
Some models imply the presence of an additional shaft to which knives, a jointer and a plane are attached. Such universal machines are equipped with powerful electric motors, which allows you to perform a wide range of wood processing work. When manufacturing a multifunctional machine, it is necessary to be guided by high-quality diagrams and drawings that will allow you to create universal and reliable equipment.
If you need to perform various types of carpentry work, then set up a coordinate table with guides. The existing stops and guides can be fixed at different angles, which allows not only to ensure safe operation of the machine, but also to perform high-quality wood processing, easily changing blades to saws of different diameters.
HOW TO MAKE A PERFECT STRAIGHT CUT WHEN ASSEMBLYING A FRAME
If you are not a tough frame construction professional, then you most likely have problems with straight cutting with a manual circular saw.
A good, even cut is very desirable when assembling a frame. Even if you have a laser-guided saw, it still takes skill and a steady hand.
Usually, for a straight long cut, they use a cord rubbed with chalk: they beat off a straight line with it and saw along it. But if you don’t have the skill, this doesn’t really help. It is good to have a rigid guide against which the edge of the saw rests - then the cut should be straight. To do this, I had to come up with equipment from what was at hand.
Types of working attachments
The choice of nozzles for work depends on the volume and type of work performed. The following devices are used with a chainsaw:
- drum debarker, which is necessary for removing bark from logs;
- lightweight attachment for sawing logs;
- standard attachment used to create boards.
Attachment for longitudinal sawing
When using this attachment, sawing occurs in a horizontal direction. It is fixed to the rail using special clamps and allows you to create boards of equal thickness. After the work is completed, the boards are dried and can then be used in construction.
Lightweight nozzle
Such devices are often used, but they should only be used when creating boards for fences or sheds. This is due to the fact that the attachment is secured to the tire only on one side.
Ocarivator
The attachment for removing bark from logs is used using a clinometer transmission. Attachment occurs with belts - special pulleys are used for this.
SAW CROSSLY
For cutting at an angle, an aluminum corner 50 x 50 x 2 mm was useful. I press it with clamps to the board that needs to be sawed. In this case, it is necessary to take into account the distance from the edge of the saw base to the saw blade.
Instead of a corner, I sometimes used a rectangular aluminum profile 40 x 20 x 2 mm, 1 m long.
One day I found an old locksmith’s corner with a steel shelf in the barn. With its help, it turned out to be convenient to make cuts at right angles, since the shelf is well fixed at the edge of the board.
Attaching the rafters to the mauerlat
Correct fastening of the rafters to the ridge beam and to the mauerlat is an indispensable condition for professionally performed roof installation.
To install the rafters to the Mauerlat, one of two types of coupling is used:
- sliding;
- hard.
The choice depends on the shape of the roof and its structural features, and accordingly on which rafters are chosen - layered or hanging.
The rigid method assumes that the connection of the rafters and the Mauerlat is carried out in such a way that the possibility of rotations, shifts, bends, and torsions between these two elements is excluded (read: “How and how to attach the rafters to the Mauerlat”).
To achieve this result, you can use one of the following methods:
- using corners for fastening rafters and supporting frame beams;
- by making a gash on the rafter leg and further securing the connection with nails, staples and wire.
As for the second method, it is used more often than the first. It provides that nails are nailed from the sides at an angle towards each other (as a result they intersect inside the Mauerlat). After this, the third nail is driven vertically. The resulting fastening points for the rafter structure provide high rigidity (read also: “Rafter fastening points - structural elements”).
Additionally, both connection methods are secured by fastening the rafters to a brick or concrete wall using rolled wire and anchors. Prepare the rafters for installation if they have the same angle of inclination throughout the roof by using a template.
Installation of the rafter system, details in the video:
A sliding connection, also called a hinged connection, is achieved by creating a special fastener that allows one of the mating elements to move freely within specified limits. In this particular case, such a part is the rafter leg, and it will move in relation to the mauerlat.
There are the following methods for installing rafters to the mauerlat, providing offset:
- with the help of sawing and subsequent laying of the rafters, the place was washed on the mauerlat;
- by driving two nails diagonally from the sides in the direction one to the other;
- connection using one nail, which is nailed in a vertical position from top to bottom through the rafter leg into the mauerlat. An alternative is to use rafter fastening plates that have holes for nails;
- fastening method using a bracket;
- by extending the rafter leg beyond the wall using single plate fastening;
- by using steel fasteners specially designed for rafters, which are called “sleds”.
All the described methods, on the one hand, make it possible for the rafter leg to rest against the Mauerlat, and on the other hand, if the structure moves, its elements can move relative to each other.
The sliding type is found quite often in the construction of houses; this connection of rafters and mauerlat is especially popular when arranging wooden houses that are built from logs or timber. Over time, the original geometry of the structure is distorted as the walls shrink and the use of rigid joints leads to the integrity of the walls being damaged. Attaching the rafters to the frame using a sliding connection allows the log walls, gables and other elements of the building to adjust to shrinkage.
It is also not possible to rigidly fasten the rafters in the ridge. The entire structure is assembled first on the ground. Before installing the rafters for the roof, measurements are taken, cut-outs are cut into the mauerlat and rafter legs, and then a careful adjustment is made.
SAW Lengthwise
If you need to straighten the edge of the board, you need a long guide. I use a rectangular profile 50 x 20 mm, 2 m long. If the board is shorter than 2 m, then it’s quite simple: we fasten the profile with two clamps and saw along it. But if the board is longer, then the profile needs its own guides and fastening. Can be fastened with two self-tapping screws. And I make a straight line using a strong thread, stretched like a string.
To fasten the thread, use a sharp knife to make a slit along the fibers at the required distance from the edge of the board at the beginning, and tuck the end of the thread there with a knot that prevents it from slipping out. At the other end there are two slits: in the upper one the thread is tensioned, and the lower one fixes it. If the tensioned thread oscillates when released and stops in the same position each time, then it is well tensioned.
We install the profile lengthwise at the same minimum distance without touching the thread and fasten it with self-tapping screws. To prevent the profile from moving during fastening, it must be pressed firmly. Having made the first pass with the saw, we rearrange the profile further. Ideally, another board of the same thickness should be placed under the other edge of the saw for support. If there is no such support, you will have to monitor the horizontal position of the saw, but this is easier than sawing in a straight line without a guide.
This way I was able to do an extreme leveling of a ceiling beam that had too much of a downward hump.
Sources:
https://mastervdome.ru/instrumentyi-i-prisposobleniya/pilim-ruchnoy-tsirkulyarkoy/ https://dnipro-m.ua/news/pravilnaya-rabota-czirkulyarnoj-piloj/ https://kak-svoimi-rukami. com/2018/08/idealno-pryamoj-raspil-ruchnoj-cirkulyarkoj-moj-sovet/
Required tools and materials
First, the material for the working surface of the table is selected. Most often these are plywood or chipboards, or other types of wood material. After installation, they require additional processing to protect them from moisture and subsequent destruction. Some craftsmen also use metal; such a table will be stronger and more reliable. But you shouldn’t use plastics in this matter, they are not suitable for such purposes.
So, to build a homemade table for a circular saw, you will need:
- Work surface material. If wood is used, then carpenters recommend choosing an option with a thickness of 20 mm or more.
- Timber for frame construction. In most cases, wood is used. You need to prepare 5 bars.
- Wooden dowels for fastening. It's better to take a spare, they are inexpensive.
- Metal fastenings. Minimum – 4 pcs.
- Metal corners. 10 pieces.
- Self-tapping bolts.
All materials must be purchased in advance and left at the place of work, so that later you do not have to run to the store again.
Of course, you can’t make a table with your bare hands. Ideally, you need to have the following set of tools:
- For measurements and drawings (tape measure, ruler, pencil, marker).
- For cutting (electric jigsaw).
- For processing wood (milling machine, plane, sander, fine-grained sandpaper).
- For fastening (drill, screwdriver).
Saddle stop
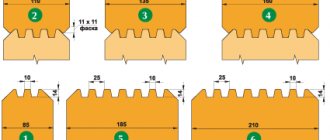
If you have to saw a lot of identical bars with a circular saw , then it’s worth spending time making a simple saddle stop. Its use will more than return the spent minutes. The saddle stop works especially effectively when cutting thick beams, for which the disk requires two cuts from different sides.
The saddle stop is U-shaped. The base is a board 25 mm thick, its width is exactly equal to the thickness of the sawn timber.
The side surfaces of 10 mm plywood are attached to the base. The width of the sidewalls must be greater than the width of the beam in order to provide support for the circular saw platform until the saw blade comes into contact with the beam.
How to cut a board into thin bars
The saddle is put on the beam at a distance from the cut marking, corresponding to the working distance to the saw blade, and is pressed through the sidewalls to the beam with clamps. Using the side as a support for the saw platform, cutting is carried out. If the thickness of the timber is such that one cut is not enough, then it is turned over and another cut is made. The position of the stop does not change in any way.
Do you need high-quality WPC materials or require installation work?
WPC decking boards WPC material differs from wood because it is made from a wood-polymer composite, that is, it consists of crushed wood and purified polymer. It is for this reason that decking differs from many other types of wood in its hardness.
So it can be difficult to saw WPC with ordinary discs. Standard wood has lower values of not only hardness, but also resistance. So, how to cut a decking board and is it possible to cut it at all?
If we talk about tools for working with decking boards, the choice depends entirely on the quality of the material, climatic conditions and simply working issues.
READ How to sharpen a wood saw at home
Cutting deck boards is, of course, possible, but it’s not so easy. Some masters of their craft will be able to cut even a figured shape from the decking. But not everyone involved in home construction is the same type of professional. So, in order to successfully saw decks and logs from WPC, you need to purchase special components:
- circular saw, electric jigsaw;
- saw with small teeth;
- hard alloy discs and drills;
- standard components such as a hammer, drill, screwdriver, etc.
Most of these tools are available to everyone who likes to decorate their home. In this case, it is necessary to focus on the choice of cutting discs and drills.
This is worth knowing: each sawn fragment of a decking board makes its length three millimeters shorter.
Features of cross cuts
Cross cutting is used only to create firewood or interior elements. The work is carried out according to several principles:
- Before carrying out work, the log is placed in a horizontal position on supports. The height of its location should be 0.5 m.
- After this, it is necessary to completely clear the log of bark.
- At the next stage, it is necessary to make marks on the entire log, located at an equal distance from each other.
- Then, cutting can be done using the created marks.
Cross cutting does not require specialized tools.
Edge stop
This is already a rather complex device that requires time and precision in manufacturing. It allows you to cut parallel to the edge of the material being cut. It will be useful to make a drawing of it before starting work so as not to miss the dimensions. Actually, such a stop is included in the circular saw kit, but its short length does not always ensure an even cut. The large size and the desired strength require the base of the stop to be made of plywood with a thickness of at least 15 mm. You can also make a thrust bar from it.
- longitudinal grooves for dowels are made at the base;
- hardwood dowels are mounted on a stop bar;
- Another through groove is made between the longitudinal grooves to secure the thrust bar during operation;
- a hole is cut in the base for a circular saw blade;
- On the sides of the base, restrictive strips are placed for installing the circular and clamps are provided to secure it securely.
When installing the stop on the material being processed, the stop bar moves in the grooves of the base to the required distance and is secured through the through slot with a clamping wing screw. In order not to have to worry about the ruler every time, you can attach it (or a piece of tape measure) to the base of the stop along the guide grooves.
Blank template
When cutting a large number of identical parts, you can use the first of them as a template for cutting subsequent copies. You just need to fasten a thrust piece on one side of the first sample with a width corresponding to the distance from the edge of the slab to the cutting disc. By installing such a template on the material to be cut, you can make many identical parts without markings.