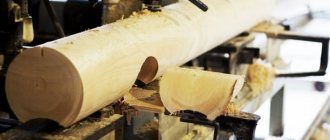
For many, a good-quality wooden house is the ideal embodiment of their dream of cozy and environmentally friendly housing. Currently, the optimal building material for such a house is profiled timber, which allows you to build absolutely smooth and beautiful walls that do not require additional decorative finishing.
However, due to the fairly high cost of this material, not everyone can afford it, so many are trying to solve this problem differently - for example, making profiled timber with their own hands.
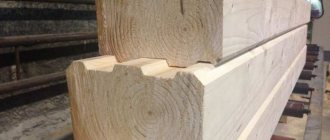
Photos of industrial designs with given dimensions
Before considering various options and methods of self-production, it would be a good idea to find out what advantages this can provide and how profitable it is.
Peculiarities
Currently, profiled timber is used literally everywhere. It is used to build both inexpensive and luxury homes, outbuildings and other structures of similar types. Many people use timber to make homemade eco-friendly furniture. All this indicates the relevance of the material under consideration and its relevance. But few users know that it is quite possible to make timber with your own hands.
The timber is made using special tools. Such work cannot be called too complex or inaccessible, which is why many people resort to them.
There are several most common reasons why users decide to make high-quality timber on their own.
- At the head of the “table” is the financial issue. In fact, in many cases, users can save a lot of money by making the timber themselves rather than buying it ready-made. But at the same time, we must not forget about the time factor - you will have to spend some time making a homemade product.
- Often people need timber that has dimensions that are far from standard. Such materials can be very difficult (or impossible) to find on sale. In such a situation, the solution to the problem can only be the independent production of such an environmentally friendly material with suitable dimensional parameters.
- The reason for making timber yourself may be the presence of a large number of leftovers, for example, edged boards, which are no longer profitable to put up for sale. From such components you can make high-quality timber and put it into use.
- If you really need powerful and strong load-bearing beams, then timber made from thick boards will be a good solution. The results are very good structures that do not crack, twist, rot or mold.
It should be taken into account that walls built from homemade profiled timber can be left without auxiliary finishing. Without paint, wallpaper and other materials, such bases look no less impressive and attractive.
There are several different ways in which users can make high-quality timber with their own hands. Each home master chooses the optimal technology for himself.
A final word of caution
Such a simulator must be durable, preventing the user from falling and getting injured. Therefore, all material must be durable, do not take anything from used materials, especially fiberboard or chipboard.
As stated above, the product experiences great stress and during operation a obviously defective crossbar or stand may break.
Paint the finished sports equipment or apply another protective coating against wood pests, ultraviolet radiation, and weather precipitation. Repeat this product for yourself at your summer cottage.
How to choose an air conditioner for your home or apartmentDo-it-yourself bait - composition, application features and storage methods (115 photos and videos)
DIY sliding gates - how to build simple and automatic gates. Schemes, drawings and review of the best ideas (90 photos)
Profiled timber
What are the benefits of making it yourself?
Note. Of course, it will take a lot of time to process it yourself, but, for example, budding - profiled timber is offered without intermediaries, and you save a lot of time.
But don't forget that all these savings come at a cost!
List of reasons for self-production:
- Of course, the most important reason is the price - if you make such products yourself, the savings will be up to 5,000 rubles per cubic meter of material.
- You can choose the shape of the wooden profile yourself, taking into account that it is not blown through. Plus, you will do it according to your needs.
- In this case, the insulation will be hidden in the grooves, so the walls will not need additional finishing.
- The crowns will fit most accurately, therefore, the fit will be tighter.
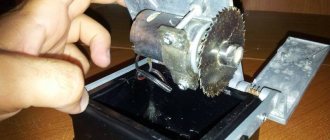
Woodworking milling machine
But there are machines that allow you to do all these stages on one machine with one installation of a log. Machines of this type are called multifunctional milling machines. This technique is equipped with removable tools, which are changed before each new finishing step. The quality of the resulting corrugated timber is affected by the quality of the cutter used on such equipment.
The groove knives on a similar machine are removable and have different profiles. Therefore, without much effort, you can obtain a thermal lock from a conventional single-groove to a complex “comb” shape. This allows the range of goods in production to be increased to the limit and increases the profitability of production.
It is necessary to briefly consider very popular models of machines for the production of corrugated timber.
Profile types
When choosing the type of profile for yourself, you first need to take into account your professionalism and what kind of cutters you have for profiling the timber. It's best to stick with the simplest options so that you don't need a lot of different tools and don't have to do the same amount of calculations. To determine this, you can use GOST 9330-76, with which you can make all the calculations most correctly.
Basically, home equipment for profiled timber is quite simple and craftsmen prefer such types of profiling as:
- through a block;
- through a triangle.
It should not be forgotten that GOST always indicates the depth and width of the groove in accordance with the cross-section of the timber being processed.
Step-by-step instruction
How to make beams at home depends only on the available materials and capabilities. In my case, I had to take the simplest route.
Source kakpravilnosdelat.ru
Stages:
- site preparation;
- applying markings for holes for 4 racks;
- preliminary installation of the posts in the hole and their fixation after confirming the matches with the expected dimensions of the projectile.
It is worth noting here that it is imperative to check the compliance of the dimensions of the future projectile. If this is not done and even a slight bevel results, this will affect the correctness of the entire structure.
Following actions:
- the pits are deepened by 70 cm;
- re-installation of racks, checking the correct location;
- fixation by filling the holes with cement.
After fixing, you will need to wait for the concrete to set for at least a week in dry weather. This is necessary so that during subsequent work the racks do not become loose.
If you wish, you can concrete the entire site, but since there is no certainty that there will be no falls, it was easier for me to leave the sand base, which was compacted during the preparatory stage.
Source yandex.net
Description of methods for self-production of profiled timber
Depending on the experience and technical equipment of the home workshop, several options can be distinguished according to their level of complexity.
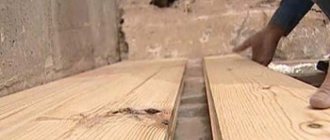
Making timber from boards
If there is practically no woodworking equipment available, then the easiest way out would be to make timber from boards.
- For these purposes, the “fifty board” is best suited, having suitable dimensions in length and width.
- First of all, you need to build a slipway from available materials, on which all the work will be performed;
- Then special templates are made according to which the boards will be laid, so as not to measure the dimensions of the tenon and groove of the future beam every time and so that all products are the same;
- To produce one beam, you will need three boards, which are stacked on top of each other in length, with the middle board being laid with an offset specified according to the template. As a result of this overlap of boards, a profile is formed in the cross section, where a tenon is formed on one side and a groove on the opposite side;
- After the boards are laid properly, all that remains is to securely fasten them together. The simplest thing is to nail them together on both sides with ordinary nails; for a more reliable connection, you can use metal screws, but in this case you can’t do without a screwdriver;
- Also, to give strength, you can glue the timber with your own hands, for which, before laying the boards on top of each other, they are thoroughly coated with glue. In any case, after this they must be fastened with nails or self-tapping screws, since at home it is very difficult to achieve perfectly strong bonding of such surfaces. The result will be a simplified version of laminated veneer lumber.
A simple way to modify a rectangular beam
In this case, profiling timber with your own hands requires at least a hand-held circular saw, but otherwise it will not cause any difficulties even for a novice carpenter.
- Here you will also need to construct a stable slipway or workbench for the entire length of the workpiece being processed;
- In this case, the main goal will be to cut identical V-shaped grooves on opposite sides of the rectangular workpiece;
- To accurately mark future grooves, it is necessary to make a template from a block with the width of the future groove, which will be installed along the entire length of the beam exactly in the center. Using the template, two parallel lines are drawn along which the cuts will be made;
- Along the control lines, using a hand-held circular saw set at an angle of 45?, an incision is made along the entire length from opposite sides to a given depth. The result should be a smooth V-shaped groove.
Now, if you place two beams on top of each other with the sides where the grooves are cut, then along the entire length a diamond-shaped cavity with a square cross-section will be formed, into which a standard 50×50 beam should be laid, the dimensions of which should be used to make the grooves.
As a result of these simple steps, you can very quickly turn a rectangular wooden blank into a profiled beam. These are the two simplest and most accessible manufacturing methods.
But in any case, before doing anything, it would be a good idea to familiarize yourself with GOST 9330-76, which is called “Basic connections of parts made of wood and wood-based materials.” This document contains all the necessary information to correctly calculate the profile depending on the size of the workpiece.
Profile cutting using a hand router
In this case, the workpiece will be a four-edged rectangular edged beam, and the main working tool will be a powerful hand router.
By the way, you should again calculate how cost-effective this is, because the price of a good tool cannot be small either, and using a low-power and cheap one, you are unlikely to achieve the desired quality of processing, and the time costs will be much higher.
Step-by-step instructions in this case will look like this:
- We build a solid base in the form of a slipway or workbench for the entire length of the workpieces being processed. The support must be stable without play or wobble, and also allow the workpiece to be firmly secured;
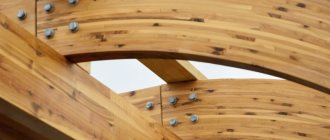
- In addition to the router itself, you will also need a set of special milling attachments, the shape and size of which will depend on the complexity of the profile that needs to be selected. With proper experience and high-quality material, you can obtain products as close as possible to industrial designs;
- When working with a milling cutter, it is important to maintain the accuracy of guiding the tool along the intended path. It is desirable that it moves smoothly along stably installed guides, without jerking or lateral play. The quality of the pairing of elements, and, accordingly, such operational parameters of the future home as thermal insulation and wind protection depend on the accuracy of the work;
Important! If you use a high-speed router with sharp cutters, you can do without additional grinding.
The use of this technology allows, in everyday conditions, to cut profiles of varying complexity on timber, which are in no way inferior to industrial designs. There are other profiling methods, but they require more complex self-made technical equipment and equipment.
In the future, regardless of what type of timber will be used for construction, it is important to adhere to the technology, which requires the use of dowels (dowels) to reliably connect the crowns to each other.
Altai machine: characteristic differences
The popular machine for profiled timber Altai differs from those versions that are sometimes created with your own hands. What are its features? First of all, its versatility stands out. The device is aimed not only at profiling the timber, but also at cutting it through. Such machines make it possible to produce building materials with various specified groove parameters. The thing is that the Altai device is equipped with 4 milling carriages. The device for the production of profiling parts is presented in the format of a rail table, complemented by clamps for timber and stops. The profile here is installed, as a rule, of a rectangular or square type. All carriages are started manually by the operator. Each cutter cuts only one side of the workpiece. As for the profile parts of the Altai device, figured knives are installed on them. It is precisely these kinds of elements that allow you to set the desired groove shape on the beam. Knives may also be used:
- straight;
- semicircular;
- aimed at giving the workpieces a cylindrical appearance.
SF-250 equipment: nuances of operation
Modern profiling machines for timber SF-250 are designed not only for profile planing, but also for flat planing. The device is aimed at creating house-building parts that are necessary for small and medium-scale work.
The excellent planing machine SF-250 is suitable for processing material in solid format, characterized by natural moisture. The device is also intended for profiling timber from the laminated veneer lumber category. The device is equipped with special spindles that differ in average rotation speed. It does not exceed 5000 rpm. Profiling machines SF-250 are a guarantee of high quality. The treated surfaces on hand-made devices turn out completely different. It is a professional machine for profiling timber that allows you to obtain ideal parts for construction. However, it is worth noting the advantages of independently created technology. It is great for those who make fragments in small quantities for personal use. You can make a wonderful machine for profiled timber with your own hands using an extremely simple scheme. Even those who rarely encounter such questions in everyday life can figure it out. Such profiling devices do not require special skills to operate. You can always adjust them yourself, without the help of professionals.
For many, a good-quality wooden house is the ideal embodiment of their dream of cozy and environmentally friendly housing. Currently, the optimal building material for such a house is profiled timber, which allows you to build absolutely smooth and beautiful walls that do not require additional decorative finishing.
However, due to the fairly high cost of this material, not everyone can afford it, so many are trying to solve this problem differently - for example, making profiled timber with their own hands.
Before considering various options and methods of self-production, it would be a good idea to find out what advantages this can provide and how profitable it is.
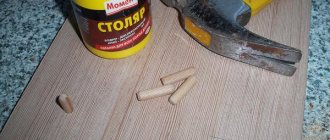
Making dowels
This type of fastener consists of wooden cylindrical elements of a certain diameter, which are driven into pre-drilled holes in beams lying on top of each other, thus additionally fastening them together.
Making dowels for timber with your own hands is not difficult and anyone can do it, however, any business has its own subtleties that you need to know.
- According to the technology, dowels should be made from harder wood species;
- Their diameter should be such that they can be driven into the technological holes with a slight tension. If the fastener is loose in the hole, it is practically useless, and if it is too tight or protrudes above the surface, it can cause problems with settling of the house.
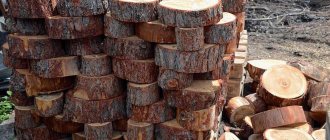
- You can split birch logs of the required length into many square pieces, and then manually trim them to a round shape of the required diameter;
- If you have a wood lathe available, then these elements can be quickly turned;
- Cuttings for shovels and other garden tools that have become unusable can be used as dowels. In this case, you just need to cut them into pieces of the required length.
Advice! You can also use metal pipe scraps of suitable diameter as dowels.
Reworking a rectangular beam
There is a method that will make it easy to profile a finished rectangular beam. Let's consider what stages it consists of.
In this case, it will be necessary to build a high-quality structure, in the form of a strong, non-shaky slipway or workbench. The length of this structure must correspond to the length of the raw material.
In the work under consideration, the main goal of the master will be to correctly cut the same type of V-shaped grooves. They should be located on opposite sides of the wooden piece.
- To accurately mark the areas with future grooves, you will need to prepare a template from a block, the width of which will correspond to the size of the future groove. This template will need to be installed along the entire length of the main beam, exactly in the center.
- In accordance with the indicators of the template, the master will need to cut 2 parallel lines along which cuts will subsequently be made.
- Along the marked lines, using a circular saw set at an angle of 45 degrees, you will need to make a neat cut along the entire length of the base on opposite sides, to a given depth level. If you cut everything correctly, you will end up with a perfectly straight V-shaped groove.
Useful tips and tricks
If you decide to build high-quality timber with your own hands, then you should take on board some useful tips and recommendations that will allow you to carry out all the work without errors and shortcomings.
Before making a beam using a milling machine, the master must take into account that a high-speed tool with very sharp cutters will avoid the further process of grinding a homemade beam.
- The most convenient way to cut a log to make timber is using a chainsaw equipped with a special frame. Such a device will allow you to correctly cut the workpiece, refusing the services of a sawmill.
- Before starting a chainsaw to cut workpieces, the master must make sure that the tool contains chains intended for longitudinal cutting of wood (the same type of cutting is suitable for dissolving a log - this is the easiest way to dissolve it into boards and slats). Only in this case will the sawing process be simple, fast and of high quality.
- When working with various tools for cutting or sawing wood, it is very important to follow safety precautions. The user must act as carefully, carefully and strictly as possible according to technology. In such work, excessive haste and anxiety can lead to very bad consequences.
- It is most convenient to make timber using high-quality and properly working tools. Excellent quality is demonstrated by branded devices, for example, devices from Makita, Bosch, Dexter. These products are very convenient and effective to use.
- When making timber using a router, we must not forget that a special attachment for such work should be ideal for it. Often craftsmen are faced with the fact that the equipment they just purchased for a router does not fit their tool. Nozzles must be selected in accordance with the specific model of the machine.
- It is strongly recommended to make timber only from high-quality boards or logs. Materials must not show signs of rot, mold or other serious defects. From such raw materials it will not be possible to obtain truly reliable and strong bars that will be used for further construction work.
When making homemade laminated veneer lumber, the prepared wooden layers (boards) should be sewn together using a special glue for woodworking. The composition must be designed for indoor use. It is advisable to find an environmentally friendly adhesive solution.
Making timber yourself is not the fastest process. If a master is afraid to get involved with such work or does not want to waste time, then it makes sense to think about buying ready-made bars. This is the easiest way out.
Nuances of choice - depending on your goals
What kind of machine can be used for the production of profiled timber? What are the features of the overall production process of this material? Proper manufacturing of profiled timber is not just a complex process. The procedure is carried out in several stages to make the product reliable. The following types of wood can be used in the process:
- cedar;
- pine;
- larch.
The first step is sorting the raw materials. The selected material is sent to the frame machine. This is necessary to file the product and clean its trunk from bark. Today, for profiling timber, it is not customary to use only one type of equipment in production. As a rule, several types of equipment are purchased. This allows you to saw the log from all sides with the highest quality possible and only then begin to profile it. To ensure that the result is a dry timber, special chambers are used, after which you can proceed to the production of a profiled product.
The process of creating this type of product is divided into several stages:
- processing using a multi-saw machine;
- four-way processing;
- trimming and marking;
- sawing out the cup and inter-crown connection.
Using a Circular Saw
The second way to make a connection with your own hands is to use available tools. For example, using a hand-held circular saw. Such a tool costs 2-5 thousand rubles, depending on the manufacturer. The main thing is that it can be cut at a back angle and make a cut with a depth of at least 65 mm.
The advantages of this option:
- Ability to control the accuracy of the cutting depth.
- Easy cutting of a straight and smooth groove.
- Disadvantages of working with a circular saw:
- The cutting depth may not be sufficient.
- It is impossible to clean the groove with this tool.
- Each time you need to readjust the cutting depth.
- Low operating speed.
- Best used for cutting a triangular groove.
Safety regulations
When cutting logs with a chainsaw into firewood, workers must use protective equipment, such as:
- headphones;
- clothes made of thick fabric;
- gloves.
It is necessary to have a first aid kit nearby, because a chainsaw is very dangerous, and even with a small wrong movement it causes deep wounds. For safety reasons, you should only add fuel after the tank has cooled, and start the engine with a chain brake to prevent premature rotation of the cutting links.
If we talk about the features of working with a chainsaw
, then it should be said about one of the main ones - you need to press it smoothly so that the chain easily sinks into the tree, and not press on it with all your might. Another important point is that when working at a height of more than one and a half meters, you need to use a ladder. How to properly cut trees with a chainsaw or electric chain saw. What safety measures need to be observed and what protective clothing to choose when sawing with a chainsaw. Otherwise, the tool will pose a serious danger to the worker. When the chain approaches the side of the trunk opposite from the person, you need to hold it in such a way that after complete sawing it does not fall on your feet, but moves slightly forward.
To learn more about the intricacies of working with this tool, you can watch videos and photos, drawing up a plan for your intended actions.
The chain on the electric saw does not lubricate
Why does a chainsaw stall under load?
A few important notes
1. Properly manufactured laminated veneer lumber is superior in its structural, mechanical and other parameters to solid timber made from the same wood and with the same dimensions.
2. Modern adhesive compositions for wood, if used correctly, make it possible to obtain an adhesive joint that is stronger than the wood itself. I once wanted to tear off the glued block to the tabletop. The end result was that the block itself split along its length, but at the place of the adhesive connection it did not lag behind one iota.
3. In many cases (including at home in a city apartment), it is possible to make laminated veneer lumber without the use of special expensive tools, if you use purchased parts (floor slats, boards) for its production.
Before moving directly to the manufacturing technology of laminated veneer lumber, let's consider some definitions.
The figure below shows the main parts of laminated veneer lumber and how to connect them. In fact, there are many more connection methods, but the figure shows the easiest ones to make at home. An important condition for timber is the relative position of the annual rings; the lamellas must be glued together in such a way that their relative positions in the manufactured timber are in different directions for adjacent lamellas. In this case, the timber will be least susceptible to warping.
Advantageous characteristics of wooden beams
Such projectiles, made from safe, environmentally friendly materials, have many positive aspects:
- Allow athletes to easily and quickly adjust the device in width and height;
- Provide simple assembly, along with relatively uncomplicated installation;
- Excellent ergonomic characteristics;
- Such a projectile is economically beneficial in the case of purchasing inexpensive, high-quality wood or cutting it down yourself;
- Additional costs for welding, cutting, and the use of special equipment for installation are absolutely excluded;
- After a certain period, you can safely carry out the necessary modernization or complete replacement of the structure;
- If assembled by yourself, the product will have the necessary strength and will last a long time without breakdowns or repairs.
For many, even the fact that timber beams will always be in their place is important. Unlike similar metal ones, which can be stolen if the owner is absent for a long time.
Medicine has long established the fact of a beneficial effect on processes associated with the necessary restoration of human health and its regenerative functions, with regular sports exercises in the lap of nature.
Technology for making laminated veneer lumber at home
Necessary tools (the list of tools, of course, depends on what kind of timber you want to make):
- Hacksaw or two-handed saw
- Clamps
- Planing tools (plane, electric plane, circular saw)
- Milling machine (circular saw with interchangeable cutters), desirable, but not required
- Belt sander, preferable, but not necessary
- Paint brushes, hair brushes, synthetic
- Marking tools (tape measure, steel meter ruler, square, etc.).
Necessary materials:
- Lumber (boards, beams, slats)
- Wood glue or universal
- Solvent 646 (acetone) - for degreasing.
The manufacturing technology of laminated veneer lumber will be discussed using the example of the production of laminated veneer lumber for the manufacture of window frames at home.
Requirements for source material. The lumber used must be dry and healthy. In this case, I used pine and larch timber (100 by 100 mm), which was stored under a canopy, i.e. natural drying.
- We cut the pieces to the required length, with an allowance of 5 cm on each side.
- We select three blanks (lamellas) to make one beam. What is important? Since at the first stage only those edges (sides) of the lamellas that are to be glued and in which the groove will be selected are planed and jointed, it is necessary to determine in advance the relative position of the lamellas in such a way that the pattern of the annual rings is multidirectional. To connect the lamellas I used a dowel connection. After sharpening the glued sides, select a groove for the outer lamellas on one side and two grooves for the middle lamella (on both sides). Based on the dimensions of the grooves on the circular saw, we make blanks for the keys.
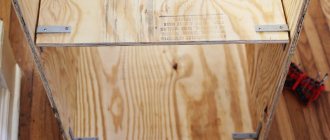
- After manufacturing all the parts of the future block, for preliminary assessment and adjustment, we assemble the timber “dry”, without glue.
- Preparing the surfaces to be bonded is an important operation. Depending on the glue used, the order of preparatory steps may vary (see instructions on the glue packaging). But the basic operations, as a rule, are still the same. Usually you need:
- Sand the mating surfaces with sandpaper or, more conveniently, with a grinder.
- Dust the surface with a brush or vacuum cleaner.
- Degrease (I used solvent 646 and a brush), let dry.
- All manufactured parts (joints) should be treated with fire protection, twice with intermediate drying.
After completing these operations, you can begin gluing the timber.
Gluing timber
Gluing timber is the most critical process. It is especially important to choose the right glue here. That is, depending on where (outdoors, indoors) under what conditions (humidity, temperature) the future product will be used, and also depending on the requirements for the appearance of the adhesive joint (color of the glue), it is necessary to select the appropriate adhesive. Now on the market there are practically no problems with the choice of glue.
The gluing technology depends on the chosen adhesive and is usually also indicated on the packaging.
As you can see in the photo, the glue is yellow in color (the color issue was not important for me), the glue is intended for use in outdoor work, on wood, the pattern of annual rings on the timber is multidirectional. Defects and chips along the edges of the timber will be removed during finishing of the timber. After gluing, I used clamps to compress and secure the parts to be glued.
Drying of the adhesive joint must be carried out in accordance with the recommendations of the adhesive manufacturer. As a rule, the following conditions must be met:
- Direct exposure of the product to the sun and water should be avoided (for example, I dried it under a canopy)
- The parts to be joined must be pressed firmly along the plane being glued
- Drying times must be maintained in accordance with the manufacturer's recommendations.
- I will mention one more non-standard (optional) operation. Taking into account the fact that laminated veneer lumber was created for the production of window blocks, and the force impacts when performing caulk work when installing window blocks are not small. I decided to further strengthen the structure of the beam by installing it on dowels. I used homemade dowels made of oak, with a diameter of 22 mm, using a hole in the lower part of the dowel for a conical wedge (the dowel fits into the spacer on the wedge - when driven in). First I drilled the holes. The dowels and conical wedge were placed on glue. I hammered the dowels in with a sledgehammer.
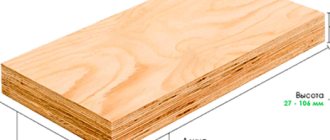
After thoroughly drying the products, we finally process the laminated timber. In particular, we plan timber. When planing, you need to maintain the same dimensions for all beams; the clean dimensions of the beam (in cross-section) are 90 by 275 mm. Next, we treat the glued timber on all sides with fire protection, twice.
The finished glued timber is shown in the photo below (end view and side view).
Comment
In order not to get hung up on the word BRUS, we need to add that this technology is quite applicable in the manufacture of other parts. For example, to make a tabletop for a computer desk, I used a purchased floorboard, from which I glued the shield.
Tip: When making small workpieces (for furniture repair) or small structures (wall shelves, drawers), when making grooves or quarters is not convenient, or you do not have such an opportunity, gluing is often done using a smooth fugue. In this case, for more reliable gluing and fixation, a set of center markers will be very helpful. I advise you to buy it. You can buy markers in construction stores; they cost pennies, but they help remarkably. Large markers, in the photo on the right, homemade, turned on a lathe, are used for larger jobs.
SPB-200 – a unique machine model
Among the most popular and in demand machines for profiling timber, it is worth noting the SPB-200 model. This type of technology is focused on planing and producing material that can be dry and have a natural moisture level. The device copes well with different types of wood with a width of no more than 220 mm.
The modern machine for profiled timber SPB-200 has a number of key characteristics. The equipment has 2 cutters. The device rotates at a frequency of about 4.5 thousand revolutions per minute. This functional machine that produces profiling parts requires an electrical power of at least 7.5 kW. The weight of the device is more than half a ton.
As for the advantages, the main advantages of the device are:
- availability of replaceable cutters;
- compactness;
- relatively affordable price;
- high and prompt payback.
Modern SPB-200 machines for profiling timber are also a unique opportunity for correcting curvature and other deformations of wood blanks. The operation of this type of equipment can be seen in the video.
When will independent production be justified?
Depending on the situation, each developer will have his own motivation for action:
- First of all, this is a financial issue. Indeed, in some cases you can save significantly, but here you still need to take into account the time factor;
- Quite often there is a need for non-standard dimensions of timber, which cannot be found from manufacturers, and then this is practically the only way out of the situation;
- When there is already a sufficient supply of edged boards and timber, but it is unprofitable to sell it, and profiled material is needed for construction;
- If there is a need for powerful load-bearing beams, and in this case, you can make laminated veneer lumber with your own hands from thick boards. This design is not subject to torsion and cracking, and can also withstand higher loads than a similar solid wood beam.