Veneer is sheets or strips of wood up to 10–12 mm thick. When glued to furniture made from cheap material, they improve the appearance of the product and give it additional strength. Covering parts with veneer or gluing it to a base is called veneering. Sometimes those who are interested in how to glue veneer at home call this process “veneering,” but there is no such word in explanatory dictionaries.
History of the creation and use of veneer
Even the ancient Egyptians made veneer by cross-cutting a tree trunk. The widespread use of veneer began when a peeling machine was invented, which made it possible to separate thin plates from wood. An improved peeling method was applied in Germany. This method is still used today.
Both in ancient times and today, veneer is used mainly as a finishing material for cladding doors, furniture and walls. In practice, the use of veneer solves the environmental problem of forest conservation, since it reduces the consumption of wood in furniture production.
On an industrial scale, machines are used not only for the production of veneer, but also for veneering. The most common is a hydraulic press for gluing veneer onto chipboard. The use of such sophisticated equipment is necessary for greater productivity. The compressive forces of the press do not play a significant role in industrial veneering technology, since they can damage the bonded material.
It is possible to veneer surfaces even if there is no special machine. Before you learn how to glue veneer at home, you need to choose the right material. To do this, it is important to know what types of veneer are produced and how they differ from one another.
Features of MDF veneering
Veneering MDF using veneer is a rather complex process. During this process, glue is applied directly to the panel, and then lumber is placed on top of the resulting film. After this, the product is subjected to hot pressing and subsequent finishing, in particular, varnishing.
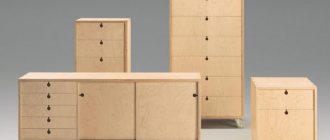
Veneered MDF is practically no different in appearance from solid wood. In addition, the product has a large number of optimal performance properties, including:
- resistance to moisture,
- long period of use,
- versatility of use,
- acceptable price,
- environmental Safety.
Veneered MDF is used in the manufacture of high-quality furniture, decorative panels and interior doors. Veneered material can also be used in the production of parquet.
Lumber made from valuable wood species is used for cladding the panels. It can be planed, sawn, peeled. Veneer is obtained by cutting wood, as a result of which it acquires a texture characteristic of a particular species.
Types of veneer
This material is classified depending on the methods of production and coloring.
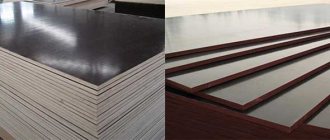
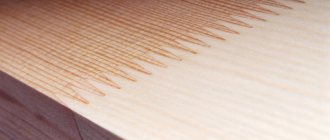
- Peeled veneer. It is made by rotating logs and cutting a thin strip from them. The peeler saw cuts the wood parallel to the grain. Steamed logs of alder, pine, birch, and oak are peeled.
- Sawn veneer. It is made from coniferous species (fir, Siberian cedar). The finished material is planks up to 12 mm thick. It is mainly used for the manufacture of musical instruments, but is also used in furniture production. This is the most valuable type of veneer.
- Sliced veneer. It is made only from hard wood (oak, mahogany). It differs from other types of veneer by the method of cutting a layer of wood. First, the trunk is sawn into bars. The layers are then cut perpendicular to the length of the fibers.
- Fine-line. To give peeled veneer the texture of natural wood, its sheets are sorted, painted, glued and pressed. Then the resulting bars are re-cut, producing sheets of planed, recut veneer that imitates valuable wood species. Fine-line veneering, like lamination, helps create beautiful wood-like chipboard textures.
The first three of the described types of materials are natural veneer, which is used in both painted and unpainted form. Fine-line is a reconstructed, unnatural material. For home use, mostly inexpensive types are chosen: rotary-cut veneer or fine-line.
general information
There is no definition of the term “veneering” in various dictionaries. In essence, it means pasting materials with the thinnest layer of decorative wood-based coating. In principle (if you don’t go into specific details) this is the same lamination technology. The only difference is that, as a rule, products (objects, structural parts) made of wood are subjected to such surface finishing.
Veneer has a certain classification. Differences in production technology, as well as durability and specific use. A detailed description of the groups is unlikely to interest the reader. It is enough to note that if you plan to finish furniture with your own hands, then it is advisable to focus on peeled veneer (a natural product)
and fine line (the so-called reconstructed modification).
They have a lot in common - ease of working with the products (the layer is very thin), a variety of textures (especially fine-line modifications) and an affordable price.
Therefore, talking only about furniture restoration is not entirely correct. With the help of veneer, you can give a “second life” to old door jambs and panels, wall panels, countertops - there are plenty of options for using such finishing.
There are several technologies for fixing veneer. There is only one available for DIY implementation - “hot”, which is based on the use of glue. This technology is excellent for restoring wooden furniture. The other two require special equipment and are not suitable for home use.
How to use veneer at home
Working with veneer at home is a more labor-intensive task than gluing a plastic edge or self-adhesive paper tape. But the use of veneer instead of plastic trim increases the service life of laminated chipboard furniture.
Both in industry and in households, the main use of veneer is lining furniture and doors. Veneering can be used if, for example, the set is still in good condition, but has lost its appearance due to scratches. Knowing all the intricacies of technology, how to glue veneer to furniture, you can not only give it an updated look, but also turn your things into exclusive, presentable models, a la a solid wood set.
In addition, if you want to refresh the interior, you can veneer the wall panels. The texture of walls lined with veneer imitates the finishing of timber or clapboard made from natural wood.
If you do not have experience working with veneer, start with small surfaces, for example, the ends of chipboard, shelves, and decorative elements. Once you feel confident in your movements, you can begin veneering furniture or walls.
Veneering at home has its own difficulties:
- Positioning veneer sheets on the product. To make the drawing look beautiful, you need to select sheets with a similar (or vice versa, contrasting) pattern.
- Docking. Veneer sheets, absorbing moisture from the glue, expand, and then, drying, decrease in size. Therefore, after gluing, gaps may form between the sheets. To prevent this from happening, use oblique trimming of the edges, overlapping gluing, or pre-joining the sheets with a special tape.
- “Siskins” or air bubbles between the veneer and the base.
You can completely avoid such flaws as uneven joints and air layers only if you acquire a certain skill in veneering.
Before gluing veneer, you need to select a suitable glue. Its choice largely depends on the veneering methods. However, general rules must be taken into account. So, if the glue is not viscous enough, it can leak onto the front side through the porous surface of the veneer. Therefore, glue that is too liquid will not work.
Many people are interested in how to glue natural veneer obtained from wood species with a high tannin content, and it is no coincidence. In the presence of iron compounds (from which the press is made), tannins stain the veneer, reacting with the glue if its acidity is below 5.5.
To prevent unwanted reactions between glue and metal, use paper or foil spacers, or use glue with a neutral or alkaline reaction.
For veneering, you can use the following types of glue: regular PVA, protein types (hide, bone, casein), special branded glues for wood.
Why veneer furniture?
Two main points can be highlighted.
Firstly, the price. You can veneer a pine table with your own hands, “turning” it into oak, and the appearance will hardly be inferior to real oak. But the price will be much lower. And if you remember the characteristics of veneer - it does not dry out, does not deform, and is not affected by moisture and temperature - then you should seriously think about whether it is worth spending money on furniture made from valuable wood species?
Article on the topic: DIY chipboard furniture
Secondly, wide design possibilities. Do-it-yourself veneering allows you to turn a tattered window sill into a new one, and a boring cabinet into a completely new item in the Art Nouveau style without much expense, just by applying veneering.
Methods for gluing veneer
Depending on the size of the products, the presence of curved surfaces, as well as skills and equipment, one of three veneering methods can be used:
- Cold contact method. Contact adhesive for veneer has a short curing and setting time. Therefore, veneering large surfaces with such glue is difficult. If you have not applied the veneer to the base accurately, it is impossible to correct the situation and the appearance of the product will be ruined. For high-quality gluing, the initial compression force is important, and the duration of the force is not required. This is the most difficult gluing method, but its advantage is that you do not need to use jigs for pressing.
- Cold gluing followed by pressing. After applying the glue, the surfaces are connected, leveled and fixed with a clamp. The most commonly used wood glue for this method is Titebond. It has a short setting and pressing time, as well as a wide range (depending on the class of moisture resistance, plasticity, resistance to temperatures or intended use for different colors of the material).
- Hot veneering. The applied layer of glue must dry (or become dry) on the surfaces to be glued. The veneer is then applied to the product and straightened using a hot iron or lapping hammer. The high temperature of the tool melts the glue, and it connects the veneer to the base.
The first two methods are used mainly for small surfaces. In this case, it is not necessary to use special surface treatment, unlike the third method. Therefore, most questions from beginners arise about how to glue veneer onto MDF, plywood, chipboard or a similar surface using the hot pressing method. Check out the sequence of actions:
- Surface preparation. If this is an old product, dismantle the fittings and decorative elements. Remove the previous coating using a spatula, after heating it with an iron. Level the surface using wood putty and, after drying, sandpaper.
- Preparation of material. If the veneer sheets have been rolled into a roll, they must be straightened. For quick straightening, wet the sheets with a sponge. Then, to absorb moisture, place paper and a weight on top, for example, a sheet of plywood, chipboard or MDF.
- Cut out the material. Combine the veneer sheets into a set of the required sizes, but first select the design on the front side. Carefully join the sheets and connect with adhesive tape along the joint, as well as perpendicular to it. The connected set should be 7–10 cm larger than the surface to be pasted.
- Applying glue. Before gluing veneer to plywood or MDF, it is necessary to apply glue evenly to both surfaces. The layer of glue applied to the veneer should dry within 24 hours. Leave the set allowances loose to weigh them down, which will prevent the veneer from twisting and warping during drying. Apply glue to the base immediately before gluing. The glue on the base also needs to be dried to a viscous state.
- Lapping. This process is carried out along the grain of the veneer. For grinding, use a special hammer or iron. Straighten the veneer carefully to remove any air bubbles between it and the base.
The final finishing consists of trimming the seams and light sanding. You can use the product within a day.
Features of processing slabs before laying on the floor
To obtain a high-quality result when installing sheets on a horizontal base, it is necessary to take into account some nuances of applying a protective coating:
The panels should not have high residual moisture; acclimatization of the material for at least 24 hours is required. It is necessary to ensure ventilation of the sheets, so they are placed horizontally. To do this, wooden blocks are laid between the panels. High-quality grinding reduces composition consumption and promotes the formation of a reliable film. The ends should also not have a burr. Impregnation is carried out with the most suitable material according to the instructions
Particular attention is paid to the side that will face the base.
After laying the plywood covering on the floor, the surface must be sanded and primed, then covered with several layers of a protective composition, most often wax or varnish
It is taken into account that processing is carried out after cutting the product into the required size parts.
Hot veneer technology
Preparing the base
- Removing fittings (if any) and structural parts. For example, a peephole from a door leaf, the rim of a keyhole.
- Dismantling the old layer of finishing on a wooden surface. It’s easy to decide what you’ll need – a spatula, an iron for heating the coating, and so on.
- Elimination of existing base defects. Methods and materials are selected based on their nature and “depth”. Basically, grouting agents, putties and adhesives are sufficient. Upon completion of the work, the base is carefully sanded so that no bulges, dents or folds are formed when the veneer is applied.
Veneer preparation
- Editing sheets. This thin finishing material is sold in rolls. Consequently, when straightened, it will try to return to its original position (memory effect). To restore their correct geometry, just walk along the reverse side with a damp sponge. The veneer will soften somewhat and straighten out. To consolidate the result, the sample should be clamped between two flat surfaces. For example, sheets of plywood, fiberboard slabs and the like, depending on the size of the fragment. To quickly remove moisture from the veneer, it is advisable to cover it with soft cloth or paper. After drying, it will remain in a straightened position.
- Editing edges. When restoring large surfaces, one sheet will not be enough. Veneer is sold with a blade width (with rare exceptions) of 30 cm. Consequently, splicing of fragments cannot be avoided. Edge straightening is nothing more than cutting sheets along a line. At home, 2 pieces of boards with treated ends are quite suitable for this (as an option). A sheet of veneer is placed between them so that only its edge protrudes. All that remains is to clamp the resulting “assembly” with clamps and trim off the excess (irregularities) with a sharp knife. It is advisable to work with a special tool designed specifically for cutting cardboard or thin plywood.
Veneering
- Before the glue dries completely, in order to ensure the quality of the veneer, it is advisable to secure all joints with adhesive tape. Then it is easy to remove it.
- In some cases, it is advisable to first fasten the veneer strips into a single sheet, and only then lay it on the base. You will have to decide for yourself what to do best. But it’s worth considering (as one of the acceptable options).
- To avoid moisture absorption into the base, it is advisable to veneer not only the front part of the sample, but also the back and ends. This should also be taken into account when determining the course of action.
Article on the topic: DIY dog furniture
The final stage
After the adhesive composition has hardened (which implies reliable fixation of the veneer), a number of simple technological operations are performed.
- Inspection of the surface and identification of possible defects in the work.
- Removing excess (if any) glue.
- Sanding joints (edges). Extreme care must be taken here. The veneer is thin, and excessive zeal will lead to bald spots. Everything will have to be redone, since it is difficult to disguise the stains to match the finish, and it will not always work. Of course, the highest quality polishing is ensured by a grinding machine, but not every home has one. If possible, asking friends for some time is the best solution.
- Application of a protective coating. This is necessary mainly for peeled veneer. It is not difficult to choose a composition, depending on the design of the sample, its purpose and specific use. The range of various oils, varnishes, and stains is impressive.
Having dealt with all the nuances, it becomes clear that do-it-yourself veneering is not a very complicated process. Knowing the technology, anyone can implement it at home. And if you wish, you can bring some of your own “zest” to this work.
Procedure for veneering furniture or doors
The work of veneering furniture is not very difficult. The base is leveled, sanded, defects are covered with wood putty, and then sanded again. Make sure all surfaces are clean and dry before applying the adhesive.
A layer of glue is applied to the veneer strips, allowed to dry a little and pressed firmly to the base. Tap the material with a special hammer or roller to level the position. Afterwards, fix the edges and joints of the veneer with masking tape, clamp the product with a press or iron it through paper along the wood fibers.
After the glue has dried, remove the tape, remove excess glue, cut and sand the edges with sandpaper or a sander. To extend the life of furniture, a protective coating of varnish and oil is applied. If the technology is strictly followed, home furnishings veneered will look amazing and will add a touch of grace and elegance to the interior.
Restoration of a swollen surface
Often veneered doors have such a common defect as swelling. It is formed due to the fact that the sheets were placed incorrectly and poorly glued. Repairing the door in this case is simple. The main thing is to be patient.
Restoration of veneered doors should begin with the use of adhesives. In the place where the bubble has formed, we inject glue using a regular syringe. For good adhesion, you should press the veneer tightly with your finger and try to rub the glue over the entire area of the given space. This method allows you to restore the surface of the door literally in minutes.
The veneer was swollen on the doors. What else is effective? If this method is too complicated, it will be much easier to heat the iron and gently rub the area
Press on the surface carefully. You can pre-moisten the surface with a damp cloth to make the material more elastic.
What you need
Materials
Tools
- Varnish brush
- Screwdriver
- Plane
- Iron
- Soldering iron
- Steel ruler
- Chisel
- Scalpel or knife blade
- Veneer saw
- cycle
What should be done
- Determine the nature of veneer damage
- Clean the damaged area, smooth out cracks in the wood
- Prepare material
- Buy suitable veneer or wood from a specialist store
- If the repair is local in nature, then the surface of the furniture should be covered so as not to damage other areas. Make sure there is good lighting.
- Fill scratches with putty
- Make patches
- Drive the slats into the cracks
Veneer defects
Veneer swelling is usually caused by incorrect placement of its sheets. If wavy swellings form after gluing, this indicates that the material was too dry. It is necessary to eliminate all swelling in time, otherwise you will face the appearance of cracks and cracks.
On old furniture, bloating can probably be corrected using an iron with a medium heat setting. A damp cloth placed on top will also help; it will make the veneer more elastic. You can inject glue under the bubble with a syringe, rub it with your thumb and secure it with a clamp.
To eliminate such a defect in modern furniture, heating with an iron and a little pressure will be enough.
We put a “patch”
Find a small piece of flawless veneer that matches the texture of the veneer on the surface you are repairing. Cut a window in the damaged area and attach a piece of veneer. It is important that the texture of the veneer and the patch match.
Once you have found the desired position, use a scalpel to cut out a “patch” exactly along the contour of the removed piece of veneer.
Fit to shape
The knife or scalpel must be held at a slight angle to obtain a “patch” of a suitable shape. Make cuts across the grain, sometimes in a zigzag pattern, to avoid splitting the wood. Now the “patch” fits exactly into place. It needs to be fixed with an adhesive paper strip. Using the wedge-shaped head of a carpenter's hammer, carefully smooth the joints. The transition from the main veneer to the “patch” should be almost imperceptible. Now the restored surface can be processed further.
The strength of glued veneer depends on the condition of the substrate. Complications do not arise when veneer is glued to plywood. The surface of the latter is leveled by machine, and before laying the veneer should only be cleaned in an appropriate way. It is a completely different matter when a facing layer of noble wood is applied to the planed surface of a saw log.
Knots and resin stains
A solid wooden base often has defects such as protruding knots, which must be removed with a hole saw. After this, the blind hole is closed with a suitable piece of wood; if necessary, the protruding parts are cleaned with a file or sandpaper. Large defective areas are hollowed out in the shape of a diamond. A new part is inserted into this place.
The resin that appears on the surface is removed with a special solvent.
Veneer surface treatment
There are three methods for finishing the veneer surface:
- wax coating,
- polish
- clear varnish.
However, the latter method cannot always be applied. For example, antique furniture requires a different approach. To determine which one, you need to know how the surface of the product was treated or its approximate age. So, for the information of non-professionals: good clear varnishes appeared about 50 years ago.
Transparent finish
To apply a polish using a swab to the facing layer, you must first apply a primer and sand it. Polishing should be carried out with smooth sliding movements without interruption. Each pass on the surface must be working, that is, leaving the thinnest layer of polish. After drying, the surface must be sanded well with a horsehair brush to give it a noble “velvet” shine.
How to cover holes
It is often necessary to repair damage to the surface of polished furniture. Small scratches can be repaired using furniture polish. Small burnt holes are carefully cleaned out with a scraper and filled with putty or beeswax. The latter can, unlike putty, be applied to already treated wood; it is combined with both polish and varnish.
After the wax has warmed up slightly, small pieces are separated from it and pressed into the damaged area with a knife. Then rub the area with a soft cloth soaked in turpentine.
Defects in raw, untreated wood can only be repaired with putty after applying varnish. Putties of all tones are available for sale.
How to seal a gap in a countertop
Over time, cracks appear on the surface of old tables made from glued solid boards - often at the end, and sometimes in the middle of the tabletop. In both cases, this can be corrected by inserting wedge-shaped plates into the slots (corresponding to the thickness of the tabletop). Wedges are cut from a piece of wood suitable for furniture. The workpiece is processed with a plane and then with a file until it is slightly thicker than the gap itself. Finally, the wedge is driven into the slot by lightly tapping with a hammer.
After driving in, the wedge should protrude slightly above the table surface so that it can be leveled.
Since the crack rarely runs in a straight line, it must be straightened after removing dirt and possible splinters. The smoother the surface, the stronger the adhesive connection. The wedge should fit into the gap very tightly. If the crack is in the middle, then a dovetail-shaped wooden plate is glued on the back side to prevent further cracks from forming.
Precise alignment
As soon as the glue has set, the wedge is carefully trimmed with a plane. Work carefully, being careful not to touch the main surface. The final leveling can be done with a sharp scraper.
Finishing
For veneering to be successful, you need to iron the coating for at least 15 minutes with a roller or wooden iron.
Start from the middle and work towards the edges. You shouldn’t spare any effort, but don’t forget about accuracy. Then iron again with an iron at a temperature of approximately 50 degrees.
It often happens that bubbles form under the coating, making the veneer look like leather. This is a defect that is easy to get rid of. The swelling areas are moistened with water, small punctures are made, into which glue is injected from a syringe. Needs to be ironed again.
We leave the veneered piece of furniture alone until it dries completely at a temperature of 25 degrees. All that remains is to apply stain or furniture varnish. Lastly, the fittings are installed. If desired, the finished product can be decorated.
In the factory, special machines are used for this process. But it’s not difficult to glue veneer on your own at home. Then the price of the finished product will be much lower.
Article on the topic: DIY home furniture ideas
The main thing is to prepare the necessary means at hand and choose high-quality finishing materials. And, of course, adhere to the recommendations for veneering. Then the finished product will delight you with its sophistication and novelty.
If you have the means, you can purchase veneer, for the manufacture of which valuable wood was used. Then the finishing of interior items will be called veneering.
How to veneer the edges of furniture, see the following video:
Refinement of this device.
When massively cutting slats of the same width, I was tired of measuring their “overhang”, so I made an addition (in fact, a second cutter, more compact):
Here a ruler is added, the gap between it and the iron guide strip is set once and then you just need to move the veneer, cut, move (changing the paper. But I practiced tearing it off after removing the strip). In this way you can get many identical veneer slats. On the right you can see my favorite veneer knife, fixed with a bolt, iron guides.
Mass production
If the part is not very complex, but must be reproduced in large quantities, then you can make two templates, for example, from thin sheet steel (from a tin can) and, holding a package of pre-cut veneer blanks in a vice between these templates, process them with a file or grinder. The fewer blanks are sandwiched between the templates, the more accurate the parts will be and the less chance they will chip. Again, to prevent chipping, you can cover the workpieces with paper or masking tape in advance.
If your hand is more or less full of work with a needle file, then you can do without metal templates, but, most likely, the two outer workpieces will be damaged by the vise jaws. True, you can make wooden pads for the jaws from hard wood such as beech. (A small addition: when using templates made of wood, you need to blacken their edges (ends) with a dark pencil. When you get to the point of accidentally grinding down the templates while processing the package, you will immediately notice this by grinding down the edges darkened with a pencil. In addition, beware of getting a “barrel” when processing the package. - V.D.’s note) Another way to assemble small parts into a package: glue the blanks together with nitro glue, wait for it to dry, process it as if it were a solid piece-rail. After that, pour acetone into a jar, throw this “package” in there and leave it to soak (sleep for now is very useful). In the morning, take out the individual parts and lay them out to dry. After evaporating the acetone, we have ready-made parts. You just don’t need to put a lot of glue, you should even apply it along the contour of the finished part, leaving the center clean. If the gluing area is large, the glue will take a long time to dissolve. There is no need to spare acetone, otherwise traces of glue may remain on the parts.
Restoring polishing
Restoring a layer of varnish is a complicated matter. Any furniture restoration begins with cleaning and degreasing, and repairing the varnish coating too. We use dishwashing detergent diluted in water: safe and reliable. After drying, we proceed to refinishing the polish.
- On dark furniture, a scratch can be painted over with iodine, achieving the desired color in a number of layers or diluting it with water. If you have furniture markers, you can use them.
- Deep scratches that have turned white cannot be painted over like this. There are other methods:
- Make mastic from 4 parts melted wax and 3 parts turpentine. This paste is applied to the polish and rubbed with a soft cloth.
If you have shoe polish of a suitable color, you can cover it with it and then polish everything with a cloth.
Scratches are painted over, then the coating is restored
- Stains of unknown or known origin can be removed with pure gasoline. A soft cloth is moistened and rubbed. For particularly difficult cases, multiple treatments may be required, but sooner or later any stains will be removed. Then, using a soft cloth, everything is polished to a shine. A mixture of linseed oil and denatured alcohol will help restore it.
- If stains remain from hot items - white circles from cups or other objects - wipe them with alcohol. You can also repeat this several times. After the stain has disappeared, the surface is renewed with a mixture of linseed oil and denatured alcohol.
- Particularly deep stains from hot spots are easier to remove using a mixture of drying oil and alcohol. Apply this mixture to the stain until it disappears completely. Then wipe with alcohol and polish with a rag.
- Two parts each of linseed oil and turpentine and one part vinegar. Mix everything, apply with a swab, wait until it is absorbed and polish.
- Mix oil and beer in equal parts and wipe the furniture with this mixture. After it has been absorbed, rub.
- The surface will be more shiny if you boil beer with a piece of wax, cool it and apply it slightly warm to the furniture. When the composition is absorbed, the surface is rubbed until shiny.
- You can remove old polish from furniture mechanically. If you have a sander, the process will go faster; if not, take coarse-grain sandpaper and remove the varnish layer until wood appears. Then take a fine grit and sand it to a smooth surface. Mechanical removal does not always work. Sometimes even a grinder does not give results: the polish does not come off, but begins to melt and stink. Then they change tactics.
- You will need a piece of old glass. Put on gloves and break it into several fragments. Use the sharp edges that have formed to scrape the coating down to the wood. If there are chamfers and recesses, it is convenient to scrape them out with sharp edges. After the main layer of polishing is removed, everything is brought to a smooth state using fine-grain sandpaper.
- If working with glass does not appeal to you, chemical methods remain. There are ready-made products for removing polish. You can work with them either in the open air or in a draft: the fumes are harmful. How to remove polish - you need to read on the packaging. The means are different and the duration and order of processing may vary.
You can simply refresh the faded polish on furniture using mixtures you prepare yourself:
A few more recipes in the video.
How to remove polish from furniture
Quite often you have to remove the polishing: it is not the most fashionable finish. Modern furniture is most often painted with opaque or tinted paints, and the surface is matte. In any case, the polish must be removed. There are several ways. Since varnishes come in different compositions, you have to select them experimentally. But one of the methods should work.
Often, restoring furniture with your own hands requires tough measures: some types of polishing can only be scraped off with glass
How to paint polished furniture
If old furniture was prepared for painting, it must be cleaned of dust, wiped with a damp cloth and allowed to dry. Then level everything with putty, smooth out all the unevenness, wait until it dries. Take sandpaper and sand again, first with medium, then with fine grain. Next, apply a layer of primer and wait for it to dry.
Applying varnish with a brush when restoring furniture polish
You buy a primer for the paint you are going to use, or you can dilute the paint with a compatible solvent and coat it instead of primer. After drying, you can paint.
You can paint with a roller or brush. Usually several layers are needed: do not try to apply a lot of paint at once, as drips may appear. It is better to apply several thin layers. This way the surface will be smooth and uniform. Another trick: for uniform coloring, layers are applied in different directions - along, then across. This also applies to applying varnish.
Some types of varnish are easier to work with when they are warm. They are heated a little and then applied with a spray gun or brush. When heating, you need to be careful: vapors may flare up.
In order of painting: first paint the internal surfaces, edges and joints, then move on to the external ones. With this sequence, there is less chance of getting dirty or touching an already painted surface, ruining it.
If the varnish coating is smooth, without defects, and it needs to be painted over, you can do without removing this layer. There are special primers for complex surfaces. Apply them to the surface and paint after drying. They have components that penetrate even the varnish layer. Therefore, the paint will apply well and last a long time. But such soils have a disadvantage: they are expensive. But they save significant time.
Some secrets of painting wood (including brushing and painting in two colors) are in the article “How to paint lining.” Watch the video for a few secrets to applying acrylic paint evenly.
If the restoration does not bring the expected result, maybe you need to change the appearance? How to remake furniture in a new way is described here.