When building a roof, special attention is always paid to the structure of the attic. After all, it is important that its covering is done technologically correctly, does not put unnecessary pressure on the walls and is able to withstand the load from things stored under the roof and sometimes an entire set of furniture.
Therefore, in this article we will understand in detail how an attic floor on wooden beams should be installed correctly: the features of its installation, calculation of loads and fastening. And our detailed illustrations will help you.
Definition of the concept
The ceiling is a load-bearing horizontal structure that divides the building in height. Its main function is to distribute the load. The beam is the main support; it holds the entire structure of the building together and provides the necessary rigidity.
Application area
Beam wooden floors are used in:
- houses on summer cottages, designed for use in the summer;
- frame and log buildings made of wood;
- prefabricated prefabricated buildings;
- buildings for economic purposes - workshop, bathhouse, barn, utility block.
If the strength of the foundation is not designed for heavy floors, then wooden beams are usually placed between floors in houses made of brick or gas silicate blocks.
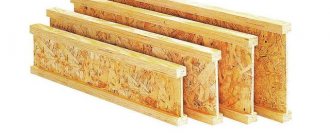
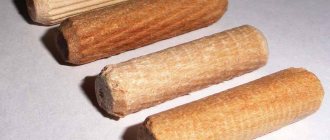
Glued laminated timber
To increase the strength or size of solid beams, they are fastened together manually during installation of the floors. For the same purposes, laminated veneer lumber manufactured at enterprises is used. It consists of several bars connected to each other. The thickness of an individual element is regulated by the number of products glued together. Glued laminated timber is produced at the factory by pressing, its length reaches 12 m.
Finished products retain the characteristics of solid lumber and can be nailed without loss of strength or cut into pieces of the required size. The only drawback of such structures is their high cost. It is necessary to carefully calculate everything before installing the first floor ceiling on wooden beams.
Note! Glued laminated timber is often used in construction for the installation of arched ceilings.
Requirements and regulations
Wooden beams are subject to certain requirements set forth in regulatory documents. Manufacturing is carried out in accordance with GOST 4981–87. The element must have:
- High strength and rigidity . The structure must withstand variable and constant loads. For example, equipment, furniture, weight of building elements of the house. There should also be no deflections under the design load.
- Soundproofing properties and good thermal insulation . Modern materials with these characteristics are placed in the interbeam space.
- High level of fire safety . To do this, the wood must be impregnated with fire retardants several times.
Attention! Beams must be checked for defects and damage.
Manufacturing and operating conditions are set out in:
- SNiP II-25–80 describes design standards, characteristics of the wood used, and operating conditions.
- GOST 16588–91 (ISO 4470–81) establishes methods for determining the moisture content of parts.
- GOST 2140–81 contains a description of the classification, terms, and methods for measuring visible wood defects.
- GOST 20850–84 is devoted to the rules and requirements for the manufacture of wooden adhesive structures.
- GOST 2695–83 – technical specifications for hardwood lumber.
- GOST 8486–86 establishes technical requirements for softwood lumber.
Government standards govern all aspects of the use of floor beams.
How to make ceiling joists. What are lags and the benefits of using them
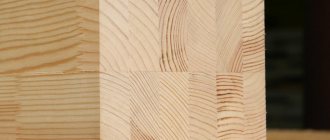
First of all, what are lags? These are transverse beams, which serve as the basis for attaching floorboards or other sheet flooring material to them. The traditional material for making logs has always been wood, although construction technologies also allow the use of metal, concrete or polymer parts. However, this is rather an exception to the rule, and non-wooden logs will not be considered within the framework of this article.
Traditional material for logs is wooden beams
The design of wooden logs also varies. The most convenient thing to use, of course, is a flat wooden beam “trimmed” to the required size - with it both assembly and setting the required level is much easier. You can also use boards, placing them on edge and, if necessary, selecting the required thickness of the log from several interconnected parts. in some cases, it is more profitable for builders to use rugged wood to make the beam, however, this will require cutting it on at least one side - for a tight fit of the floorboards or counter-lattice slats.
They can also make logs from round timber, but you need good carpentry skills
Wood may be inferior in some ways to cement coating, but, nevertheless, the construction of the floor on logs provides many significant advantages:
- First of all, with the same height of the floor, a structure with logs is incomparably lighter than concrete, even if lightweight compounds with insulating fillers are used.
- When assembled correctly, the floor on the joists is ventilated, which is very important for the safety of the floor covering.
- It is very easy to place hidden communications – pipes or electrical wiring – between the joists. If necessary, gaining access to them to prevent or eliminate an accident is much easier.
Cables laid between joists
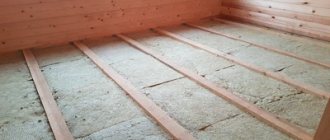
- The presence of communications will in no way hinder the effective insulation of the floor - the niches between the joists “ask themselves” to lay thermal insulation material in them.
Floors on joists can be easily insulated
- With the help of logs, it is not at all difficult to level floors to an ideal horizontal level, even with very significant level differences. In this case (unlike concrete floors), material consumption practically does not increase.
The floor is easily leveled even with very strong level changes
- In addition to its insulating qualities, flooring on joists has much more effective sound absorption.
- The logs very evenly distribute and transmit static and dynamic loads to the base. The apparent simplicity of the design does not in any way reduce the strength qualities of the created floor.
- It is easier to repair a floor on logs - after dismantling the covering, it is enough to simply replace the damaged parts if necessary.
- The design with logs, by and large, can be used for almost any type of floor covering - it can be not only wood, but also any rolled material or, subject to the appropriate technologies, even ceramic tiles.
Electric and water heating of floors on joists
- Floors on joists were often reproached for the fact that they do not “join” well with water or resistive heating systems. However, technologies have now been developed that make it possible to organize any of the underfloor heating systems on such a surface - resistive, infrared or from a water heating circuit.
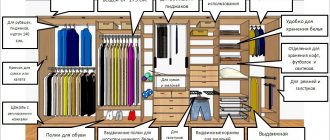
How to create mini-storage facilities in an apartment?
If the wooden floor is high above the base, for example on a balcony, this space can also be usefully used for household purposes.
Read about this in the article on how to make a cellar on the balcony.
Main characteristics and dimensions
An important indicator for an element is the maximum length without supports .
It depends on the size of the span. When constructing a wooden floor, timber and board running parameters are used. For example, 50x150 mm, 50x200 mm, 100x150 mm. These dimensions correspond to the standards when covering openings of no more than 4 m.
The minimum dimensions of the timber are 10×7 cm . This element is used for a span length of 2 m.
The maximum value of 25x18 cm is needed for a span of 7 meters. The most common sizes used in the construction of floors are 150×100 mm or 150×150 mm. The strength of the floor depends on the height of the beam.
Existing standard beam sizes:
- 100x150x4.50 m;
- 100x200x4.50;
- 150x150x4.50;
- 150x200x4.50;
- 100x150x6.00;
- 100x200x6.00;
- 150x200x6.00;
- 200x200x6.00.
Maximum load level:
- basement and interfloor ceilings is 210 kg/1 sq. m;
- attic – 105 kg/1 sq. m.
Important! The maximum deflection level is 0.004 m/1 lm. If the calculated value is greater, then it is dangerous to use the ceiling.
To determine the cross section, you need to make a calculation. In practice, its height is taken in the range of 4–5% of the span length. Spans over 6 m, including 8 meters, are covered with purlins with a large cross-section.
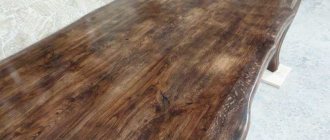
Ceiling beams: harmony in style
Decorative elements on the ceiling in the form of beams can be used in various styles, ranging from classic to high-tech. If the interior is designed in an elegant classical style, then the surface of the beams should be smooth and varnished.
Scheme of the design of false ceiling beams.
If there are elements of luxury in the interior, it is best to paint them in light colors, for example, in the tone of silver, and decorate them with carvings or paintings. For an interior designed in a modern style, parts with a smooth surface are used. They can be painted in both dark and light colors, and in a brighter, mischievous color with the use of lighting on them.
In the high-tech (loft) style, beams painted with metallic effect paint that are in harmony with the brickwork look great. If the house is decorated in a rural style, then it is better to decorate it with elements made to look like old wood. In color they can be either light on a dark ceiling or very dark with a rough finish on a light background.
For lovers of the French rural style - Provence - it is better to use well-treated and bleached wooden beams for decoration. To decorate rooms in an ethnic style, either natural ceiling elements or their imitation made of polyurethane with a wood-like texture are used.
Diagram of a beam ceiling.
When choosing a color scheme for ceiling beams, you need to maintain harmony. For example, a design with a contrasting color scheme looks great. In this case, to highlight the decor, a combination of dark wood with a white ceiling or vice versa is performed.
And for a brighter interior, you can combine any colors, for example, a yellow ceiling and blue beams, a turquoise ceiling and white beams. You can also make the decorative element the same color as the surface of the ceiling. At the same time, parts painted to match will give the room an expressive structure and visually increase the volume of the room.
When choosing a color scheme for decor, you need to remember that the beams installed on the ceiling must match one of the interior elements in color, for example, with the shade of furniture or with the floor covering.
You should also remember that dark decor looks bulky and gives the room a graphic feel. Light shades look lighter and more sophisticated, giving the atmosphere a restrained coldness.
Calculation
Costing should be performed at the design stage . To carry out the calculation, input data is required - the length of the beam, the distance between two elements, the acting loads.
To determine the length, you need to measure the span and add the overlap to the resulting value for the backfill into the walls. For example, for load-bearing walls made of building blocks and bricks, the backing depth is 150 mm, for a wooden structure - 70 mm.
If the structure is rectangular, then the beams are calculated for the short side. The distance between the elements and the quantity depend on the laying step. Optimally – from 40 cm to 110 cm.
Loads
There are two types of loads - permanent (weight of the structure) and temporary (objects and people). Exact calculations are made by designers; in private construction, average indicators are chosen.
For attic non-residential premises the figure is 150-200 kg/1 sq. m. When storing materials or things in the attic, the load indicator should be increased to 250 kg/1 sq. m. For an attic, basement or interfloor ceiling, the load is selected in the range of 350–400 kg/1 sq. m.
The section is selected using tables depending on the distance between the beams and the design load.
| Loads kg/linear m | Section of beams with span length, m | ||||||
| 3,0 | 3,5 | 4,0 | 4,5 | 5,0 | 5,5 | 6,0 | |
| 150 | 50×140 | 50×160 | 60×180 | 80×180 | 80×200 | 100×200 | 100×220 |
| 200 | 50×160 | 50×180 | 70×180 | 70×200 | 100×200 | 120×220 | 140×220 |
| 250 | 60×160 | 60×180 | 70×200 | 100×200 | 120×200 | 140×220 | 160×220 |
| 350 | 70×160 | 70×180 | 80×200 | 100×220 | 120×220 | 160×220 | 200×220 |
Rounding should be done upward.
Examples and formulas
The strength test is performed using the formula:
M/W< = Rd,
Where:
- M – bending moment (kgf/m);
- W – moment of resistance (cubic cm);
- Rd = 130 kgf/1 sq. m (bending resistance for coniferous wood).
To calculate the design bending moment there is a formula:
M = (ql^2)/8,
Where:
- l is the length of the beam span;
- m; g —load, kgf/m.
Accepted initial data:
- span length – 4 m;
- pitch between beams – 600 mm;
- cross-section of the supporting beam - 0.15 × 0.2 m;
- temporary standard load - 250 kg/1 sq.m;
- standard load from the weight of partitions is 75 kg/1 sq.m.
Calculation of own weight of 1 sq. m of floor:
600×0.05+15×0.1+600×0.019+1000×0.01=52.9 kg/1 sq.m.
Weight of 1 linear meter - 0.15×0.2×600 = 18 kg/1 sq.m.
Load per 1 sq.m of flooring - 52.9+250+75 = 377.9 kg/1 sq.m.
The load per 1 linear meter of beam is equal to: gн = 377.9 × 0.6 + 18 = 244.74 kg/l.m.
Bending moment of a beam. M = 244.74×42 / 8 = 489.48 kg/m.
W = 489.48×100/130=376.523 cc.
Tables have been compiled to determine the cross-section:
In the example, a rectangular beam of 12x15 cm (W = 450 cubic cm) is suitable.
Now you need to determine the deflection of the beam using the formula:
f = 5/(384)xgнl4/(EJ)
Components:
- g — standard load, kgf/m;
- E - modulus of elasticity of wood, kgf/1 sq. m (100000);
- J is the moment of inertia of the beam, cm^4 (3345).
Before starting dimension calculations, it is necessary to comply with:
- gн = 244.74 kg/l.m = 2.4474 kgf/cm.
- l = 4 m = 400 cm.
Substitute the values into the formula and get the result:
f = (5/384)x(2.4474×400^4)/(100000×3345) = 2.4388 cm.
Compare it with the maximum deflection in the table.
fpr = (1/250)x400 = 1.6 cm.
| Building elements | Limit deflections in fractions of beam span “1” in cm. |
| 1. Interfloor ceilings | 1/250 x 1 |
| 2. Attic floors | 1/200 x 1 |
| 3. Coverings, except for the crossbar (valley) a) purlins, rafter legs | 1/200 x 1 |
| b) lathing, flooring | 1/500 x 1 |
| 4. Crossbars (valley), slanted legs | 1/400 x 1 |
Conclusion - it is necessary to increase the cross-section to 12×18 cm (J = 5830). Repeat the calculation:
f = (5/384) x (2.4474×400^4) / (100000×5830) = 1.3992 cm. The result is less than the limit value. The required section is 12x18 cm.
Video about calculations:
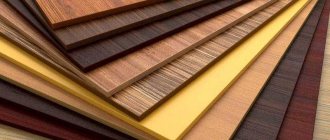
Materials used
Diagram of a beam ceiling with thermal insulation
- Lumber. Laminated materials. Glued plywood materials. Edged tongue and groove boards. Plywood. Beams or logs. Fiberboard. Solid beams. Beam shoes. Nails. Corner fasteners.
In addition to the standard set of working tools for DIY installation, you must have other additional tools.
Return to contents
- Chainsaw (hand-held circular saw). Leveling tube. Pneumatic hammer.
In order to properly strengthen the main element of a wooden frame structure to the walls of the house with your own hands, you need to cut grooves from both ends of the beam, the width of which coincides with the width of the beam located in the upper frame. This groove should have a depth equal to ½ the width of the beam. When installing it in the designated place, it is required to make a strong fixation with nails.
Return to contents
Sometimes, if necessary, the boards are paired together, laying one on top of the other, after which a through hole is drilled and fastened with bolts. To reduce hassle and speed up the result, you can use timber during installation.
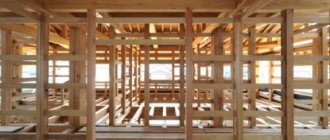
Having installed the rafters, you can begin installing the ceiling beams and begin installing the wooden frame. There are cases in which the originally installed beams are the fulcrum for the legs of the rafters. But most often the rafters are attached to them.
It is good to use a beam with a cross section of 200*200 mm to make the main element of a wooden ceiling frame structure with your own hands. But the main thing is that the beam for such installation has a larger cross-section compared to the one located inside the walls. The goal here is to make it possible to “file” the ceiling in the outermost walls.
Initially, installation begins with the installation of a wooden structure from the edges, after which all the free space between them is gradually filled. This method is called “lighthouse”. It is necessary to ensure that parallelism between them is not violated. This condition is one of the main ones, because when installing rafters, they place emphasis on the beams.
If there is no parallelism, then the geometric component of the entire ceiling will immediately be violated. During installation, the beams should be at a distance of 800 to 1400 mm from each other. They begin to attach the boards to the ceiling joists from the wall of the building.
Thanks to this, it will be more convenient to join the tongue of one board with the groove of another. It’s good if, before starting to install the supports themselves, you make preliminary markings on the floor, and then lay the timber along it. It is advisable to check the correctness of their installation using a building level.
Assembly and installation of a wooden frame structure requires carefulness and clarity, since the slightest violation of the laws of geometry can lead to irreparable consequences.
These errors can lead to incorrect calculation of forces, after which, as a result of lateral loads, the walls may move apart at a certain moment. Wooden ceiling structures must be attached to the wall. This fixation can be done using a 200-gauge nail, which is driven to a depth equal to 0.75 times the thickness of the beam into a pre-prepared hole, or a pin can be used for this purpose.
Sometimes wooden or metal spikes are used for these purposes. For better fixation, you can use a bracket made of metal tape for installation. When calculating from the outer surface of the wall, it is necessary to leave an overhang of the beam, somewhere around 35-40 cm.
Author: graffff
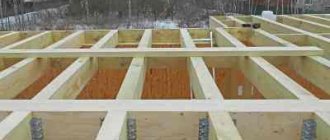
In this part of the DIY plank frame series, I will talk about installing ceiling beams and permanent jibs. Since the span of the ceiling beams was too large, more than 6 meters), it became necessary to make another beam (ceiling and floor) - perpendicular to the others. Therefore, I will also look at the correct arrangement of the floor and ceiling cross beams.
How to do the installation?
When installing wooden floors you should:
- Start installation with the outer beams, and then continue with the intermediate ones.
- Place elements strictly horizontally.
- Clearly maintain the parallel and step between the two bars.
- Use insulating materials in places of contact with load-bearing surfaces.
- Cut the ends of the beam at an angle of 60°-70°.
- Fix every 3rd beam to the wall with an anchor bolt.
For the process of fastening elements, it is necessary to use a fastening tool:
nails;- screws;
- self-tapping screws;
- dowels (plastic and metal);
- anchor bolts;
- metal corners;
- U-shaped staples;
- wooden cotter pins.
The metal used to make fasteners must be durable and resistant to oxidation.
Important! Corners must be taken with a safety margin of at least 2. The element must withstand a weight 2 times greater than calculated.
The fastening method is selected depending on the wall material and design requirements:
- The timber beams are fastened to the reinforced belt using anchor plates with an anti-corrosion coating.
- Angle fasteners are used to attach timber to brick and concrete structures. In this case, screws and nails are replaced with mechanical anchors. For concrete, you will need to use strong dowels (plastic) for the screws and a drill with hammer drill functions.
- To fix the timber to a wooden wall, you need perforated fasteners (flat or corner). You will also need screws, self-tapping screws and nails.
- If the wall is made of plasterboard or aerated concrete, then you should prepare screws with threads along the entire length. The second option is chemical or mechanical anchors.
- When using the hanging fastening method, metal pads are needed.
Examples of installation technologies:
Installation of longitudinal ceiling beams
After installing the ceiling cross beam, I installed the ceiling longitudinal beams.
Fig 4. Longitudinal beam of the ceiling
I made longitudinal beams from the same board, 50 mm thick and 150 mm wide. At the ends of the longitudinal beams resting on the external walls, I made a 50/50 cut under the top beam (visible in Figure 4). And those ends that lie on the cross beam were simply fastened together using a piece of board and attached with a metal corner to the cross beam (a little visible in Figure 5).
Fig 5. Extreme ceiling longitudinal beams attached to the beam
The distance between the longitudinal ceiling beams was made 1200 mm to match the size of the rolled thermal insulation. I positioned these beams in such a way that not a single beam would stand above the window opening; for this, the step had to be taken in some places a little less, and in some places a little more.
Important: if you are going to make a living floor above the ceiling, often walk on the ceiling, store some things in the attic, then with spans like mine at 4 meters and 150 mm thick boards, the step needs to be made smaller - 600 mm or added beams later.
I pulled the outer longitudinal beams of the ceiling with self-tapping screws to the side of the beam, so that they became in the same plane with the wall. The protrusion of the beams beyond the external wall was provided at 300 mm, as can be seen in Figure 6.
Fig. 6. Ceiling beams protrude 300 mm beyond the load-bearing wall
My ceiling beams also serve as a support for the rafters, which is why the 300 mm protrusion is made. To install rafters on them, a 50\50 mm block was placed on top of the ends of the beams with a distance of 50 mm from the edge (Figures 7 and 6).
Fig 7. Block for installing rafters
Advantages and disadvantages
Among the main advantages of the element, one should highlight:
- low dead weight;
- no lifting equipment is required during installation;
- saving time on installation;
- possibility of carrying out repair work during operation;
- environmental friendliness;
- relatively low cost.
Minuses:
- flammability and, as a consequence, the need for treatment with fire retardants;
- less strength than metal structures;
- deformation and shrinkage of the material due to changes in temperature or humidity;
- exposure to pathogenic microflora.
Additionally, it should be noted the need for accurate calculations.
Features of floors
The photo shows the installation of floors.
Based on the experience of professional and independent developers, we can say with confidence that it is the wooden structures of interfloor slabs that are the most popular and often manufactured in the construction of private houses. (see also the article Cottages made of timber, advantages and disadvantages of the material)
This is due to several factors, of which the main ones can be identified:
- ease of installation (2 people are enough to manufacture them, and there is no need for specialized equipment, such as in the manufacture of reinforced concrete structures);
- low cost compared to all other types of structures;
- sufficient strength, reliability and durability;
- ease of repair and dismantling.
For more information about timber floors, watch the video in this article.
Average prices
The price of an I-beam 6 m long made of dry planed timber starts from 310 rubles. up to 360 rub. per linear m . If the beam is treated with bioprotection, the price increases from 330 rubles. up to 380 rub. for per linear m.
Beam cost with:
- Wooden shelf OSB (length up to 6 m) from 265 rub. up to 355 rub. per linear m.
- Wooden shelf OSB (length up to 12 m) from 365 rub. up to 455 rub. per linear m.
- Shelf made of LVL bars (length up to 12 m) from 425 rub. up to 465 rub. per linear m.
- Wide shelf made of LVL bars (length up to 12 m) from 525 rub. up to 585 rub. per linear meter
Glued laminated timber:
- section 185×120 mm, 185×160 mm, 185×202 mm, 185×240 mm, 140×202 mm, 140×160 mm – 36,000 rub./cubic. m;
- section 240×202 mm, 240×240 mm, 280×202 mm, 280×240 mm, 240×202 mm, 280×202 mm - 38,000 rub./cub.m.
Consequences of breaking the sequence
The cake for each type of wooden floor has certain functions. Violation of the sequence of layers or their absence can lead to negative consequences.
The basement structure gives strength to the floor of the first floor , which bears the main load. If there is no insulation or it is not done properly, the floor will freeze in the winter.
Without ventilation or waterproofing, a wooden structure will dampen and rot.
Failure to comply with the characteristics of the pie leads to:
- reducing the temperature in the building;
- the appearance of dampness and fungus;
- condensation and mold formation;
- increasing the cost of heating a home;
- gradual destruction of a wooden structure from the inside.
In addition, attention should be paid to the choice of material for each layer.