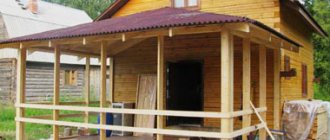
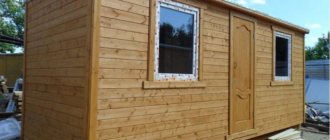
A frame veranda is a type of gazebo attached to a house; it is an unheated summer room, convenient for relaxing in the warm season. It can be made open or closed; there are dozens of decorative design and glazing options.
The veranda is built using frame technology in the shortest possible time, and it can be used as a summer kitchen or hobby room. Building it yourself is not so difficult: you will need an initial set of construction skills, tools and material for the foundation, frame, walls and roof.
Design and location of the veranda
They usually try to make a frame veranda before entering the main house: such an extension replaces a large porch. However, you can place it on the side: in this case, you will need to make a separate entrance to it with an additional porch. Frame construction allows you to implement a variety of projects, so you need to decide on the following parameters:
- Extension dimensions. The standard width is 2.5 meters, the length depends on the length of the building itself. You need to think in advance about how this room will be used so that it does not turn out to be too cramped.
- Foundation type. For an extension, you can use a strip, pile or column base; the latter option is the most common.
- Wall filling option. Usually the veranda remains at least half open: after all, this is a summer extension, which is characterized by a large glazing area.
- Roofing material. It usually coincides with the material used for the main roof: it can be corrugated sheets, metal tiles, asbestos-cement sheets, etc. The roofing system of the veranda is a continuation of the roof of the house; usually a pitched roof is installed for it.
It consists of concrete pillars that are installed in places of maximum load, which are installed at a depth below soil freezing. The strip base is designed for more powerful structures, and it will cost more.
You can leave it completely open, like a small terrace, but in this case it will only be comfortable to be on it in the summer. You can use a modern option with panoramic glazing; the veranda area can be turned into a mini-greenhouse if you place it on the sunny side of the house.
You can begin building a frame veranda with your own hands immediately after the construction of the main house: ideally, it should be immediately included in the project so that there is a common foundation. However, in practice, extensions are often built decades after the main construction: this is a great way to update the appearance of the house and make it more comfortable and modern.
Preparatory stage
Building frame extensions to a house with your own hands is not so difficult if you have minimal experience in construction. However, you should not neglect certain rules.
In particular, before adding anything, it is better to coordinate the work and obtain permission for the extension. If the structure disturbs the neighbors, for example, casting a shadow on the tomato beds, dissatisfied owners of the adjacent plot have the right to go to court. If the extension was built illegally, the judge will make a decision to restore the territory to its original form. As a result, the homeowner will not only lose additional premises, but also incur significant losses.
To avoid trouble, you need to act in the following sequence:
- make sure that there are no underground communications at the construction site;
- draw up a drawing of the frame extension and an estimate of the work;
- take several photographs of the site from different angles;
- write an application to the BTI about changes to the technical plan;
- pay due fees and expert services.
Important! The law does not prohibit the legalization of extensions after completion of construction, but if the examination reveals the inadmissibility of such work, the structure is subject to demolition. Only after agreeing on technical issues and settling the paperwork can we move on.
Construction of a foundation for a veranda
The first step before building a summer extension is clearing the area. Construction waste and green spaces are removed from it; if necessary, this fragment of the site must be leveled.
After this, the location of the future extension is marked with ropes and pegs, carefully aligning the corners. The simplest and most inexpensive type of foundation for a frame veranda is a columnar foundation. It is built as follows:
- The pillars are located in the corners of the future extension, in addition, they are placed along the entire perimeter at a distance of 1.5 m from each other. For each post, a hole is dug 70 cm deep with a side of 500 mm.
- A support cushion of sand and crushed stone is poured onto the bottom of the holes; they must be compacted thoroughly. After this, a waterproofing film is placed in the pits and a reinforcement frame is installed.
- Formwork made of boards is installed on the surface to the height of the base part. It is recommended to place the frame veranda at a level of at least 500 mm from the ground to protect the lower beam from moisture.
- The pillars are filled with concrete. The solution must dry completely; the process takes quite a long time. To prevent the top layer from cracking due to premature drying, it is moistened with water several times.
- When the concrete has dried, the formwork is dismantled, after which a waterproofing layer is laid on the pillars. After this, the foundation can be considered complete and we can proceed to the construction of the frame.
Choosing a location for future construction
Veranda - according to the Construction Rules SP 55.13330.2016 “Single-apartment residential houses”, as well as SNiP 31-02-2001, there are three types:
- Attached to the house;
- Built into the house;
- Built-in and attached.
By definition, a frame veranda to a house is a covered and glazed unheated room. Its construction is planned to create a place where you can relax in comfort. It is emphasized that it is unheated. If you extend the heating, it will be an auxiliary room.
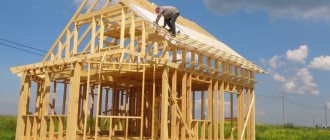
Construction of the veranda frame
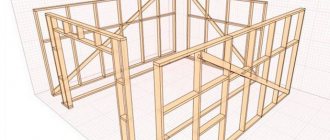
How to build a frame veranda? The basis of such a structure is a frame made of treated timber, to which wall cladding made of OSB boards and other materials of wood origin is attached.
For the bottom trim, a beam with a section of 10x10 or 15x15 cm is used, it is laid in two rows and connected using the direct lock method. At the level of the second row, logs are cut in, which will become the basis of the floor for the future extension.
It is necessary to decide whether the veranda will be used in winter. If it is heated, the floor will have to be insulated: a waterproofing film and insulation, which can be used as extruded polystyrene foam or mineral wool, are laid on the subfloor.
After this, another layer of waterproofing and finished floor boards are laid. You can also use OSB boards or simple thick plywood for it; later finishing material is laid on them.
Vertical frame posts are installed on the lower frame. They are made from 150x150 mm timber; the wood must be pre-treated with antiseptics.
The frame is connected by a top frame: this is the basis for installing the rafters and the entire roofing system. At a height of a meter from the floor, another row of transverse beams is installed to unite the frame; for this you can use a beam 120x120 mm thick.
The height of the frame depends on the height of the building itself: the frame must be positioned so that the roofing system can be installed on a slope, otherwise snow will accumulate on it in winter. All frame elements must be positioned as evenly as possible: it is necessary to check the verticality of the racks with a plumb line, and using a level to check the horizontal position of all transverse elements.
Pairing with the main house
Connecting the frame extension with the main house
Regardless of the quality of the foundation, due to the difference in the magnitude of the load that the cottage and the extension exert on the ground, there is still a possibility that over time they will move relative to each other. For this reason, experts strongly do not recommend a rigid type of connection between an extension and an old house; it is more advisable to use a connection similar in principle to a tongue-and-groove connection. To install it, you need to fasten two beams to the wall of a permanent building, and install a vertical beam between them, which is an element of the frame wall of the extension. This type of connection will ensure leveling of mutual movements. Of course, you can use a metal frame instead of wood, then all the embedded elements will also be metal. Or you need to use a bolt-on hinge.
However, the connection of the extension is not limited to just the walls; it is also important to connect the two roofs correctly. To do this, the rafters need to be connected at one end to the top frame frame, and at the other end, they need to be fastened to the rafter system of the roof of the old house. The sheathing under the roof is mounted in such a way that the junction of the old and new roof is between the elements of the sheathing.
As a roofing material, it is necessary to use only one that has a certain degree of flexibility, for example, soft tiles or corrugated sheets with a wave height of no more than 10 mm. But slate or ceramic tiles are no longer suitable for these purposes.
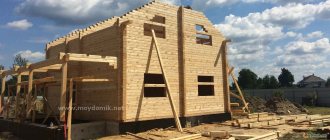
Construction of a frame veranda roof
In order for the building to become a single whole, it is necessary to partially dismantle the already installed roofing system and combine the rafters. In a two-story building, the roof of the veranda is installed on the wall, and a cross beam is nailed to it to secure the rafters. There are two options for laying the roof covering:
- Hard roof. These are metal tiles, corrugated sheets, slate and other materials laid on a horizontal sheathing of boards. They are laid with an overlap, installation is carried out from the bottom up, so that water does not linger on the roof. You can hem the ceiling from below by placing insulation between the beams; in some cases, the beams, on the contrary, are left open, and they become a full-fledged part of the rustic interior of a country house.
- Soft roof. The use of flexible tiles, roofing felt and other soft materials requires the construction of a continuous sheathing of boards: the roofing covering is nailed to it. Modern soft tiles are glued using a special self-adhesive layer: this not only saves time, but also ensures the most accurate and durable coating.
The roofing system of the veranda serves as a natural continuation of the roof of the house in design. It usually has the same color and is made from the same material. The decoration of the ceiling can be different: sometimes they use not just a simple lining, but, for example, suspended or suspended ceilings, which allow you to create a special interior.
Wall “pie”: characteristics
Wall “pie”: characteristics
The ultimate goal of any construction work is to create a durable structure in which living will be comfortable and cozy. The quality of the wall “pie” has the most direct and decisive influence on achieving this goal. When insulating the walls of a frame house or extension, you need to remember that properly installed vapor and wind insulation is the key to long service without loss of performance characteristics of any type of insulation. If you forget about this, the insulation will very quickly absorb moisture from the environment and become unusable.
If we consider the layers of the wall “pie” from the inside of the frame extension, then they should go in this order:
Options for filling the walls of a frame veranda
There are quite a lot of options for covering the frame. The simplest and most common solution: the lower part is sheathed with OSB boards or other wood materials, and the owners prefer to glaze the upper part of the frame.
This allows the room to be provided with sufficient illumination, but at the same time the veranda will be reliably protected from rain and other vagaries of nature. However, there are more interesting options:
- Retractable panoramic glass: the veranda room will be filled with air and light. It will be possible to grow any plants on it.
- Open veranda with railings. In some cases, the owners refuse to fill the walls altogether, and the veranda can be compared to an ordinary spacious porch. The railings are installed at a height of 1 meter and can be equipped with beautifully turned balusters.
- Fully enclosed veranda. This is, rather, a summer extension with a small glazing area: it may have one or more regular-sized windows.
Modern double and triple glazed windows are installed as frames, allowing you to reliably insulate the room from the cold. However, this solution also has disadvantages: glass is a fragile material, and any strong blow or childish prank can lead to serious trouble.
Wooden posts, railings and posts can be varnished, painted or treated with translucent glazes to show off the beauty of the wood. Making identical balusters yourself is problematic, so it’s easier to order them from a turner in a workshop.
It can be used as a summer kitchen or an additional bedroom for the summer; in such an extension you can place a workshop or allocate space for a hobby. This is an opportunity to create additional usable space and beautifully equip the entrance to the house.
Target use
Before you start purchasing the necessary building material, it makes sense to decide what function the additional room will perform. There are several options here, each of which involves its own nuances when constructing the structure.
Frame extensions to wooden houses can be used as:
- living space. Here we mean an additional room, made in accordance with all the rules for carrying out construction work and suitable for all-season living. Such an extension will have to be legalized, otherwise in the future the sale of a house with a changed square footage and non-compliance with the technical plan of the BTI will be impossible;
- outbuilding. In this case, we are talking about a kitchen or utility room. The first option involves installing a ventilation system and connecting utilities. The second does not require such difficulties. If the extension is intended as a storage room, it is enough to create the necessary conditions for storing things;
- verandas. This is a unique version of a summer dining room, where you can have family dinners or friendly tea parties. Verandas can be open or closed; in the second case, glazing is required to make the room comfortable to use in any weather.
- terraces. An open area that is usually an addition to the porch of a home. Here you can arrange a small recreation area or greenhouse;
- baths Not the most common, but still a possible option for using a frame extension. This method of construction is used in situations where it is not possible to install a separate building on the site. The construction of an adjacent building is noticeably cheaper.
In addition to the above, the annex can be used as a shed or a full-fledged garage for a car, or a small workshop or studio can be organized here. If the house is two-story, then the extension can also be made high and in this case the usable area can be enormously increased.
Possible mistakes
Completing and redesigning an existing structure is always more difficult than building from scratch, so it is worth once again paying attention to possible errors in the process of constructing a frame extension.
The first and main thing is that many inexperienced builders rely on factory processing of all lumber. However, this is incorrect; before assembly, all frame elements must be thoroughly dried and treated with fire-retardant impregnations. Window frames and doors must be installed strictly level and secured to already installed vertical posts, that is, the dimensions of all openings must be specified
How to legalize an extension to a house?
Construction of a frame house in section
When all the construction work on the construction of the frame extension is completed, many of our compatriots begin to think about the need to legitimize the resulting masterpiece of architecture. However, it is better to think about this before starting work, since the process of legalizing an unauthorized structure is a little more complicated, you will have to go to court, and besides, the result may not be in favor of the plaintiff and then you will have to demolish all the resulting beauty, and at your own expense. Of course, you can avoid going through the circles of bureaucratic hell and leave everything as it is, but this will entail the impossibility of selling, renting, bequeathing or donating the entire house, and not just an extension.
When applying to the courts, you will need a whole set of various documents, among which the most important are the following:
- Certificate of ownership of the land plot;
- Certificate of ownership of a residential building (dacha);
- Certificate from the BTI;
- Permission from the housing and communal services organization;
- An extract from the house register about the number of registered citizens in the residential building;
- Frame extension plan;
- House project;
- Control shooting of the extension on a scale of 1:500;
- Consent of neighbors if the extension borders their site;
- Epidemiological service report.
In some cases, you may need a photo of the site, residential premises and an extension to it.
The preparation of a statement of claim must be taken with full responsibility, since the process may be lost due to errors made in it. Most courts will provide you with an application form and help you fill it out.
After filing a claim, you need to wait for a response, which should be sent by mail. To make sure that the application has been accepted, you can call back after 10 working days and clarify the information. It should be borne in mind that judges have only 2 legal reasons for rejecting a claim: the presence of a court decision regarding the legalization of a given building or an incorrectly drawn up claim document. In the second option, you must submit a second application.
The municipality will become the defendant during the court hearing, and the owner of the house to which the extension has been made will, accordingly, be the plaintiff. If the court makes a decision in favor of the plaintiff, he will need to receive a payment receipt from Rosregistration for payment of the state duty and make the payment, after which the owner will be issued all the necessary documents legitimizing the unauthorized construction.
As for other financial expenses, approximately 10,000 rubles will be spent on collecting all the necessary information (consultations with lawyers, etc.), the price of the state duty is currently 500 rubles, 20,000 rubles costs an entry in the Urban Development Cadastre, about 60,000 more rubles will be required by specialists for forensic construction and technical examination. Thus, in addition to direct construction costs, about 100,000 rubles will be needed for all bureaucratic delays.
Features of insulation
Features of insulation
Insulation of the building is one of the most important factors for a comfortable stay in it in the future. In fact, all the nuances concerning the insulation of a frame extension completely coincide with the insulation features of full-fledged houses built using frame technology. For insulation, you can use a variety of materials, both traditional and more modern: ecowool, sawdust, basalt mineral slabs, extruded polystyrene foam and much more. From the point of view of speed and ease of installation work, perhaps, mineral slab insulation is optimal. Such insulation must be tightly laid between the frame racks in several layers, but without kinks or pinches, which over time can lead to the formation of “cold bridges.” An important feature during the work is the need to shift the joints between the slabs relative to each other in adjacent layers. This principle must be observed not only when insulating walls, but also ceilings and floors.