[contents]
Advantages of a frame veranda
A frame veranda can be erected in the shortest possible time and has the following advantages:
- creation of additional multifunctional space;
- strengthening the walls of a frame or timber house;
- improving sound insulation of main rooms;
- maintaining heat in the house;
- ergonomic appearance.
The veranda can be used as an entrance hall, living room, summer kitchen, or greenhouse. It can be divided into several zones, for example, for relaxation and storage of garden tools, etc.
What types of frame verandas are there?
The appearance and purpose of a frame veranda make it possible to implement the most innovative design solutions. In shape they can be either classic rectangular, square, or radial, L- and U-shaped, polygonal, etc. Like verandas made of other materials, frame structures can be:
- open, in which the roof is supported by support beams, and one or more walls are missing;
- closed, which is a space completely enclosed by walls or glazing.
Sergey Yurievich
Construction of houses, extensions, terraces and verandas.
Ask a Question
Verandas are also distinguished by the material from which they are built. The best option is a frame veranda made of timber. This structure is perfect not only for a log house, but also for a cottage made of brick, foam blocks, or silicate.
In terms of environmental friendliness and ease of construction, a wooden frame veranda has no equal. The only condition is that the wood used for construction must be treated with effective fire and bioprotection.
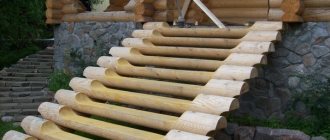
Rules for fastening the support beam
It needs horizontal
It is easy to attach to the wall, along the lower edge of which the height of the foundation is indicated. The logs rest on it, which allows you to connect all the elements of the frame terrace into a single structure. To fasten the support beam, it is better to use self-tapping screws, which must be installed at intervals of 60 cm from each other.
It is necessary to install a layer of waterproofing on the support beam to prevent moisture from entering the gap between the beam and the wall of the main building.
Foundation for a frame veranda
When constructing a foundation for a veranda, it is not recommended to connect it to the foundation of the house. Buildings have different weights, and the loads from the house will be transferred to the extension, which will lead to its shrinkage.
The strip foundation is carried out using standard technology: markings are made and a trench is dug. The formwork is installed, inside which the reinforcing frame is laid. Then the structure is filled with concrete mixture. After the concrete has hardened, you can begin building the frame.
The strip foundation can be made of prefabricated FBS slabs. In this case, there is no need to wait until the concrete hardens and you can immediately build the extension.
A columnar foundation for a frame veranda involves digging in foundation pillars, which can be either ready-made or poured directly on the site. The lower crown is mounted on the installed supports.
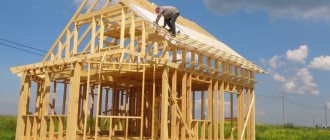
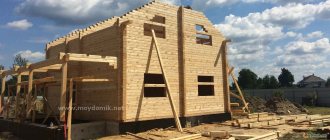
Construction of the veranda frame
The frame veranda is built from treated timber with a cross-section of 10x10 or 15x15 cm. For the lower trim, a beam of a larger cross-section can be used, which is laid in two rows and connected using the “direct lock” method. Logs are mounted on the frame - the basis of the veranda floor.
Frame structures are installed vertically on the lower frame and are united by the top frame. Additionally, at a height of 1-1.5 m from the bottom point, a number of horizontal beams are installed that connect the frame, giving it strength and stability. The height of the veranda depends on the height of the ceilings in the house. When installing the frame, it is important to position it so that the roof is sloped. The correct installation of frame supports should be checked at the building level.
The cutting of supports is usually carried out using the “direct lock in 1/2 wood” method. Making high-quality connections of horizontal and vertical elements to create a strong and safe structure is a responsible task that only a qualified specialist can do. The joints are reinforced with bolts, angles, screws and other fasteners provided for by the project. To prevent deformation and shifting of the frame, it is attached to the foundation elements using anchors or clamps.
To connect the frame veranda to the house, exhaust floor beams or parts of the rafter system are used. After assembling the frame, the walls are filled, hydro- and thermal insulation is carried out, and the finishing is applied.
Do-it-yourself canopy construction technology
Drawing or working diagram
First, they make a diagram of the future product, indicating the dimensions. Then, structural elements are selected from this sketch, their estimated length is indicated, and the number of identical elements is counted, trying not to miss a single detail. After this, the required amount of material for the racks, trusses and roof is calculated. If the canopy structure is closed, then the material of the walls and floor is also considered.
Installation of supports
It is recommended to place the racks at a distance of no more than 1.2 m from one another. If the rack frame is adjacent to the wall of the building, a number of support pillars are also placed near it. If it is not possible to install vertical pillars near the wall, then a load-bearing beam is attached to the wall, which will take the load from the coating. To attach the beam to the wall, use long anchors that will securely hold the beam together with the roofing.
Farm construction
Depending on their shape, trusses are divided into triangular, rectangular, trapezoidal, broken and arched. Additional racks, purlins, braces and struts can be installed inside the truss. Trusses can be supported on two supports, pinched at one end, or have a combined method of support on supports.
The farm is made so that the roof slope is 15-20º. This slope is suitable for any roofing made of corrugated sheets, plastic, polycarbonate, roofing felt, slate, metal tiles and other materials. Sheets of profile flooring, slate and tiles are laid so that the waves are parallel to the water flow, but in no case perpendicular.
Pouring the foundation for the supports
The holes for the pillars are made 70 cm deep, a layer of crushed stone and sand is poured onto the bottom and watered for maximum shrinkage. The pits are concreted after installing the pillar and fixing it in the design position. Concrete is made in concrete mixers for large volumes of work or mixed by hand. Fill the entire cell at once; you cannot leave half of the filled hole until the next day.
The next day, the concrete gains half its strength, the remaining 50% of the concrete gains within 27 days. If a solid foundation is being made for laying the floor, then before pouring concrete, a welded or bonded reinforcement frame is installed, which is then filled with concrete.
Further work on strengthening the strapping on the top layer of the racks can be carried out after a week. Poles made of metal profiles are cut to the design size using a grinder, then reinforced with transverse profiles.
Truss welding
The alternation of trusses along the wall is determined by calculation. If we are talking about small sheds, then the standard distance from one to another is equal to one meter. After installing the trusses in the installation position, a sheathing made of a square profile or corner is welded to the upper rafters.
If a wooden sheathing is provided, it is attached to the metal of the truss using bolts. The pitch of the sheathing is taken depending on the roofing material; sometimes an additional continuous covering of plywood is installed over the sheathing.
When making trusses, their size should be 30–50 cm larger than the width of the canopy. This is necessary so that as little water gets on the foundations as possible and does not lead to their destruction. Another, more reliable option is to drain wastewater from the roof of the shed using galvanized gutters or modern plastic systems.
Anti-corrosion treatment
After the frame of the racks is installed and the trusses stand on it, anti-corrosion treatment is carried out. Before processing, the profile is degreased with a solvent. Treat the metal profile with the compound and allow it to dry for the required time according to the instructions. The primer will protect the metal from rust and will reduce the consumption of the final painting composition.
Painting is done using a brush or roller. Large canopies are painted with a spray gun or sprayer, which speeds up the painting process.
Attaching roofing materials to the sheathing frame
The construction of a canopy made of a metal profile does not require special construction skills, so assembling and installing it yourself is suitable for those owners who want to learn how to do something in their home on their own. This will save money on paying for the work of specialists and will allow you to be proud of the work of your hands.
Frame veranda roof
The role of the Mauerlat in a frame veranda is performed by the upper frame, on which layered or hanging rafters are installed. The roof of the veranda can be single- or double-sloped. When installing a pitched roof, it is necessary to make such a slope that will allow precipitation not to accumulate on the roof surface.
The same material is used as roofing as for the roof of the house. Also, the roof of the veranda can be covered with lightweight and durable polycarbonate. The roof is attached to a pre-installed sheathing. Elements of a drainage system should be installed on the roof of the veranda. They must be connected to the house's drain for effective water drainage.
Selection of materials and designs
The selection of materials is closely related to what kind of building structures are planned to be assembled to add a veranda to the house with your own hands. The main raw materials used to create frames are: timber, profiled pipes, all types of bricks, natural stone, expanded clay concrete, foam or cinder blocks. The specified construction products have their own characteristics that make their use optimal for the construction of terraces of a certain type.
You can read in more detail here about how to attach a veranda to a house, giving preference to certain materials, as well as their combinations, here, however, at the general planning stage it is a good idea to already know the following important points.
When choosing a roofing material,
it is necessary to determine what type of roof will be over the extension to the house.
- If the veranda has a simple rectangular shape, it is most advisable to use metal tiles or corrugated sheets. They are distinguished by their high strength, as well as the large format of the elements, which facilitates and speeds up the process of their installation. However, processing metal profile roofing without special skills sometimes causes difficulties. In addition, the high cost of high-quality sheet products makes their use on complex broken roofs economically unprofitable due to the large amount of waste generated.
- For dome, hipped or polygonal roofing structures, it is more advisable to use soft tiles. It is made on the basis of bitumen-polymer compositions applied to a base of fiberglass or cardboard. The material is quite easy to process - even cut with ordinary scissors. The installation technology is also not complicated, and its implementation can be done by one person. The variety of shapes and wide range of colors of veranda roofs covered with bitumen shingles allow them to harmoniously fit into the exteriors of almost any architectural design. The only limitation for soft piece coatings is their high sensitivity to constant high temperatures. Due to intense solar exposure, bitumen melts, which leads to deformation of the elements of the decorative and protective layer of the roof.
Choosing a foundation design
is carried out last, although it is from its laying that the construction of the veranda begins. The reason for this approach is the need to know the full weight of the extension, also taking into account the snow, wind and operational load on it. However, columnar, pile or strip foundations are often installed under verandas:
- Screw piles made of steel pipes are widely used as elements of the load-bearing foundation on pile supports. They can be quickly installed even on their own, since they are screwed into the ground manually using a conventional lever gate. Screw piles are suitable for many types of soil, including problematic ones - soft and heaving (peaty, swampy, clayey, etc.);
- columnar supports can be made of concrete (poured method), stone, brick, concrete blocks. Their use is preferable for laying under open terraces made of lightweight structures. It should be taken into account that on particularly heaving soils, pillars can behave unpredictably, up to a complete loss of stability (overturning);
- if a closed veranda attached to the house is being built, having heavy walls made of brick, stone, blocks, then installing a strip base under it is suitable. On stable soils, it is permissible to install prefabricated foundation strips from piece materials, while on problematic soils it is more correct to lay solid reinforced concrete structures.
When choosing veranda flooring,
it must be taken into account that it is subject to more intense pollution than the coating inside the house. Therefore, it is preferable to use materials that combine strength, as well as the ability to quickly clean without the use of special tools and excessive effort. For example, even inexpensive linoleum is quite suitable for a closed veranda. But the flooring in open verandas should also be anti-slip, as it will be exposed to rain, covered with snow and ice. These criteria are best met:
- outdoor ceramic tiles (porcelain tiles with a rough surface);
- terrace board;
- corrugated rubber or vinyl tiles (in the outdoor version).
Decorative finishing of the veranda
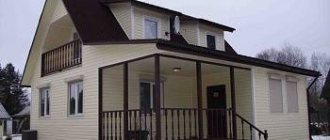
The optimal option for making the walls of a frame veranda: the bottom is covered with OSB boards or other wood materials, and the top is glazed.
When installing high panoramic windows, a lot of sunlight will fall on the veranda. This option will allow you to equip a greenhouse or winter garden.
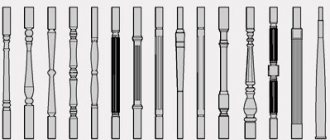
The frame veranda should be in harmony with the appearance of the house. Decorating the veranda depends only on the owner’s imagination! Wooden carved posts and railings coated with varnish or paint will be an excellent exclusive decoration. You can order carved balusters or make them yourself. There are a lot of options for decorating a veranda, so it is recommended to consider different styles and trends and choose what you like best.
You can also use different materials to finish the floor of a frame veranda. The most ergonomic solution is a terrace board. High-end laminate can be used from inexpensive materials.
Open type
An open veranda is a frame building without walls, and the roof is mounted on beams. This design has a number of advantages and disadvantages.
Advantages and disadvantages
Among the undeniable advantages of an open veranda, it is worth noting the following:
- Easy to install. Its construction requires a minimum of materials and time. It is not difficult to erect it.
- Easy care. Such a veranda is more of a part of the street than of a house. Therefore, to keep it clean, it is enough to sweep the floor regularly.
- An open veranda will allow you to enjoy the view and breathe clean air while on it.
Open terrace
Like all man-made works, open-type construction also has disadvantages:
- Not suitable for use in the cold season.
- It is impossible to install upholstered furniture on an open veranda, since it will be impossible to care for it, and, therefore, staying here will be deprived of a certain home comfort.
- Difficulties may arise with the choice of finishing materials, as they will be subject to negative environmental influences.
Tools and materials
For construction you will need:
- Concrete pillars for the foundation.
- Beam for the frame with a section of 150×150 mm.
- Cement and sand.
- Beam for strengthening the frame with a section of 120×120 mm.
- Bracket for connecting timber.
- Lathing for the lower part of the veranda. This can be OSB, forging or slats in the form of slabs or balusters.
- Wood screws 100 mm and 25 mm for fastening OSB or wooden lining.
- Wooden lining.
- Beams for roof installation 150×150 mm.
- Anchors 150–200 mm.
- Krokva 60×120 mm.
- Roofing material, for example, metal tiles or ondulin.
- Boards for making roof sheathing.
- Logs 100×100 mm.
- Wind board.
- Floor board 30–40 mm.
- Paint and varnish products for wood processing.
- Rolled waterproofing for foundations.
- Drill and saw.
- Level.
You have already become familiar with the method of making a foundation, so we will skip this point in our description of the construction of an open-type building. Let’s immediately move on to the features of flooring.
Features of flooring
To carry out high-quality installation of the floor, you must first prepare the base. To do this, first of all, the earth is leveled and compacted. Adjustable supports can serve as supports for the joists. Moreover, their number will directly depend on the planned loads on the floor. This idea is great for open verandas.
Then install the joists on the adjustable supports and fasten them. Thanks to these supports, you can adjust the slope of the floor and level it. Installation of boards begins from the edge of the veranda parallel to the joists. The boards must be level and dry. They should be placed closely. The boards are fastened to the joists using nails or wood screws.
The structure of the frame and roof does not differ from the technology described in this article.
Heated frame veranda
You can turn your veranda into a full-fledged room that can be used all year round with proper heating arrangements. As a rule, the heating system of the house does not allow placing additional radiators on the veranda. In this case, you can install a small wood or solid fuel stove, if the space allows.
Also, a heated veranda requires high-quality insulation of the walls, roof and floor. Mineral wool is used as insulation, meeting all environmental and fire safety requirements. It is better to use triple-glazed windows for such a veranda to prevent heat loss.
The cost of arranging a heated veranda is much higher than a regular one, but you will get a full-fledged room that can be used as a hall, dining room or recreation room.
You can ask your question to our author: