Buying or building a house made of logs or timber is an excellent solution to the housing problem. The house is completely made of natural material, it is safe for its owners. Often this is suburban housing, as a result, fresh air and ecology.
Such real estate is good for everyone, but to achieve the proper level of comfort you will have to work hard, first by allocating a room and arranging a bathroom in a wooden house.
Features of a toilet in a wooden house
Activities for arranging a bathroom in a wooden house have a number of features that cannot be ignored. All of them directly follow from the characteristics of the material:
- wood is susceptible to dampness;
- spoiled wood is an excellent environment for the development of mold;
- several years after construction, shrinkage of the building is noticeable;
- the geometry of the rooms changes depending on the season and weather conditions.
It may seem that the combination of these characteristics makes it impossible to move a bathroom into the house, but this is not so. Using modern materials, it is easy to ensure proper protection of wood and compensate for seasonal changes in the linear dimensions of the building. It is possible to equip and tile a bathroom in a wooden house with your own hands, you just need to choose high-quality materials and do the work responsibly.
Activities for arranging a toilet or bathroom are carried out in the following sequence:
- planning;
- sewerage installation;
- water supply;
- installation of ventilation;
- waterproofing;
- plumbing installation;
- final finishing.
You need to start with drawing up a plan. It is not at all necessary to prepare full-fledged project documentation; it is enough to sketch out a step-by-step list of activities indicating the desired result. This will speed up the work process and avoid serious mistakes.
Options for outdoor toilet stalls
You can build a toilet stall from different materials. Most often, the basis of the structure is a wooden frame covered with OSB board, tongue and groove board, plywood or siding.
Moving away from the use of a frame and sheathing, the house can be built from mini-timber, thereby creating a picturesque imitation of a log house.
Lovers of natural wood can also be advised to use a blockhouse for cladding. It is cheaper than a massive log and is easily mounted on a frame. The walls of the toilet, lined with wooden herringbone paneling, look no less attractive.
Many dacha owners are not satisfied with the rustic appearance of the “birdhouse” toilet. Striving for originality, they erect luxurious log mansions on the plots for “solitary reflection.”
Bricks and blocks as materials for constructing latrines are still very popular. Whatever one may say, the capital structure will last for decades. Neither dampness, nor wind, nor sun will harm it.
If there are no facing bricks at hand, then the walls can be built from the remains of red and silicate bricks. High-quality plaster will hide uneven masonry.
Translucent polycarbonate can be used to cover the cabin from a metal profile. This material looks very aesthetically pleasing and is not afraid of moisture.
Sheet corrugated sheets are a practical and durable material for toilet cubicles. It can be placed on either a wooden or steel frame. The only condition is the internal lining of the walls with insulation. Without this addition, there will be a hot “oven” in the summer and a freezer in the winter.
Straw blocks can be classified as unusual materials used for the construction of latrines. A cabin built from them is warm and cozy. Anyone who wants to amaze the imagination of neighbors and guests does not go to a construction site to buy materials. Having collected a certain number of empty bottles, he builds a toilet out of them, “to everyone’s surprise.”
In addition to rectangular and rounded structures, “huts” of different sizes are very popular.
There are two rational grains in this decision:
- The slopes of a steep roof replace the walls;
- The unusual appearance of the building adorns the landscape.
Very often the toilet becomes part of the utility unit. This solution allows you to place several rooms in one building. As a result, savings are achieved during construction (common walls) and the comfort of use increases (a warm toilet is always at hand).
Location and dimensions
Ideally, a room for a bathroom is chosen at the stage of preparing the house plan. In practice, everything can be different; quite often it is necessary to rebuild an already completed building. When choosing a room in which the bathroom will be located, you should follow the recommendations:
- the toilet should be located next to the living room, on the floor below it, but not above it;
- one of the walls should be external, which will simplify the creation of ventilation;
- in a multi-storey building, bathrooms are installed one above the other, this will facilitate the laying of communications and their subsequent maintenance.
The dimensions of the room are determined individually for each specific project. This is influenced by a number of factors:
- type of bathroom (separate or bathroom with toilet);
- number of bathrooms;
- dimensions of a residential building;
- physical characteristics of people.
Important! When planning a bathroom, it is necessary to proceed from construction standards. The dimensions of the toilet must be at least 0.8 × 1.2 m, the size of the toilet with washbasin must be 1.6 × 2.2 m. A full bathroom with a bathtub can be located in a room measuring at least 2.2 × 2.2 m.
It is mandatory to make a schematic drawing of the room allocated for the bathroom. The dimensions of the plumbing fixtures and their installation locations are marked on it. It is also important to consider the location of the pipelines. The bathroom must be planned in such a way that the distance from the toilet to the sewer riser does not exceed 1 m, and from the bath – 3 m. Otherwise, you cannot do without pumping equipment.
In the case of a country house with several floors or a cottage with an attic, it is worth considering the option of placing a toilet and bath under the stairs. This will make it possible to significantly save space without sacrificing convenience. The bathroom can be attached to the main building, since the design of a wooden house makes this easy to do.
Choosing a location
Before starting work on arranging a latrine, you should carefully consider the question of where it will be located. First of all, you should maintain the distances that regulations require the restroom to be separated from various objects.
These distances are shown in the table:
| Object on site | Minimum permissible distance, m |
| House, basement, cellar | 12 |
| Well, borehole or natural water source | 25 |
| Bathhouse, separate shower | 8 |
| Shed for animals and birds, cowshed, etc. | 4 |
| Fruit trees | 4 |
| Border of the site, bushes | 1 |
The water source available on the site should be located above the place where the toilet will be - then it will not be polluted by the water flowing from its side. The direction of groundwater flow should also be taken into account, to identify which a special study is carried out. The latrine should be located downstream of the well or borehole.
All of the above applies to pit toilets. But you need to think about your neighbors in any case, that is, regardless of the type of restroom.
It won’t be very good if you build a structure near a neighbor’s barbecue or children’s sports equipment. You need to choose a corner without constant occupancy and install the cabin so that it is turned towards the neighbors with the back side, and not the door.
Materials and tools
A prepared room diagram will allow you to quickly and accurately calculate the amount of material used, and a work plan will help you select the right tool. In general, to make a bathroom you will need the following materials:
- pipes for water supply, sewerage and ventilation (it is better to choose modern plastic);
- roll waterproofing;
- sheet material for sheathing (waterproof OSB board, plywood or plasterboard);
- slats or metal profile for making sheathing;
- flooring (laminate, tile, linoleum);
- fasteners (self-tapping screws, screws, nails).
We still need doors. Any kind will do, but from an aesthetic point of view, wooden ones are preferable. In addition to the material, you need a tool. The list varies significantly depending on the specific project:
- saw (hacksaw or electric circular saw);
- screwdriver or electric drill with an attachment;
- Screwdriver Set;
- hammer;
- ruler, pencil, tape measure.
Important! When choosing materials for finishing a bathroom in a wooden house, you should under no circumstances try to save money. Low quality material will not provide adequate protection for wooden walls, which will cause unscheduled repairs.
Toilet installation
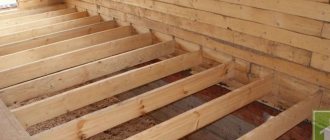
As a rule, private houses have wooden floors. Therefore, you need to start with preparing them: strengthening, leveling and laying linoleum. If the pipe neck is located above the toilet outlet, it must be raised. The material for the podium can be a wide board or several pieces of timber, and when installed on a concrete floor (for example, in the basement) - brick and cement. The wood should be well coated with linseed oil and painted.
In most cases, the connection to the sewer can be made directly: a regular cuff with an O-ring is inserted into the pipe, and the toilet outlet is inserted into it. If this is not possible, then a corrugated cuff or a plastic eccentric will be required. Connecting to a fecal pump is much simpler, since its inlet is at a standard height, and everything necessary for docking is already available.
Having placed the toilet in the intended place and making sure that it is securely connected to the sewer, we mark the holes. Then we remove it and drill the floor. A mounting kit is usually included in the kit. It includes self-tapping screws, as well as plastic dowels, washers and decorative caps.
We put the toilet back in place and use a building level to check whether it is level. If necessary, level it by placing something solid under the base. Upon completion of the work, it is necessary to fill the resulting gap with cement. If the installation is made not on the floor, but on the podium, then the leveling is done at the stage of its creation.
Now you can secure the toilet with self-tapping screws, not forgetting to place soft washers under the caps. Connections to the pipe and cuff must be syringed with silicone sealant. The same must be done with the base of the toilet so that water does not flow under it. The work is almost finished, all that remains is to connect the water to the drain tank. This is usually done with a coaxial hose, in front of which a tap must be placed.
Waterproofing
Maximum attention is paid to waterproofing a wooden house. This is more than important; water seeping through the cracks in the finishing will cause the wall to lose strength, resulting in destruction of the wood and expensive repairs.
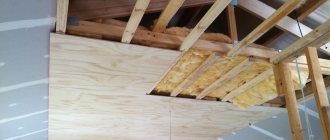
Rolled waterproofing will help you quickly and efficiently create protection from moisture. This can be classic roofing felt or modern fiberglass-based products. Roofing felt can only be used as a last resort; it is essentially paper, which is not conducive to the durability of the coating.
The first step is to protect the floor. The sheets are laid on a backing made of waterproof wood board or on a concrete base. Each subsequent sheet should be overlapped and the surface should be heated.
When installing bathrooms in houses made of timber, it is enough to soak the walls with an antiseptic. If subsequent cladding is planned, they are also covered with rolled material. The principle applies here: there is no such thing as excessive waterproofing.
Installation of external sewerage
The outer part of the sewer is laid in a trench. Regarding its depth, it is better to consult with specialists at your place of residence, since it depends on the climatic conditions of the region. In any case, you will have to dig much less if you use thermal insulation.
Pipes for external sewerage are made from various materials: cement, asbestos, ceramics, cast iron and plastic. The latter are the most popular now.
Important! Only special plastic pipes are suitable for laying in a trench. As a rule, they are painted orange. At great depths and in places of increased load on the soil, it is better to use pipes made of more durable material or corrugated ones.
Of course, external non-pressure sewerage must have a constant slope of 2% in the direction of drainage. It will be much easier to do this if you pour a layer of sand about twenty centimeters thick at the bottom of the trench and properly level it.
Communications
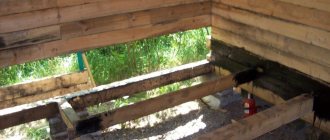
Installation of communications in a wooden house also has its own characteristics. The first thing that a master planning the supply of water and drainage of wastewater should remember is that wood is subject to seasonal fluctuations. During operation, the building sags and the length of the walls changes noticeably.
This does not mean that it is impossible to make warm toilets in village houses, it just requires a special approach to laying internal communications. To do this, damping devices are used or gaps are left to compensate for shifts in wooden structures.
Work begins with the sewer. It is better to use a plastic pipe with a diameter of 100–120 mm for this. A gutter is made in the foundation into which the drain is placed. Under no circumstances should the pipe be routed through walls; it must rest on a stable foundation. Inside the house, the riser is secured using elastic hangers; when passing through the walls and ceilings, holes are cut with a margin.
Most likely, the sewer outlet will have to be insulated. The need for this activity is determined by the local climate and the depth of the pipe. It should lie below the soil freezing level.
Next, the water supply is installed. The main requirement for it is complete tightness. Pipe joints must be visible. You cannot hide the joints inside the walls. This will not allow you to notice the leak in a timely manner and take measures to eliminate it. In the future, the pipelines can be closed with a box, providing technological hatches in it.
Construction of a cesspool
To collect waste, you can use any of the possible schemes for arranging a cesspool:
- from a plastic or metal container;
- with brick walls;
- from reinforced concrete rings;
- from ready-made factory-made septic tanks;
- from car tires.
In this case, we use ordinary working red brick. This scheme for arranging a cesspool is considered very profitable, since it requires a minimum amount of costs with high efficiency. To build this structure with your own hands, you need:
- Dig a small pit, the dimensions of which are 0.8 x 0.8 m and the depth is 2 m. Such a pit is quite enough for a country toilet for at least 10 years, even if you use it
Construction of a cesspool
every day. - Place a layer of gravel or sand at the bottom of the pit, which will act as a filtration field.
- Lay the brick. To do this, use cement-sand mortar. At the same time, leave a gap between the bricks of 2-3 cm.
- After laying each row, check the verticality of the walls.
- Lay the last 3 rows of bricks without gaps.
Ventilation
A toilet in a wooden house with sewerage is impossible without good ventilation. It will not only remove odors, but also provide the proper microclimate in the room. Ventilation can be natural or forced. In the first case, air renewal is carried out thanks to free circulation through a hole in the wall or ceiling; in the second, one or more fans are used.
Natural ventilation can only be used if one of the walls of the bathroom is external. To create it, just cut a hole closer to the ceiling. It is covered on both sides with decorative grilles.
If the bathroom is located surrounded by other rooms or its area is significant, this option is unacceptable; you need to install a full-fledged system that provides air inflow and outflow.
Important! You should not try to make homemade ventilation; it is better to buy a ready-made one and entrust its installation to specialists. It's not a matter of complexity, but of safety. Ventilation is motors powered by electricity. Improper installation may cause a fire.
Toilet installation
Toilets come in different types of mounting. Let's consider the classic version of a floor-standing toilet, which allows you to create a toilet in a private house
easier and faster. Its installation is carried out on four to six anchors, which are driven into the concrete screed. The transition between the toilet itself and the sewer pipe is provided by a flexible plastic corrugated adapter for a pipe diameter of 100-120 millimeters, fixed with rubber gaskets and seals. If you want to use a wall-mounted toilet, you will either have to install an additional partition inside the toilet itself, or reconsider the method of draining the sewer pipe. The first option is preferable, since the space behind the additional partition can be used to store household chemicals and other accessories.
Finishing work
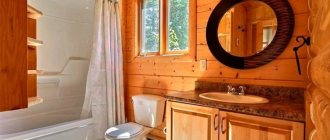
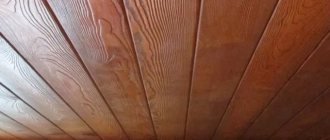
Almost any materials can be used to decorate a bathroom in a wooden house. Walls made of timber can be left as is, having previously been treated with an antiseptic and covered with several layers of varnish. It is beautiful, although not cheap, to decorate a bathroom with natural lining. This will maintain the overall wood style and create a durable surface.
You can lay tiles on drywall or wood board. A correctly selected pattern will create a unique interior; in addition, the tiles will become an additional barrier to water. A budget option is PVC panels that imitate wood or stone.
The floor in the bathroom can also be tiled or laid with a practical and affordable laminate.
Final stage
To arrange the floor in the toilet, use boards 40 mm thick. Also install a kind of podium where the hole in the cesspool should be placed. To give it a more aesthetic appearance, additionally use a lid from a real toilet.
Ready-made toilets for a summer cottage made of wood
Arrange the roof of the structure from boards 4 cm thick. For waterproofing, use a sheet of roofing material, which is laid on a wooden covering. After this, install slate on the roof. Don't forget to allow for a slight slope of the slope. To do this, make one wall of the toilet 15 cm lower than the other.
Also, be sure to install massive doors that will prevent frost from penetrating inside the outdoor bathroom. Paint the structure itself with regular paint, which will significantly extend its service life.
Choosing a wastewater treatment system
The most common method for summer residents is biological treatment.
This method is based on the life process of special bacteria placed in a well or septic tank. Usually used:
- anaerobic,
- aerobic cleaning system.
- The bottom of the wells must be sealed with roofing material or waterproofing (several layers), or cement.
- The joints of reinforced concrete rings must be made airtight. To do this, use cement mortar or liquid glass.
- The well is equipped with a tightly fitted lid with an inspection hatch.
- The contents are discharged at the level of the lower ring or using a sewer truck.
They involve the use of a septic tank - a special container in which the above-mentioned microorganisms decompose the waste of our life. After this, the wastewater enters the soil through the drainage (if the soil does not absorb moisture well enough, then the wastewater goes to the place of filtration, i.e., to the nearest ditch).
It must be taken into account that the septic tank must be at least 5 meters away from the house, and 20 meters from the well. The volume of the septic tank should be three to four times the daily water consumption.
A biological treatment system can be organized in a simpler way - by installing a well made of reinforced concrete rings or one large container:
Construction of a warm country toilet that is not afraid of winter
Making a warm toilet in your country house with your own hands is very simple if you use certain materials and successful design schemes. This structure can be used without problems in winter, when the air temperature drops below zero. At the same time, such a room will always be warm and dry.
We use bricks for construction
If you make a winter toilet out of brick with your own hands, it can be used at any time of the year in the presence of cold, snow, rain or, conversely, high temperatures in summer. This material for the construction of a bathroom building has the following advantages:
- This building material has high thermal insulation properties. This allows you to create a brick toilet
In addition to these advantages, a brick toilet has significant disadvantages. First of all, making such a structure with your own hands is not so easy. You need to be able to do masonry, build a solid foundation, the quality of which determines the durability of the toilet.
Bricklaying Tools
The brick structure is stationary, which is not always relevant in the conditions of a summer cottage. Often there is a need to move it to another, more favorable place. Also, erecting brick walls and other structural elements of such a warm toilet will require much more money than using wood or metal.
A guide to assembling a spacious outdoor toilet
Wooden toilet
Making a winter toilet out of wood with your own hands is very simple. You can get the following benefits:
- This material is characterized by fairly high thermal insulation properties. So that the toilet is made of wood
The disadvantages of wooden toilets that are built with your own hands include their low service life. When exposed to moisture, this material quickly succumbs to the process of rotting. This is especially observed in cases where special compounds were not additionally used that protect the wood from all negative environmental factors.
How to build a simple toilet for your dacha yourself?
Having decided on a waste disposal system (powder closet, cesspool, septic tank), you can begin construction.
The minimum internal dimensions of the cabin are 1 meter wide, 1.4 meters deep and 2.0 meters high.
The basis of the structure, the step-by-step construction of which we will consider, is a wooden frame made of antiseptic bursa. It can be placed on a block foundation or on a shallow concrete “ribbon”. A thick sheet of plywood or OSB board with a rectangular hole cut in it is attached to the frame on top.
Having assembled the base, the vertical frame posts and strapping bars are leveled.
Having made the frame, it is sheathed with plywood using a jigsaw and a screwdriver.
The next step is installation of the roof rafters. They are made from dry timber with a cross-section of 5x10 cm, cutting it into the upper chord of the walls. In the upper part, the bars are connected to a horizontal ridge board.
Having completed this stage, the rafters are sheathed with plywood. This is the best base for asphalt shingles to go on the roof.
Having finished with the roof, they begin to assemble the “podium” frame. A powder closet storage tank will be installed in it and a hole will be made for a seat with a lid.
The toilet door is assembled from a tongue and groove board, fastened with transverse strips for greater rigidity.
After lining the doorway with timber, the door leaf is attached to it using hinges. The final operation is painting the toilet booth outside and inside.
In conclusion, let’s say that we have considered the option of building a summer outdoor toilet. For the winter season, the walls from the inside must be insulated with polystyrene foam (minslab) and sheathed with any sheet material (plywood, OSB, board, plastic).
Varieties
Traditional options
Different types of toilets for dachas require different approaches to arrangement, therefore, before starting work on installing a sewer system, it is worth studying all the available options and analyzing their pros and cons.
So, what can you choose for a suburban area:
The simplest design is a wooden or plastic-lined booth installed directly above. This option is the least expensive in terms of equipment, but the comfort it provides is very conditional: it’s cold, the wind blows through the cracks, and there’s a bad smell inside.
The advantages of dry toilets include ease of use and the ability to move from place to place. The disadvantages are the need to regularly replace filling containers (the cost of the service company’s work can be very high). And in winter it’s still quite uncomfortable in such a booth.
Innovative solutions
If you want to equip a winter toilet (i.e.
one that can be used throughout the year without the risk of catching a cold), then in addition to traditional solutions, you can also pay attention to modern models
Some of them are presented in the following table:
| Device type | Operating principle |
| Compost with partial recycling of waste | Peat or a mixture of peat and sawdust is used as a reagent. When interacting with wastewater, the material is effectively composted. In modern models, peat is filled using an automatic dispenser. |
| Compost with full recycling of waste | It differs from the version with partial recycling in the large volume of the waste bin. Long-term storage of wastewater allows for more efficient composting of feces, turning it into a fairly productive organic fertilizer. |
| Separation | During the operation, the liquid and solid fractions are separated. This allows faeces to be recovered for composting and better treatment of wastewater with high moisture content through filtration. |
| Thermal | Waste disposal is carried out by burning it to ash. Combustion is carried out in a special thermally insulating container using an incandescent spiral or an open flame. The main disadvantage of this technology is the high power consumption (up to 5 kW). |
| Freezing | Perhaps the most unusual toilet described in this section. It consists of a container and a container for freezing waste. Deep freezing allows you to avoid the appearance of an unpleasant odor, in addition, almost all microorganisms are destroyed during the cryotreatment process. As a result, fecal matter becomes completely suitable for composting. The main disadvantage is energy dependence. |
As you can see, such devices can significantly optimize the process of removing sewage. At the same time, for their operation it is necessary to have a source of electricity, therefore, when installing them, renting a diesel generator for a summer residence will move from the “desirable” category to the “necessary” category.
Method 2. Install a heater
You can purchase an infrared outdoor heater with protection class IPX5. Such a device is protected from splashing water and is more economical than a gas heater. However, purchasing an IR device will cost 3-4 thousand rubles.
Another option to warm up the toilet is a fan. Take devices with ceramic heating elements, they quickly increase the temperature and cost around 1000 rubles. Such devices will instantly warm up the cabin - you turn on the fan at home and by the time you reach the toilet, it will become warm inside.
To insulate a cabin with a heater, you either need to know how to install the electrics yourself, or hire a specialist.
Examples of finished projects
One of the simplest solutions for country toilets, which are used everywhere, is the construction of a “birdhouse”. This is the name given to a standard rectangular restroom. Most often it has a pitched roof, which is made of slate. Below you can see a drawing indicating the dimensions of just such a restroom. Among the disadvantages, it is worth noting that the restroom is unstable to loads, as well as the need for additional upholstery material that will eliminate drafts.
If you want something more intricate, then you can build a triangular toilet. It is called a hut. This is exactly what it resembles with its shape. The triangle is one of the most stable shapes, so such a toilet can withstand both wind and snow loads. Unlike the previous option, snow cover will not be able to accumulate on such a latrine. Below is a drawing showing all the dimensions of the restroom. You should not save when choosing the width of the toilet. If you make it too small, then it will be almost impossible to stand up to your full height in the restroom.
A more complex toilet option for making in the country is a diamond-shaped toilet. It is also called a hut. Such a restroom will require significant consumption of building material. But with such a toilet you can be sure of stability even in strong winds. Another solution would be to build a restroom in the shape of a small house. It usually has a gable roof and is constructed from any type of materials.