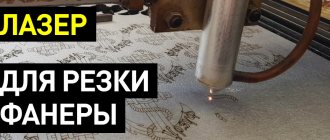
A laser cutter greatly simplifies wood processing and allows you to easily cut out a variety of complex parts from it. Light rays, which, thanks to the use of a collimator, are combined into one beam, heat the material to the evaporation temperature, ensuring maximum cutting accuracy and the absence of irregularities.
Making a laser cutter for wood with your own hands is not difficult, but this will require all the necessary materials and accessories, which we will discuss in this article.
How to make a laser cutter for wood with your own hands
Benefits of Using a Laser Cutter in Woodworking
Laser cutting devices are very economical, as they consume a minimum of energy during operation. In addition, this equipment has a number of other advantages:
- high efficiency;
- absence of dust and chips during the cutting process; the tree simply evaporates, leaving no traces behind;
- light weight of laser systems; Thanks to this, the transportation of equipment is greatly facilitated, and it becomes possible to use it in different areas of production;
- almost complete absence of noise during operation; if you have heard the sounds a sawmill makes, then be sure to appreciate this advantage of a laser cutter;
- possibility of using a cutter for engraving;
- high cutting precision; it is ensured by the use of numerical software control of laser equipment;
- no vibration.
You can cut more than just wood with a laser. Depending on the power, the device can process glass, plastic, ceramics and even metal sheets, profiles, and pipes.
The disadvantages of a laser cutter include the inability to process laminated particle boards, as well as the release of harmful toxic substances into the atmosphere when working with polymer materials.
Laser cutter design
To make a laser cutter yourself, you need to know the design of this device. It consists of several key elements:
- An emitter, which can be solid-state, gas or fiber. You can make only the first option with your own hands.
- A mechanism that generates radiation and transmits it to the workpiece. He is also responsible for cooling the equipment.
- A work table on which wood processing is carried out. Included in the design of only powerful stationary devices.
- A control system that allows you to adjust the operating parameters of the equipment.
The handheld cutter uses only an emitter, collimator and power supplies. Therefore, this device can be made independently.
How to make a wood cutter
Below we will give two ways to make a homemade laser cutter. To implement any of the options, you will need an old DVD with a recording head, a pointer and a metal case from a rechargeable flashlight.
First way
It allows you to make a very simple cutter, which will be quite enough for cutting thin pieces of wood or creating engravings. The device is manufactured in this way:
- Carefully disassemble the optical drive and pointer. You need to remove the red diode from the DVD-rom, which is then installed in the upper part of the pointer.
- We insert the upgraded laser into the flashlight housing. First you need to remove the glass and the lamp from it.
- We connect the wires, insert the batteries and check the functionality of the device.
Second way
Using it, you can create more powerful equipment that is suitable for cutting wood, plastic and metal. It is made as follows:
- We disassemble the pre-prepared flashlight, laser pointer and DVD drive.
- We create a printed circuit board with capacitors whose capacitance is 100 μF and 100 pF, as well as a resistor. A fairly simple circuit will allow you to regulate the power of the device.
- Instead of the flashlight glass, we install a lens that will act as a collimator - collecting light rays into a narrowly directed beam.
- We connect the wires and install the batteries.
- We check our homemade laser, measure the current strength with an ammeter or multimeter, and then adjust it depending on the materials being processed.
During the manufacturing process of both the first and second wood laser cutters, it is important to securely fasten all components - diode, batteries, lens, etc.
The wires are connected to the battery compartment with strict polarity to prevent short circuits. In addition, when working with a ready-made device, be sure to follow safety regulations.
Do not expose your hands to the laser beam to avoid burns, and try not to let the device fall or hit it hard.
Source: https://SpecInstrumenta.ru/poleznye-sovety/kak-sdelat-lazernyj-rezak-po-derevu-svoimi-rukami.html
Design and principle of operation
The main element of the engraver is a semiconductor laser. It emits a focused and very bright beam of light that burns through the material being processed. By adjusting the radiation power, you can change the depth and speed of burning.
The laser diode is based on a semiconductor crystal, on top and bottom of which there are P and N regions. Electrodes are connected to them, through which current is supplied. Between these regions there is a P-N junction.
Compared to a regular laser diode, it looks like a giant: its crystal can be examined in detail with the naked eye.
The values can be deciphered as follows:
- P (positive) area.
- P - N junction.
- N (negative) area.
The ends of the crystal are polished to perfection, so it works as an optical resonator. Electrons, flowing from a positively charged region to a negative one, excite photons in the P-N junction. Reflecting from the walls of the crystal, each photon generates two similar ones, which, in turn, also divide, and so on ad infinitum. The chain reaction occurring in a semiconductor laser crystal is called the pumping process. The more energy supplied to the crystal, the more it is pumped into the laser beam. In theory, you can saturate it indefinitely, but in practice everything is different.
During operation, the diode heats up and must be cooled. If you constantly increase the power supplied to the crystal, sooner or later there will come a time when the cooling system can no longer cope with heat removal and the diode will burn out.
The power of laser diodes usually does not exceed 50 Watts. Above this value, it becomes difficult to make an effective cooling system, so high-power diodes are extremely expensive to produce.
There are semiconductor lasers with 10 or more kilowatts, but they are all composite. Their optical resonator is pumped by low-power diodes, the number of which can reach several hundred.
Compound lasers are not used in engravers because their power is too high.
DIY laser cutter for plywood
Today, laser cutting machines for wood are gaining increasing popularity. This feature can be explained quite simply. In the production of souvenirs, advertising, furniture and carpentry products, there is often a need to quickly and efficiently carry out complex elements and cuts.
Not every tool can cope with the task with your own hands, and here laser cutting and engraving can come to the rescue.
Cutting wood with a laser machine
Wood is considered the most beautiful of all materials known to mankind. In addition, wood is an environmentally friendly, safe and higher quality material that has been used since ancient times. It is used in various fields of production, in particular in construction.
Today, a wide variety of products are made from wood, which we use both in everyday life and as decorative elements.
Not so long ago, every manipulation: cutting, engraving, burning, was carried out the old fashioned way - with your own hands. The process was, of course, labor-intensive, but very interesting and exciting. Today, any action with wood can be done using laser machines and improvised tools.
The laser has a thermal effect on wood. When cutting, the machine fuses the edge, thereby protecting the wood from germs and bacteria, ensuring a longer service life for the product.
Unlike metalworking tools, when working with the equipment, no waste, chips, sawdust is generated, the workpiece or model is not deformed, and the design is completely consistent with the original. However, each type of wood is processed differently. It all depends on the breed, thickness, humidity, hardness, as well as the season of delivery.
Types of laser machines for plywood
Computer numerical control machines Modern CNC laser machines can handle workpieces from any wood perfectly. However, despite its versatility, each model has its own features and characteristics:
- Floor machines. The working table of the machine can vary from 0.5 meters to 2 meters. Such machines are designed for installation in a specialized room and are used, as a rule, in heavy industries. The machines have a monolithic body, which provides them with stability of the entire structure, and also effectively reduces the vibration background that occurs during operation. The main purpose of such equipment is cutting, engraving, cutting wood.
- Tabletop machines. A small-sized model that does not require installation in a production area. Ideal for processing at home or within the walls of a small office. The excellent optical system allows you to cope with high-quality cutting and decoration of workpieces.
- Compact machines. With your own hands, using a marker, you can apply decorative elements to various three-dimensional products (pens, key rings, jewelry, any layout, etc.), while each detail will be clearly visible, and the design will be durable. This feature is achieved due to the special design of the marker with a high-tech optical system.
Principle of operation
The layout, the workpiece is processed using a beam, which on the surface of the material looks like a spot, the diameter of which is several microns. The beam is formed thanks to a lens that is installed at a short distance from the base part of the part. The beam moves thanks to a drive that is pre-programmed for the technical parameters of the element being processed.
How to choose the right machine
Still, the main question remains the choice of equipment. Convenience, quality of work, and productivity depend on it. And many problems simply will not arise. When choosing, it is important to consider reliability, accuracy, and ease of use. You need to select for specific tasks, so as not to overpay for unnecessary options, but also not to miss out on everything you need. Basics:
- emitter power,
- working field size.
Which laser tube to choose
This element is a glass tube filled with carbon dioxide CO2. When voltage is applied, it induces radiation.
For plywood, it is selected at the rate of 10 W per 1 mm of thickness. So, for example, if you are going to cut a thickness of 10 mm, you need a tube of at least 100 W. But the optimal mode of operation of the cutting element is 80% of the maximum.
Working field size
Selected according to the scale you plan to carry out. For example, for the production of small elements or products, a machine with a working field of 500x300 mm may be suitable. For larger tasks (furniture, billboards) - 1200x900, 1600x1000 or even 2000x3000 mm.
Equipment selection examples
For example, for the production of small icons on a stand made of thin plywood, a table-top machine Elixmate NG 0503 M, with a 50 W tube and a field of 500x300, is quite suitable. And if you are working on built-in furniture, decorating shop windows or cafe halls, then the powerful Rabbit Flat Bed 1220, with a 100-130 W tube and a working field size of 1200x2000 mm, is suitable.
These brands have proven themselves well and offer a wide selection of CO2 CNC machines for any task.
How to make a laser cutter for metal with your own hands?
Of course, a homemade device will not be able to gain the greater power that industrial devices have, but you can still get some benefits from it in everyday life.
How to make a laser cutting device from a pointer?
The most interesting thing is that you can make a laser cutter using old unnecessary items.
For example, using an old laser pointer will allow you to make a laser device with your own hands.
In order for the process of creating a cutter to progress as quickly as possible, you need to prepare the following items and tools:
- laser type pointer;
- battery-powered flashlight;
- an old CD/DVD-RW writer that may be out of order - you will need a drive with a laser from it;
- electric soldering iron and a set of screwdrivers.
The process of making a cutter with your own hands begins with disassembling the drive, from where you need to remove the device.
Extraction must be done as carefully as possible, and you will have to be patient and attentive. The device contains many different wires with almost the same structure.
When choosing a DVD drive, you need to consider that it is a writeable drive, since this is the option that allows you to make recordings using a laser.
Writing is done by evaporating a thin layer of metal from the disk.
During the reading process, the laser operates at half its technical capacity, slightly illuminating the disk.
During the process of dismantling the upper fastener, the eye will fall on a carriage with a laser, which can move in several directions.
The carriage must be carefully removed and the connectors and screws carefully removed.
Then you can proceed to removing the red diode, which burns the disk - this can easily be done with your own hands using an electric soldering iron. The extracted element should not be shaken, much less dropped.
Once the main part of the future cutter is on the surface, you need to make a carefully thought-out plan for assembling the laser cutter.
In this case, it is necessary to take into account the following points: how best to place the diode, how to connect it to the power source, because the diode of the writing device requires more electricity than the main element of the pointer.
This issue can be resolved in several ways.
To make a manual cutter with more or less high power, you need to remove the diode located in the pointer, and then replace it with the element removed from the DVD drive.
Therefore, the laser pointer is disassembled as carefully as the DVD burner drive.
The object is untwisted, then its body is divided into two halves. Immediately on the surface you will be able to see a part that needs to be replaced with your own hands.
To do this, the original diode from the pointer is removed and carefully replaced with a more powerful one; its reliable fastening can be done using glue.
It may not be possible to remove the old diode element right away, so you can carefully pry it out with the tip of a knife, then lightly shake the pointer body.
At the next stage of manufacturing a laser cutter, you need to make a housing for it.
For this purpose, a flashlight with rechargeable batteries is useful, which will allow the laser cutter to receive electrical power, acquire an aesthetic appearance, and ease of use. To do this, you need to install the modified upper part of the former pointer into the flashlight body with your own hands.
Then you need to connect charging to the diode using the battery located in the flashlight. It is very important to accurately establish the polarity during the connection process.
Before the flashlight is assembled, it is necessary to remove the glass and other unnecessary elements of the pointer that may interfere with the laser beam.
At the final stage, the laser cutter is prepared for use. For comfortable manual work, all stages of working on the device must be strictly observed.
For this purpose, it is necessary to check the reliability of fixation of all embedded elements, correct polarity and evenness of the laser installation.
So, if all the assembly conditions stated above in the article have been strictly met, the cutter is ready for use.
But since a homemade hand-held device is endowed with low power, it is unlikely that it will turn into a full-fledged laser cutter for metal.
What materials and mechanisms will be required
To make a simple laser cutter with your own hands, you will need the following materials and technical devices:
- laser pointer;
- a regular flashlight equipped with rechargeable batteries;
- an old burner drive (CD/DVD-RW) equipped with a laser drive (it is not at all necessary that such a drive be in working condition);
- soldering iron;
- set of locksmith tools.
The higher the write speed of the drive, the more powerful the laser cutter will be.
Thus, you can make a simple laser cutting device using materials that are easy to find in your home workshop or garage.
Do-it-yourself laser cutting on wood
Foreign and domestic industry produces many different types of equipment designed for processing and cutting blanks from wood materials (including plywood).
The most high-tech solutions involve the use of modern laser machines for these purposes.
One of these mechanisms, a wood laser cutter, is capable of performing many other operations in addition to its main function. This allows us to classify it as a universal type of woodworking equipment.
Operating principle
The main working tool of a plywood laser cutting machine is a high-power light beam, under the influence of which the processed area is subjected to thermal heating. As a result, part of the wood fibers burns out and forms a cut that cuts the workpiece into fragments of a given configuration.
Note! This processing method refers to non-contact methods, since in this case there is no direct contact of the working element with the material being cut.
For different machine models, the laser light power can vary significantly, which affects not only their capabilities, but also their areas of application. In any case, the cut is smooth, there are no shavings, laser machines allow you to perform work quickly and as accurately as possible, to produce original toys, furniture parts, souvenirs and much more.
Capabilities of laser cutting tools
According to their intended purpose, all existing models of laser machines for wood are divided into the following classes.
Firstly, these are devices with a small power reserve, which are intended mainly for woodworking operations.
And, secondly, these are units with a fairly powerful emitter, used for cutting hard materials (including non-ferrous metals and similar substances).
Low-power laser machines designed for processing wood materials (plywood in particular) are in demand among craftsmen for home and domestic use. They are installed in small private workshops for personal needs or permanent production work.
Regardless of the features of a particular laser unit, they are all capable of performing the following unique operations:
- cut blanks of any shape or stencils from solid sheets of plywood and veneer;
- engrave various markings and inscriptions on the surface of wood blanks;
- apply simple drawings on working surfaces;
- milling wooden parts of varying degrees of complexity, accompanied by making recesses, grooves and chamfers in their body.
What is a nichrome cutter?
Greetings to all subscribers and guests of the Podelkin channel. Today I want to introduce you to a homemade and very useful tool called a nichrome cutter.
A nichrome cutter is a device for cutting shapes from wood (plywood), which consists of two main elements: a power source (12V) and a cutting part (nichrome wire).
This tool is easy to make yourself and has a number of advantages over a conventional hand jigsaw.
Unlike a manual jigsaw, a nichrome cutter does not have a metal arc-shaped frame that limits the length of the cut (with a manual jigsaw it is impossible to cut at a great distance from the edges of the part), so it can be used to make very voluminous products.
A nichrome cutter has a much higher cutting speed, during which you will make virtually no effort. This device will not only simplify your work, but also save your time. And the last thing is the price. To assemble a nichrome cutter, you will spend approximately the same amount of money as a manual jigsaw costs.