If the main tools of a blacksmith are a hammer and an anvil, then for a carpenter there is nothing “more familiar” than his workbench. For people who work with wood, it can at the same time be a cutting platform and an assembly table, a stop and stand, a device for storing tools and even, if you want, a small carpentry machine, and sometimes a means of earning money. This article tells you how to make woodworking tables with your own hands. The instructions, photographs and drawings presented in it will help even a beginner to install this structure.
Osya member of FORUMHOUSE
First of all, after building a workshop, you need to make yourself a table. A table like a workbench, essentially. This is a table for work - fitting, assembling small things made of wood (stools, shelves, etc.). I'll call it an assembly table.
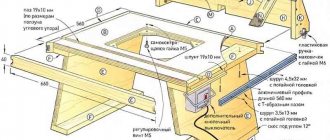
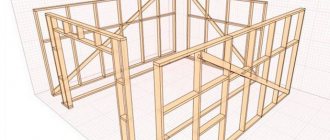
In fact, the second name for a workbench is an “assembly table.” But, as you already understand, its purpose goes far beyond assembly operations. Therefore, the design of a multifunctional workbench in a carpentry can be quite intricate (see drawing below), and its development (in the absence of experience) can be spent as much time as it takes to design the carpentry workshop itself.
General description of the carpentry workbench
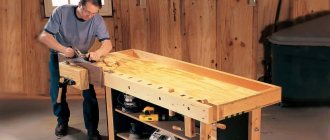
At the heart of any carpentry workbench, regardless of the number of operations that are supposed to be performed with its help, there is always an ordinary wooden table. It is on it that the master will do carpentry, drill parts, process surfaces, assemble wooden trinkets into one complex structure and surprise others with his skills.
A good solid table is the basis. And everything else - vices, clamps, boxes with tools and fasteners - all these are constant attributes of the most useful tool in a carpentry workshop.
Workbench project
To make a carpentry workbench with your own hands, you must first understand its parameters that are optimal for you.
The first and most important thing you should pay attention to when developing a project for a future workbench is its height. After all, you will have to work for him for a long time. And you can get tired standing at a workbench that is too high or too low in no time.
The dimensions of the workbench for work are chosen in such a way that you can work while standing at full height and without slouching. For a person of average height, the height of the table should be within 70...90 cm. But it is better to focus on the features of your own anatomy. It is optimal if the upper cut of the legs is at the level of your lowered arms. When a few centimeters are added to this height (the thickness of the workbench lid), you will understand that working while standing at such a table is a pleasure.
The optimal height of a carpentry table for standing work for a person of average height is 70-90 cm.
It is better to make the workbench cover, as well as the working surface, from solid wood or plywood. There are people who use particle board materials, light chipboard sheets, etc. for these purposes. We strongly do not recommend that you follow their example. This is a bad design - after all, the loads on the surface of the structure can be quite noticeable, and the particle board under such conditions will quickly fail.
Osya member of FORUMHOUSE
5 years ago I received 2 sheets of plywood as a gift from a neighbor. It was decided to use it in the construction of a workbench. The size of the workbench was determined immediately - it was a pity to cut such a sheet. Experience has shown that there are no extra centimeters at the table. The height was determined by the height of the palms from the floor and amounted to 850 mm.
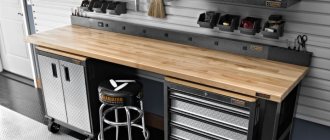
Ideally, a homemade workbench should have a special tray on the lid for storing tools and wood pieces involved in the work, as well as special holes (sockets) for wedges and combs. Using wedges and (or) combs, parts and workpieces will be secured to the table surface. It is on the cover that auxiliary clamps (vises) should be mounted to fix the processed lumber.
The dimensions of the workbench may vary depending on the size of your workshop. But, as practice shows, the optimal dimensions of the lid are 700 mm wide and 2000 mm long.
The supports (legs) of the workbench can be made from wooden beams 120*120 mm, no more. This will be quite enough to ensure that the structure is stable and does not become loose under the influence of brute physical force.
DIY workbench. Blueprints. Video instruction
A stationary workbench can be installed not only indoors, but also in the courtyard of your own house or cottage.
Making the base
First of all, you should make the frame of their beams with your own hands and fasten it in such a way that the base is as rigid as possible.
- Vertical supports are best made from rectangular timber, the dimensions of which are approximately 120x120 mm.
- Jumpers are cut into the table legs and fixed with glue or screws.
- A drawer frame is attached along the length in the middle of the workbench. The lintels and drawers need to be positioned at a distance of 40-50 cm from the floor. In the future, it will be possible to install tool boxes on them.
Most often, first, according to the drawing , grooves are made , and only then the entire structure is assembled. In this case, all joints are glued and fixed with clamps. If the workbench is collapsible, then all parts of the frame can be connected using metal corners.
To make the stationary structure even more reliable, several parts of the support frame can be secured to the wall. You can increase the stability of a carpentry workbench with wedge-shaped inserts or diagonal jumpers. They are attached with self-tapping screws between the top of the frame and the legs and are made of the same material as the table base.
Making a table top with various accessories
The size of the workbench cover should be several centimeters larger than the base of the structure, then it will be convenient to work behind it.
- The boards are attached to three bars using metal corners, which are placed on the back side of the tabletop. Grooves must first be made for these bars.
- Then the boards are carefully adjusted to each other, sanded and coated with a protective solution. It is recommended to use drying oil or oil.
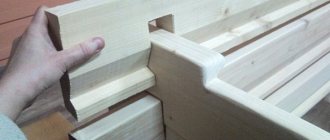
A recess is made at the end of the tabletop for a vice . In this case, the vertical plate should form one plane with it. In addition, you will need a plywood pad, which will need to be placed at the bottom of the workbench.
The vice is applied to its location, and the location for the holes is marked. A vice is inserted into the finished recess and fastened with bolts and nuts to the table top so that its lips are located flush with the surface of the table top.
You also need to build stops on the carpentry workbench, which you can purchase or make yourself. It is not recommended to use round dowels or bolts as stops, since dowels do not secure parts well, and the bolt head can damage the workpiece.
You can make pegs or rectangular stops . With their help, you can securely fix parts of any size. These stops are made from hard wood. You can make them simply rectangular, widen them at the top, or cut them out with a jigsaw and make them with a “spring.”
You can make holes in the tabletop for pegs or build it up with bars of the required thickness, screw them to the edge of the table and cover it with a plank on the other side. In order to fix any part, the sockets should be located from each other at a distance of half the travel of the vice.
The stationary workbench is ready, now you can work on it. However, if there is not enough space to install a desktop, then you can make a collapsible carpentry workbench.
Workbench installation
As practice shows, making a workbench is not difficult. Installing a workbench is no different from assembling an ordinary wooden table. The vertical supports are fastened together using vertical boards and self-tapping screws. The working surface should also be secured to the supports using self-tapping screws.
When assembling a workbench, you should avoid using nails to connect parts. After all, this can subsequently lead to rapid loosening of the workbench and even distortion of its supporting frame.
In order to save space in the carpentry workshop, some craftsmen make a homemade workbench folding. It is mounted on the wall. This type of installation means that carpentry work will only be carried out when necessary.
Cartman Sr member of FORUMHOUSE
In the past, in cramped conditions, I had a workbench board - a laminated MDF board 24 mm thick, with dimensions 1200x2200. It had minor modifications, such as: holes and grooves for attaching a hand router and circular saw, a flush-mounted metal frame with threaded holes for attaching rulers, and mustache nuts at the bottom, located in the places where the hand plane and drilling machine from a drill with a rocker are attached. The tabletop was attached to the wall on three hinges. During non-working hours, it was raised vertically and fixed to the wall. Under the board, also on hinges, are two triangles from the same board. She laid herself on them while working.
This design is an excellent way out of a situation in which the interior space of the workshop is very limited. But such a carpentry table does not withstand intense loads well, and it can only be made independently in exceptional cases.
After you have mounted the frame and working surface of the product, a simple carpentry table can be considered ready. But in order for it to turn into a full-fledged workbench and begin carpentry work, its functionality needs to be slightly expanded by adding specialized equipment to the design.
Taking into account the special specifics of the activity, the carpenter’s workbench must be equipped with appropriate equipment. And if the necessary tools are always at hand, then this is an excellent indicator. And the structural elements of the workbench itself will help you correctly arrange devices, fastening materials and power tools.
Rear and front clamps
Rear and side (front) screw clamps are those elements without which no workbench simply can fulfill its main purpose. Therefore, this part of the structure should be built first.
The rear clamp is designed to hold lumber while planing. As shown in the diagram, its vice blocks move along the front edge of the workbench, allowing the workpiece to be securely secured using lead screws.
The side screw clamp (which, due to its special location, is called the front clamp by many) has the same purpose as the rear clamp. And these elements differ from each other only in their location. Here are the drawings of a carpentry table for making it yourself.
Main types of workbenches: photos of structures and vices for various purposes
Drawings of tables that can be found on the Internet are presented in a huge variety. To choose the best option for creating a workbench at home, it is better to decide in advance on the type of structure and its configuration. There are several types of tables used for working with wood.
The simplest design to manufacture is a stationary type workbench. To create it you will need a minimum set of tools and a little patience. Such structures are mainly used for processing large-sized wooden workpieces.
Carpentry workbenches differ in size and type of construction.
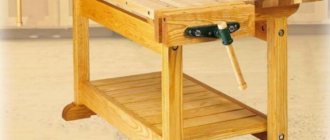
Folding carpentry workbenches have a more complex structure. These products are quite compact. Their weight does not exceed 30 kg. Such structures are considered mobile and, if desired, they can be easily moved from one place to another. In folding workbenches, the lower support part can be made of metal. This is done in order to increase the stability of the structure. Mobile tables are designed for working with small wooden workpieces.
Carpentry workbenches can also be composite. In this case, all structural elements are fixed using bolted connections. The advantage of such a table is that all its components are interchangeable. On the other hand, the drawings of composite type carpentry workbenches are quite complex, as is the technology for their manufacture. Only an experienced master can cope with this task.
Workbench vices come in universal, special, manual and chair types.
Before you start creating a workbench, you need to choose a suitable vice option. In this case, the specifics of future work must be taken into account.
There are several types of vices for a carpentry workbench:
- Chairs - these devices are used extremely rarely, since they are designed to perform heavy work.
- Universal – designed for working with small workpieces. Bolts are used to secure this fastener to the workbench cover.
- Special - allow you to adjust the position of the workpiece both vertically and horizontally, which greatly simplifies the work of the master.
- Manual - there are instrumental, rotary and non-rotary.
On a note! In non-rotary and rotary manual type vices, the width of the jaws is 8 cm.