How to permanently repair a crack in a timber or log.
Cracks inside wood can occur for various reasons. Sometimes they appear due to excess stress inside the wood, seasonal shrinkage, mechanical damage or other reasons. In order to eliminate them, you will need to use a wide arsenal of products - sealants, putties, adhesives and other products that are aimed at different types of defects. This article will discuss the best technologies and materials that are used to repair cracks in logs and beams - we are talking about large longitudinal cracks and small chips.
Wood putty
Wood putties are paste-like compounds that are used to cover cracks, fill depressions and level the surface. Yes, puttying has become the most popular method for eliminating defects in wood due to the availability and simplicity of the method. This technique has a number of undeniable advantages, but also requires knowledge of some nuances. Due to the fact that the composition is viscous, it is possible to perfectly fill cracks and depressions. After drying, which occurs quite quickly, the material gains strength, and then it can be used to subject it to standard wood processing procedures - sanding, planing and sawing.
All coatings that form a film - paint, enamel and varnish - will fit perfectly onto the frozen layer of putty. Due to the various tinting options, you can easily select a putty to match the wood that you plan to restore - this is extremely important if you plan to apply varnish, wax or stain in the future.
Wood putty can be divided into two main groups:
One-component - putties made on the basis of an alkyd, water-based or other binder, and they are usually produced in finished form. Such materials are affordable and quite practical - you just need to knead the mixture to a paste consistency, and then you can start all the work. The relatively long life of the mixture allows you to slowly work with large volumes of space, namely, sealing cracks in a wooden floor or leveling other large-scale surfaces.- Two-component - compositions that are offered for purchase in the form of two different components - a hardener and a putty. They should be mixed immediately before work begins, and all recommendations specified by the manufacturer should be strictly followed. This differs from the first version of the composition in that it is more durable, has greater elasticity, and there is practically no shrinkage, and it is also resistant to water and solvents.
For the most part, the disadvantages are relative - high cost and rapid hardening. The lifetime of a two-component putty is approximately 5 minutes, which creates some inconvenience when working with a large area, so such products are often used only for local repairs - to cover up a crack in a small area.
How to cover up a crack
The basic principles of working with putty are shown using the example of how to seal a large meticulous crack in a walnut cut. The example photo shows what the restored board looks like after applying the wax finish. The composition for sealing cracks in timber should be applied with a spatula, while tightly filling the crack cavity. All putties gain strength after drying, but their hardness will not be compensated by sufficiently high elasticity. With large fluctuations in the size of wood, which are caused by its shrinkage and swelling, the joints that are puttied begin to crack over time. For this reason, this sealing method is effective for the most part only for interior work, where differences in humidity and temperature are not as great as outside.
Selecting materials for embedding
As a rule, wooden houses made of logs or profiled timber are not covered with additional facing materials, since wood itself is a decorative and finishing material. Therefore, all the cracks and crevices spoil the appearance. There are many ways to correct defects in wooden structures, but the most often used in practice are:
- caulking with moss,
- filling with wood chips,
- filling with artificial fillers,
- caulking with sealants,
- sealing with wood putty.
It is not difficult to seal defects with moss, but you must do the work carefully. The process itself is quite labor-intensive and, depending on the method, will require certain investments.
A mixture of glue and wood shavings
Also, in addition to the material for sealing cracks, you can also use a mixture made from wood glue and small wood shavings. This method is not suitable for correcting wide depressions and leveling large surfaces, but it is more reliable as an alternative to putties during local repair of cracks. Unlike putty compounds, which, despite their merits, only fill cracks, a filler made from shavings and glue will help further ensure bonding strength.
In those places where the putty composition will sooner or later begin to crack due to various factors such as seasonal fluctuations, a self-made glue filler will be able to withstand the test of time. It is recommended for use for sealing cracks along carpentry joints, repairing cracks in wood doors and other places where the seam is subject to stress.
Ideally, the adhesive should be mixed with fine wood dust that is generated during sanding. When drying, this composition will shrink significantly. Therefore, when filling cracks, it should be applied in large quantities, so that it protrudes above the surface. After everything is dry, you can carefully remove the excess using a sharp chisel, and the area that has been repaired should be sanded with fine-grained sandpaper.
Please note that you should think about cracks during design. Due to seasonal fluctuations in humidity levels, wood constantly changes dimensions, and this important feature, as well as all the others, should not be forgotten during the design and creation of most carpentry projects. In particular, during the manufacture of tables from laminated board and solid wood, since the lid needs to be attached using special fittings, which will allow the wood to easily change sizes. Rigid installation of the tabletop, which will be tightly screwed to the frames, will lead to the fact that it will begin to warp and long longitudinal cracks will form.
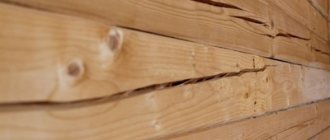
Why are cracks in logs dangerous?
Microcracks do not pose a serious threat to the integrity of the building. Deep (3–5 mm deep) longitudinal cracks and breaks can lead to uneven shrinkage and deformation of the log house. This, in turn, can lead to the complete disrepair of the building.
Minor cracks and grooves should not be ignored. Over time, moisture accumulates in them, contributing to the formation of fungus and mold. Invaded bark beetles can also cause the destruction of the strongest frame and lead to a decrease in heat and waterproofing properties.
Timely repair of cracks can prevent further deformation of the log. If deep cracks and longitudinal splits do appear in the log, they must be eliminated immediately.
Epoxy resin
Using epoxy resin is perhaps the most reliable method for repairing cracks. Two-component type products, which consist of a hardener and resin, can be easily modified into an adhesive filler. With their help, you can obtain a composition of the shade and viscosity you require, which can perfectly fill all cracks, chips, potholes and help create a strong bond.
After hardening, the epoxy resin will begin to gain strength, which exceeds the strength of wood, and due to its fluidity and excellent adhesion, it will penetrate into all cavities and thus restore the original integral structure of the wooden product, and will also prevent the further spread of cracks. This method is often used when working with solid wood, when the problem of cracks worsens due to high internal stress.
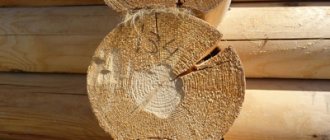
After the epoxy resin has completely hardened, it will turn into an inert and completely safe plastic that will have increased strength. The resin can be used to repair defects in products that come into contact with food, such as repairing kitchen countertops or repairing cracks in a cutting board or dining table. Epoxy resin makes it possible not only to fill a crack in a beam/log/wood product and thereby hide cosmetic defects, but also to completely stabilize the condition of the wood. Often this is only the only opportunity to bring back to life a timber that seems to be completely and completely damaged by through cracks, as shown in the photo below.
Butterfly dowels for crack stabilization
Large cracks can become not just a headache, but even a natural decoration of the overall design of the project. To a greater extent, this will apply to products made from slabs - these are massive cuts of wood, which are subsequently used to make table covers, seats for benches and other elements. In such furniture, wide cracks can preserve the philosophy of the Live ege style, which is characterized by interference with the natural forms of wood. But in order for a crack not to be a defect and become a real decoration, it first needs to be stabilized. If this is not done, it will continue to expand and after some time will split the wood part into two halves.
To perform stabilization, functional and decorative elements such as butterfly dowels are usually used. They should be glued into grooves that were milled in advance. The standard thickness of the dowel will be 1-1.5 cm. The number and size of the embedded butterflies is an entirely individual matter, since it will depend on the size of the part and the nature of the crack. To enhance the decorative effect, stabilizing inserts are made from wood species that have contrasting colors.
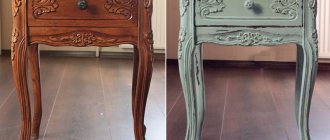
Wax correctors
Special sticks made from hard wax are a simple and extremely convenient solution for cosmetic repairs of small cracks, dents, chips, deep scratches and other defects. Wax correctors have become very popular as a means of redecorating furniture and other wooden products that are used indoors and are not subject to much wear and tear. Wax concealers are usually offered in colors that imitate different types of wood. The colors can be easily mixed to obtain the desired shade.
Before starting work, the area to be repaired should be prepared - clean it of dust and various contaminants, remove chipped nicks. Wax correctors should be used at a temperature that is not lower than +10 degrees. First, polish the restoration site gently with a lint-free cloth. Next, you should apply the wax with force to the damaged areas so that it is thoroughly packed into all cavities.
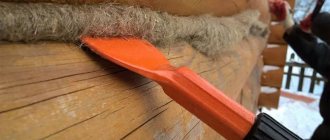
Caulking with moss
The most ancient method in existence is caulking cracks with moss; its use was determined by the very beginning of the use of wood as a building material for the construction of walls. Forest moss was used to fill the space between the stacked logs, and upon completion of construction and during further operation of the log house, all remaining cracks were caulked with it.
To do this, the moss must be prepared, that is, it is collected in advance from the forest and dried. Before caulking, the moss mass is slightly moistened and only after that they begin to fill the cracks with it using special devices. Filling is carried out until a dense elastic substance is obtained; at the end of the work, the protruding excess is cut off.
This method is the cheapest, as it does not require the cost of purchasing material, but if you use flax tow instead of traditional moss, then this will require additional costs in the region of 700 rubles per 50 kg. The method of sealing cracks with moss or tow has significant drawbacks. Although such a seal restores the thermal conductivity and tightness of the house as a whole, the appearance of the walls will remain unsatisfactory, and given the fragility of the material, it makes this method unreliable.
We suggest you familiarize yourself with: Fireproof sheet for the bath
Filling with wood chips
If you use large sawdust to fill cracks, you need to make sure that they do not fall out, so be prepared to spend money on fastening material. It could be:
- casein glue,
- PVA glue,
- artificial drying oil.
This type of filler with glue is convenient to apply with spatulas, although it is more durable compared to moss, it still will not be possible to completely hide the cracks. If you can get sawdust or wood shavings for free, you will still have to pay 150 rubles per kilogram for glue or 100 rubles per liter of drying oil. This method can be considered inexpensive and reliable.
We suggest you read: How to install a chimney pipe through a wall
House made of rounded logs
The importance of prevention
The first rule of prevention is to use only well-dried logs (with a humidity of about 20%) in the construction of a log house. In this case, the drying process should occur naturally in a shaded, dry, not hot room for at least 2 years. In this case, the process of evaporation of moisture from all layers occurs evenly, and the appearance of cracks is practically negligible - no more than 1–2 mm.
The duration of drying can be determined by the size of the cracks: for example, logs aged for only a year develop cracks from 6 to 10 mm, and when aged for less than a year - 10–20 mm.
Another important preventive method is unloading or compensation cutting. It is performed with a router or chainsaw in the center along the entire log to a depth of 1/4 - 1/3 of the diameter. In this case, it is not important to saw through the ends. The cutting width is 7–10 mm.
The depth of the technological cut should not exceed one third of the diameter. If the rules are not followed, a wide split will inevitably appear, which can lead to the collapse of the entire log.
During construction, the groove is covered with a top log, thus protecting it from moisture. The presence of a cut prevents the formation of new cracks, and even if they appear, their depth and width are insignificant.
The third method is to treat the end cuts with sealant. This method prevents intense evaporation of moisture through the ends of the logs, ensuring uniform evaporation from all layers of wood.
Drying oil, oil paints and varnishes, wax and even lime can be used as a sealant.
Timely elimination of cracks and breaks in the log helps prevent internal destructive processes and significantly increase the service life of the building.
Sealing with wood putty
To give time-cracked wood a pristine look, use a special putty for working on wooden surfaces, which, like the sealant, is available in wood texture colors. With a cost of 250 rubles per kilogram, putty is one of the most expensive materials for woodwork. Since putty can only be used to fill chips and cracks no larger than 1 cm in size, according to the instructions for use.
How to apply sealant correctly
Tags: log, seal, round, crack
« Previous entry