The process is considered natural if you prevent their spread immediately after detection and monitor the condition of the house on an ongoing basis.
There are several reasons that provoke the appearance of splits in wood; experts have developed a number of proven methods for elimination.
Causes of cracks
Timber is a material consisting entirely of natural wood. It is prone to cracks and there are several main reasons for this:
Poorly dried timber.
Cracks in such material appear already in the first stages of operation of the structure, after the elements dry out naturally. You can check the moisture content of the timber before starting construction with a special device; the indicator should not exceed 14%.If it turns out that the material has not dried completely, you need to lay it on a hill (30 cm from the ground) in the shade. Each element is laid separately. Then it dries to the desired humidity percentage.
During the construction process, part of the timber remains on the street, part inside the house. As a result, half dries out faster, the stress in the elements is distributed unevenly, the wood cannot withstand it and cracks.
- Frame overload .
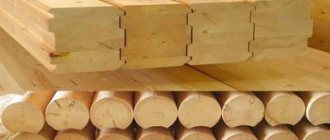
The material is often used to create a frame structure. To reduce the number of walls and partitions inside the house, 15*15 or 20*20 cm timber is installed in the form of single columns. If installed incorrectly, cracks appear in the wall and on the frame, and the seams may come apart. To avoid this, installation must be carried out meticulously. Builders should not forget about expansion gaps. - Heating. A house made of timber must be allowed to shrink for at least 6 months before completing the installation of window openings and doors. According to the rules, the building cannot be heated for a year after the construction of the box.
One more point: intermittent heating has a detrimental effect on the integrity of the timber. For example, the owner comes to the dacha for the weekend in the fall and heats the house. After he leaves, he turns off the heating. A week or two later he comes again and heats the house again.During the cold period, the walls gain moisture, during the heating process they dry out sharply, after which the process is repeated and cracks appear. It is recommended to maintain a positive temperature, even during departure, if the house is regularly visited by the owners.
The appearance of cracks is influenced by untimely and inappropriate maintenance. The material must be treated with an antiseptic; hydro- and vapor barrier is required. It is also worth remembering the expiration dates of protective compounds.
Why do you need to fix the defect?
A crack is a suddenly formed free space, which carries with it several dangers :
- Reduced thermal insulation properties of the material. Splits make the timber thinner, additional cold bridges appear, and the temperature inside the building drops.
- The service life of the building is reduced. Cracks can appear unnoticed by the eye; insects can settle inside and increase the effect of destruction. As a result, the house becomes uninhabitable and even life-threatening.
- The appearance of microorganisms. Free space, warm, filled with oxygen, is an ideal environment for the development of mold and mildew. Part of the building begins to rot, and it becomes dangerous to stay in the house for a long time.
- Additional expenses. First of all, cracks increase heating costs. Then you have to spend money on eliminating splits and repairing thermal insulation.
- Loss of strength. The split disrupts the structure of the material, it becomes brittle.
- Not aesthetic appearance. A wooden house with cracks looks unkempt. A crack spoils the appearance of a building, despite the fact that it is a natural process.
As a rule, only one crack can be present in one element. The main task of home owners is to eliminate the defect in a timely manner so that the split does not increase and spread.
What to do with cracks
Naturally, it is easier to prevent a problem from occurring than to fix it. Prevention, of course, will not help completely avoid the appearance of cracks. But it will still reduce their number and intensity, and also delay their occurrence.
Prevention in the fight against cracks
- Using wood in construction whose moisture content does not exceed 18% will significantly reduce the risk of cracks. To achieve this moisture level, proper drying of the wood is necessary. Ideally, this is natural drying over a long period of time. This way the wood will dry evenly and will not crack in the future.
- The presence of compensation cuts in logs, which are made in order to reduce stress in the wood and prevent it from cracking. Such cuts are made at the bottom and top, along the axis of the log. This way the cuts will be covered by the lower and upper logs. This design minimizes moisture penetration.
- Since the ends of the logs are the first to suffer from moisture penetration, their treatment will also be a good prevention of cracks. The ends need to be treated with a sealant that will prevent moisture from leaving the wood so quickly.
But if cracks have already appeared, what should you do?
Repair materials
Processing the timber after building the frame of the house implies complete waterproofing, vapor barrier, and sealing of joints.
To ensure that cracks do not pose a danger to building elements, they must be treated with a material that does not allow moisture to pass through . The composition must be firmly fixed to the timber and not be afraid of external influences.
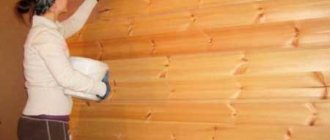
Before application, the damaged element is prepared: the nicks are removed, leveled, and sanded.
Sawdust and PVA
A moisture-resistant mixture of these ingredients creates a coating that is resistant to external manifestations and is not afraid of humidity and cold.
You cannot use shavings to create mass; only small sawdust forms a viscous consistency. It is mixed with moisture-insensitive PVA glue and applied to the crack with a spatula. Afterwards, the excess is removed, wait until the mixture dries and sand.
How can I replace PVA and sawdust?:
- Wood glue with a different composition. This will not affect the properties of the mixture in terms of crack size, but it will become stronger. The material tolerates moisture better and lasts longer.
- Wood dust. The consistency of the composition becomes less loose and more homogeneous.
Since the composition contains wood materials, when mixed with glue they moisturize. When the crack is repaired, the PVA hardens, the sawdust dries out and decreases in size.
It is not recommended to use the mixture to eliminate large cracks.
Slivers
The material is suitable for repairing cracks of any size. Before starting work, the wood chips need to be sharpened into a wedge shape and used to fill the gap. The element is driven into the split until it stops, and fixed with PVA or carpentry glue. The essence of the method: the chip restores the pressure from which the timber was relieved after receiving a defect.
Instead of wood chips, you can use butterfly dowels 1-1.5 cm thick . These are specially cut pieces of veneer that will prevent the cracks from opening even further. Externally, they are shaped like an hourglass. To install the butterfly, a groove is milled in the split, and a key generously lubricated with glue is inserted into it. The excess is removed and waited for complete drying.
A gap can not only become a defect, but also decorate a building if it is located in a visible place and looks beautiful. Butterfly dowels allow you to maintain the shape of the split; it does not increase in size, retains its shape and is not dangerous.
Tyrsa
This word refers to the waste that is formed after processing limestone. The composition also contains no more than 10% clay, which creates additional density .
To seal a crack, the mixture must be moistened and the free space in the timber must be tightly filled with it. It will set, dry and become a strong, moisture-resistant bond for wood. After the work is completed, the surface is sanded.
Wood putty
The material is intended for repairing small cracks with a depth of no more than 3 mm. If you use putty for large splits, the composition will crack after drying and lose its properties. Another reason against thick layers is the shrinkage of the material, which entails detachment from the base. The putty is made on the basis of acrylic resins.
When finished, the mass is very plastic and easily falls on the timber.
There are two types of wood putty :
- With one leading component. It can be acrylic or alkyd resin, water. Before application, mix the mixture thoroughly.
- With two components. It consists of substances that need to be mixed: filler and hardener. They are characterized by a high solidification rate, high strength and ductility. The mixture practically does not shrink and is not afraid of moisture and solvents.
To apply the composition, use a rubber spatula, grind the surface after drying with a fine-grain abrasive. The putty is chosen by color; it must match the wood. After repair, the surface is covered with protective compounds or finishing materials.
When air temperature or humidity changes, the material changes shape relative to the wood and may peel off. Therefore, it is recommended to use wood putty for the inside of walls and structures located indoors.
Arbogypsum
The material consists of sawdust and a binder - alabaster, in a ratio of 3:1. To create alabaster, gypsum is diluted with water in a 2:1 ratio. The mass is prepared immediately before the start of repair work.
Instead of sawdust you can use:
- tyrsa;
- crushed bark;
- chopped straw.
The resulting composition can be diluted with an alkaline solution from soap or shampoo for plasticity. The material adheres well to wood and has a long service life.
When creating a mass, you need to eliminate all lumps and achieve maximum homogeneity of the composition. The mixture reliably holds the wood together, works for a long time, and does not shrink.
Epoxy resin
One of the best materials to combine with wood. Creates a strong, durable filling and prevents further splitting.
It has a viscous, viscous consistency, thanks to which the resin evenly fills the entire crack. If you mix resin with glue, it helps restore the integrity of the timber. Also used for repairing chips and potholes . After drying, shrinkage does not occur, the material performs a reinforcing function, and the defect will not increase.
Sealant
Suitable for medium-depth splits up to 5 mm. Before application, the crack must be processed, the jags removed, for better adhesion to the acrylic-based sealant. If the crack is deep, experts recommend placing a silicone or polymer cord inside to reduce its size.
The sealant blocks the function of moisture exchange in wood. The cord inside enhances this effect and can cause moisture accumulation, subsequent rotting and bacterial damage.
But there are also advantages from using this material.:
- the sealant is thick, elastic, fills the crack completely;
- not afraid of frost and moisture;
- can be used on extended cracks;
- dries quickly.
Wax corrector
Visually it looks like a stick made of hard wax. Used as a material for repairing small defects. The color of the corrector should be chosen according to the color of the wood ; you can mix shades if you don’t find a suitable one.
Work is carried out at a temperature not lower than +10 degrees; it can also be used for furniture repair. Before starting work, the split is cleaned of nicks and dust.
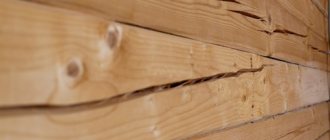
Deformation and cracking of wood
This defect is more or less extended longitudinal tears in wood, formed under the influence of internal stresses, which reach the tensile strength of wood when stretched across the fibers. There are meticulous, frost and frost cracks, which appear in a growing tree, and shrinkage cracks, which appear in felled wood.
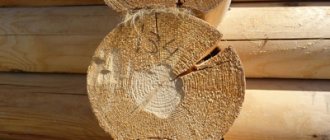
Methic cracks are one or more internal radial cracks in the trunks of growing trees of all species. Most often, this type of crack occurs in overmature forest stands. The crack starts from the butt, goes up the trunk and sometimes reaches the crown; thus, its length along the trunk reaches 10 m or more. In round timber, metic cracks are observed only at the ends (preferably at the butt), since, starting from the core, they do not reach the bark and are not visible on the side surface. In lumber they are found both on the ends and on the side surfaces. Depending on the location in round assortments, simple and complex metic cracks are distinguished.
Rice. 80. Layout of metic cracks in round timber: a - simple metic crack; b and c - complex metic cracks.
A metic crack (or two cracks directed along the same end diameter) that is located in the same plane along the length of the assortment is called simple (Fig. 80, a), complex is two or more cracks directed at the end at an angle to each other, and also one or two cracks directed along the same diameter, but located along the length of the assortment not in the same plane (Fig. 80, b, c). The last type of metic crack is observed with a spiral arrangement of fibers (inclination of fibers, see below).
Methic cracks most likely occur in a growing tree, but it is believed that the cracks are formed when the tree is felled by impacts with the ground. According to observations made on sleepers that were subjected to special sawing, metic cracks are not continuous along the length of the sleeper, but intermittent breaks, separated by bridges of solid wood and having different lengths and widths in cross sections.
Rice. 81. A crack in an oak beam.
Peeling cracks are peelings (along the annual layer) of wood inside the trunks of growing trees of all species. These cracks have some extent along the height of the trunk; they are not visible from outside the trunk. Peeling on the ends of round timber can be found in the form of arched (not filled with resin) or annular cracks, on the ends of lumber in the form of cracks-holes, and on the side surfaces in the form of longitudinal cracks or grooved depressions (Fig. 81). Until now, the reason for the appearance of peeling cracks has not been precisely established. Observations show that these cracks form in places where there is a sharp transition from fine-grained wood to coarse-grained wood. This kind of change in the structure of wood occurs as a result of light growth during severe thinning of forest stands or when cutting down the first tier in continuous stands.
Frost cracks are external longitudinal tears in the wood of the trunks of growing deciduous (less often coniferous) trees. They spread deep into the trunk in radial directions (Fig. 82). Frost cracks form when temperatures drop sharply in winter. This type of crack also occurs from lightning strikes.
On the surface of the trunk they are observed in the form of a long open crack with ridges or ridges of overgrown wood and bark along the edges. Sometimes cracks are not accompanied by such swellings. In round timber, frost cracks are clearly visible on the side surface and ends; on the outside they have the greatest width, going deep into the wood (often to the core), gradually narrowing. In lumber they are found in the form of long radial cracks with the annual layers widening around them. The walls of the cracks are dark or tarred (in conifers).
Rice. 82. Frosty crack in the black alder ridge.
Shrinkage cracks occur in timber under the influence of internal stresses during drying. They spread from the side surface deep into the assortment in radial directions. These cracks differ from metic and frost cracks in that they are shorter along the length of the assortment (usually no more than 1 m) and shallower in depth. Cracks may appear on the end surfaces of round logs and lumber due to uneven drying along their length. At the final stage of drying of large-section lumber (usually hardwood), internal cracks (fistulas) sometimes appear, which are revealed during cutting. Depending on their location in the assortment, cracks are divided into end, side and edge. End cracks are located at the ends and do not extend to the side (face) sides of the assortment.
Side cracks are located on the side (slab) sides of the log and can extend to the ends; edge cracks are located on the edges of lumber and can extend to the ends. In addition, lumber is distinguished between one-sided and through cracks. One-sided cracks are those that extend onto one side (face or edge) of the assortment; through cracks are cracks that extend onto two sides or two ends of the assortment. These also include peeling cracks that extend in two places on one side of the assortment (they can form a groove).
Cracks are measured by the depth of the assortment in millimeters and the length in centimeters or, respectively, in fractions of the thickness and length of the assortment. A thin steel probe is used to measure depth. Mark, chip and frost cracks in round timber are measured by the smallest thickness of the core board into which they can be fitted (for saw logs) or as a fraction of the end diameter; the exit of cracks to the second end is taken into account. In lumber, end cracks are measured by their length at the end in millimeters or in fractions of that side of the assortment on which their projection is larger.
Cracks violate the integrity of wood and, therefore, reduce its mechanical properties. However, the degree of influence of cracks on mechanical properties depends significantly on the relative size and nature of the cracks, their direction in relation to the acting forces and the type of loads. The smallest reduction in strength due to cracks is observed during compression along or across the fibers (a through crack during compression along the fibers can reduce the resistance by 5 - 10%), the greatest - during tension across the fibers, if the crack is located in a plane perpendicular to the acting force, and also when chipping, if the crack coincides with the plane of chipping. During bending, the greatest negative effect is exerted by a crack located in the neutral zone if it is in a plane perpendicular to the bending force; the least influence is a crack located in a plane coinciding with the direction of the acting force. In the first case, the magnitude of the reduction in strength turns out to be proportional to the reduction in the area working for shearing under the influence of maximum shear stresses (in the neutral zone). Cracks do not affect the modulus of elasticity in tension in compression along the fibers, but greatly reduce the modulus of elasticity in static bending if the plane of the crack is perpendicular to the bending force. In some assortments, restrictions in the tolerance of cracks are explained not only by a decrease in mechanical strength, but also by the fact that cracks allow moisture and fungal spores to penetrate deep into the assortment.
- Forward
Consumables and tools
To repair splits in timber use :
- fine sandpaper for cleaning the crack from nicks and debris, final sanding;
- dry rag to remove sawdust;
- masking tape to protect the surface from dirt;
- sealant gun;
- rubber spatula for putty;
- a clean small container if you need to mix filler ingredients;
- water (for compositions or cleaning after work);
- rubber hammer (if you need to hammer in a chip);
- a damp cloth to get rid of excess solutions;
- gloves.
Repairing cracks in furniture
Repairing a crack in wood can be done in two ways. The first one is simpler. For internal surfaces made of solid wood without veneer. Use a router to even out the width of the crack along its widest section. Cut the strip to the appropriate size. Apply glue and glue the strip into the milled crack. Tighten with clamps, or put under a press. After gluing, align the rail. Remove remaining glue, tint and varnish.
The second method is more difficult. We restore expensive, valuable furniture, and we don’t allow ourselves to just drive a router over it, increasing the loss. Using this method, our craftsmen restore all cracks from small cracks to wide gaps. It consists of the following.
The technician cleans the gap or crack of dirt. Cuts out an insert from an array of valuable wood with which the object is veneered. The insert must exactly follow the shape of the crack in the solid. Ideally, the natural color of the insert (slat) should match the color of the surface. If the color cannot be selected, a lighter breed is taken. It will be easy to tint it later. And then everything is the same as in the first case.
Peculiarities of sealing thin long cracks. If the width of the gap is no more than two millimeters, it is repaired with veneer. The veneer is cut into long strips along the grain. It is inserted into the slots in the direction of the fibers of the array.
Step-by-step repair instructions
How the repair process is carried out:
- If a crack is detected, examine it, check the depth and decide on the material for repair.
- Using sandpaper, carefully clean the surface from nicks and debris.
- Remove the sawdust, check that there is no excess left inside the split and that it is clean.
- Cover the edges of the crack with masking tape so as not to stain the surface.
- If the crack is deep and a sealant is used, a cord is placed inside using a long thin object (for example, a knitting needle or a toothpick). It should fill the inside so that 5 mm is left free from the edge. Afterwards, the sealant is filled carefully, leaving no empty spaces.
- The remaining materials are used according to the same principle - they fill the gap with them, trying to fill the maximum possible space. If you use a sliver, use a rubber mallet to hammer it into the split so that it holds tightly using a rubber mallet, using careful movements.
- Remove excess liquid material with a damp cloth.
- Wait for the filler to dry completely and remove the masking tape.
- Using sandpaper, level the surface, remove debris and nicks. If necessary, cover with protective and finishing materials.
Why are cracks in timber dangerous?
- Thermal insulation is reduced. An intact surface protects better from heat loss than a wall with breaks. The degree of reduction depends on the size of the cracks - the wood often spreads along the entire length of the log and timber, the depth reaches 25-50%. As a result, the wall freezes and the house becomes colder.
- The appearance is deteriorating. A wall with cracks loses its original attractiveness, the house seems old and unkempt. The defect on a log looks natural, but a cracked beam does not evoke pleasant emotions even among connoisseurs of natural materials.
- Strength is lost. Deep tears reduce the overall reliability of the structure - especially when a piece breaks off from a part or a log splits into pieces.
- Maintenance costs are rising. Defects need to be eliminated, repaired, processed. Loss of insulation increases heating costs.
- Service life is reduced. Water gets into the open cracks, pests infest inside the log, and the tree rots. The destruction of wood accelerates significantly, begins from the central part, and occurs unnoticed.
Difficulties and errors
What you need to consider when repairing cracks in timber walls:
The material must be clean and dry before application. Jagged edges and debris are removed for better adhesion of the surface to the filler.- You cannot use repair mixtures on the inner surface of the wall outside the building. They will be of no practical use; the cracks will increase in size.
- Gaps need to be repaired in a timely manner, without waiting for the building to completely collapse. This also applies to small cracks, which must be repaired immediately after detection.
- Mixtures and solutions for sealing cracks are used immediately after combining the main substances (arbogypsum, putty and the like), otherwise they will harden before they hit the wall. Prepare solutions in small portions.
- Be sure to let the wet ingredients dry and leave the crack for the period required according to the instructions for the substance. Do not cover with finishing materials until the composition in the split is completely dry.
Where do cracks in the timber of a house come from?
1. Shrinkage. When shrinking, wooden parts dry and curl. The shape and linear dimensions change. Cracks appear on the surface. Cottages made of logs and timber with natural moisture are especially susceptible to this danger. It is almost impossible to find photo reviews about laminated veneer lumber with cracks, but huge cracks in logs are considered the norm.
2. Changes in temperature and humidity. The upper layers of wood warm up faster, give off moisture, and shrink - but the core at this moment retains its size. As a result, the surface breaks.
List of expenses
The cost of repairing cracks in houses made of timber starts from 100 rubles/sq m. It may vary due to the complexity, volume, and material used to perform the work. Attracting highly qualified specialists increases the price several times.
Average cost of materials:
- carpentry PVA + sawdust – 150 RUR/piece + 120 RUR. per bag;
- wood putty - about 200 rubles. per kg, the manufacturer and volume of the can matter;
- epoxy resin 500-600 rubles, depends on the volume and manufacturer;
- sealant – 150 rub. per packaging;
- wax corrector 110-150 rub. per piece;
- tyrsa – 35 rubles. per bag.
How do cracks occur?
The appearance of cracks in a log or beam is a natural phenomenon, occurring due to uneven drying of the wood. It dries quickly on the outside when in contact with air, but remains damp inside for a long time. The dried layers stretch, the core remains wet and compressed, and strong tension arises and the wood cracks along the fibers.
If the walls are built from very fresh, recently cut down wood, then the lower crowns are subject to additional load from the weight of the overlying ones. In this case, the defects may be even more pronounced, and cracks in the timber outside the house will need to be repaired.
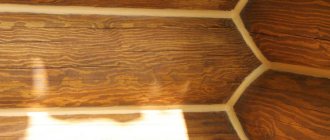
Cracks in a new log house Source slobodskoy-les.ru
For reference! An additional factor contributing to fiber rupture may be improper installation of crowns with distortions and uneven distribution of load on the log.
Folk methods of restoration
What can be used from improvised means for repairs?:
Moss. It is pushed tightly into the cracks so that there is no free space left. Before starting work, the moss is moistened in water and rolled into strands. Afterwards you need to wait for the plant to dry completely.- Beeswax. Before application, it must be melted, then spread over small cracks with a brush.
- Tow. Suitable for large cracks. Hammered inside using a spatula or small shovel.
If tow is used, you cannot apply much force, otherwise the crack may become even larger than it was before the work to eliminate it began.
Cracks in wooden furniture
1. To fill, a strip of veneer of the required length and width is cut out. The same wood species as the ama part. The direction of the fibers of the solid part must coincide with the direction of the veneer fibers. Otherwise, the end of the veneer after varnishing will acquire a color darker than the surface of the part. You can also fill the crack with pieces of veneer, placing them not in the direction of the grain of the wood, but perpendicularly. In this case, the veneer must be chosen of a lighter species than the part of the furniture being repaired and, after varnishing, tinted in the desired color.
2. If the gap is wider than 0.6 mm (veneer thickness). A thin strip of the required width and thickness is cut from the solid wood. Trimmed to fit the shape of the gap. Installs tightly with glue into the crack. After the glue has dried, it is leveled, tinted and coated with areola-free restoration varnish.
Preventive measures
Prevention of cracking of timber begins at the stage of cutting down the tree and continues throughout the life of the material :
- It is recommended to cut down a tree in winter, when it does not absorb moisture from the soil. During this period, the trunk is as dry as possible, the process of industrial drying will proceed faster, and the likelihood of wet material entering the construction site is minimized.
- During the production process, special cuts are created inside the timber, similar to small cracks. Their task is to relieve stress from the material when it is under the pressure of the weight of the entire structure.
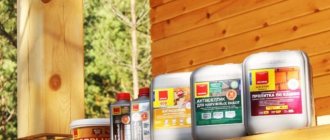
- The finished structure is painted and protected from moisture, frost and steam. Precipitation and climatic phenomena will in no way bring destruction.
Why seal cracks?
It is believed that any defects on the surface of wood, and especially cracks, become a haven for wood-boring insects, fungal and mold spores. Which over time destroy the wood, causing it to rot and lose strength. But looking at the old wooden houses, some of which are more than a hundred years old, one can doubt this. Our ancestors did not know and did not use modern means for protecting wood and built houses without external decoration. Their walls have darkened with time, they are often covered with numerous cracks, but they are intact and unharmed. Only the lower crowns rot and collapse, and most often due to the lack of a high foundation and direct contact with wet soil and melting snow.
Therefore, before you seal cracks in the timber of a house outside or inside, think about whether this is necessary. In any case, small and shallow tears are safe for the structure. For fungus to multiply, a constantly moist environment is needed, and walls dry out very quickly when exposed to air.
Such cracks are not dangerous Source mwood-hause.ru
Wood putty
All coatings that form a film - paint, enamel and varnish - will fit perfectly onto the frozen layer of putty.
Due to the various tinting options, you can easily select a putty to match the wood that you plan to restore - this is extremely important if you plan to apply varnish, wax or stain in the future. Wood putty can be divided into two main groups:
- One-component - putties made on the basis of an alkyd, water-based or other binder, and they are usually produced in finished form. Such materials are affordable and quite practical - you just need to knead the mixture to a paste consistency, and then you can start all the work. The relatively long life of the mixture allows you to slowly work with large volumes of space, namely, sealing cracks in a wooden floor or leveling other large-scale surfaces.
- Two-component - compositions that are offered for purchase in the form of two different components - a hardener and a putty. They should be mixed immediately before work begins, and all recommendations specified by the manufacturer should be strictly followed. This differs from the first version of the composition in that it is more durable, has greater elasticity, and there is practically no shrinkage, and it is also resistant to water and solvents.
For the most part, the disadvantages are relative - high cost and rapid hardening. The lifetime of a two-component putty is approximately 5 minutes, which creates some inconvenience when working with a large area, so such products are often used only for local repairs - to cover up a crack in a small area.
How to cover up a crack
Putty
This technique is used in cases where there is a small crack or chip on the tree. It is important to note that sealing cracks using putty gives a cosmetic rather than a practical effect. Moreover, even such sealing of cracks will allow you to perform any operations on the tree again, without fear of damaging it even more (for example, you can safely saw it).
Also, it is strongly recommended to putty before painting the material. To eliminate defects, you must first prepare a mixture purchased at the store. The resulting substance is applied to the damaged surface using a staple so as to fill all the cavities. You will definitely need to wait for the mixture to dry (this will take 15-20 minutes), after which you can begin secondary processing.
We suggest you read: Why you should choose a wooden doorway
Main manufacturers
Wood putty is produced in different brands. But on the construction market there are several proven compositions that are in demand due to their high quality. Knowing the features of these brands can help you make your choice.
Tikkurila produces a product diluted with water. The layer can reach 2 millimeters, after drying there is no cracking. Once cured, the color will be the same as the wood. This avoids further painting. The manufacturer offers a choice of various shades of putty solutions that match the colors of tree species:
- Pine;
- Beech;
- Oak;
- Mahogany.
When the filling stage is completed, you can apply stain or paint material on top. To treat the surface, a spatula is used, the layer is made thin and the surface dries in four hours. Sanding is carried out every other day.
Tikkurila produces a product diluted with water.
Belinka has six colors in the palette, so the choice for wood is optimal. It is distinguished by its plastic properties, covering effect, and can be used to repair various defects. The product is easy to apply and the layer dries quickly.
The level of adhesion is high, which provides reliable fixation to the wooden base. It does not emit a pungent odor; the composition is comfortable to use. Suitable for external and internal work.
It is distinguished by its plastic properties, covering effect, and can be used to repair various defects.
Eurotex can be used for exterior work as a finishing putty material. Easy to apply and sand. Effectively eliminates defective areas, dries quickly, resulting in a matte finish.
Effectively eliminates defective areas, quick-drying.
Rainbow0023 is distinguished by its elasticity, withstands deformation loads, shrinks a little, so it can be used for seams. Creates good adhesion to wood. With a millimeter layer, drying will last four hours. It uses harmless species as its constituent elements. It is resistant to ultraviolet rays and moisture, and is selected for exterior decoration.
Rainbow0023 is distinguished by its elasticity, withstands deformation loads, shrinks a little, so it can be used for seams.
Ep 0010 is made on the basis of epoxy resin, it has high adhesion and can not only cover cracks, but also be used for priming. High resistance to moisture, a popular choice for handling vessels and outdoor work.
Ep 0010 is made on the basis of epoxy resin, high adhesion.
Bolars is a finishing type of putty, waterproof. It has a high level of compressive strength and is frost-resistant. According to the technical characteristics, they can withstand up to 50 defrosting and freezing cycles.
It has a high level of compressive strength and is frost-resistant.
Why do you need to seal cracks?
The developer of a log house should not be afraid of small cracks in the tree, since they do not affect the strength characteristics of the walls and cannot cause serious damage to it.
But in the event that a gap 5 mm wide is discovered throughout the log, he will need to immediately take effective measures.
Consequences of having large gaps in a log house:
- Moisture penetrates freely into them, which activates the processes of decay.
- Such defects spoil the appearance of the building.
- The thermal protection characteristics of the building decrease.
- Sometimes a very tiny crack becomes a door for harmful microorganisms and fungi. In contrast to the top layer, which is blown by the wind, particles of water are concentrated in the cracks, which is considered a necessary condition that promotes the rapid proliferation of microbes, as a result, rot and rot appear in the body of the log.
- Weakening the mechanical strength of the tree, which is especially dangerous on the top crown to which the roof is attached. A powerful wind or seismic activity can destroy such a building. Because a log oppressed and destroyed by cracks is not able to withstand the increased load. In the practice of wooden house construction, there are cases when, due to the occurrence of a crack, the log split into 2 separate parts.
- Reduces the resistance of logs to fire. Since fire retardant impregnation is capable of penetrating into the body of a log no deeper than 2 cm, a deep gap allows fire access to layers that were not treated with this solution.
DIY wood putty
It is possible to make the putty solution yourself, saving money. But quality ingredients are chosen. The chalk is crushed to a powdery state and mixed with PVA glue; it is necessary to create a homogeneous mass in the form of sour cream. You can add sawdust to the mixture. Drying lasts 24 hours.
Or the chalk is dissolved in varnish with an acrylic base, which is water-soluble. Achieve a consistency that is not too liquid; it should resemble toothpaste. Drying the layer takes 12 hours.
Cooking should be done in small portions, any smudges that form should be wiped off immediately.
Cooking should be done in small portions.
Puttying wood can improve the external qualities and strengthen the material. The process is not very difficult to carry out, for this reason you can do it yourself. But they choose the mixture carefully, taking into account the operating characteristics. To save money, it is possible to prepare a putty mixture with your own hands according to the recipes described earlier; you don’t need a large number of ingredients.