A workbench is a necessary device for a craftsman who produces diverse wooden parts. Thanks to a seemingly simple table, you can effectively organize your workspace, simplify your work and speed up the process of making parts. Every willing craftsman can make a carpentry workbench with his own hands. To start making a workbench, you just need to decide on the type of table and select all the necessary materials (tools).
What is a carpentry workbench
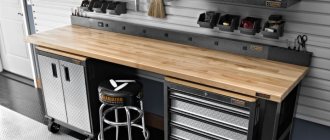
A carpenter's workbench or table is a simple, but at the same time convenient design. This is a high, long table designed for heavy objects and complex work on it. As a rule, the tabletop has large holes so that waste from production falls and does not interfere with work. There are also shelves for support and tool boxes.
For simple carpentry work, everyone can make the simplest work table, or you can think through all your needs and create an ideal workplace.
The workbench is used for several types of work:
- Cutting wood and other hard materials.
- Cutting materials.
- Wood processing: planing and sanding.
- Assemblies of various parts and objects.
The most convenient way is to make a universal carpentry table with your own hands. This is absolutely not difficult, and the owner will be able to gain additional experience in carpentry.
By approaching the work with full responsibility and armed with drawings, you will receive a convenient and functional workbench.
A table of your own production will save money, and besides, it can be quickly assembled from scrap materials. If the device is needed only for a while, it will be easy to disassemble after use.
Important! When making a table with your own hands, the craftsman will be able to take into account individual dimensions, requirements and make the necessary shelves, supports and other elements important for work.
How to calculate the dimensions of a workbench for a garage: recommended dimensions
The dimensions of the structure are selected individually depending on the preferences of the owner, as well as taking into account the expected types of work. The width of typical structures is in the range of 0.7-1.2 m, and the length is from 1.5 to 2 m. Workbenches are single and double. The differences between these designs are the length and number of nightstands with drawers. If the desktop is single, in this case the optimal dimensions of the tabletop will be 0.8 x 0.8 x 1.5 m. In double designs, the length is increased to 2.8 m.
Drawing of a simple carpentry workbench with dimensions for a garage.
The height of the carpentry workbench is selected taking into account the height of the craftsman who will work at it. Typically this figure varies from 85 to 95 cm. It is quite easy to check the correctness of the calculations. If, standing at the table, the master can freely rest his palms on its lid, then the height is chosen correctly. It is very important not to make a mistake with this indicator, since frequent stretching and bending is harmful to a person’s back and can lead to rapid fatigue.
The same applies to metal structures, which can also be used for plumbing work. In any case, the desktop must be stable and very durable. The minimum thickness of the lid is 5 cm. Textolite or linoleum is used as upholstery, which will protect the tabletop from damage. In metalworking workbenches, the wooden surface of the workplace is covered with a steel lid. The minimum thickness of this coating is 5 mm.
Main types of workbenches
There are several types of workbenches, which differ in their functional purpose. Complex devices combine several types at once. Simpler ones have limited functions.
- Carpenter's table. It is an ordinary high table with a flat, even tabletop. It is designed for processing and sawing small parts. But it is difficult to process large boards on it.
- Long workbench. It is a long structure with a vice for securing boards and logs. Its main purpose is to process these types of parts. However, it is impossible to collect small items here.
- Universal table. It has a flat, wide table top, nearby holes for dumping debris and a long mount with a vice. The most advanced models are reinforced on individual sides with metal sheets or tape, which makes it possible to process metal and stone products on it.
There is also a gradation of workbenches by type of assembly. There may be the following options:
- Mobile workbench. It is small in size and weight. Designed for carrying from place to place and processing small products.
- Stationary table. These structures are heavy and, as a rule, securely attached to the floor. They process heavy logs, boards, and large parts. Typically, such options are used in private homes, where the owner quite often does carpentry or other work. Most often, these workbenches are universal with a large number of accessories.
- Folding table. This is an intermediate option between a mobile device and a large stationary table. Prefabricated workbenches are also quite large in size, but can be removed fairly quickly. They are suitable for garages or small private houses.
According to its design characteristics, a carpentry workbench is a table on which shelves for tools, drawers and additional equipment are located.
How tall should the workbench be?
- What should be the optimal height?
- Standard options
- How to calculate?
A carpentry or metal workbench is a necessary piece of equipment that is available in almost every workshop. With the help of this special table, the master has the opportunity to perform his work in comfortable conditions, when all the tools he needs are at hand and do not fall on the floor.
In order to conveniently place all the devices and tools for processing wood or metal workpieces, it is important to correctly calculate not only the width and length of the tabletop, but also the height of the workbench.
If you choose the right dimensions of the workplace, then by working for several hours in a comfortable position, the master will be able not only to preserve the health of the spine and joints, but also to increase the productivity of his work.
Construction of a carpentry workbench
Despite its simple appearance, the carpenter's table has a very complex structure, since any inconspicuous detail here carries a number of important functions.
Traditionally, woodworkers worked with hand tools, so to work with electric tools, the worktop must be modified to suit your needs.
Main elements of the workbench:
- Base or bed. This element is also called the underbench. This is a support made of thick timber or metal. As a rule, it is a frame that has additional drawers or crossbars. It must support a heavy structure with a tabletop, tools and wood for processing. The drawers and frame elements are connected to each other with wedges and glue. The construction of a carpentry workbench is simple, but requires careful design, calculation of dimensions and the correct choice of material.
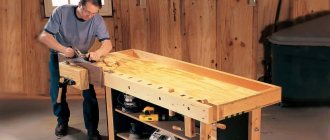
- Tabletop. It is also called a workbench board. It is made from thick boards. As a rule, the thickness of the board is 6-7 cm. This is necessary to withstand the weight of tools, workers and heavy blows to them. The table top has the necessary grooves, holes, holes or clamps. Each master places them at his own discretion.
For a home workshop, it is most convenient to make a stationary wooden carpenter's workbench with a base made of metal or wood. - Vices, clamps. The workbench should have at least two clamps on both sides. The clamps are made of wood, since it will not deform the material of the products. The maximum number of clamps is not limited. If you plan to work with parts of different sizes - for example, small items and large boards, then there should definitely be several clamps. At the same time, they should be located on opposite sides of the tabletop so as not to interfere with each other.
All types of work tables known to us originated from the carpenter's workbench. - Shelves for tools and additional stops. They are located under the tabletop. It is important to place shelves for tools so that they can be easily reached with one hand without leaving the table. That is why it is convenient to place them below, and not in the closet nearby.
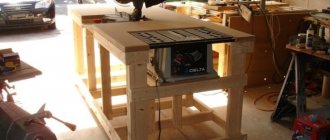
Wood-metal workbench
Let's figure out how to make a bench with dimensions of 2.2 m * 0.75 m * 0.95 m and six drawers (three on each side). For work, in addition to tools and sheets of plywood, you will need a two-millimeter profile pipe with dimensions 6 cm * 4 cm:
- 3 pieces of 2.2 m for both sides of the table top and the lower rear stiffener of the workbench;
- 6 pieces of 0.75 m each for the other two sides of the tabletop (end), as well as to form a frame for retractable drawers;
- 4 pieces of 0.95 m each for the legs of the workbench table;
- 5 pieces of 0.7 m each for assembling frames intended for drawers, as well as for the jumper (foot rest).
To make a workbench out of wood and metal, you need to start by assembling the basic structure. To do this, you will need to weld the future tabletop from two long corrugated pipes and two 75-centimeter ones. At the second stage, four legs are attached to the corners of the structure in the same way (in this example they are 95 cm long). At the next stage, you need to weld the third long pipe at the bottom, in the back of the product so that it is parallel to the floor, 25 centimeters above it.
How to make a carpentry table with your own hands
Creating a carpentry table with your own hands, despite all its features, is quite simple. To do this you need:
- Calculate exact dimensions.
- Create a preliminary drawing.
- Select the necessary boards and other materials.
- Refine the drawing.
- Assemble the table itself.
A modern work surface is also additionally equipped, for example, with space for a milling machine.
Size calculation
The basic size requirements are simple: the table must fit in the room so that it is convenient to walk around it with a tool. To do this, a distance of 80-100 cm should remain between it and the wall or other objects.
The size of the table is determined by factors such as the area of the room and your individual characteristics.
The size of the tabletop should be such that it is convenient to place everything you need on it. If you plan to work with small objects, then a length of 100–150 cm and a width of 80 cm will be sufficient. If you plan to process large objects, then it is better to choose a length of 200–250 cm and a width of 80–100 cm.
Ideally, the height should be such that it is comfortable to work behind it while standing or sitting on a chair. To do this, it must be 70 cm. A height of 80 cm will allow you to work only while standing.
Working at a workbench that is not the right height will lead to serious back problems.
Drawing
Once the basic dimensions have been determined, you can begin creating the drawing. You need to pay close attention to this, since the details will then be cut out from it.
Drawings of the future structure, as well as its dimensions, are selected taking into account all conditions.
The drawing is performed in two versions:
- Table top drawing.
Here the width of the boards is calculated and how they will be connected to each other. The necessary clamps and vices are also indicated here. Important! It is worth trying on the location of important elements in real size, trying from which points it is convenient to reach them with your hands and checking whether they interfere with work. - Basic drawing. Here it is important to calculate the load on the legs and how the frames will be strengthened.
Drawings of tables that can be found on the Internet are presented in a huge variety.
After this, it is worth checking the drawing again and its compliance with the materials: whether there are boards of the required width or the required number. Are the necessary support bars available?
Selection of tools and materials
Before assembling the table, you need to prepare all materials and tools.
Necessary materials:
- Wooden boards are 15-30 cm wide and 6-7 cm thick. Their length should be no less than the length of the table top. The cheapest regular pine board is suitable for this.
- Wooden blocks for the frame, legs and drawers. The width of the bars should be 10-15 cm.
- Square metal pipes for making metal supports.
- Metal furniture corners for connecting wooden parts.
- Self-tapping screws and bolts.
- Wood glue.
It’s great if you can find lumber made from beech, ash, maple or hornbeam, but if not, then make a table from a pine board.
Tools needed for assembly:
- Hammer.
- Jigsaw.
- Hand saw.
- Grinder saw.
- Screwdriver.
- Ruler.
- Roulette.
- Pencil.
For convenience, tools and small parts should be placed on one side, and large boards should be placed on the other.
Other tools may be required, but this will depend on the design of your workbench.
Advice. Small parts and screws should be laid out on a light cloth or paper. This way you can immediately find the item you need.
Table creation process
Assembling a workbench involves several steps:
- Frame assembly. She's going first. The supports are fastened together using drawers and crossbars. For the most reliable fastening, they are connected using wedges or puzzles, which must be prepared in advance. A simpler connection is also possible using metal brackets and furniture corners. The metal base is assembled using welding or screws.
- Creating a tabletop. First, boards of the required size are cut.
- Fastening the table top to the frame. To do this, furniture corners are attached to the boards, then they are installed on the frame and attached to it. If a folding tabletop is intended, then you first need to make its parts and then connect them to the frame using furniture hinges.
- Creation of additional elements: clips, puzzles and others. After the tabletop is installed and secured to it, it is convenient to attach additional elements: clamps, vices. Here you can also cut out the necessary holes with a jigsaw.
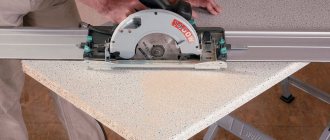
The tabletop is treated with a surface planer and a sander to achieve a smooth surface.
Advice. When assembling the table, do not use nails. This will subsequently cause the table to become loose. Self-tapping screws can always be re-tightened. Puzzles and wedges are firmly connected with glue.
After assembly, all that remains is to prepare the table for work and you can begin the creative process.
The base is impregnated with an antiseptic, which will not allow fungus or mold to grow in the wood.
Final stage
Finally, it is necessary to check the strength of all connections and modify those that may become loose.
It is also important to check the comfort of all parts on the countertop. Most likely, something will seem superfluous, and something will be missing. To be more confident, you should try working on a large object on a workbench. In this case, nuances will certainly appear that can be quickly corrected before installing additional equipment and securing the table.
You can make a shelf on the bottom frame, or one or two cabinets. Careful craftsmen make a cabinet and a shelf on which various equipment is stored.
The very last step in creating a woodworking table will be attaching it to the floor. The table is usually screwed to the floor using furniture corners. This ensures its stability and ease of support during operation.
Mobile devices intended for small items do not need to be screwed to the floor. But in this case there will still be a risk of knocking it over.
Project and drawings
When developing the design of a carpentry workbench, the most important criteria are height, configuration and equipment. In addition, it is necessary to take into account who will use the desktop - left-handed or right-handed.
Considering that you will have to work at a carpentry bench for a long time, the closest attention should be paid to the height of the future structure. For people of average height, experts recommend making a table no higher than 90 cm.
Drawing of a carpentry workbench
When determining the distance from the floor to the tabletop, it is best to focus not on average parameters, but on the features of your own anatomy. It is optimal if the upper cut of the legs is at the same level as the hands. If you calculate this parameter taking into account the thickness of the tabletop, then you will be able to work tirelessly at such a workbench for several hours.
The machine cover can be made of boards, solid wood or plywood and is a composite structure. It is not recommended to use chipboard or OSB for these purposes. Professional carpenters have long determined the optimal size of the tabletop - a maximum of 2 m in length and 0.7 m in width. On such a workbench, you can make both a prefabricated wooden door and a small window with equal convenience.
When designing a structure, do not forget about the strength of the supporting frame. For supporting elements of the structure, timber with a cross-section of at least 100x100 mm is used. As longitudinal and transverse reinforcing elements, it is allowed to use slats and beams with a smaller cross-section - from 50 - 60 mm or more. The joints of the parts are mounted on tenons or dowels; furniture corners and other fittings are used for strength, and all connections are made using bolts and self-tapping screws. Nails will not be able to provide the required stability and fundamentality of the structure.
Carpentry workbench. View from above
Often the frame, or otherwise the workbench frame, is made of metal. Despite the fact that this material makes it possible to create a height-adjustable structure with less labor, professional carpenters prefer all-wood structures.
Next, let's look at a project for a carpentry table made from plywood, or more precisely from two plywood sheets 1.8 mm thick glued together. The dimensions of the lid are 150x60 cm. The edges of the tabletop are reinforced with plywood strips, which increases its thickness to 72 mm. By the way, the presented dimensions are not a dogma and can, if necessary, be adjusted in accordance with the needs and characteristics of the specific room used as a workshop.
Installation of additional equipment
After the table is ready, additional equipment is installed on it:
- Board clamps. Usually mounted from two bars. Clamps are installed at both ends of the tabletop. For convenience, it is worth installing several clamps of different thicknesses: 5 cm, 10 cm, 15 cm and 20 cm. The clamps are installed exactly opposite each other.
- Vise for parts. Ideally, there should be several vices: 2 or 3 pieces. They are designed for small and large parts.
- Stops for cutting parts. This is optional equipment. Stops are usually small blocks on the countertop.
- Lower shelves for tools. They will create comfort during work and significantly save time. It is better to place heavy, large tools on the bottom shelf. Place boxes with small items a little higher. It is better to make drawers for small things retractable.
- Additional lighting. Without it, work will be uncomfortable. Typically, a long LED office lamp is mounted on the desk. To prevent shadows from your hands from interfering with your work, you should attach two lamps on different sides.
Don't forget about the lighting. We suggest considering fluorescent lamps or LED strip as an additional lighting source.
Editor's Choice
BLACK+DECKER WM301-XJ (from 3000 rubles)
BLACK+DECKER WM301-XJ.
Photo: yandex.market.ru The American brand of tools opens a rating of the best workbenches presented in 2022. Although the tool was made in China, buyers still speak warmly about the quality of the product. The series is called Workmate, which translates from English as “partner.” One of the main advantages of this carpentry table is its folding design. This is convenient to store, transport and take out as needed. The body has levers that increase the compression force of the vice. The base is made of steel. The legs have rubber pads to prevent slipping. Available settings for vices and stops so that workpieces of various shapes can be mounted on the work surface. The table top is made of bamboo plywood. This is a significant advantage compared to competitors, who often resort to crumbling chipboard.
Characteristics:
| Type | Universal |
| Maximum load | 160 kg |
| Workbench height | 760 mm |
| Desk Length | 610 mm |
| Desk depth | 341 mm |
| Housing material | Steel |
Bamboo work surface
Labor-intensive to assemble the first time you use it
show more
KETER 17182239 (from 10.7 thousand rubles)
KETER 17182239. Photo: yandex.market.ru
Professional tool for the master. This participant in the ranking of the best workbenches of 2022 is assembled in Israel. The company specializes in plastic products for various purposes. This workbench is made of polypropylene. Although the tool is foldable, when unfolded it turns into a full-fledged workplace without any amendments and reservations that have to be made when we are talking about mobile tools. The surface can withstand workpieces or tools weighing up to 453 kilograms. So you can work not only with large wooden beams, but also with metal. Some may not like that it is not made of wood. But objectively speaking, plastic is much stronger than even bamboo plywood or MDF. Plus, you can safely put it outside and forget it, without fear of weather vagaries.
Characteristics:
Components: legs, tabletop, clamp.
| Type | Versatile, foldable |
| Maximum load | 453 kg |
| Workbench height | 755 mm |
| Desk Length | 850 mm |
| Desk depth | 550 mm |
Huge work area
The quality of the plastic could be better
show more
RYOBI RWB03 (from 7200 rubles)
RYOBI RWB03.
Photo: yandex.market.ru If you are looking for the best steel workbench, then this sample is a clear leader in 2022. Its design is similar to other mobile tools, but the materials are much stronger. All components are made of steel. However, this also affected the weight: if workbenches with wooden tabletops weigh on average 6-8 kilos, then this one reaches 12.5. Although the maximum load here is a standard hundred square meters. Although in the reviews there are mentions that this or that element was bent after use, next to them there is always a remark in the spirit of “stood on it with your foot” or threw a thick steel sheet over it. You need to understand that this is not an industrial tool, but still a compact assistant. The frame elements are securely connected with fasteners. The tabletop is fixed not in three classic positions, but in four - 0, 25, 50 and 80 degrees. The clamping system is sliding. This allows you to work with different types of workpieces. The height is adjustable, which not all workbenches have. This has seven positions, which are quite enough for masters.
Characteristics:
Height adjustment possible.
| Type | Folding, sliding work desk |
| Maximum load | 100 kg |
| Workbench height | 760 mm |
| Desk Length | 600 mm |
| Housing material | Steel |
Wide range of adjustment options
Weight
show more
Selecting a place to install the table
The choice of the main location for installing the workbench should be thought out in advance. Usually this is a workshop, a place on the site next to the technical unit or in the garage.
In addition to the placement location, you need to think through a few more technical nuances:
- From which side will the approach to the workbench be? To work with small objects, an approach from one edge is sufficient; such a device can be installed against a wall. For large-scale work, a free approach from all sides is required.
- Which side will the items be placed on the table? It is important to think through this point so as not to touch other furniture with long boards.
- Do not place the workbench next to a door or window. Usually such work takes a lot of time. There are always drafts near a window or door; if you stay here for a long time, you can catch a cold.
When setting up a workbench, think carefully about where the power tool will be connected.
Working through these points will make work in the future comfortable and safe.
Manufacturing
Frame
First of all, we take a metal profile, measure and cut it. (all dimensions in the drawing above)
Next, we put everything in place and see what happens. The workbench will have 6 legs and two areas for storing tools, one larger, the other smaller and divided into two parts.
Then we weld the seams and measure the diagonal so that everything fits together clearly.
If the diagonals come together, you can completely weld all the welded seams, clean them with a flap disk and weld the legs; it is advisable to use a square to weld the legs exactly to the base.
And this is roughly how the future table frame turns out. As you can see from the photo below, it turned out to be quite strong.
Rework before installation indoors
In my workshop it is not possible to place this table close to the wall, since there is a brick plinth underneath, so I decided to weld pieces from the profile behind the table.
Then, after checking, we completely weld the seams and also clean them with a grinder.
Next, from the 20*20 corner we make a frame for the panel.
I did not weld this frame to the workbench, since then it would be impossible to bring it into the workshop, so I made this part removable. From the photo below, I think everything is clear how it was done. The panel holds perfectly on this connection.
I also pre-drilled holes for attaching the OSB sheet to self-tapping screws.
Painting
After all the work has been completed, we paint the workbench.
Operating rules
In order for the carpenter's table to last a long time and to work at it safely, it is important to follow the basic operating rules:
- All table parts must be firmly secured. If they start to wobble, they need to be tightened or secured. Any unsteady position can result in serious injury. It will not be very pleasant if the saw or jigsaw comes off the part at the most inopportune moment.
- All items for work should also be held well on the table. This will make the work more accurate.
- The device must be protected from moisture. Wooden boards will warp and crack with sudden changes in humidity. If there is high humidity, mold may grow here.
- When working with heavy objects, you need to evenly distribute the load on the tabletop.
Making a carpentry workbench yourself is not a quick task, but it is exciting, because you need to take into account not only your needs, but also the ergonomics of the entire workspace.
Proper assembly of this device and its correct operation will bring joy from carpentry work, which will give inspiration for creativity.
Necessary materials
When selecting material for each workbench unit, you need to take into account the functional features and loads to which it will be subjected.
To ensure that the workbench does not turn out to be too massive, light softwood is preferred as the material for making the frame:
- pine;
- spruce;
- alder;
- Linden.
Hardwood, as well as plywood of various thicknesses, is used to make countertops.
The frame for the workbench can be welded from a metal square pipe or an angle of a suitable cross-section, but most carpenters prefer wooden structures.
Workbench: this is the main element of the woodworker's workshop
In any workshop where they work with wood, there is always a carpentry workbench. Regardless of how the material is processed (manually or using a power tool), the presence of this element allows not only to properly organize the workspace, but also to make it more convenient and comfortable. All this ultimately affects the result. In such conditions, the productivity of the master and the quality of his work increase.
Any carpenter cannot do his work without a workbench
A workbench is a work table that is used for processing wooden products manually or mechanically. Its design and ergonomic capabilities are designed in such a way that it is convenient for the master to fix parts in different positions to perform various tasks.
The workbench allows you to perform the following operations:
- assembly of wooden structures;
- production of wood parts;
- processing of workpieces with varnishing compounds and other means.
A carpenter's workbench is a table on which a craftsman processes wood products
Note! A traditional carpenter's workbench is designed for working with lumber whose length does not exceed 3-3.5 m. To work with longer workpieces, you will have to use a carpenter's workbench.
Construction of a carpentry workbench: design features
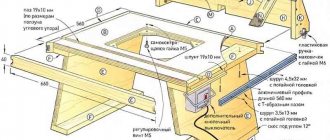
The simplest carpentry workbench consists of two elements: a workbench board (tabletop) and a workbench (a frame that performs a load-bearing function). A traditional workbench must be equipped with a vice. Depending on their placement, they can be front or end. Using a vice, wooden blanks are fixed in the required position.
Construction of a carpentry workbench: 1 – front clamp; 2 – rear clamp; 3 – screw; 4 – twists; 5 – tray; 6 – emphasis; 7 – sockets for wedges; 8 – wedges; 9 – front legs; 10 – hind legs; 11 – connections (2 pcs.); 12 – wedges (4 pcs.)
There are holes in the cover of the workshop table, as well as in the jaws of the vice, made of wood. They are used to install stops and clamps, which can have different heights and cross-sectional sizes.
Before work, the stops are set in a certain configuration so that the part can be placed between them in the required position. After the workpiece is installed, it is pressed using a screw mechanism that is equipped with a vice. This design allows you to securely fix the wooden part in a horizontal position.
The vice can be used to work with workpieces of different thicknesses. Specially for this purpose, stops of different heights are provided. The size of this element is selected so that during the processing of the part it does not protrude beyond the edge and does not interfere with the master.
The required components of the simplest workbench are a tabletop and a supporting frame