Nowadays it is fashionable to make furniture yourself at home, and every year the number of home craftsmen is increasing. Some people prefer to purchase blanks and use them to assemble the necessary furniture, while others do all the work themselves from start to finish. A homemade bed can be very simple or with intricate shapes and patterns. It's not just about skill and availability of equipment - personal preferences and financial capabilities play an important role. In this article we will tell you how to make a bed with your own hands from various materials.
In order for the product to please you and to be able to use it for a long time, you need to approach the matter very responsibly, realizing the limits of your capabilities. It is necessary to select a suitable model and prepare the tool taking into account the material used.
Required Tools
Depending on the material chosen, certain tools will be required to work with it.
For working with metal
- Electric welding machine.
- Bulgarian.
- File.
- Metal brush.
- Electric drill.
- Roulette.
For working with wood
- Jigsaw. If the product is made of boards, you can get by with a hacksaw.
- Screwdriver.
- Electric drill.
- Roulette.
- Construction corner.
- Pencil.
- Plane.
- Chisel.
- Grinder machine.
As for consumables, we’ll talk about this separately when considering this or that model.
Bed 180x200 cm in rustic style
ReginaPiterFORUMHOUSE participant
I want to share the idea of a bed; my husband was inspired to make it with his own hands, from materials that are available at the nearest hardware store. There was nothing else in the store, except for an ordinary board (dry). My husband outlined his idea, and I tried to recreate it in the designer. We agreed on this option.
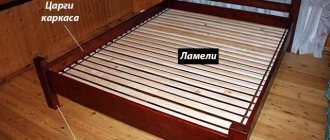
The frame was assembled from 40 mm boards - two pieces were used for the sides and legs, and three pieces were used for the headboard, a prefabricated central beam (from bars), two sawn steps 900x300 mm were used as legs. The mattress panel is made of thirteen wooden slats (board 100×20 mm). The headboard and frame elements were connected by complete cutting. The balusters in the corners were purchased, there weren’t many identical ones, so we made do with different ones.
Various metal fasteners were also used - corners, bolts, plates, self-tapping screws (for lamellas).
After a trial assembly, the structure was disassembled, coated with alkyd glaze varnish, sanded with fine sandpaper and coated again with colorless varnish. And to make it easier to move, pieces of carpet were glued under the legs.
Surprisingly, the forum member’s husband did all the work without power tools; all he needed was a garden hacksaw, a chisel, hand sanding and a file.
An impressive result with such initial results.
To the statement that it is easier to order furniture, ReginaPiter responds as follows.
Of course, it’s easier when it’s not affected by the crisis and there are financial opportunities. But there is another reason - the pleasure of the work and the result and pride in my beloved spouse, who until that moment had not held a hammer in his hands.
By the way, the bed became a catalyst, and now the house has a homemade insulated entrance door, a table, and the couple are not going to stop there.
Material selection
Question of choice
Materials for making a bed:
- Metal corner.
- Profile or round pipe.
- Solid wood.
- Plywood.
- Chipboard.
- Pallets.
The above materials can be used either individually or in combination. Thus, a metal bed can be equipped with wooden backs, and a plywood product is assembled on a frame made of timber. There can be many options, and you can understand this in more detail by reading the article.
Requirements for a master
To make a bed, several conditions must be met, and all of them are equally important; the absence of at least one of them causes an unsatisfactory result. In this case, it is much better not to start work at all. What criteria must a home furniture maker meet?
- Have practical experience in carpentry work. Don’t flatter yourself with the thought that 2-3 articles read will make you a master; theory can never provide the knowledge and skills that can be acquired in practice. You must make independent decisions in difficult situations, feel the tool, not be afraid of woodworking machines, etc.
- Have tools and equipment. Do not think that the quality of handmade work is superior to the quality of mechanical processing. You will never be able to get the same smooth, clean, and smooth surfaces as with a four-sided router, circular saw, or sander. You must have a minimum list of woodworking equipment.
To make wooden furniture you need appropriate equipment - Have a great desire and free time. Even experienced masters are sometimes disappointed, but you shouldn’t just tune in to a minor key. Prepare for problems, do not retreat when they arise, but analyze the reasons for their occurrence and make every effort to solve them.
- Have material resources. They are not so large, but for a good bed you need to purchase lumber of at least first grade, use only high-quality paints and varnishes.
High-quality lumber is not cheap
If you have positive answers to these questions, then you can start making the bed.
Location
The first step is to clearly determine what the dimensions of the future bed will be, taking into account its location. It is possible that you are modernizing your bedroom, changing its design, then you can move away from the usual bed placement patterns and find a new place for it. If so, then pay attention to a number of tips that will help with this.
Adviсe
- Do not place the bed with the head of the bed facing the window opening, as if the window is open there will be a draft and your head may get blown out.
- If you place the head of the bed towards the doorway, you will not be able to see the person entering the bedroom.
- It is better not to have a chandelier hanging above the bed. It can break and fall on a person lying in bed.
- In uninsulated houses, the outer walls are very cold, so it is better not to place the bed in such places.
- A shelf that is precariously nailed to the wall above your head can also cause a lot of trouble.
- In a narrow bedroom, a bed located in the center of the room will not allow you to move freely. In addition, this arrangement may cause discomfort.
- Many people leave a place at the head of the room for a laptop. In this case, you will be deprived of many hours of proper rest.
It may seem like there is no room left for a bed in the bedroom, but this is not the case. We have only given recommendations, and you can decide for yourself how relevant they are in your case.
Wooden bed
Homemade wooden bed
Don't be fooled by the apparent simplicity of the design. You need to be prepared for the fact that you will have to work a lot to make a bed from solid wood. If you are determined, then there is every chance to do something original while saving money. It is quite natural that it is not easy to immediately decide on the design of the bed, so first look at a few photos of wood products.
Photos of wooden beds
This is what a wooden bed without a mattress looks like
Application of turned parts
Simple wooden bed
The back is made from a section of a tree trunk
Figured frame
Application of tree trunks
The use of spliced boards in the manufacture of beds
Application of wild wood
Some elements of the bed are artificially aged
On massive wooden legs
Stacked bed
Bed made of timber
Wooden bed with a semicircular headboard
A solid board was used to make the backrest
The wood is exposed with stain and varnish
Using an edged board
Bed without legs
To make such a bed, you will have to work hard.
Having chosen the product you like, you can find a similar drawing on the Internet or draw it yourself, taking into account the dimensions of the room and personal preferences. Often, home craftsmen take a drawing of a bed and remake it to suit themselves, removing or adding something.
From the array
If you are not going to sleep on boards, then when planning the size of the bed you need to take into account the dimensions of the mattress. If you have not purchased it yet, then you need to take care of this in advance or find out the standard sizes on selling sites and build on this data. If you plan to make a bed of non-standard sizes, it is important to know that the mattress will have to be made to order.
A custom-made mattress will cost a little more.
It is clear that in a relatively short article it will not be possible to describe the manufacture of several wooden beds, and we are not striving for this. Based on the example given, you can understand how to assemble a bed from solid wood.
Let's look at an example of making a wooden bed for a 200x160 cm mattress, if you have a minimum of tools - only the most necessary ones.
The actual dimensions of the mattress often differ from those declared by the manufacturer, and to a smaller extent. After purchasing a mattress, measure it, and then adjust the dimensions of the bed to fit it.
If there is no drawing with a bed suitable for the size of the mattress, then you can take any one you like as a basis, altering it to your size. If the design is very simple, then you can draw a sketch yourself.
Let’s say that after checking the dimensions of the mattress it turned out that its length and width are one centimeter less than stated - 199x159 cm. The following material will be needed:
- Beam 50×40 mm, length 209 cm – 19 pcs.
- Planed board 22×100 mm, length 159.5 cm – 18 pcs.
- PVA glue (furniture).
- Self-tapping screws 41 and 65 mm.
Having a clear idea of the quantity and size of the required material, you can go to the store to buy it.
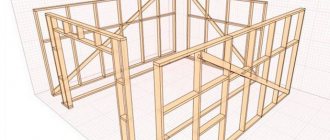
Making a frame
The frame can be assembled on the floor or on four stools.
This is how the frame is assembled.
So, we need to make a rectangle with internal dimensions of 200x160 cm, which corresponds to the dimensions of the mattress + 1 cm tolerance. Each side of the frame will consist of three beams assembled into a single structure.
- Of 19 pcs. purchased timber 40×50 mm you need to select 4 pieces. the smoothest and with the minimum number of knots.
- For further work, you need to saw off the excess at a right angle. With sufficient skills, you can mark the timber, and then, using a construction angle, draw a cut line. If you cannot cut straight along the line with a hacksaw, then it is better to use a miter box.
- You should get 2 bars of 160 cm each and 2 bars of 208 cm each (the internal size of the bed length is 200 cm + 2 bars of 4 cm each).
- The cleanest side of the bars will be used as the front side (top of the bed), so we will place the bars with this side down.
- You will need 4 more bars with the same dimensions. You also need to cut 2 bars of 200 cm each, and 2 bars of 168 cm each (the internal size of the bed width is 160 cm + 2 bars of 4 cm each).
- In order for the frame to be strong, the corner joints must be overlapped, so for the second row we use bars of a different size, which we cut last.
- Glue is applied to the bars of the first layer, and then the bars of the second row are laid and secured with self-tapping screws. Excess glue must be removed immediately, otherwise it will interfere with surface grinding later.
- Now the bars of the third row are attached in exactly the same way.
Wood preparation
Before starting work, the wood must be cut to size, the ends and corners sanded, and possible defects and irregularities removed. This point should not be neglected, because otherwise wooden beds will look like an awkward home product.
The procedure is as follows:
- Cut all the bars and boards according to preliminary markings. Sand the cut areas, clean the corners and the entire surface to make it smooth.
- Treat all structural elements with a wood primer before assembly so that there is protection even in hard-to-reach places and fasteners.
- Impregnations and pigments for wood are used if it is necessary to enhance the structure of the fibers. They prevent rotting processes, strengthen the base and increase the service life of the finished product.
- If smoothness and uniformity are important, it is better to use stains. They should be applied in two layers with a brush or nap roller before final installation of the entire structure.
- Varnishing is carried out at the final stage of installation. Be sure to wait a while for the surface to gain strength and for the unpleasant odor to disappear; Furniture can only be used after its final demise.
To prevent the bed from creaking, when assembling the frame and installing other structural elements, the joints must be treated with wood glue, which will strengthen the fastening and provide the necessary “layer.” If this is not done, squeaking cannot be avoided.
Wood processing
Primer
Wood impregnation
Applying paint
Varnished
Drawings and diagrams: bed assembly
Sketch of a double lift bed frame
Sketch of a wooden bed with bedside tables
Drawing of a bed with a nightstand
Did the article help you?
Let's sum it up
A homemade bed, couch or crib will help create an original interior of any room.
For a small bedroom in a small city apartment or studio, a bed model with a lifting mechanism will be relevant. This will allow you to add one more to its main functions - storage of bedding and some things.
Children's bunk beds look very interesting. The process of their manufacture is similar to that presented above. It differs only in that two smaller berths are placed one above the other. It is required to comply with the safety standards prescribed and attach the legs to the floor.
Preparatory work
Schematic drawing for assembly
Before deciding to assemble furniture yourself, experts advise determining the following parameters:
- Location of the structure in the room
- Number of people who will use it
- Availability of material for the manufacture of the frame and necessary accessories
- The ability to buy a ready-made mattress or the need to order a non-standard size option
- Availability of drawings and diagrams for manufacturing
Design
Hanging bed - an unusual design solution in the bedroom interior
Any bed, regardless of shape and configuration, consists of the following components:
- Frame
- Base
- Side and support panels
- Optional design elements (legs, hanging backrests, headboard, storage drawers, lifting mechanism)
A home-made sleeping place usually consists of a frame on which a base is installed - a mattress support. The supporting structure is made from:
- wooden slats (slats)
- metal mesh
- spring mechanism
Furniture for sleeping and relaxation can:
- have legs (most often no more than 20 cm high)
- be floor-standing (the frame is located directly on the floor)
- be suspended (fixed to the ceiling)
Original headboard for bed
The headboard is a decorative element that:
- carved from wood
- sawn from chipboard
- forged from metal
- upholstered with foam rubber and fabric
- can be carved and solid, straight and curved
In addition to the main functionality - a place to rest, the bed also serves as:
- closet
- stand
- sofa
- podium
In these cases, the mattress is hidden in the shell of the body during the day, and at night it is unfolded using a “book” mechanism or a gas lift.
Typical sizes
When making a bed, it is worth deciding on its size. The standard sizes are:
- children's beds : for small children they are 120 by 60 cm, for preschoolers the optimal dimensions are 140 by 160 cm, beds for schoolchildren are made in dimensions 160 by 80, for teenagers - 180 by 90 cm;
- adult single beds – length – 200–210 cm, width – 90-100 cm;
- one-and-a-half model: length – 200-210 cm, width – 140-160 cm;
- double : length - 200-210 cm, width - 180-200 cm.