Powdering
You can transfer the design onto the material in an original way, using tooth powder, crushed chalk or activated carbon, and also blue.
First they make a matrix. It can be used several times. This is a blank in which the design along the contour is pierced with a sharp object (a needle). There are many holes on the surface of the matrix. The more there are, the higher the image accuracy. All holes are sprinkled with powder. The matrix is first attached to the material. For white surfaces, choose a dark powder; for black surfaces, on the contrary, light powder. Advantages and disadvantages
minimal costs; clear contours.
a pattern is obtained on the fabric in one color; labor intensity of the process.
Transfer using decoupage film
Decoupage is becoming a very popular hobby, so many people know how to handle film from it. After printing the desired image on it, also prepare white acrylic paint.
It is necessary to perfectly clean the wood and also give it a smooth surface. Next, we apply pre-slightly diluted paint in two layers. Moreover, the application directions must be perpendicular to each other.
The paint must be allowed to dry. Once this has happened, the dampened decoupage paper (about 30 seconds soaking in room temperature water) is placed on the surface, removing the base and rubbing with a sponge to ensure a tight seal. After waiting for it to dry, you can treat the surface with varnish.
Highest class equipment:
UV printer Docan M-10 UV
- Fixed printing bed equipped with vacuum clamp with reverse vacuum option
- Borderless printing, edge-to-edge
- White printing module, allowing the use of white ink as a substrate, cover layer and as a halftone color
- Light shades of yvettes Lc and Lm (Light cyan Light magenta), the use of which improves color rendering in complex layouts
- Automatic material positioning function;
- Photographic print quality.
Milling and engraving machine Multicam Multivision 3000
- Maximum material thickness: 152 mm (optional 254 mm);
- Z-axis travel: 304 mm;
- Repeatability: +/- 0.025 mm;
- Position offset accuracy: +/- 0.125 mm at a distance of 3 meters;
- Maximum cutting speed: 592 mm/s;
- Free movement speed: 1050 mm/s;
- X and Y axis drive system: rack and pinion;
- Z-axis drive system: ball pair;
- Standard work surface: 25 mm thick phenolic plastic.
Transfer using PVA or gel medium
Regardless of the material chosen, the process is approximately the same. However, in the case of gel, the application occurs directly on the board, well, the glue is applied to the photograph. The photo itself can be a simple printout on plain paper.
If this is important to the image, it is necessary to have a mirrored version of the photo, as later the picture will take on the correct appearance. The following is the procedure:
- The wood must be thoroughly cleaned and perfectly sanded to create a smooth surface. You can use 120 grit sandpaper;
- Processing photos with glue or wood gel. In the case of the latter, it is necessary to do everything as carefully as possible, without missing the slightest fragment;
- The sheet must be glued to the lubricated surface, and then passed over it with a roller for a better fit, absence of folds and air bubbles. This stage is extremely important, since it determines how well the drawing will be translated;
- Leave the product overnight, then, as soon as the gel is completely dry, wet the sheet and remove it with a dishwashing sponge. The image is translated quite reliably, and it is not so easy to erase it. However, it is still better not to try too hard. However, in the case of PVA glue, it will be more difficult to erase the paper layer;
- After all the paper has been removed, make sure that there are no traces of it left on the surface, as they may interfere with the next step - varnishing. You can use waterproof or clear acrylic varnish.
What needs to be done with the drawing and wood before transferring
- Transferring an image onto a wood surface, like any other, is in some cases impossible without the mirroring effect. In the case of an image, this is not so important, but it is better to initially make letters and numbers mirrored so that after transfer they take on the correct appearance;
- Any drawing is best transferred in high resolution. During the work process, blurriness may appear, and if the image resolution was initially low, this can greatly deteriorate the quality of the final result;
- The quality of the transfer directly depends on how clean and smooth the surface is. Any contamination is unacceptable, as are unevenness. In the latter case, you can use sandpaper;
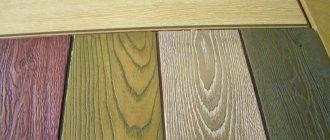
- The color of the wood can also play a role in transfer. It is best to use options that are as light as possible.
Laser printer
A laser printer and paper for freezing food products (freezer paper) will help to transfer the image to matter. It is better to print the design on thin white cotton or linen fabric. The freezing paper with the smooth shiny side must be glued to the material using an iron. For printing, cut out an A4 size rectangle.
You can print a picture on textiles in any color complexity. To do this, the glued blank (from freezer and fabric) is placed in the printer. First you need to make sure that the design will be printed on fabric and not on paper. Sometimes a printer not designed for printing on fabric may fail. In this case, the attempt must be repeated until the printing device accepts the workpiece.
Advantages and disadvantages
the ability to receive a copy in color; perfect picture.
labor-intensive process; a printer not designed for printing on fabric may not accept the workpiece; The pattern obtained on the fabric is erased during frequent washing.
Prices
| Material | Printing cost per 1 m2. Prices are indicated in rubles. | ||||
| Ultra economy | Economy | Standard (Outdoor) | Interior | Premium (Small parts, souvenirs) | |
| Printing on sheet materials | 350,0 | 450,0 | 600,0 | 750,0 | 1100,0 |
| Printing on wood coverings | 350,0 | 450,0 | 600,0 | 750,0 | 1 100,0 |
| Printing on metal coatings | 350,0 | 450,0 | 600,0 | 750,0 | 1100,0 |
| Printing on glass and transparent coatings | 500,0 | 600,0 | 750,0 | 900,0 | 1 250,0 |
| Interior printing | 350,0 | 450,0 | 600,0 | 750,0 | 1100,0 |
| Printing on roll materials | 400,0 | 500,0 | 650,0 | 800,0 | 1 150,0 |
| Printing on souvenirs | 8000,0 | 10 000,0 | |||
Additional white +100% to the cost
Double-sided printing +50% to cost
Primer application +50% to cost
Printing on the finished product (stencil printing) +20% to the cost
Preparation of layouts required +1500 RUR.
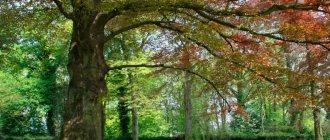
Why is it necessary to decorate a tree with pictures?
Unlike paper and canvas, painting on wood is something new and interesting in our design.
Therefore, such paintings will attract attention, and those people who want to create an interior that can surprise can consider this particular option.
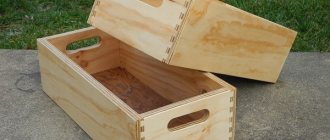
In addition, you can decorate the wood that is used directly in the decoration, making the interior that is familiar to many look completely new. In addition, you can decorate a variety of wooden products in this way, from boxes to furniture.
Finally, transferring an image onto a wooden surface can be a hobby for children and adults, and for some, a way to earn money. After all, handmade things are actively purchased today.
Remove paper
This is a very interesting stage. To remove the paper, we only need to wet it and scrub it with our hands. This is a rather messy process and there may be another way, but we found our fingers to be the most suitable tool. Some parts of the image will be easier to remove than others, but keep in mind that by the end of the procedure your hands and fingers will definitely be tired. The procedure may have to be repeated and in total it will take from up to 30 minutes. But this extremely exciting moment is to see how the photograph appears on the tree. Have your vacuum cleaner ready to clean up the mess you're sure to get from this step.
Transferring an image to wood - technology features
All photos from the article
A distinctive feature of the age of high technology is the ease with which beauty is replicated and originality is put on stream. But if not everyone can become an artist and paint great canvases, then many can create unique images using simple technologies.
Wood is one of the suitable materials on which a photograph or favorite drawing will look great. In addition to the fact that the quality of the product will remain unchanged for many years, it will be a kind of masterpiece or a piece of goods, depending on how it is disposed of.
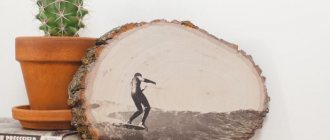
Looks like a window to another world
Method two - glue
In addition to high-precision equipment, a source code and a wooden canvas, you will need:
- regular PVA glue;
- solvent;
- fine-grained emery;
- varnish, for example, Dulux;
- roller;
- sponge/long knife;
- a little patience.
Note! Experienced craftsmen advise lightening the image slightly before transferring the photograph to wood, because the finished colors will be more saturated. Photo before application
Photo before application
roll out the sheet with a roller in the manner of smoothing wallpaper, or using the flat side of a knife; leave to dry for a day; moisten the sheet with a damp sponge; start slowly and carefully erasing the paper with your own hands, or rather, with your fingers; let the work dry; varnish.
Method three - gel
From it you will learn how to transfer a drawing onto wood using an acrylic gel medium. This modeling paste, used to create a relief surface, costs more than 500 rubles, but it’s not worth saving, nor is it worth using expired ones. According to reviews from the masters, they produce good products.
For tools and supplies you will need:
- photograph and tree of the same size;
- gel medium and brush for it;
- roller/knife/ruler;
- paraffin/matte glue used for decoupage;
- another paraffin brush.
Erasing the foggy veil
The working instructions are in many ways similar to the previous one:
- Apply gel to the board with a brush. The layer should not be thick, but also without bald spots;
- a photograph is placed on the treated area and smoothed, expelling air bubbles;
- leave overnight in a secluded place;
- roll up the paper and let dry;
- cover with paraffin.
Playing around with translations
Wondering how to transfer a photo onto wood without gel and glue? An alternative would be blank decoupage film on which the photograph will be printed.
After getting wet, the backing is pulled out from under the top film, leaving a rich pattern in place.
To work, you will need sandpaper, white acrylic paint, a plate of water, cotton pads, paper napkins, brushes, a marker, and patina varnish.
"CHIP-ART" guarantees
- Sand the surface;
- Dilute the paint slightly with water and apply the first layer, brushing along;
- The second layer, respectively, with transverse strokes. Let dry;
- Before transferring the picture to the tree, you need to lower it for half a minute in water at room temperature;
- Take it out, apply it to the surface and pull out the base;
- Remove excess moisture from the film using blotting movements;
- Let it dry and cover up any imperfections with a marker.
- Open with varnish.
Note! You can buy special napkins for decoupage. With them, the question of how to transfer a drawing to wood will not cause any particular difficulties
In conclusion
The new possibilities of a wood surface used as a basis for a painting or photograph are unusual and evoke a lot of emotions. Familiar images look a little different than on paper - softer, more mysterious. Branded supplies will help perpetuate your work, which may outlive the paper version.
The video in this article shows an example of transferring an image to wood.
Pictures on boards - what are they?
Artists can paint on any materials: wood, paper, plywood, canvas. However, wooden decor has become a real symbol of nobility and quality. Pictures on wooden boards combine the natural texture of wood with the latest advances in printing. The size of the paintings can be very different and its choice depends on the area of the room where such decor will be located. Images may also vary. Landscapes, futuristic scenes, and photographs from personal archives that record pleasant life moments look great in the interior.
We use an iron
You can transfer the drawing using an ordinary iron. True, in this case it is necessary to buy paper with a special coating for inkjet printing, designed for thermal transfer of the image printed on the printer onto light cotton fabric. One such sheet costs 0.5-1 dollar.
On top of the textile you need to place a drawing printed in color, face down. The top of the picture must be ironed with a hot iron (the steaming mode must be turned off). While the paper has not cooled down, it must be quickly removed from the fabric. A bright, richly colored image will remain on the surface of the material.
Advantages and disadvantages
allows you to get a copy in color; ease of implementation.
You will need thermal transfer paper; fabric with a printed picture in color can be washed at a temperature of no more than 40 degrees; Do not use bleach when washing.
Ironing paper
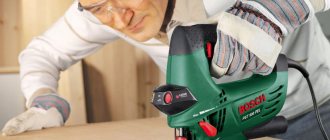
It is often used when it is necessary to transfer images to wood for subsequent tracing with a special soldering iron and thus creating a picture. Some people draw by hand, while others prefer this method. However, the method is also suitable for creating final products, and due to its cheapness and simplicity, it is very accessible and popular.
To transfer, you need to print the desired image on a sheet of paper. The sheet itself is laid on a perfectly cleaned and smooth wood surface. In this case, the paper is moistened with a small amount of acetone, which will make the process of transferring pigment from it to wood when heated better.
Important! When working with acetone, all precautions should be taken. Remember that the material has a strong odor and evaporates rapidly. It is best to work in a ventilated area, and you should protect your respiratory system with a respirator or at least a mask. It is also important to have a fire extinguisher on hand to prevent static electricity.
Having stretched the paper soaked in acetone to the desired size, we begin to iron it with a hot iron, and after a while the image will be transferred.
With the help of light
You can transfer the outline of any image from paper to textile material using light. To complete the work, you need to have an ironed, clean fabric and the image itself. The paper is taped to the window. The material is spread over the image. It is also fixed with tape. Then, using a simple pencil, trace the contours of the image.
Advantages and disadvantages
minimum costs; ease of implementation; the ability to obtain a clear outline.
only the outlines of the picture are printed on the fabric; does not translate the color of the drawing.
You can use a rectangular piece of glass instead of a window. Then the transfer of the image from paper to textiles is performed in a horizontal position. The glass is placed on the seats of two chairs located opposite each other. A light source is placed below - a table lamp. The image and material are attached to the glass using tape. Having fixed the fabric, trace the contours of the design with a simple pencil.
Instructions
This method requires compliance with the following rules:
- The pattern is very tightly attached to the product. You can use a soap solution for this.
- Many craftsmen use a canter for this work. With it, the image turns out to be very accurate - almost jewelry work, which, however, takes a lot of time and requires some preliminary training.
- The instrument is taken with three fingers, resting on the ring finger, which serves as a kind of spring. The emboss is located 2-3 mm from the design, its light strokes form a dotted line - the main outline of the image is drawn. The smaller the detail of the picture, the more densely it breaks through.
- When all the lines have been transferred, you can wash off the paint.
- The image can be varnished.
Now you know how to transfer a design from paper to paper, to leather, to glass, to wood and to metal. Go ahead - get your tools, and good luck in your endeavors!
Wood milling
| Price per 1 linear meter, rub. | |||||
| Material thickness, mm | |||||
| Material | 1-3 | 4-8 | 9-12 | 13-20 | |
| 1 | Wood, chipboard | 55 | 70 | 85 | 130 |
| 2 | Plywood | 30 | 40 | 85 | 140 |
| 3 | MDF | 30 | 40 | 45 | 60 |
Submit your application
How to transfer a drawing from paper to glass
To work, take an image with good contours and a roll of cling film. To transfer, you need to purchase a felt-tip pen - a marker for glass; it fits well and is easily washed off the surface.
Instructions:
We take the film. Its size should be slightly larger than the drawing itself. The film is attached to the surface, which prevents the picture from getting lost. The image is placed on film and outlined thinly and very carefully. Now the film is carefully transferred with the front side to the previously prepared surface. Preparation consists of degreasing its front side. Make sure that the film is completely adhered to the glass and get rid of wrinkles and bubbles. For a clearer transfer, we trace the image again along the contour with any sharp object. It's time to get rid of the polyethylene. We do this very carefully so as not to smudge the drawing. If there are inaccuracies somewhere, now is the time to correct them. Now we draw the outline
This can be done using acrylic paints and a brush. After everything has dried, carefully remove traces of the marker using cotton swabs dipped in liquid. Inside, the image is filled in any way. If the technique is stained glass, then everything is poured along the contour. After drying, for a longer service life of the product, the image can be baked or varnished
It all depends on where this item will be used.
Final touches
At this stage you can show your creativity. Since we were going for a vintage look, we gave it one coat of wood paint. Be careful not to let the work become too dark or take on an undesirable color. After application, you can soak the surface with a rag to remove excess.
We then lightly sanded the edges to remove any excess gel and smooth out the wood surface. We also used a product called Pigment and sponged it onto the edges to create a vignetting-like effect.
At the final stage, coat the painting with soft paraffin to make it smooth and even. After the first layer has dried, the procedure can be repeated.
Examples of decals
You can find ready-made transfers on sale. They are also called applications, thermal transfers or thermal stickers. This is a color image glued face down to paper. The reverse side is impregnated with adhesive.
Transferring a design from a template to fabric is very simple. You need to attach the picture face down (paper side up) to the fabric and run a hot iron on top. It is advisable to set the temperature to maximum.
Advantages and disadvantages
the result is a colorful picture; You can use the applique as a patch.
synthetic thin materials may not withstand high temperatures; After washing, the picture may come off.
The transfer of drawing to matter is carried out in different ways. The easiest way is to transfer the outline of the image. To do this you will need a regular pencil and carbon paper. A drawing in color can also be depicted on matter. However, in this case you will need special paper (freezer or thermal paper).
We hang it on the wall
In any hardware, tool or home improvement store you can find special brackets for pictures; be sure to take screws no longer than the thickness of the wood.
Useful short videos from Make-Self.net
Transferring with film for decoupage
This method uses a board surface prepared with sandpaper, onto which white acrylic paint is applied. The paint is first slightly diluted with water, after which one layer is applied to the surface of the board in the longitudinal direction, and later a second layer in the transverse direction. After this, the paint is allowed to dry.
At the same time, decoupage film is used, on which a photograph or the desired image is printed. First, it is moistened in water at room temperature for about half a minute. After this, it is placed on the surface of the board, and then the base is removed.
By treating the film with a sponge, excess moisture is removed from it so as not to rub the pattern. After it dries, you can use a marker to correct image defects. The board takes on its final appearance after it is coated with varnish.
After creating a design on wood, it can be placed in any room of the house or used as a decorative element, multiplying it several times.
Some masters have turned this simple activity into a good business. But first of all, the main task of such a transfer is a beautiful drawing on wood, the creation of a beautiful object, gift or decor that will bring pleasure to its owner.
Paintings on boards in the interior
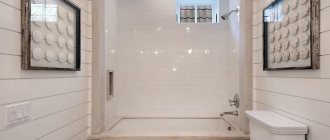
A great way to transform the interior, emphasizing its individuality, can be paintings on boards in Provence or classic style. A trend in modern interior design are paintings on boards in the loft style. Such an industrial style decoration should be contrasting and stand out against the general background of the wall. Large modular paintings on boards can decorate a partition or door in a room. Small decorative elements with images of portraits are placed on wooden shelves. Pictures on boards in the bedroom can decorate the wall or headboard of the bed.
How to transfer an image to wood
For this master class, you need to choose drawings or photographs that will look harmonious on the treated wooden surface. For example, we took a picture with pine cones and printed it on a laser printer.
We carefully sand the board on which we are going to transfer the images - there should be no knots or nicks. Alternatively, you can use a wooden rectangular or square cutting board that matches the size of the printed design. If necessary, trim the image to the desired size.
Apply gel from the Liguitex company to the board with a wide brush or spatula. If you couldn’t find it, then you shouldn’t put off the planned work of translating the picture; the gel is completely interchangeable with ModPodge decoupage glue
But pay attention - it must certainly be matte; glossy is not suitable for this decoupage experiment. There is no need to apply a too thick layer of gel to the wooden surface, it should be uniform
Very carefully lay out the drawing on the prepared surface. Remember that there will be no second time. Therefore, accuracy is important. It’s better to take a slightly larger piece of wood than you need, and then trim off the excess in case the image moves for some reason during gluing.
Using our hands, carefully smooth out the image glued to the wood, ensuring that there are no wrinkles or air bubbles. If the latter do occur, then a thin needle will help get rid of them. In those places where bubbles have appeared, simply pierce with a needle and release the gel.
Make sure that the picture is glued the way you intended, it looks smooth.
Now we must be patient and leave the work for 24 hours. We would recommend keeping it away from children and pets so that they do not become curious and accidentally damage the future painting.
We return to work in a day. You need to prepare a bowl of water and an old soft towel that you don’t mind, or just unnecessary rags.
We wet the rag and begin to remove the paper base. You can apply a wet rag to the drawing for a couple of minutes, but in this case the rag must be properly wrung out. It is better to start removing the base in parts.
Do not rush, do it carefully, otherwise you may accidentally press harder than required and, as a result, damage the image applied to the wood. Some areas will come off easily. But there will be times when you still need to make a little effort. Do not despair. Wet the rag again and continue to methodically apply it for a minute or two and again peel off the paper layer with your fingers. It is impossible to say how long it will take you to completely remove the paper - it depends not only on the area of the wooden surface being processed, but also on whether you have done something similar before, for example, transferring a photograph to wood.
It’s better to work methodically, a few centimeters at a time, moving from top to bottom.
When you begin to inspect the work after completion, you will probably see that there are missing places from which the paper has not been completely removed. Don't worry, this is completely normal. The main thing is to remove large pieces. You'll come back to the rest a little later.
The surface of the wood will be slightly damp. Use your hand to lightly walk over the entire area; you will feel the places where the thin paper remains. Rub there lightly. But do not overdo it, otherwise you risk damaging the transferred drawing. If the wood dries quickly, wet your fingers with water. This will help moisten the stuck paper so that it can be easily removed. Simply wipe off the remaining residue from the tree with a towel or a slightly damp sponge.
These are the original works that come out in the end. New Year's mood guaranteed! And most importantly, you have an exclusive handmade gift in stock. Agree that for the sake of such a result, it was worth a little work and mastering the generally simple technology of transferring a design to wood.
Translation from English – Ksenia Andreeva
Colleagues, question. Has anyone ever painted with acrylic on plywood?... - illustrators and illustrations
One of the most popular materials for painting is wood - many household items were originally made of wood, furniture, and the houses themselves were also made of wood, and the desire for beauty has always been inherent in humanity, so they decorated the surrounding objects with everything that was at hand. Painting on wood with acrylic paints on wood is becoming especially popular, as it allows you to plunge into the world of distant ancestors and take your mind off the stress and frantic rhythm of the modern world.
At the same time, you don’t have to be a professional master of this or that type of painting - stores have a large quantity of necessary materials and tools that will help you master any technique in a fairly short time. If this is not enough, then various educational institutions will be happy to offer you to attend courses for beginners at a time convenient for you.
Painting on wood with acrylic paints is most suitable for beginning artists - they are bright, easy to apply and waterproof, while they are practically odorless and easy to work with.
There are different types of painting that originated at different times and in different places in our country, but they all originate in ancient times, when people lived in harmony with nature and the world around them.
One of these types of painting is Khokhloma painting, in which the main elements are grass, flowers, berries, that is, the pictures reflect the entire plant world surrounding a person. This type of painting got its name from the name of the village of Khokhloma, near which it originated.
Another popular folk painting technique originated in a small town on the Volga called Gorodets and was called Gorodets painting. A distinctive feature of this type of painting is that animals are always depicted in profile, and people in full face. The main theme of this type of painting is the everyday life of ordinary people - walks along city streets, fair festivities, weddings, and at the same time, the paintings are always saturated with bright colors that frame them in the form of garlands, wreaths or simply bouquets scattered throughout the picture.
In addition to these two types of wood painting, there is another decorative technique that is no less popular - Mezen painting. Its distinctive features are the use of only two colors in the designs - red and black, as well as a rather symbolic image of various elements (the main motifs are solar disks, rhombuses and crosses, which have certain meanings)
Let's take a closer look at painting on wood using the example of a master class on decorating a wooden board. We will use acrylic paints, as they are the most convenient for working at the stage of getting acquainted with this type of folk art. In this case, the board is also the most convenient object from which you can begin to master the painting technique.
Very simple and quick transfer of drawings to any surface
This invention will eliminate the need for blue carbon paper forever! Now there is a completely new way to copy drawings that will no longer be erased by accidental contact with your elbow! In addition, you can also transfer color drawings and photographs; the quality of the transfer can even compete with printed products!
The methods described below will make it possible to qualitatively and permanently transfer drawings and photographs onto leather, rubber, plastic, ceramics, metal, wood, paper and film.
Chemical transfer
For chemical transfer you will need 646 or 647 solvent of the old (2004) sample with a high content of toluene (50%). where toluene plays a major role. But it is not recommended to use toluene in its pure form, as it is harmful if inhaled! Acetone ethyl acetate is also suitable, but much worse: butyl acetate xylene.
For transfer, take a high-quality (the amount of ink is checked for transmission) color or black and white photocopy or a printout from a laser printer; the copy must be printed on regular office paper (required!). When transferring a design, take a photocopy in one hand, and with the other hand, moisten this photocopy with a solvent on the back side, where there is no design, and only after that press it to the desired surface, using a brush with artificial fibers or a spray. The process itself should take no more than 30 seconds.
The easiest and fastest way to transfer drawings
To transfer (fresh) color magazines such as Natalie, Kull, Bravo, rest or silk-screen types of printing, as well as photocopies, you can use another method of transfer, moisten the very surface of the object and press a dry photocopy or magazine to it; before interrupting the drawing, it is advisable to make on the computer in mirror image. If there is no computer, then the photocopy is first transferred to a blank, unnecessary sheet of paper, and then transferred from it to where it is required. There is another way to get a DSLR. The photocopy is greased with vegetable oil. This is how TRANSPARENT PAPER is made!I! The excess oil is wiped off and the drawing is quickly photocopied on the other side.
However, there is also a non-mirror transfer method; for this, adhesive tape is placed on top of the photocopy on the drawing itself, and the other (back) side is generously moistened with solvent for at least 10 seconds, then the adhesive tape is carefully removed from the paper still wet from the solvent (the drawing is transferred to it) and pressed against the required surface. Then the tape is removed from the surface and a high-quality copy of the design is already visible on it! It will be interesting to know that the transferred drawing is no longer washed off, is not erased and is acid-resistant! By the way, black and white photocopies are interrupted from 2 to 4 times, and color photocopies and magazines only once. 646 solvent peels off tape and delaminated lamination! To do this, moisten the paper under the tape or lamination with a solvent.
DIY painting on boards
For those who want to decorate their home with a modern and stylish piece of furniture, you can buy a piece of art you like, but this will most likely cost a lot of money. You can learn how to make a painting on boards with your own hands and create an original and creative art object yourself. To paint on old boards you will need the following materials:
- boards;
- paints of the required shades;
- brushes;
- liquid Nails;
- a piece of plywood;
- frame for a future painting.
First, we prepare the boards: sand them, clean them of dust and cut them into pieces at an angle of 45º. We paint the boards and place them on a sheet of plywood in the form of a picture. We glue them to the plywood with liquid nails, install the frame, and our work of art is ready to decorate any room.
Preparation, components and tools.
A piece of board, plywood or any wooden surface. This is the basis. Sandpaper or, in my case, an abrasive sponge (100+ grit) for finishing the surface to which we will transfer. A brush, a wallpaper roller, if you have one, but you can do without it, a sharp knife, the picture itself or a photograph printed on a regular laser printer. If this is a portrait, or the correct perspective is important, we display it in a mirror in any graphic editor. You can use Picmonkey or regular Paint. Print, choose the best print quality. And the main ingredient of our Foto transfer potch idea can be chosen from any company, I chose this one due to its availability in the nearest store (245 rubles) and acrylic varnish (140 rubles) to your taste, glossy or matte. Transfer ⋅ is a certain composition that glues a thin layer of paper to the surface, forming a protection and making this layer transparent, which we will then protect with varnish.
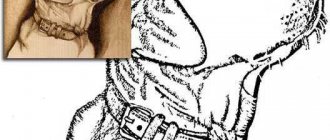
Crop the image to the required size. Try to touch the drawing less with your hands so as not to leave greasy marks. I took the portrait of Mikhail Afanasyevich Bulgakov, mirrored it in the editor and printed it on a regular laser printer. I sanded the plywood thoroughly and cleaned it of dust.
We apply the transfer, not too much and not too little, so that the layer is uniform.
Smooth and press, try to avoid bubbles. Carefully, trying not to move, glue the image down and try not to move. If you have a roller, roll it. I put a piece of plastic down and smoothed it out. We wait until it dries, they recommend 12-24 hours. If you can't wait, dry it with a hairdryer. Then the magic begins!
We pour water and let the paper get thoroughly wet, there is no need to be afraid, the main thing is not to rush and wait for the picture to appear.
Calmly and better with your hands, they just feel the surface and tell you how to act
We remove the top layer of paper until the image appears, it seems imprinted on the wood, but still caution will not hurt, try not to damage the image layer
Here is the finished version, all that remains is to dry it and varnish it. If after drying there is a layer of paper left and the picture is whitish, then the procedure can be repeated. It will not be in perfect condition, but after varnishing, clarity will appear and thereby protect the work from exposure to the external environment.
I have a glossy acrylic varnish, you can use another one, but first make sure it doesn’t conflict with the transfer on a separate surface.
This is how it turned out for me, if you choose a more structured foundation, it will appear in the photo accordingly. Good luck and make more crafts with your own hands, they will retain your energy and you will enjoy them!
comments powered by HyperComments
Features of sketches for burning
To create an interesting and beautiful picture, it is necessary not only to develop certain practical skills, but also to comprehensively study the intricacies and technology of drawing vector images and graphic elements on wood. In addition to choosing templates and sketches, you need to choose a high-quality “canvas”. Furniture plywood or dry softwood (birch, alder, aspen, etc.) are best suited. At the same time, in order for the drawing to be as clear and realistic as possible, the surface of the wooden workpiece must be perfectly flat.
Burning patterns are classified into simple geometric and complex abstract. In addition, there are thematic drawings: animals, flowers, landscapes, cartoon characters, transport and paintings. It is easier to burn out monochromatic sketches in the form of outlines, since they lack complex strokes and patterned elements. Drawing compositions (paintings, photographs, illustrations and others) is a painstaking creative process, during which a complete image on a smooth wooden surface is created in stages, over several approaches. This type of work requires attention and perseverance.