Often during repairs you may encounter a situation where it is necessary to saw off a piece from a part at an angle of strictly 45 degrees. Typically, this is needed to connect two parts at a right angle, 90 degrees, such as: door trim, baseboards, pieces of furniture and much more. An experienced craftsman, professionally engaged in repair work, can often do without special devices, and is able to cut the required part evenly and clearly by eye. But if you are a novice repairman, and you want to do the job as efficiently as possible, without damaging expensive parts, then you simply need to purchase a miter box - a special device that allows you to saw off material at a given angle without any special tricks.
How to make the correct connection
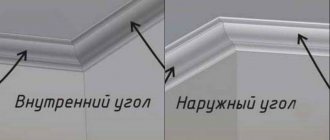
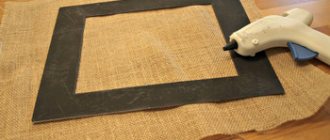
If after gluing part of the baguette there is some distance left to the corner, you need to think about how to avoid making a mistake - a small margin will not hurt. First, it is better to cut off a piece with a good margin of about 10-15 cm. Then, having cut off the corner using any convenient method, try it on a dry surface. To do this, you should attach a bar to the ceiling and mark the point where the shortening border will pass. We cut at right angles.
Equally important is the correct alignment of the corners. Finished skirting boards are usually fixed at an angle slightly less than 45 degrees, so there may be inconsistencies between the cut edges and the appearance of gaps. Here, the initial cutting of the corners is followed by dry, as precise as possible joining of the skirting boards on the ceiling itself. Problems usually arise when using wooden and plastic materials.
After completing the rough joints of the fillets, they should be glued or screwed, and then, if necessary, use putty and then seal all existing seams.
Ways to cut the trim at 45 degrees without using a miter box
The easiest way is to use an ordinary protractor, which is found in every home where a school-age child lives. With its help, marking is not so difficult.
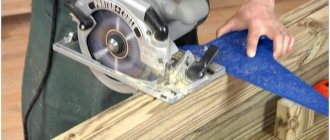
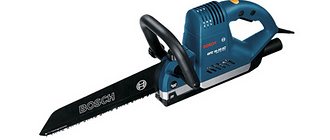
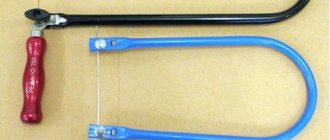
Important: The drink itself is also important. To avoid the formation of cracks, it is recommended to use a hacksaw not for wood, but for metal. Yes, this method takes more time, but the cut will be much more accurate and smoother.
READ How to Cut an Object in Cinema 4d
When the marking using a protractor is made, you need to position the platband on a horizontal surface so that the front side is at the top. It is recommended to make a cut along the entire plane of the clypeus.
If there are no office supplies nearby, you can use a regular tile, with which you can draw a 90-degree angle. By dividing it into 2 halves, we get a template for a 45-degree angle, which can be used for marking instead of a miter box.
If you have a ruler, the task becomes several times simpler. You just need to take a piece of paper A-4 and draw a square, and then draw the bisectors of the corners. To make it more convenient, you can take a small board and attach it to one of the corners, which will allow you to fix the structure. Well, then you need to attach the platband and start sawing.
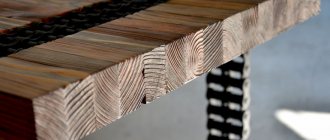
Composition and features of the material
To understand how to properly cut a plinth, you need to understand its composition. This will help you choose the right tool and cutting technology.
- Styrofoam. The price and strength of this material are the lowest. But since we are creating a decorative decoration for the ceiling, strength is not particularly required.
- Ceiling plinth made of polystyrene foam is more dense. than regular foam. To cut such material, the most ordinary knife is used.
Tip: sharpen the knife well before use. This will eliminate the presence of torn edges at the incision sites.
How to cut a skirting board straight
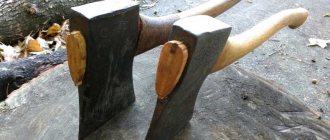
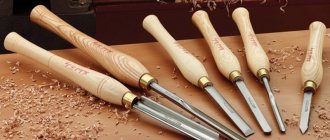
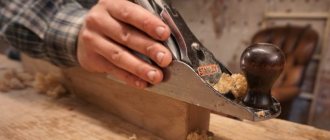
Tree. Here you will have to put more effort into processing. For wood, use only a hacksaw.
Tip: the smaller and more frequent the saw tooth, the smoother the edges will be. You can even use a metal cloth.
Plastic. How to cut plastic baseboard? The same method is suitable here as with wood - a saw, a hacksaw. Alternatively, you can also use a grinder.
Using a regular hacksaw blade
Cutting parts at an angle using a protractor
You can cut the part at an angle using a protractor. This is a measuring tool that is easy to use, and which is designed specifically for measuring angles or making the necessary markings on certain parts. The protractor is applied to the part, the angle is marked and the markings are made with a pencil. Using these markings, cutting the workpiece at the desired angle will not be difficult.
Using Templates
If you don’t have a protractor, miter box or ready-made corner elements, you’ll have to look for a suitable template. Of course, the template must have the desired angle. It is applied to the workpiece and the workpiece is marked with a pencil. This is one of the easiest ways to achieve the desired result.
Trimming "on the spot"
The walls, floor and ceiling will not always be perfectly flat in practice. Most often they have irregularities. For this reason, there is no need to cut the workpieces at clear and precise angles, because anyway they will not fit perfectly.
Instead, it is sometimes convenient to trim the same ceiling plinth in place. That is, first they glue one strip of the plinth, trim it in the corner, and cut the second strip under it.
Of course, it is hardly possible to cut the workpiece perfectly. However, if a small gap appears in the corner, it can always be covered with putty or gypsum plaster. Nothing special.
Video: How to cut the corner of a plinth or baguette without a miter box
Yeah, and at the same time there is the “almighty” sealant. which will hide all the master’s flaws! I used various cheap miter boxes - the corners never came together without additional masking with sealant or very labor-intensive adjustment with files. Maybe your hands are crooked... But if you do it cleanly, then you can’t do without a high-quality specialized tool.
To cut the plinth at an angle of 45 degrees, you need to measure its width and set this value along the length at one of the ends of the plinth. You will get a square. Now draw a diagonal in this square in the desired direction and saw off. In order not to bother too much with cutting the plinth, I usually use a Soviet-made protractor ruler.
We cut off the required length of the plinth at an angle of 90 degrees. We apply it to the corner to which it will be glued. Draw a line on the ceiling.
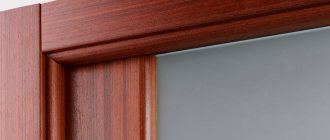
How to connect to a door frame
You know how to carefully make a corner on a plinth, but that’s not all. Most often, the room has doors. By the way, they must be installed before attaching the baseboards. So, you still need to correctly connect the skirting boards with the trim on the door. If you just cut straight, it turns out rough. There are plugs for plastic - not the most elegant way, but quite acceptable. Wooden ones can also be trimmed by cutting off the “face” diagonally. Also “not ice”, but already something. What to do with MDF skirting boards, since their timber is unpresentable? There is a way to create a beautiful connection to the jambs. You will need to make two cuts at an angle of 45 degrees (see photo below).
How to properly design the joint between the baseboard and the door jamb
If the edge is not even, first cut it strictly perpendicular. We make a cut at 45 degrees relative to the aligned edge. A small cut piece will be useful to us for decorating the junction. We make the second cut at 90 degrees relative to the first, but if we lower the perpendicular from the corner, we also get 45°.
How to make a neat connection to a door jamb
Now we take the first cut piece and apply it to the cut we just made with the long side. This creates a beautiful rounded cut. If there are chamfers or recesses on the baseboard, they match perfectly. In the case of a wood pattern, you cannot be sure that the lines match. All the same, such a junction of the plinth and door trim is much more aesthetically pleasing.
When installing a pipeline, it is often necessary to cut the pipe at a certain angle. Accuracy plays a big role in this task. There are several simple ways to cut a pipe at an angle.
An incorrect pipe cut will make it impossible to install the structure of the shape that was originally intended. For example, if you plan to rotate the system by 45 degrees, then it is necessary to cut the pipe at 45 degrees. To complete the task, you will need marking tools and a grinder (it can be replaced with a hacksaw).
How to properly cut a ceiling plinth at an angle of 45
Corner elements for ceiling plinths can be easily trimmed using a miter box or by hand. In the first case, you will need a miter box and a hacksaw, and in the second, a pencil and a hacksaw/cardboard knife. The hacksaw blade should be well sharpened so that you don’t have to think about how to cover up chips and roughness on the cut.
Cutting a corner using a miter box
We take a polyurethane ceiling plinth. designed for the left or right side of a corner. We lean it against the future installation location so that the end of the segment opposite from the corner is against the edge of the already glued molding. In the place where the bottom edge of the ceiling plinth touches the top of the wall corner, make a dot with a pencil or stick a piece of insulating tape. We repeat these steps with the second segment.
How to cut an external corner of a ceiling plinth:
- We place the left blank in the miter box from left to right, pressing it to the edge closest to us. The corner vertex mark should coincide with the leftmost slot in the same edge
- We place the right blank from right to left, pressing it to the near edge. The mark for the top of the corner is to the far right slot.
How to saw down a ceiling plinth at an internal corner? Everything is very simple, the actions will be exactly the same, only the location of the corner vertex mark changes. Here it’s the other way around: for the left segment – the far right slot, and for the right – the far left. The finished ceiling fillets must be aligned, and then the joints should be held up to the light - there should be no gaps. If they are very small, then editing is not necessary; you can get by with sealing with putty material after installation.
How to make a corner of a ceiling plinth: positioning the workpiece in a miter box
Important: sometimes the angles deviate too much from the standard 45 degrees, and a simple miter box for the ceiling plinth becomes useless - you can cut off the excess. The solution would be to purchase a rotary tool, but it is not cheap and this “one-time” purchase will be irrational
In this case, you can use the intersecting point method.
How to cut the corners of a ceiling plinth without a miter box
If you are wondering how to properly cut down a ceiling plinth without a miter box, then the following information will be useful to you. We take the right section of the ceiling plinth made of foam plastic, apply it to the installation site and draw a line on the ceiling along its upper edge. It should extend beyond the vertices of the corners by about 5 cm. We do the same with the left segment and put points at the intersections of the lines. We put the ceiling plinths in place one by one and transfer the resulting marks to them.
We've dealt with the upper part of the ceiling moldings, now let's move on to the lower part. Everything is simple here, the marks we need are the vertices of the corners. We mark their location with dots on the lower edges of the left and right ceiling plinth. Next, you need to connect the dots on the moldings - this will be the cutting line. This method will help you cope with even the crooked corners. Adjustment will most likely not be needed, and if it is, it will be minimal.
How to cut a ceiling plinth without a special tool: the photo shows marks for the intersecting point method
Important: the work described here requires marking the surfaces. Therefore, first you need to start cutting and fitting the ceiling plinth, and only then think about how to glue the wallpaper
Or, if you want to mount the plinth on top of the wallpaper, we do the marking and trimming before the final finishing, and the gluing after it.
Three working methods for trimming skirting boards
For floor and ceiling skirting boards, the cutting instructions are almost the same. But if on the floor a crooked corner can be covered with something, then on the ceiling this is already a problem, so we will pay more attention to how to cut the ceiling plinths.
Method number 1. Classic miter box
The classic miter box is a U-shaped box with slots in the opposite sides. A piece of suitable size is inserted into this stock and sawed off with a hacksaw through the slots in the sides. The idea is not new, the tool is already several hundred years old, but despite its simplicity, not everyone knows how to correctly cut the corner of a ceiling plinth using such a miter box.
Not everyone knows how to cut a ceiling plinth in a corner using a classic miter box.
Tip: when trimming, ceiling plinths are applied to the side of the miter box that is closest to you, and floor plinths, on the contrary, should be applied to the side of the tool farthest from you. This is not a dogma, but it is much easier to work this way.
It is easier to work with floor plinths, since the miter box lies on a horizontal plane, it is easier for you to orient yourself in the position of the plinth. People most often make mistakes when cutting ceiling fillets; they simply insert them into the tool incorrectly. There is a simple but important rule here.
Important: the side of the ceiling fillet that touches the wall should be directed to the upper edge of the side of the miter box, and that part of the plinth that borders the ceiling should be placed on the bottom of the miter box.
Scheme for trimming skirting boards.
As you know, a corner has 2 sides, so in order to make fewer mistakes, train yourself to place the bar that will be mounted on the right side of the corner in the miter box on the right, and the bar that is attached to the left in the miter box on the left. The intricacies of using a classic miter box are described in detail in the video in this article.
How to properly trim the inner and outer corners of a ceiling fillet.
In addition to the classic U-shaped miter box, there are two more types of similar designs - a professional and a rotary tool. As for the professional option, only masters use it. The device is quite bulky, but it rotates at any angle and has a hacksaw that can be locked in the desired position.
Professional miter box with the ability to fix a hacksaw and workpiece.
The rotating device can easily be called a “pocket” miter box. The only advantage here is the ability to clearly fix the angle of rotation of the bar. On the one hand, it’s easy to work with - set the corner, apply it to the baseboard and cut it off. But on the other hand, you need to get used to such a tool; if you do not have experience working with a hacksaw, then you should not take a rotary miter box.
How to work with a rotary miter box.
Advice: when choosing a classic U-shaped miter box, first of all, do not buy Chinese products. And secondly, try to buy models with the ability to rigidly fix the part inside; one of these models is shown in the photo below.
A miter box with the ability to fix the part inside is much more convenient to work with.
Method number 2. Trimming according to a template
Most often, both ceiling and floor skirting boards need to be cut at 45º. If there is no specialized tool nearby, then an improvised miter box can be drawn on a piece of notebook paper. From the school geometry course we know that the diagonal of any square in relation to the base has an inclination angle of 45º.
You can set the 45º angle by attaching the plinth to the diagonal of the square.
Next you need to draw a square and draw 2 diagonals in it - this will be the required 45º. All you have to do is correctly attach the plinth to the leaf and mark. True, in order to cut the plinth smoothly without guides, you need a good eye and a steady hand.
Method No. 3. Applied universal
Trimming at 45º is a common option, but what if you need a different angle and only have a hacksaw and a pencil? It turns out that there is a very simple way out of this situation. Plus, this method is universal, it is suitable for both external and internal corners.
Moreover, I can assure you that those angles that visually seem straight, in fact have deviations of a couple of degrees. As a result, you buy a good tool, cut at exactly 45º, and when joining, a gap appears between the baseboards. Here this problem disappears. And then, using an example, we will look at how to cut the ceiling plinth in the inner corner.
| Illustrations | Recommendations |
| Stage 1. Take a fillet, place it on one side of the corner and use it to draw 2 lines, along the wall and along the ceiling.
| |
| Stage 2 . Do the same on the adjacent side of the corner. | |
| Stage 3 . If you draw a diagonal from the intersection of the lines on the ceiling to the inner corner, you will get the desired cutting line. | |
| Stage 4 . Next, take the tool and cut along the finished markings. If you are comfortable with a hacksaw, then the baseboards should fit together perfectly. | |
| Outer corner . As I already mentioned, you can trim the outer corner using exactly the same technology. |
Important nuances
If you tried your best, but a small gap at the joint still “came out,” do not be discouraged. In wooden fillets, such a gap can be easily covered with furniture wax. To fill a gap on baseboards made of polyurethane, foam, plastic or plaster, putty is perfect. Naturally, the color of the composition must match the color of the baseboard.
All cracks in the area of the ceiling fillets are sealed with putty.
Wide ceiling fillets are certainly beautiful, but they can only be mounted on perfectly flat walls. If the plane of the wall in relation to the ceiling is wavy, then it is better to buy narrow polyurethane fillets, they are elastic and will smooth out this drawback.
A wide fillet requires perfectly smooth walls.
The most questions arise about how to cut wallpaper to fit the ceiling plinth. There is nothing complicated here: the wallpaper is glued with a slight overlap on the baseboards and when the wall is completely glued, take a large spatula, place it in the corner and cut off the excess along the blade with a knife.
How to cut wallpaper to fit a ceiling plinth with your own hands.
But keep in mind - neither the knife nor the spatula can be removed from the wall until you have gone through the entire plane. That is, you put a spatula from the corner, cut the wallpaper along the length of the blade, and then, without lifting the blade from the wall, move and cut until you reach the next corner.
How to cut the corners of a ceiling plinth - general rules
Trimming should be carried out along the outer edge of the plinth, as well as from the inside (when forming an external corner) or the front side (for internal joining). If everything is done correctly, the texture of the cornice will not be disturbed. At home, foam finishing materials are most often used. The technology for joining elements is as follows.
- Using a protractor, measure the angle between the walls. If it is strictly equal to 90°, you need to cut the edges at 45°. The action is performed on both elements.
- If the joints between the ceiling and walls are not even, the corner radius should be divided in half. In this case, the baguette, which will be attached on the left side, is cut on the right, and the right element, accordingly, on the left.
- The edges of the inner corner parts are cut so that the top part is shorter than the bottom. The edges of the outer corner are formed differently: their lower part is shorter than the upper.
- Unlike foam baseboards, wooden parts must be precisely adjusted to each other and to adjacent surfaces, applying and cutting along the abutment line.
Ceiling plinth (corners): the photo demonstrates techniques for trimming and joining elements:
How to make an angle on a plinth more or less than 90°
Not all angles are exactly 90 degrees. If the deviation is small, the cracks can be removed using sandpaper. In other cases, you will have to mark and cut taking into account the real degree. The main task in this case is to find the point on the floor where the two skirting boards will join.
Let's start by explaining how to properly cut an outside corner if it is not 90 degrees. We take the plank, place it against the corner on one of the sides, press it tightly against the wall - as it should stand. Draw a line on the floor along the bottom edge of the baseboard with a pencil. We apply the bar to the other side of the corner and do the same. The intersection of the two lines will be the joining point of the two baseboards.
How to join a plinth if the angle is less or more than 90 degrees
Relief plinth
So, we already know how to cut corners on ceiling plinths. But we looked at the order of work in the presence of simple forms
Now you should pay attention to the relief varieties. There are increased requirements for their installation
Due to the presence of decorative elements, cutting such products is a little more difficult.
The corners are joined in those places where stucco or other volumetric elements protrude more than the surface. The angle then becomes expressive. It is better to take into account the components of the design and do the cutting in the appropriate place.
The joints of volumetric ceiling plinths must be carefully glued. When working with relief products, it is allowed to use the tool listed above. It is allowed to mark on the wall. But using a miter box will make it easier to cut out voluminous skirting boards.
If you do the work carefully, the result will exceed all expectations. Having studied all the intricacies of the technique and figured out how to cut corners on ceiling plinths, you can begin to practice. Don't worry: the process will go quickly and easily. This finish will fit into almost any interior. If all actions are performed carefully, carefully gluing the joints, the decorative effect will be amazing. The interior will please the eye for a long time.
How to cut lengthwise
Another frequently asked question is how to evenly cut a pipe lengthwise . Here the algorithm of actions will be approximately the same as for transverse cutting. It is important to pay attention to marking.
You can, for example, use painting thread, which is usually used when marking walls. In this case, it is necessary to firmly fix the pipe. The sawing process itself must be done carefully and slowly, since when sawing long elements there is a high probability of the cutting disc slipping off the marking mowing line.
Preparatory work
To make the process quick and simple, use a tool such as a miter box. This is a template that has a U-shape. There are slot patterns in its side walls. They have different angles of inclination.
There is another technique that allows you to evenly glue the ceiling plinth. It is possible to cut corners without a miter box. But still, using such a tool makes the work much easier.
First you need to mark the baseboard. If you need to create an external corner, the length is measured along the ceiling, the internal one - along the wall. For fillets, a line slope of 45 and 90 degrees is used. Since this is a fairly small number of slot options, it is quite possible to make the template yourself. All you need is a sheet of paper or cardboard.
If the repairman has significant experience in carrying out such operations, he can cut the corners without additional tools. The craftsman places the fillet against the wall, and then makes marks on the product right here. After that, he trims off the excess. An inexperienced craftsman will most likely not be able to cut straight corners the first time. Therefore, it is better to use a miter box or cover the unevenness with decorative corners.
How to cut at a 45 degree angle
Often during repairs you may encounter a situation where it is necessary to saw off a piece from a part at an angle of strictly 45 degrees. Typically, this is needed to connect two parts at a right angle, 90 degrees, such as: door trim, baseboards, pieces of furniture and much more. An experienced craftsman, professionally engaged in repair work, can often do without special devices, and is able to cut the required part evenly and clearly by eye. But if you are a novice repairman, and you want to do the job as efficiently as possible, without damaging expensive parts, then you simply need to purchase a miter box - a special device that allows you to saw off material at a given angle without any special tricks.
To work, you need to have: a miter box, a hacksaw, a protractor with a pencil, a piece of wood, a screwdriver with screws or a clamp.
How to cut a profile pipe evenly
Any suitable tool can be used for sawing. If you have to cut a lot of pipes, then it is advisable to make full-fledged templates from scraps. In this case, measuring and marking work will have to be done only once.
Facing at 45 degrees. How to cut at a 45 degree angle
During home renovation projects, you may need to cut materials at a 45-degree angle. This is usually done to connect two parts “in a miter”, that is, with an angle of 90 degrees (frames, baseboards, door frames, etc.). In order for the result of the work to please you, it is important to absolutely accurately fit the adjacent parts of the workpieces. Doing this without a special device - a miter box - is extremely difficult, especially for a novice craftsman.
- - miter box;
- - hacksaw;
- - wooden blank;
- - protractor;
- - pencil;
- - a clamp or screws and a screwdriver.
Prepare a corner template that will help you easily make an accurate cut of a piece of wood at an angle of 45 degrees. This device is a profile in the form of an inverted letter “P”; On its sides there are through slots for a hacksaw. They are usually located at angles of 45, 60 and 90 degrees. More complex miter boxes are additionally equipped with arbitrary fixed slots, or have a rotating design - it allows you to install the saw in the optimal position.
READ How to cut a pipe at 45 degrees with a grinder
Drill several holes in the walls of the future miter box, apply wood glue to the ends and assemble the box (tray) of the miter box. Secure the corner template with screws. The walls of the instrument must lie strictly parallel to one another; the bottom and each side form clear perpendiculars.
Mark a 45 degree angle with a pencil and add additional grooves with mowing line if necessary. To avoid mistakes in your calculations, use a protractor.
The most important thing is the slots. It is recommended to perform them with the same hacksaw that will subsequently be used to make cuts in the finished miter box. Start sawing without putting too much pressure on the working tool and hold the blade. First saw through one side, then the opposite.
Start processing lumber. Secure the miter box to a workbench or work table with a clamp (clamps for fixing parts) or screws. Then make a mark for the future cut on the slats (boards, plinths) and place the workpiece in the box. Press it firmly against one of the side walls of the template, aligning the marks with the 45-degree angle slot.
Insert the hacksaw into the grooves of the miter box and cut the workpiece. The saw will be limited to fixed cuts and you will get a clean and precise cut.
Be careful when measuring
So when naming angles, make sure you know what. what angle did you ask for?
Some tips for cutting pipes
Sometimes households need to cut to connect a pipeline at different angles or along an axis. The main tool for performing these works is a universal grinder and metal discs.
Some useful tips
Before you begin installing ceiling moldings, it is advisable to familiarize yourself with a few secrets:
- To measure the plinth strip in the space between two corners, you should not forget about a simple rule: when measuring the size of internal corners, the starting point is the corner itself. For external corners, you need to do this starting from a point distant from it into the depth of the room by the width of the baguette;
The plinth strip is attached to the ceiling surface only after the adjacent corner of the next strip has been adjusted. To try on sections, do not use a stepladder - it is much more comfortable to do this directly on the floor; Adjusting the cuts in this matter is an inevitable event. Sometimes this needs to be done more than once or twice, which is impossible without the proper patience; If there are small gaps in the corner parts, they can be easily filled with putty, with the exception of wooden ceiling plinths.
Why do you need to set tiles?
Now I will tell you how to make manual tile installation. Gripping involves sawing and grinding the tiles at 45 degrees. Joining tiles cut at 45 degrees gives a beautiful visual effect and is useful for decorating niches and other external corners.
Without grooves and decorative outer corners, tiles are often joined in such a way that the edge of one tile rests against the edge of another. In this case, the end of one of the tiles is exposed to our viewing.
This can often be seen in hospitals, schools and other public institutions.
When tiles cut at an angle of 45 degrees are joined, such an outer corner looks much prettier.
Ideally, a seamless convergence can be achieved at the junction of the tiles. There is also a simpler option - leave a small gap between the tiles for sealing with a fugue.
Now I will show how this is done in practice.
How to cut without any tools at all?
- Make the necessary marks on the baguettes;
- Connect the edges of the baguettes with the marks using a regular ruler. In the future, trimming can be done by already taking measurements at the top;
- Having placed the section intended for trimming on the table with the area that will join the ceiling, we cut it at a 45 degree angle. The need for adjustments will be much less in this case;
- The above steps are repeated for the outer corner.
You noticed that we did not need any special means: we just need to tune in to the fact that there may be a need for adjustment.
Features of cutting various angles
We have discussed the general technology of how to cut ceiling skirting boards. But there are also some nuances when cutting different corners of this product.
Indoor floor
View of the internal corner
First, let's set the left and right plinths at right angles. We insert the left product into the miter box, applying it to the outside, and cut off the left inner corner. Then we perform a similar operation with the right one. Ready.
External floor
View of the external floor corner
In this case, using a miter box, we set the mode not to the inner, but to the outer edges. Otherwise the operation is similar.
External ceiling
View of external ceiling corner
We already cut the ceiling corners on the inside of the device. Inserting the left plinth into the miter box, cut off the left outer corner. We substitute the right one – the mode is right outer edge.
Internal ceiling
View of the internal ceiling corner
By analogy with the outer corner, we also cut the inner one. Just cut the inner left and right edges respectively.
It is important to remember: the product is always attached to the ceiling upside down. Therefore, insert it upside down into the miter box.
This will help you cut the baseboard correctly.
Measuring and Creating Angles - Dummies
On the map, you trace your route and come to a fork in the road. Two diverging roads diverge from a common point and form a corner. The point where the roads diverge is the top
. An angle divides the area around it, known in geometry as a plane. into two areas. Points inside an angle lie in the interior region of the angle, and points outside the angle lie in the exterior region of the angle.
Once you become familiar with the types of angles and learn how to measure them and create your own, you will gain valuable geometry skills that will help you solve even the most difficult geometry puzzles.
To accomplish both tasks, you use a protractor, a very useful tool (see Figure 1).
When choosing a protractor, try to find one made of transparent plastic. Determining the angle is easier because you can see the angle line through the protractor.
Instructions
- If you have nothing at hand except a sheet of paper and a pencil, then you can get by with even these supplies. To do this, very carefully fold a sheet of paper in four, while smoothing the folds well. As a result, at the place of the double fold you will get a right angle that has 90°. Fold the corner in half again, and you get the desired angle of 45°. True, in this case a small error will appear in the form of a loss of several degrees. For a more accurate drawing, trace a right angle with a pencil onto a blank sheet of paper, carefully cut it out and fold it in half - this will give an angle of 45°.
You can draw an angle using right triangles, which can be different - with angles of 90°, 45°, 45° and 90°, 60°, 30°. Take a triangle (with angles 90°, 45°, 45°) and trace an acute angle of 45° on a piece of paper. If you only have a triangle with angles of 90°, 60°, 30°, then on another sheet of paper draw a right angle, cut it out, fold it in half and trace it on the desired drawing. This will be an angle of 45°. The most accurate construction option would be one that uses a protractor. Draw a line on a piece of paper, mark a corner point on it, attach a protractor and mark a 45° point, then connect them together. Interestingly, even with the help of a compass you can also draw an angle of 45°. To do this, it is enough to have a depicted 90° angle in front of you (for example, using a right triangle or by folding the paper in four). Then draw a circle from the corner point with a compass. At the intersection of the circle and the sides of the right angle, mark the points. Now, from each of the two points, use the same compass solution to make two more circles. At the place where they intersect, you will get a point, which you connect to the corner, resulting in two angles of 45°.
Method of joining platbands without trimming
Today, platbands are often not cut at an angle and then joined together, but the joints are made at right angles. This method of connecting platbands does not require any special trimming, which is very convenient. In addition, this method looks more modern and attractive.
Cutting at an angle using a miter box
If you still need to cut this or that part at an angle, then you should stock up on a miter box - a simple device that looks like a small box. The miter box has slots that are designed for a saw or a long sharp knife. Of course, these slots are made to form a smooth and precise 45 degree angle.
However, a miter box can have many slots at once, at different angles. This is convenient because with the help of one device you can trim any parts at different angles.
There are adjustable miter boxes on sale. The slots in such a miter box can be adjusted, which allows the master to set exactly the angle that is required at the moment. In particular, it is quite simple to move the slits of such a miter box to a position of 45 degrees.
Now you can trim the workpiece simply. A baguette, platband or plinth is placed in the miter box, after which a saw is inserted into the slots and the excess is simply cut off. The angle ends up being perfect, exactly 45 degrees.
What to do if there is no miter box? Very simple. You need to make a template according to which it will not be difficult to transfer the necessary markings to the workpieces. As a template, you can choose thick cardboard or anything else that will be appropriate in this case.
How to make a miter box at home?
If the methods described above are not to your liking, you can make a miter box at home yourself. A miter box is a device that resembles a tray in shape and is U-shaped.
It is equipped with saw slots designed to cut material at a certain angle. The dimensions of the parts are not very important, but the wider our homemade device is, the wider and more accurately we can cut wide slats.
Important: Everything needs to be done wisely; you shouldn’t overdo it either, because if the width of the miter box exceeds half the width of the hacksaw, sawing will be inconvenient.
You can make markings using the methods described above, and then use small pieces of plywood and a hacksaw. And in order to hold everything together, you can use self-tapping screws or even super glue. However, all this is more complicated and will take much longer, although it will provide the most accurate result (of course, if done correctly).
However, if for some reason a situation arises that it is impossible to get a tool in the shortest possible time, you can use improvised tools, such as a ruler, a protractor or even a tile, with the help of which it is easy to create a template with the necessary markings or even recreate a miter box at home .
Sometimes you need to cut a particular part or product at a certain angle. As a rule, you need to cut baguettes, fillets, platbands, baseboards and other similar interior elements at an angle of 45 degrees. Anyone can cope with this task. The main thing is not to rush, don’t be nervous and everything will work out.
Buy ready-made corner elements
For example, as for baguettes or fillets, special corner elements are sold for them that fit perfectly into the corner and do not need to be trimmed. They just need to be glued into place and pressed well.
Cutting methods
The product is installed around the perimeter of a rectangular room. Trimmed to finish right angles. Therefore, we will consider how to cut the baseboard at 45 degrees.
Cutting using a miter box
What is a miter box? This is a special tray made of wood, aluminum or plastic with grooves provided to guide the saw at the desired angle.
Here are brief instructions for using such a carpentry tool:
- Preparation. We take the product and put it in the tray. We align it to the position in which it will be installed on the ceiling.
- Cutting. With the other hand, insert the cutting tool into the groove. It could be a knife or a hacksaw. And we cut it boldly. The device will not allow you to miss the intended place.
You should know: the metal blade is also suitable for cutting foam plastic.
Treatment. The wooden baseboard may need to be further processed with a file to align the edges of the cut. Plastic or foam can be trimmed with a knife, as long as it is sharp enough.
Tip: when cutting, do not put pressure on the product. The polystyrene foam may crumble, and the wood may even split.
This miter box is so easy and simple to use
Cutting without a miter box
If you do not have such a device, and you are not going to purchase it for one-time use, then you can use the following methods on how to cut the baseboard at 45 degrees.
- The first way is to make this simple carpentry tool yourself. To do this, knock down the most ordinary wooden tray. Then we measure the lines of the slots using a protractor or a school square. We cut the grooves and we have a primitive device ready.
- Second way. How to cut a plinth at an angle is even simpler. It is especially painless to use in cases where the corners of the room are not even.
We don't need a tray. All you need is two boards bent at 90 degrees and a cardboard stencil with a line drawn for orientation.
- Third way. In this case, we don’t knock anything down at all, but simply use a table placed against the wall or any other similar structure.
We mark future joints directly on the product itself, on the wall and on the ceiling. We place the plinth the way we are going to mount it and cut according to the marks.
The simplest way without the use of special devices
Remember: when cutting, keep the tool strictly vertical to obtain a right angle.
How and with what to cut plastic skirting boards
All of the above applies to MDF and wood skirting boards. Cutting them with a regular hacksaw is not a problem. It is advisable to use a blade for metal, since it has a smaller tooth and the cut is smoother; you will have to work less with sandpaper. With plastic the situation is different - when you try to cut a piece, some thin-walled skirting boards crumble and break.
Cutting plastic is not very convenient due to the thin walls
To cut normal quality plastic skirting boards you can use:
- A hacksaw for metal.
- Grinder (angle grinder) with a diamond blade.
- Turned with a miter saw. Before cutting, accelerate the blade and only then start cutting.
- A jigsaw and a fine-tooth file. Here you have to try - select the speed and blade.
- Sharp knife.
- Metal scissors. In any case, it is not difficult to make straight cuts with them.
Only personal experience will help you decide which is more convenient for you to cut plastic floor plinths. If you have a miter saw, try using it. It’s not a problem to try a couple of times with a grinder with a diamond blade. If all this does not give a normal result, try a hacksaw, jigsaw or knife. There are, of course, special scissors for plastic, but for one-time use they are too expensive to buy.
Accessories for decorating corners and joints of PVC skirting boards
In plastic skirting boards, you can design corners and joints using special fittings. There are external and internal corners, plugs and connectors. In principle, they allow you to assemble the desired configuration. Each manufacturer makes its own fittings - according to its own profile, colors. But the principle of their use is the same.
How to decorate the corners of a plastic plinth
The first rule is that all cuts are made straight. Strictly perpendicular. Marks in the corners are placed 1-1.5 mm away from the corner. The fact is that the fittings for rigidity have their own jumpers. So for them you need to retreat a couple of millimeters, but no more. Otherwise, a gap will appear or the baseboards will pop out of these corners.
This is what comes out of the assembly:
I must say that not everyone likes the look of plastic corners. You can make a corner on a PVC plinth in the same way as described for wooden or MDF. The only difficulty is that you have to be careful with plastic - it breaks from excessive force. There is one trick - before cutting the plastic baseboard, add a little polyurethane foam on the back side and wait for polymerization to begin. It will be tougher, easier to cut, less deformation. If the foam subsequently gets in the way, it’s not a problem to remove it, but it’s actually easier to cut it.
Skirting material
Experts agree that polyurethane is the best material for the presented finishing products. But even it has a number of disadvantages. These should be taken into account before cutting corners on ceiling plinths. Polyurethane is susceptible to temperature changes. Therefore, it is not used for finishing in the kitchen or bathhouse. Otherwise, the baseboards will quickly crack and lose their aesthetics.
Expanded polystyrene has almost all the positive characteristics inherent in polyurethane. But it is still a more fragile material. It is easy to break.
PVC skirting boards are relatively cheap. But it is very easy to leave dents or gouges on them. Therefore, you should work with such products very carefully.
Wood looks very beautiful, but not in all interiors. In addition, it is quite difficult for a non-professional craftsman to work with such material. Do you want to do the renovation yourself? Then you are better off choosing polyurethane or expanded polystyrene.
Measuring and cutting tiles
Finishing the second row of wall tiles, I approach the niche in which the heating radiator is located. And here I have to first mark and cut the tiles, and then do the grouting.
I lay the tiles and install spacer crosses, first marking the place where the edge will pass. I will tightly stick adhesive tape onto the future edge to protect the future tile from chipping.
Of course, there is an option to first cut the tiles to width using a tile cutter, but I will immediately cut and process the edges of the tiles with a grinder. I re-apply the tile with the tape already glued and make a mark for cutting, adding the thickness of the tile and the gap for the glue - this way I immediately take into account the thickness of the tile glued to the end of the niche.
Now I will draw a line on the tape along the mark I made earlier.
In this case, the tape protects the tile from chipping the enamel when cutting.
For cutting and subsequent beveling I will use a small grinder
Note the disk that is installed here
This is a disc for stone and concrete, which has notches on the cutting part. There is also a disk with a solid cutting part - there are no notches on it, and it is designed for cutting stone and tiles when cooled with water. This disc is not suitable for cutting tiles with a grinder, but you can try to make a bevel with it.
A lot depends on the quality of manufacturing of these discs. Take the time to look at the options at a hardware store.
Be sure to use safety glasses and gloves when working with an angle grinder.
First, I will cut the tiles with a grinder along the intended line
This operation must be done slowly and be careful not to go beyond the line
This cut is made at right angles to the tile. After removing the excess part, lightly sand the edge.
External corner
Quite often, the contour of the walls in a room has a complex shape. In this case, you will need to figure out how to cut the outer corner of the ceiling plinth. To do this, it is placed on the bottom of the miter box in the same way as in the previous version, with the side adjacent to the ceiling.
For these corners, different slots are used. They also have a slope of 45 degrees, but are on the other side. Next, after marking and trimming, 2 skirting boards are applied to the corresponding place on the ceiling. Adjustments are being made.
Difficulties may arise if it is necessary to cut the same plinth on one side for an external corner, and on the other for an internal one. This is where many people make a mistake. First you need to cut out the inner corner. Otherwise, too short a plinth will not fit together in any place.
Cutting with a miter box
The use of a miter box is justified when the room has relatively smooth corners and walls. To cut the corner correctly, the part in which the cut is supposed to be made is placed in the miter box, and a saw is inserted into the tool guides. Remaining motionless, the part allows itself to be “cut off” at the required angle.
For fillet cutting to be effective, it must be in close contact with both surfaces at the same time. This is possible if it is pressed tightly against the wall of the tool with a section closer to the one working.
Let's say you need to cut an angle of 45 degrees. First of all, the baguette must be positioned correctly in the miter box.
Cutting sequence:
- Having determined the direction in which the cut will be made, cut off the corner;
- We put the cut out sections together, we get two angles: external and internal;
- Applying the miter box to the ceiling, we check how even the cuts are. If necessary, you can correct some things with a knife or use the services of putty.
What tools will you need?
- Miter box - this aluminum, plastic or wooden professional carpentry tool has the shape of a groove in the shape of an inverted letter P. With its help, the material can be sawed at the required angle. Usually it is mounted on a table or workbench. It is safe and easy to use;
An electric miter saw that replaces a miter box. Provides high cutting accuracy; An electric jigsaw that can be used to accurately cut corners; A sharp and well-sharpened knife for processing foam baseboards; A saw for manipulating wooden baguettes or a blade - when working with all others, including foam and plastic.