How to determine the need to sharpen a plane knife
Both hand and electric planes require sharpening from time to time, especially when used intensively. Contact with wood dulls the blade and the tool begins to work worse.
The following signs help you understand that it’s time to sharpen your plane at a certain angle:
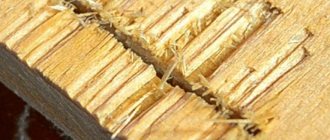
- When removed, wood shavings often break and have torn edges;
- when planing workpieces, more effort has to be applied;
- After several passes, protruding bumps or hooks remain on the surface of the wood.
If we are talking about an electric tool, then other signs indicate the need for sharpening. Namely:
- change in sound during operation;
- the appearance of excess vibration;
- rapid overheating of a working tool.
When using an electric planer, the condition of the cutting part must be assessed primarily by the quality of the processed workpieces. Vibrations and unusual sounds may indicate damage not related to the sharpening angle.
When processing hard wood, the plane becomes dull faster than when planing soft workpieces
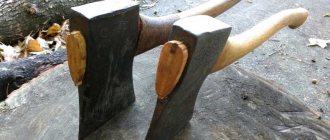
Knife operating conditions
All knives for hand planes (electric ones have some nuances, but more on that later) operate under conditions of significant loads on the blade, which manifests itself in increased shear stresses experienced by the metal.
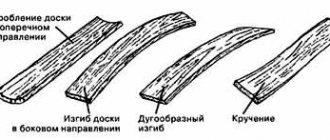
The dynamics of the plane knife operation are as follows. When the tool moves back and forth, the knife cuts into the wood to a certain depth. Since the tree does not have any noticeable plasticity, a certain layer chips off with the formation of chips. The chips themselves are also rarely very long and quickly split into smaller fragments. This happens when the wood cut from the workpiece “crawls” onto the inclined edge of the blade. As the plane moves further, a crack appears in the next layer, etc.
If you do not take into account the individual characteristics of the material being processed, then the durability of the plane knife is affected by the size of the passage - the maximum length of the broken chip fragment. With a decrease in span and a decrease in planing depth, the surface of the workpiece becomes cleaner and smoother, and at the same time the shear loads on the blade are reduced
Since the chips break when bent upward, the greatest stress is caused in the plane block. Therefore, it is made from the hardest wood species. However, the durability of the block, as a rule, far exceeds the durability of the knife. This is explained:
- More favorable block geometry, where there are no stress concentrators;
- The situational desire of a carpenter (especially an inexperienced one) to increase the cutting depth, as a result of which the thickness of the passage increases;
- Increased friction between the contact surfaces of the knife blade and the chips, as a result of which the temperature at the working edge of the knife increases.
These factors lead to rapid dulling of the blade. Therefore, the correct choice of the geometry of the knife for the plane, as well as the material from which the tool is made, is important.
What is the sharpening angle of the knives of a manual and electric plane in degrees
If the tool has become dull, then it is not enough to simply sharpen the plane knives at home until they are sharp. It is necessary to maintain a certain angle, otherwise the blade, even after processing, will not be able to remove chips from the wood efficiently.
The indicator depends primarily on the type of workpieces used in the workshop. According to the rules, the sharpening angle of a plane knife is equal to:
- 20-25 degrees - for processing pine, aspen, larch, linden or other soft wood;
- 30-35 degrees - for planing oak, maple, pear, hornbeam and other hard workpieces.
Most often, the cutting piece of the tool already has a clearly defined sharpening angle. There is no need to re-shape it; it is enough to simply adhere to a clearly visible bevel on the metal.
Attention! When carrying out home sharpening, it is very important to firmly fix the tool during the process, otherwise the clarity of the angle will suffer.
Methods and devices for sharpening knives of manual and electric planes
Sharpening at the desired angle is carried out using standard methods. You can use the same tools as when servicing kitchen knives.
Sharpening with a whetstone
The easiest way to sharpen the blades of an electric planer or hand tool at a selected angle is to use a whetstone, which is found in almost every home. The algorithm looks like this:
- The whetstone is placed on a flat tabletop or clamped in a vice to prevent vibration and slipping.
- The dull piece of the planing device is fixed in a special clamp or simply grasped tightly in the hand by the back.
- The sharpening stone is moistened with water, and then the blade is placed on its surface at the selected angle.
- Using smooth movements with light pressure, the knife is moved over the grainy stone, avoiding sudden jerks and slipping.
- From time to time, the block is moistened with water again to increase the efficiency of sharpening and remove the resulting dust.
After a few minutes, the blade is checked for sharpness. If the regrinding was successful, the piece of iron can be put back into the plane and tried at work.
Manual sharpening of a plane is convenient because it allows you to remove a minimum amount of metal
Sharpening using a machine
You can resharpen the planing device at the required angle using a special electric machine. The method is faster and seems very simple, but in fact it is recommended to use it if you have experience. For beginners, the machine will be more difficult than a manual sharpening stone. During the processing process, you can accidentally deform the blade or remove much more metal from it than necessary.
Sharpening a plane according to the rules on a special machine is carried out as follows:
- Remove the dull knife from the manual or electric device.
- Moisten the metal surface of the blade with water and set the machine to the lowest speed possible.
- Start the device engine.
- Place the blade against the rotating abrasive wheel at the desired angle with slight pressure.
- Process the edge until it becomes evenly sharp.
When sharpening on an electric device, it is recommended to use protective gloves to avoid injuring your hands from the rapidly rotating abrasive stone.
Attention! The plane cannot be machined at high speed. This increases the likelihood of damage to the cutting edge, after which it will be difficult to give it the desired angle.
When sharpening a plane on an electric machine, it is important to ensure that the blade does not overheat
Sharpening a plane using musat
If you don’t have a special machine or a simple sharpening stone at hand, you can restore the sharpness of the blade with musat. The device is usually used for kitchen cleavers, but it will also work well with a planer.
Musat is a long sharpening rod with a handle at the top. The tool can be ceramic or diamond. The algorithm for editing the angle of the cutting edge on musat looks like this:
- The device is installed vertically on a flat tabletop - the working part down, the handle up.
- The edge of the knife is placed against the surface in accordance with the table of sharpening angles for wood planes.
- With a slight arcuate movement, move the piece of iron along the rod from top to bottom.
- The procedure is repeated several times in a row until the blade becomes sharp on one side.
- The knife is turned over and, if necessary, the algorithm is repeated for the opposite surface of the cutting edge.
To prevent the musat from sliding on the table and maintaining an even position, it is recommended to place a soft towel under its tip. It is not necessary to press hard on the planing tool during the sharpening process at an angle, otherwise defects may remain on the cutting edge.
The most convenient way to sharpen a knife is with diamond grinding stone - just a few movements are enough to make the blade sharp.
Performing various types of work with an electric planer
Electric planers can be used to perform various operations:
- plan wide or narrow boards, as well as other wooden blanks;
- choose quarters;
- remove the chamfer.
Before carrying out work, you should select lumber of appropriate quality:
- without knots;
- well dried;
- without cavities filled with resin, chips and cracks (longitudinal or transverse);
- with a flat surface that does not contain depressions or protrusions;
- There should be no metal inclusions in the board or timber: nails, screws, bolts, brackets, screws, staples and others.
Selecting a quarter (removing a fold) is one of the operations performed using an electric planer. To do this, you need to install two stops:
- the first (top), which controls the movement of the tool along the workpiece in the desired direction;
- the second (lateral), which determines the depth of the quarter sampling.
READ MORE: Semi-automatic welding machine without carbon dioxide for wire welding
The stops are adjusted to the required dimensions, following the instructions in the operating instructions for the product used. In this case, the distances are measured by focusing on the cutting edge of the blade, which occupies the upper position.
There are two ways to select a quarter:
- moving an electric plane along the workpiece;
- moving the processed wooden part along a homemade machine.
- On the surface of a well-fixed workpiece, using a marker or pencil, marking lines are applied that determine the depths with the width of the quarter.
- Turn on the electric plane.
- After the drum has reached full speed, the tool is brought to the workpiece. The movement begins with light pressure on the front part of the working unit, leveling the force after the sole is completely on the surface of the part and increasing it at the end.
- Perform passes until the desired sample size is achieved.
Quarter sampling scheme
The second option (stationary) is more productive when it is necessary to perform significant work. They work with the workpiece slowly. After its front edge extends beyond the drum, it is intercepted with the second hand, distributing the force evenly over the part.
Sampling a quarter is a fairly complex operation that requires this kind of skill. Therefore, the following errors may occur:
- angle bevel caused by poor clamping of the workpiece;
- “ladder”, which is the result of improper installation or adjustment of the position of the knives;
- curved groove caused by the initial curvature of the side face of the workpiece.
Uneven pressure on the plane and its tilting in any direction when removing the fold leads to the appearance of bulges, roughness, and grooves. Therefore, you should constantly monitor it, which comes with experience.
- When processing workpieces by planing, you need to move an electric plane from the edge along the fibers (with a portable method of using the tool) or move the part along the machine, positioning it correctly.
- If the wooden structure consists of several elements, for example, it is a prefabricated panel, then the power tool is moved diagonally (at an angle of 45 degrees) to the fibers, setting a small planing depth.
- You should move the plane, evenly distributing the force and making sure that no chips get under its sole (they need to be removed in a timely manner).
- The ends of timber or boards are rarely processed, having previously set the minimum processing depth and chamfered on one side.
- In order to plan the part as efficiently as possible, it is initially taken to a greater length, and after planing, the ends are cut off.
- Each face of the workpiece is processed separately.
- When performing work on the machine, the part is fed by resting it on the side stop and grasping it in the hands.
- Wide workpieces are planed in several passes.
- The planing depth is set based on the degree of unevenness of the surface of the lumber.
- The sole of the power tool should always be parallel to the surface being worked.
- In order not to overload the electric motor, hardwood is planed at a shallow depth in several passes.
When roughing, it is allowed to move the tool across the grain of the wood. To reduce the appearance of defects to a minimum, the plane must be moved slowly, evenly distributing the working forces. Planing panel structures using homemade stationary equipment is quite difficult. In such cases, it is better to use a manual device.
The ends are planed until the edge of the chamfer is reached. To ensure that the processed workpiece is streak-free, additional passes are made with a plane along its surface, setting the knives to the minimum depth.
How to properly sharpen a knife for a hand plane
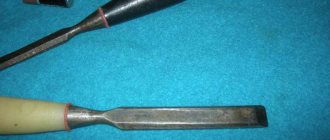
It is easiest to sharpen the blade of a hand-held plane. The algorithm looks like this:
- Unscrew the clamping bolts on the tool and remove the blade from the block.
- A coarse grinding stone is placed on the table and moistened with water.
- The knife is placed on the surface of the stone in accordance with the desired angle.
- Perform slow circular movements on the abrasive stone for several minutes.
- After rough grinding, take a stone with a fine grain and repeat the same procedure on it in order to properly polish the processed edge.
Advice! It is better to sharpen the knife at the first sign of dullness. In this case, the procedure will not take much time, and it will be easier to restore the desired angle.
When regrinding a piece of iron, you can make movements not only in a circle, but also in the direction away from you
How to properly sharpen knives on an electric planer
Sharpening knives on an electric planer with your own hands is no more difficult than adjusting the sharpness of the blades in a hand tool. But before carrying out the procedure, you need to inspect the device and understand what type of cutting parts it is.
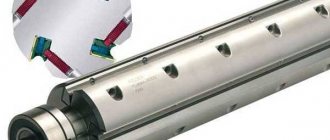
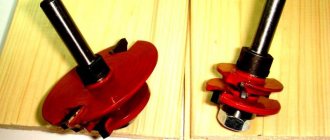
The electric planer can be equipped with:
- Disposable knives. These blades are made of carbide material and have a double-edged edge. If one side of the knife becomes dull, you just need to turn it over and put it in its usual place with the opposite part facing out. Once the second edge wears out, the blade will have to be thrown away - it usually cannot be sharpened on an abrasive stone.
- Reusable knives. This type of blade has only one cutting side, and it can be adjusted by hand or on a machine to the desired angle repeatedly.
You need to sharpen the knives of an electric plane according to the following simple scheme:
- Unscrew the fixing bolts from the pressure plate and carefully remove the blades, making sure that they do not slip inside the tool.
- The cutting parts are fixed in a special plastic clamp, which is included with the planer.
- Moisten an abrasive bar with a large grain with water and place the blades on it at a certain angle of 20-35 degrees, depending on the type of wood being processed.
- Smoothly and with gentle pressure move the iron along the sharpening surface until the edges become sharp.
After successful straightening, the knives are placed back into the plane and pressed again with the plate.
Both cutting edges of the electric planer must be in the same plane when regrinding.
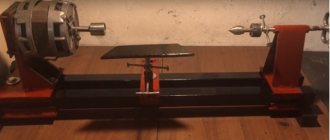
How to make a device with your own hands
The device for sharpening plane knives is made separately for an electric sharpener and separately for a whetstone. It is recommended to make the device for the sharpener with an adjustable angle of inclination so that you can set the angle to be sharpened and fix it with screws. If the machine is used mainly for straightening plane knives, then the device can be made stationary, but if the machine is more universally used, then it should initially be made replaceable.
It is advisable to choose metal as the material for the attachment to the sharpening machine, but for manual work you can use hardwood.
Preparatory stage
The first step is to make a sketch or drawing of the future device. Since the tool itself is small in size, it is recommended to make a drawing in full size, taking into account the sizes of the cutting plates and screws for the clamps.
When selecting material, it is better to use new parts and fasteners. It is worth remembering that the device must ensure reliable fixation of the cutting plate.
The procedure for making a sharpening device
The simplest and most universal device for straightening may be a simple wooden block with clamping screws. An oak block with a cross-section of 60×100 mm and a length of 150 mm is taken as a workpiece. The workpiece is processed and cleaned with sandpaper to remove burrs, and a 2-mm chamfer is removed at the corners. Using a protractor, an angle of 60 degrees is drawn on the side 60 mm from the edge. Using a miter box, a cut is made along the line to the full depth. The resulting wedge will be the basis for attaching the blade.
To securely fasten the blade on the plane of the wedge, two holes are made. A line is drawn in the middle of the wedge plane. 30 and 60 mm are retreated from the edge and marks are placed. The workpiece is clamped in a vice so that the plane of the wedge is horizontal. At marking points, holes with a diameter of 5 mm are drilled at an angle to the plane. After this, on the back side of the holes, recesses are made for the heads of furniture bolts. The bolt heads must be completely recessed into the block.
The knife is fixed using nuts or wings. To ensure reliable fixation, a 60×40 metal plate with a thickness of 2-3 mm with holes for bolts is used.
Using such a simple device will allow you to sharpen the tool, both on a sharpening machine and on an abrasive stone manually.
How to check the quality of blade sharpening
Before installing knives into the tool, it is recommended to check the quality of their sharpening. The simplest test is this:
- Take the blade in one hand and regular printer paper in the other.
- A sharpened edge is drawn along the edge of the sheet from top to bottom or they are tried to cut it across, holding it suspended.
- Evaluate the result.
If the knife is sharpened well, the cut will be perfectly smooth and neat. A dull edge will not cut the paper or will tear it roughly and unevenly. After regrinding, you need to check the tool in operation on a test workpiece, which you don’t mind ruining.
Warning! It is not recommended to evaluate the sharpness of metal with your finger without appropriate experience. A well-sharpened corner can leave a deep cut.
Preparing to work with an electric planer
Before you start working with an electric planer for the first time, you need to study the operating instructions for the device and take into account the features of a particular model. Each time before using the tool, you must check:
- is there any damage to the case, cable, knives;
- Are the cutting elements securely fastened?
- whether the mechanisms are clogged.
You should also not neglect safety rules. To work with a power tool, you must choose suitable clothing - sleeves and other parts should not interfere or hang down. It is necessary to prevent tension on the power cable: if its length is limited, you will need an extension cord
It is also important to securely secure the board or other lumber to the work surface.
Note: measure 7 times and read the instructions: why is it important to study the instruction manuals
Checking and adjusting the position of the front plate
To learn how to properly use an electric planer, for example, the Makita N1923B model, you should first carefully study the preparatory stages of the work. The process of setting and monitoring the front plates is an important point in the work. It is with these actions that preparation for using the device begins. To do this, you need to turn off the power and prepare an overlay - a ruler or glass of appropriate sizes.
Next, we fix the front plate by turning the device over, and by rotating the drum we secure the knife in the upper position. Use a ruler to check the parallelism of the front plate and the sole. Unevenness in position may be caused by clogging with wood waste or prolonged use without maintenance.
To adjust, you must perform the following steps:
- detach the handle with the front sole from the body;
- remove blockages inside the vacated compartment of the device;
- lubricate the mechanisms;
- assemble an electric planer;
- re-check parallelism.
Adjusting the position of the cutting edge
Before working with an electric planer on wood, you need to adjust the position of the cutting edge in relation to the sole of the tool. The level of the outer part of the knives depends on the type of cutting element and the depth of the required planing, which is changed using a switch handle with a minimum step of about 0.1 mm. The protruding fragment of the blade (usually 0.5-1 mm) should be in a position parallel to the power tool plate, at the same distance. The setup takes place in several stages.
For this procedure, slightly unscrew the fastening bolts, use eccentrics to achieve the desired height of the knives, fix them and check them. If there are several cutting components in the model, they should be installed in the same way, using a caliper or ruler. When everything is done correctly, the drum rotates easily.
Checking the installation of knives
Depending on the task, knives can be straight, wavy, or with a rounded end. When positioned correctly, turning the drum is easy, without jerking or difficulty, the blade barely touches the ruler. When the cutting part does not reach the pad, pushes it up or touches the sole, the position of the edge should be adjusted. To do this, use an overlay that is placed on the sole.
Before you start using an electric planer like the Sparky P82-35 model, you need to repeat the check and, if necessary, re-adjust it.
Working positions of the electric planer
There are two main positions: stationary and mobile. Each has its own characteristics:
| Peculiarities | Stationary | Mobile |
| Method of working with the tool | Fixed to the work surface | Moves manually |
| Planing principle | The wooden element is moved by the master | The tool moves along the fixed lumber |
| Advantage | Convenient to work with short workpieces | Works great on long boards |
You can read about another tool here: How to choose an angle grinder for home use - 10 main criteria