Often, when we come to a housewarming party, we think in stereotypes and give tea sets or dishes. But what if each guest comes with a set of cups or plates? We advise you to pay attention to such a wonderful gift as a cutting board, especially since you can paint it yourself. Or rather, not even paint it, but burn your own drawing on it! The topic of designs for burning on a cutting board is very popular today, and that’s what we’ll talk about.
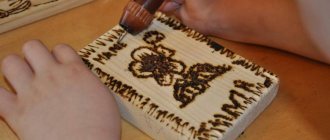
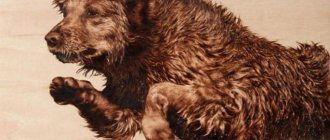
Even if you have no experience in pyrography or wood burning, it’s okay, this activity is available to everyone: both adults and children. There is absolutely nothing to be afraid of here, because pyrography is not difficult, but very exciting. You can see an example in the photo.
Wood burning designs are easy to find online and there are a wide variety of templates and stencils that are suitable for beginners. The main thing in this matter is to be patient and have 1.5-2 hours left for a simple drawing.
Methods of burning drawings
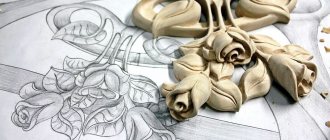
Sketches are preliminary drawings with clear contour lines, along which master burners apply the image to the base. They reflect the main idea and concept of work:
- color and light planning;
- composition;
- proportionality of forms;
- plot component.
Stencils are also used, the main function of which is to apply complex compositions to a wooden surface. The more carefully the sketch or template is worked out, the better and more professional the result will be.
Unfortunately, not all pyrographers are high-class artists - mostly they are lovers of creating something with their own hands, people who gravitate toward beauty and grace, but are far from perfect in using a pencil.
Beginners just starting to dive into this fascinating field of study can be advised to use the following methods:
- search the Internet for the image you are interested in and print it on a printer;
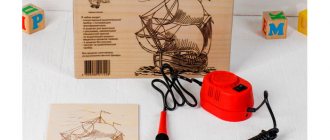
- visit a large market that sells goods for handicrafts and creativity, and choose from a wide range of products any burning set you like, with ready-made templates, stencils and sketches;
- Alternatively, you can find a similar product in a highly specialized online store and place an order.
The last two options require some financial costs, but the first one is quite economical and affordable. Needlewomen and craftsmen often resort to it in a variety of handmade areas. Even without the necessary equipment - a printer, it will not be difficult to implement your idea by using photocopying services in any photo printing salon or office supply store.
The variety of topics and wide range of applications in various household areas place pyrography on a par with the most popular types of crafts.
If we look back at the times of the Soviet past, we can remember that burning was one of the popular activities for schoolchildren. Club activities in pioneer homes and labor lessons in schools were often devoted to this applied type of creativity. Boys and girls enjoyed burning out a variety of pictures for their mothers, fathers, and friends.
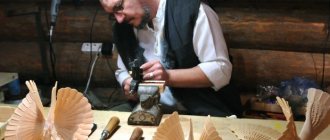
Now this direction, gaining strength, is being born anew, adapting to modern realities. New interesting topics are appearing, tools and imaging technologies have been modernized. With their help, professionals create masterpieces of wood art.
Step-by-step instructions for decorating a cutting board
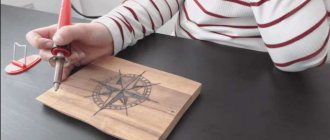
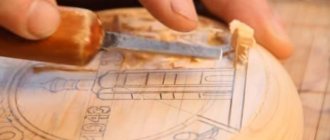
- Using a simple pencil, draw the outlines of plants and insects. Draw a border along the edges of the board and around the hole. If you do not have great artistic talent, and also do not want to spend time drawing each flower, then simply transfer the objects you like using carbon paper. You can find drawings suitable for copying in various books and magazines dedicated to floriculture. The main thing is to be logical when composing your composition. You should not combine, for example, flowers that occur at completely different times of the year (for example, asters and snowdrops).
Plug in the burning device and wait until the tip heats up. Proceed to burning, carefully tracing the contours of each element of the design. Take your time, because you won’t be able to remove the extra scorched line.
When finished burning, unplug the device from the outlet. Use an eraser to erase all pencil lines.
Now prepare a jar of water, a set of watercolor paints, a sheet of paper and brushes. Round brushes made from kolonka or squirrel hairs are suitable for painting. A more economical option is brushes with synthetic hairs.
Start coloring with leaves and stems. To do this, mix different shades of green with yellow and brown colors.
Then start coloring the flowers and berries. To color rosehip petals, mix pink and white paint.
Then color the snail and butterflies. Paint the border brown.
Set the board aside for an hour to dry thoroughly.
Prepare acrylic varnish and a brush. The varnish can be either glossy or matte, depending on what effect you plan to get in the end.
- Apply varnish to the surface of the board. During application, do not press the brush too hard to avoid smearing the paint. Leave the board to dry for a couple of hours. When it dries, you can apply another coat of varnish.
Your DIY cutting board is ready. Such a gift will please any housewife, because it is not only beautiful, but also functional.
Project work on technology for a 7th grade student of the municipal educational institution secondary school in the village of Nikifarovo, MR Alsheevsky district of the Republic of Bashkortostan, Kamaletdinov Iskander (2017-2018 academic year)
Popular stories
Perhaps the most acceptable place where the pyrography technique fits harmoniously into the interior was, is and remains the sauna. This is facilitated by the excellent combination and uniformity of the material - wood, which, by the way, is often left over after the construction of a steam room and can be successfully used as a raw material for wood burning. There are many sketches for a bath, as well as original ideas for decorating bath accessories and supplies. These include story panels, shelves, hangers, and signs with inscriptions. After all, there is nothing better for a bathhouse than a comfortable environment that sets visitors up for rest and relaxation.
For example, signs with slogans of invitation and wishes for light steam would be good to hang on the doors. Decorate the walls with funny plot paintings that correspond to the spirit of the steam room and, of course, place a panel depicting the owner of the establishment himself - Bannik. The transformed steam room will delight its regulars and attract new steam lovers to visit.
Bath furniture is also decorated with burning, using for these purposes cliches of plant ornaments, depicting mainly oak and birch leaves, as elements of the main attributes of the steam room’s health-improving procedures.
Beautiful openwork frames - frames - are also made with ornamental patterns. You can find a wide variety of wood burning designs.
Tips and secrets for beginners
To ensure that your drawings are neat from the very beginning, it is enough to follow simple rules:
- In the process of applying the first point, you can blow a little on the sting, so it will turn out neat.
- Contours are done with slow movements and one line. It is important not to scratch the wood.
- The tip often needs to be cleaned to remove burn marks. A metal brush is suitable for this.
Note!
Plasticineography - interesting options for creating pictures from plasticine on cardboard for children
DIY scrapbooking for beginners: what it is and how to do it. What you need to create a beautiful album or notebook (photo + video)
How to make a craft with your own hands: what you can do with your own hands at home
Important: There is no need to overheat the pyrograph, otherwise the lines will turn out too black.
All experienced pyrographers give this advice to their students.
Drawings of patterns for frames
Ornaments contain the following elements:
- vegetable;
- combined - flora and fauna;
- religious, ethnic, protective symbols;
- geometric.
The component that unites them is the rhythm of the pattern.
Any framed images always have a completed, laconic appearance. Elegantly decorated, they are used to frame mirrors, photographs, portraits, panels, congratulatory texts, and kitchen cutting boards.
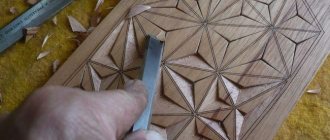
It is important to know that the art of pyrography is a very painstaking task. Applying such complex, ornate, repeating patterns requires increased attention and effort. You can look at a small example of how you can burn out an ornamental frame yourself.
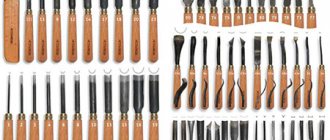
Tools and materials:
- Burnout soldering iron;
- wooden base;
- a frame sketch selected and printed on paper. (It is more convenient to use a stencil, as this will greatly simplify the work. You will not need to draw the pattern, just trace it with a pencil along the cut out outline);
- copy paper of any color;
- masking tape;
- simple pencil.
Step-by-step work:
- Select a pattern. If it is intricate, then it would be advisable to make a stencil. For beginners, it is advisable to use the simplest folk ornaments with a simple geometric pattern. Print it out.
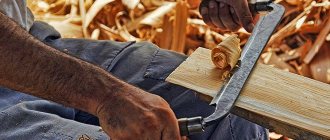
- Prepare the wooden surface. Remove all burrs from it and sand it smooth.
- Attach a carbon copy to the base with tape around the entire perimeter and on top - the drawing itself;
- Carefully, without effort, trace with a lead pencil so that only faint imprints of the future image remain on the wood. This way the result of the work will look more natural.
- Remove all papers. Turn on the pyrograph and start burning.
- Tip: the wood fibers should be positioned from top to bottom, that is, along the working surface. The burning tip will then slide smoothly without encountering obstacles in its path. Don't start using it like a pen or pencil. Only “advanced” masters and specialists work this way. Beginners are advised to identify all lines with a point touch, slowly, gradually, dotted line by dotted line, point by point, moving towards the goal.
Thus, by faithfully fulfilling all wishes, you can achieve great success and become a real master of wood burning.
Mastering the technique
Once the design is traced onto the board, it’s time to start burning. Make sure the board is completely dry. Then heat the burner until the nib turns dark red.
Be careful when working with a hot pyrograph, it is very dangerous! It is better to do everything more slowly, but there will be no consequences.
Burning is best done from the contour to the center. That is, we first outline all the outer edges and only then move on to the inner ones. It is best to burn in separate areas: once you have worked on one, move on to the next, but in another part of the drawing. This will allow the drawing to cool evenly and will not create unnecessary lines or random strokes. When the work is completed, it can be decorated with paints. And then treat it with wax so that the board has a shine.
Let the owner of the house decide for himself whether to use your gift in everyday life or hang it on the wall or put it on a shelf. In any case, your gift will find a worthy place in the kitchen and in the heart of your friend!