Articles
All photos from the article
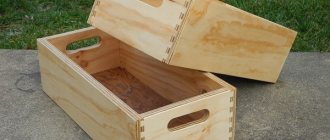
Making furniture yourself can significantly save the family budget, and this process is quite interesting and exciting. Of course, to get a high-quality result, you need some skills in working with wood and plywood, however, you can acquire them in the process of work. In this article we propose to make a chair from plywood with your own hands using ready-made projects.
Homemade plywood chair
Tips and tricks for making
In order to produce any piece of furniture with high quality, you need to take responsibility for all stages of its production.
To begin with, carefully consider the choice of material from which you are going to make your furniture, be it a stool, chair or armchair. Prepare all the tools in advance and purchase the missing ones. Take all measurements accurately. Be sure to study the information on this issue. Take into account all the nuances, do not neglect the little things.
With a little practice, you can move on to heavier models.
Use helpers whenever possible, especially when assembling a three-legged chair.
Use the resulting product strictly for its intended purpose. If the furniture is for home use, then it may not withstand aggressive environmental influences (rain, sun, heat, cold, etc.).
Don't overload.
Having fulfilled all the conditions, you will gain significant experience, save your family budget and enjoy your holiday on a product of your own production.
Main design elements
The first priority in assembling a chair is to select the correct shape. It is important to decide how a person spends time at the computer, since different types of activities require different furniture. You should also focus on the height, weight, and body features of the future owner of the seat.
Many people decide to start assembling a chair with their own hands due to the fact that the price of furniture in this category in the store is sky-high, and creating your own design is several times cheaper. In addition to saving money, a master who decides to assemble a convenient structure gains new skills, which means he spends his working time profitably.
A homemade computer chair is furniture assembled according to exclusive drawings and fulfilling a specific role. Such designs have a unique design, meet exclusively the needs of the owner and usually last longer than their serial counterparts. Other advantages include the fact that by making your own chair, it becomes possible to make a product that matches a person’s non-standard height or weight.
Assembling a chair according to your own sketches also involves creating a unique drawing in which you can use any components, including unusual elements. But if you need to make a simple chair, then you can use a standard set of components. The following parts are usually used:
- Armrests - to keep the torso within the chair, comfortable positioning of the arms.
- Seat – for a pleasant pastime, you need to make it comfortable, not too soft.
- The backrest is an important element that helps control the owner’s posture.
- Regulating mechanism - to control the design, create a certain shape.
Before you make a computer chair with your own hands, you need to decide in advance on the type of design, since this will not only be the basis of the drawing, but also the criterion for choosing tools and materials.
Mechanisms
Seat
Back
Armrests Spring mechanism
Varieties
The versatility of the material allows you to create chairs from it for a variety of purposes. Such products can be found anywhere. You've probably seen similar options: children's chairs in kindergartens, educational institutions or canteens. They are easy to move, they are absolutely harmless and safe. Bent-glued plywood is an excellent basis for production; it makes excellent rocking chairs and other fancy models.
- For home. The environmental safety of this material allows you to choose plywood chairs for your home or apartment. Birch and coniferous plywood are most often in demand, and sometimes combined plywood is also found. From a design point of view, such chairs can be very different. Modern plywood chairs fit into almost any interior. Very popular today are models that represent a combination of plywood with leather or its substitute.
- For the dacha. The dacha is usually the place where annoying objects from the house are “exiled.” A plywood chair is no exception. Everyone who has a dacha dreams of decorating it like a cozy nest. Therefore, beautiful plywood chairs will come in handy. A specialized assortment will allow you to add some zest to your country interior; you can choose both garden and home chairs.
- Made from bent plywood. Bent plywood is a very convenient material for manufacturing. The models are good for their smooth lines, which is accompanied by ease of use. As a rule, such chairs are distinguished by a smooth back and a similar seat. Design incarnations allow you to purchase not only useful, but also interesting from a decorative point of view options.
- Carved. These masterpieces are sometimes worthy of the most representative exhibitions. Sometimes designers create original thrones from seemingly simple plywood. Due to the availability of the material, even students can afford them. This chair is ideal for home and garden. Furniture stores today are pleased to offer you similar furniture in a variety of sizes.
- Round. These chairs will look perfect with a round or semicircular table. Families with small children will especially appreciate this option. Round stools without backs will be an ideal solution for a garden or kitchen. Long gone are the days when plywood chairs were boring and faceless. Modern models are presented in beautiful and elegant options for a variety of purposes.
- Computer. The smooth silhouettes that plywood allows you to create make it possible to keep up with the times. Computer chairs made from this material are unsurpassed. Such options give even the most advanced chairs a head start. From an aesthetic point of view, these chairs look very original and unusual. Experiments continue.
Where can it be used?
A rocking chair in general can be installed anywhere, be it a room or a veranda in the garden. But most often it can be seen in a spacious living room in a private house or in the garden. In the latter case, rocking chairs are often made of either metal or rattan. The products are characterized by increased strength; when properly processed, they are not afraid of water, are durable and can really not only decorate the garden, but also create a real relaxation area in it. Moreover, the rocking chair will feel great both on the veranda and on the lawn or garden path, where it will not disturb anyone.
Rattan rocking chair
On a note! In the garden you can put not just a rocking chair for one person, but also a real rocking sofa or a bench that can accommodate several people at once.
Also, rocking chairs fit perfectly into the interior of large and spacious rooms, especially those made in a certain style. Of course, with modern design solutions, you should abandon the traditional rocking chair, but a stylized chair will fit even into a high-tech room.
Rocking chair made of boards and plywood
DIY wooden chair with backrest
If you have successfully completed the manufacture of a stool, we suggest making a “full-fledged” wooden chair with your own hands. For such a product, you can already choose more solid wood - oak or walnut, for example. In addition to lumber, you will need screws, wood glue, the tools described above and a cutter. If it is not possible to work on a machine, use a set of chisels and a hammer. For tinting you can use the same stain.
Below is a table describing the number and sizes of parts needed to make a chair with a backrest. At first glance, it seems that there are too many of them (especially when compared with a stool), but such a chair will turn out to be very comfortable and will serve for many decades.
Which design to choose for a bathroom with toilet - more details
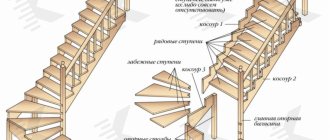
To make the task easier for you, we have prepared a visual plan for subsequent assembly with numbered parts. In the future, to create your own exclusive furniture, you will have to make a drawing of a wooden chair yourself.
Progress:
- You should always start sawing from the legs, no matter what kind of chair you make. Cut two pieces 38mm thick, 75mm wide and 1075mm high.
- Measure and locate the attachment points for the horizontal jumpers.
- Make two front legs - they will be shorter than the back ones. Height 420 cm.
- Sand the parts using a sander.
- Make markings and use a milling cutter (chisels) to select grooves for joining the legs and jumpers. Cut the upper ends so that you get a low pyramid.
- Make 2 horizontal and 5 vertical jumpers 475 mm long - these will make up the backrest.
- Make grooves in the horizontal elements.
- Form tenons in parts #3 4, 5 and 6.
- Bevel the top of element #3 from the middle to the edges.
- Make a rough assembly of the back (without glue), adjusting the tongue-and-groove joints.
- If everything is done correctly, disassemble the back, coat all attachment points with wood glue, assemble back and clamp with clamps.
- The hardest part is making the side inserts. One of them includes the upper arch part No. 7, the lower crossbar No. 8, 5 slats No. 9 and 10.
- Cut out blanks for these elements and for arched lintels No. 11.
- Since all the arched elements are the same size, to make the task easier, you can make a template from MDF.
- Sand all parts.
- Mark and select the grooves on the arched elements - the tenons of planks No. 9 and 10 will be inserted into them.
- Using the template, draw a fillet to get 4 identical parts.
- Make tenons in planks No. 9 and 10.
- Place markings on the upper ends and cut them out, fitting them flush with a cutter. To make the tenons on the tops, first use a rabbet bit.
- On all arched parts and elements No. 12 and 13, cut off the tenons on the miter side.
- Roughly assemble the side inserts.
- Glue the connections and secure with clamps.
- After the glue has dried, reinforce the attachment points with screws.
- Close the holes for fasteners with decorative plugs.
- Planks No. 16 are designed to support the seat. Screw them with screws to the crossbars No. 18, having previously drilled sockets for them.
- All that remains is to collect all the pieces together. First, glue elements No. 11, 12 and 19 to the rear leg.
- Turn over and insert the tenons into the grooves of the second long leg. Secure with clamps and screw in the screws.
- Glue the side elements of the drawer and the side inserts to the finished back.
- Glue the arched lintel and the front side of the drawer with the legs.
- Place the resulting structure onto the sidewall spikes.
- Install the clamps, but do not tighten them all the way - check the squareness of the structure first. To do this, use a square, place a chair on the floor and simply inspect it from all sides, moving away a couple of steps. If everything is smooth, tighten the clamps and screw in the screws.
- Perform a final sanding, smoothing out any rough edges or sharp corners.
- Cover the product with stain and varnish. When using polyurethane varnish, apply it in 2-3 layers. Apply a new layer only after the previous one has completely dried!
- Cover the seat with soft leather or leatherette. First, nail a thick layer of furniture foam to the seat, and after upholstering it, screw the seat to No. 16.
Here you will find design options for a small kitchen
It is recommended to attach felt or rubber pads to the lower back parts of the legs to avoid damaging the floor covering.
Making chairs from wood is a very interesting and creative process, which over time can develop into a useful hobby. Once you learn how to make basic designs, you can diversify the process by adding your own details, using wood carving tools, and combining different materials. Anyone can make wooden furniture, but you can start with an ordinary kitchen stool.
What is
A chair for feeder fishing can be made in the form of a simple stool. For greater comfort, it is worth building it more complex: with a back, armrests and a body kit. For a chair to be comfortable to use, it must meet the following requirements:
Compact design - the chair should easily fit into a backpack when going fishing. Lightweight, which is important for carrying over long distances. Strength, which affects the ability to support the weight of the fisherman. Stability on any surface, since the banks of reservoirs are not perfectly smooth. The safety of the fisherman depends on this. The legs of the chair for winter fishing should not be thin so as not to be pressed into soft ground or snow under the weight of a person
Another advantage of the feeder chair can be the adjustable back and legs, which allows you to change the height of the backrest and, in a sitting position, relieve tension from the back that arises from being in one position for a long time
The legs of a chair for winter fishing should not be thin so as not to be pressed into soft ground or snow under the weight of a person. Another advantage of the feeder chair can be the adjustable back and legs, which allows you to change the height of the backrest and, in a sitting position, relieve tension from the back that arises from being in one position for a long time.
Compact design
Lightness
Strength
Stability on any surface
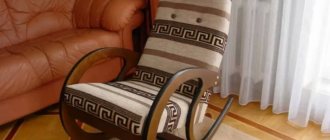
Plywood rocking chair
Creating a rocking chair is no different from the previous one, only the foot changes, instead of a strong support we create a smooth slope. As with any design, it is necessary to create a drawing of the future product. To create a chair we will need:
- Plywood sheet (Parameters according to the original drawing)
- The minimum sheet thickness for this product is 15–20 mm.
- Beam 30*50mm (length according to drawing)
- Self-tapping screws
The entire drawing is transferred to the pattern and a stencil is created. Next, using prepared samples of cardboard or paper parts, components are drawn on a sheet of plywood. Do not forget about the correct cutting of the material and careful treatment with paint and varnish.
ATTENTION! For a more aesthetic appearance of the product, drill holes for the screws so that the caps do not protrude outward
All parts of the chair are attached to 2 supports using self-tapping screws, then the remaining holes are covered and painted.
Drawing
A drawing of a future rocking chair is a necessary component for the manufacture of a reliable, functional and aesthetic piece of furniture. With its help, you will be able to control the process, eliminate errors and perform all procedures as quickly and accurately as possible.
Before making a rocking chair, prepare a drawing; it can be obtained in three ways:
- Select a ready-made drawing from those offered on the Internet and, if necessary, modify it.
- Draw your own version using a specialized application.
Overall dimensions of a low rocking chair Source pinimg.com
- Draw a drawing by hand, calculate proportions and put down dimensions.
When choosing the design of your future rocking chair, give preference to models with a small number of parts. A plywood sheet is essentially a multi-layer gluing. If we compare plywood with solid materials, then dynamic loads affect it more strongly, and the destructive effect appears more strongly at the joints. Therefore, the fewer parts, the more reliable and long-lasting the operation.
Material: wood, plywood, pipes and metal
Having decided to build a practical and functional folding chair, in addition to its design, construction and dimensions, you must carefully select the materials of manufacture. Most often, home craftsmen prefer:
- Natural wood. These products have interesting designs. They can be either stationary (that is, quite massive) or portable (used primarily for outdoor recreation).
You can build a real work of art from wood. The main thing is to correctly calculate your strength, because all wood is divided into: hard, soft and durable.For example, a novice master cannot cope with oak. Since this material is quite difficult to process. It is better for beginners to try making furniture items from softer woods: linden, pine, birch.
These lumber have good technical qualities and are more affordable. It is worth adding to the advantages of natural wood: resistance to negative factors (with proper treatment with antiseptics and pest control compounds), safety and environmental friendliness, long service life, pleasant aroma of wood and a delicate texture to the touch.
A wooden chair with a folding mechanism will make you proud and delighted every time. It will harmoniously fit into any yard exterior and become its decoration.
- Plywood.
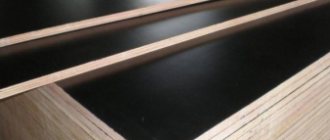
This material has many advantages. The versatility of plywood allows you to create chairs of any design and for different purposes. Such products can be installed in any living space due to the naturalness of the material, or outdoors. The special plywood production technology guarantees it: environmental friendliness, strength, reliability and durability. Plywood can be easily treated with paints and varnishes. Therefore, a piece of furniture can be colorful and original. In addition, coating with varnish or paint will significantly extend the life of the chair. If you choose laminated plywood to make a chair, its surface will be perfectly flat, smooth and pleasant to the touch. One of the positive aspects of making furniture from plywood is that it can withstand heavy loads, and even in its unprocessed form it is not at all afraid of moisture. - PVC pipes. This original approach to making easy-to-use chairs is in demand among lovers of original ideas.
The biggest advantage of making furniture from PVC pipes is saving money. As a rule, men begin to assemble furniture with pieces of pipe available.The most important thing here is to have a special soldering iron and know how to use it. To make bent shapes from a plastic pipe product, it must first be heated with a gas burner. The peculiarity of furniture made from PVC pipes is that they do not require finishing. This material is not afraid of sudden changes in temperature, high humidity, or direct sunlight. It copes well with the loads when the frame is correctly assembled and has a long service life of more than 50 years.
- Profile pipes.
This material differs in diameter and cross-section. Pipes can be round, rectangular or square. To work with a profiled pipe, you need to have a special tool - a snail, so that you can bend the material. The advantages of products made from profile pipes include: high resistance to mechanical damage and negative factors, reliability, durability and affordability. If you choose a thin-walled pipe, the furniture product will have little weight. A wide selection of geometric shapes of profile pipes allows you to create unique and original designs of folding chairs. - Metal. Such products are distinguished by: low weight, compactness, variety of shapes. Their seat and back can be either fabric or wood. The features of metal products include: a small investment of money in manufacturing and a simple type of design. The only thing is that to make a folding model of a metal chair you need to be able to work with a welding machine.
Swing principle
Basically, there are three types of rocking chairs, regardless of their modification options: chairs with curved runners, hanging models and pendulum models. Although they have external differences, swinging still occurs according to the principle of a pendulum.
This principle is achieved by shifting the center of gravity. The first swing always occurs with effort, when all subsequent swings occur by inertia, which ultimately gradually weakens.
Plywood selection
Chair made from a sheet of plywood: top view with dimensions.
The thickness of this building material has a wide range, and processing methods are chosen taking these parameters into account. If the thickness does not exceed one and a half millimeters, such a sheet can be cut with a hand jigsaw. Up to 6 millimeters, cutting is done with an electric jigsaw, or a circular saw can be used. Plywood, like other types of wood, is a fibrous material, so chips and cracks cannot be ruled out during the process of cutting sheets or sawing. It happens that it is necessary to work across the fibers. In this case, weakening cuts are first applied; they are made parallel to the sawing line using a sharp knife.
For a good rest in a city apartment or in a country house, you first need comfortable furniture, and a hand-made chair will be a very popular interior element. Rocking chairs are especially popular, or you can choose a regular option. You can choose the model you like based on a ready-made sample or create a completely exclusive version, your own.
Subtleties of balancing
A novice master is able to accurately reproduce the shape of a rocking chair; but making a dynamic design yourself comfortable the first time is not easy. If the resulting chair does not rock well and leans back too much when landing, then it needs additional balancing.
In order for the chair to swing well, they resort to weighting the rear overhang (the back of the runners). This can be done by connecting the rear ends of the arcs with a transverse part: a wooden beam or pipe with a load (a recess is made in the bottom of the beam for the load, the load is placed inside the pipe).
The size of the load cannot be guessed right away, so balancing is performed in several approaches. If the rocking chair falls backwards, the load is attached to the front overhangs, forming it in the form of a footrest.
Garden rocking chairs with soft seat Source thdstatic.com
How to choose material and design
Modern models of rocking chairs are made from various materials, each of which has its own characteristics:
- Wood. Furniture made from various types of wood looks stylish, it is durable and reliable. The surface must be treated with a finishing protective compound.
- Sheets of plywood. The material is easy and comfortable to work with, it can take any shape, and is also suitable for the manufacture of small elements. However, it is better not to place such rocking chairs outside.
- Profile pipes. It is better to make individual parts from them, rather than the entire structure. The material is durable and easy to work with.
- Plastic pipes. A practical, budget-friendly and reliable option, the material is lightweight and easy to process.
- Rattan and wicker. The result is beautiful designer products, but the weaving technology is quite complex, and high-quality material for manufacturing is not easy to find.
- Metal. Processing parts will require skills and experience from the master. Metal chairs are durable and resistant to external influences.
Tips from the experts:
- Coniferous woods are the most comfortable when assembling furniture yourself, as they are easily amenable to any type of processing. However, they quickly react to humidity and swell, so rockers made of spruce, pine or alder must be treated with special protective solutions.
- Furniture can also be made from expensive and denser species, for example, oak, beech or ash. In this case, you can be sure of the strength and durability of the structure, since these types of trees do not have large pores.
- To create swinging products, it is better to use well-dried first grade wood blanks. If the chair is assembled from damp material, the entire structure may become deformed and deteriorate over time.
- The choice of material is often determined by the location where the rocking chair will be located. An outdoor structure (for a dacha or veranda) must have additional protection in the form of treating all surfaces with antiseptic agents that can minimize the effects of snow, rain and frost.
- Summer cottage products should not be covered with textiles and covers should not be placed on the body, otherwise the fabric may become damp and rot. In this case, it is better to use removable pillows and blankets.
- Wood can be combined with metal to create an even more durable structure. In this case, the frame should be metal, and the seat itself should be wooden.
- It is better to choose plywood sheets with good ductility for manufacturing; they are more convenient to process.
Some general information
Whatever one may say, it is a rocking chair, especially one standing in the garden or near a lit fireplace, that many associate with comfort, a pleasant evening in a narrow family circle, peace and quiet. In such an environment you can have a great rest and relaxation by reading your favorite book or watching a good movie. The rhythmic rocking movements of the rocking chair will help you get ready for sleep and simply feel peace, which is so rare in modern life, filled with bustle and heavy thought processes.
Rocking movements increase concentration
On a note! Scientists have proven that rocking movements with a certain rhythm calm a person and increase the concentration of his thoughts. Sometimes it is sitting on a rocking chair that can solve serious life problems and problems.
It is still unknown exactly how and where the very first rocking chair came from . Usually many people associate it with old England, fireplaces and rugs. At the moment, there are two main versions of the history of the origin of this chair. According to one of them, the first rocking chair was invented by the Viennese furniture maker, experimenter and innovator, as well as a fan of bent wood, Michael Thoneta in the mid-19th century. However, there is one more fact that casts doubt on this version. Thus, at the end of the 18th century, the word “rocking chair” was added to the English dictionary, and since the 1800s, such chairs began to be produced by many English furniture manufacturers. But the fame and peak of popularity of rocking chairs came precisely in the 19th century. They were used mainly by rich and aristocratic people, as well as those involved in literary and artistic arts.
Plywood rocking chair
According to the second version, the rocking chair was invented by Benjamin Franklin. In terms of time, this was also the 19th century. But there are those who refute this version, believing that Franklin was just the one who became the first owner of the rocking chair.
In a word, we can say that the beginning of the history of the chair is the 18th-19th centuries. The sources are silent about the rest. And, nevertheless, rocking chairs still remain popular and in demand, and are primarily intended to create a special ambiance and comfortable environment in a certain place.
The rocking chair has its own history
On a note! The rocking chair is still the only non-static piece of furniture.
What kind of plywood to use for a rocking chair?