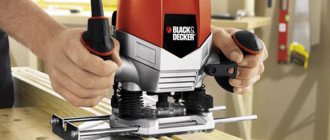
Accessories for hand router
How to make picture frames with a hand router
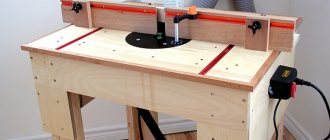
Creating frames for pictures and photos is one of the easiest ways to make woodworking products. These are several wooden slats cut using a cross-cutting jig and joined together to form a frame. First of all, in any frame the main role is played by the profile of the shaped part of the rail. To make the profile of the slats, we will need a milling table and a set of standard cutters. Next, we will consider ways to form various profiles for the slats of future frames.
This frame (see photo above) is one of the popular models because it is basic and looks attractive. The milling sequence is shown in Fig. 1-4.
The frame described above provides a good basis for creating many options, see fig. 5-6.
Simply forming profiles with a router and gluing them together will help create the option shown in the photo below. Here the strip is made of contrasting wood, see fig. 1-4.
You can add a different color to the frame using a frame of the desired color. In the photo below, a stripe painted with gold paint has been added to the inside of the frame to highlight the inner edge of the frame, see fig. 1-4.
You can give the frame a nice, smooth look by rounding the edges of the rail and creating a merging effect, see photo below. Increase the width of the rail and this frame will be good for large paintings or photographs, see fig. 1-4.
Even in small frames, you can add a contrasting strip (insert) for decoration. The second strip creates a cutout for photos, paintings and glass, see fig. 1-4.
It's hard to find a home or office that doesn't have space for paintings and photographs. But simply attaching a photograph or a masterpiece of art to the wall will be ugly and absurd. It is precisely in order to frame photographs and paintings that frames were invented. With their help, you can refine the interior and add comfort to the premises. Nowadays there are millions of frame options in stores, but it is not always possible to find what suits your home. That is why we will tell you how to make a frame with your own hands, while spending a minimum of money and effort. You need to start by choosing a design for your future craft.
Material selection
There are no special restrictions on the material. The only thing that remains unchanged is the base on which the decorations will be glued. It should be dense, strong and not get wet from glue. Thick cardboard and, of course, wood work well for the frame. Moreover, the wooden frame itself is already a completed craft. It can be varnished and will be appropriate for any interior. You can decorate the product with any available means. This could be pasta, pebbles, clothespins, buttons, beads. But do not forget that the chosen material should complement the picture. So, for example, shells will go well with a seascape, and a frame of pasta with the addition of cereals will be perfect for the kitchen.
Let's look at the two main materials from which frames are most often made - wood and polyurethane foam.
Wooden frame
Wood is a classic material used to make picture frames. Such designs are durable and fit almost any picture and room design.
To make a wooden frame, you don’t have to go to the forest to get wood, then process it and cut out the planks. You can go to a hardware store and purchase wooden skirting boards there. They are perfect for a product like this.
What you need:
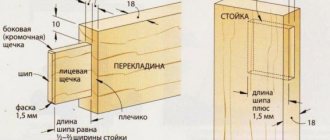
- Wooden plinth. Its length and width should correspond to the size of the picture. Therefore, be sure to measure the picture before buying a plinth and do not forget that the frame will be longer than the canvas.
- Well sharpened knife.
- Scissors.
- Sandpaper.
- Furniture glue. PVA will do.
- Hacksaw.
- Small nails.
- Hammer.
- Ruler. It would be better if it was angular.
- Cardboard or plywood.
What to do:
For a richer look, you can use carved wooden baseboards. Their price corresponds to their appearance, so you will have to pay a decent amount for such material for the frame, but upon completion of the work it will be worth it.
Polyurethane foam frame
For women, “polyurethane foam” sounds threatening, but there is no need to be afraid, because it is ordinary polystyrene foam, only stronger. Ceiling plinths are made from it, which are now used to renovate apartments. Their price is low, but the variety of patterns is impressive. There is no difference in manufacturing with wooden baseboards. But don’t forget that this is not wood, so you should handle polyurethane foam more carefully. Any blow can lead to dents, or even break the entire structure.
What you need:
- Ceiling plinth.
- Hacksaw or sharp knife.
- Glue.
- Ruler.
- Plywood or cardboard (depending on the size and strength of the catrina).
Contemporary artists often sell paintings without frames. They believe that a person has the right to choose which frame to use, and whether it is necessary at all. In specialized stores you can buy ready-made picture frames, but they are of a certain size. And if the canvas does not correspond to them, then you will have to somehow get out of the situation. The best option is to do everything yourself, because it is not difficult. This way a person will receive a decent frame for a picture of the required size, as well as a design that, in his opinion, suits him perfectly.
Now we will describe in detail how to make a picture frame with your own hands from wood. This is classic material. The first frames began to be made from it back when fine art was just in its infancy. Therefore, let's start with it.
Preparing cutters and slats
Profile manufacturing begins when cutters and material are available.
Prepared material and cutters.
Milling cutter preparation stage
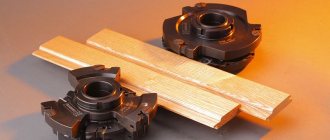
To produce the intended profile, 3 cutters are used:
- groove fillet cutter with a diameter of 20 mm;
- two edge molding cutters with bearings with diameters of 32 mm and 35 mm.
Cutters for a given profile
The dimensions of the cutters are checked with a caliper.
Measuring a cutter with a diameter of 32mm
Measuring a cutter with a diameter of 35mm
The stage of preparing slats for a wooden cornice
The profile will consist of two glued figured slats.
Glued profile
To get a beautiful profile, you need narrow and wide slats.
2.1. A narrow rail is made measuring 21 x 34 mm
Measuring narrow slats
For a narrow strip, ash trimmings of lumber are used. A wane is a section of a tree with remains of bark. At this point the board is stronger than at the core.
Wane billet
A lath of the required dimensions is obtained when a workpiece 23 mm thick is driven through a thickness planer. The machine makes the slats the same thickness along the entire length. Planed along the grain, the lath becomes very smooth.
A chamfer is selected in place of the bark. After processing, a high-quality strip is obtained, since under the removed bark there is the highest quality part of the tree.
Chamfer selection location
To get a shaped edge, use a 35 mm shaped cutter. During milling, the support bearing of the cutter moves along the surface of the rack, so there should be no unevenness or potholes on it. If this condition is not met, the profile will be damaged.
Before milling, the rail must be secured in the machine, since for safety reasons it is impossible to hold the material in your hands when processing with a manual milling machine.
Milling a narrow strip
2.2. The wide rail is made with dimensions of 47 x 17 mm
Measuring the dimensions of a wide rail
To have 2 fillets on a wide lath, take a 20 mm fillet cutter. This cutter selects straight semicircular grooves.
Fillet cutter for two grooves
After passing through the fillet cutter, two grooves appear on the wide lath. The outermost fillet is made in such a way that during its rounding, the support bearing of the cutter moves in the center of the fillet.
Choosing a location for fillets
Two fillets on a wide strip
At the final stage of preparing a wide lath, the outermost fillet is rounded with a 32 mm milling cutter.
Rounding the extreme fillet
Selection and quality of material
First you need to select the slats. The wood for their production is not cured in a certain way, so in places where there are knots, cracks and unevenness appear when the material subsequently dries out. It is for this reason that you need to carefully select material that does not have flaws. However, if in the design of the frame you need to show the structure of the wood fibers, then it is better to make the slats for the baguette yourself. This type of production of picture frames requires seasoned wood, only the knots in it do not have cracks, because it was dried using a special technology for a year.
Tools for creating corners when cutting baguette
Wooden picture frames must have right angles, unless, of course, their shape is to be traditional. It is very difficult to saw a baguette and maintain the exact degrees of its angles. To do this, it is better to use a special device such as a miter saw. It is not cheap, but the result justifies the money. But still, how to make a picture frame with your own hands without a special machine? If engaging in such production is not part of your plans, then buying such an expensive tool is not advisable. Therefore, it is better to purchase a miter box for sawing baguette. If you still can’t cut out the corners perfectly, you can always refine them using sandpaper. It will allow you to carefully sharpen the corner so that everything fits together.
Processing tools
Industrial cutting
So, we have voiced the general principles, now it’s time to move on to specifics. Before cutting a baguette, we need to select the appropriate tool, and the choice here will be quite extensive.
A guillotine for cutting baguette allows you to simultaneously make two symmetrical parts
Framing shops use either guillotines or miter saws to perform this operation. Both types of devices have their own characteristics, the main ones of which we describe in the table below:
| Type of cutting machine | Features of design and operation |
| Guillotine | The cutting element is a blade mounted vertically. As a rule, guillotines are equipped with pairs of rigidly fixed blades, which makes it possible to form two symmetrical parts with one movement. The cutting part is powered by a foot drive. Some industrial models also come with hydraulic systems or electric motors to handle thick workpieces. A significant disadvantage of the guillotine is that thin figured and carved baguettes can break off under the pressure of the knife. |
| Miter saw | Instead of guillotines, miter saws are often used for cutting to size. Usually, in one workshop, a pair of identical saws with a symmetrical arrangement of disks is installed - this way, to form an angle, you do not have to reconfigure the machine for cutting the baguette every time. To ensure that the cutting line is smooth and clean, experts recommend using special discs. Also a prerequisite is the rigid fixation of the installation on the base and the adjustment of the machine to reduce spindle runout. |
Miter saw with adjustable blade angle
Tools used in everyday life
If we have to work with wooden or plastic profiles from time to time, then it would be unreasonable to spend money on buying a guillotine (the price of a middle-class structure can be up to 200 thousand rubles or more).
It is much easier to acquire the following set of tools:
Making a baguette using a manual milling cutter from a flat board using shaped cutting elements
- a manual router, for which you should definitely buy special shaped cutters for baguette. This fairly simple device will allow us not only to select grooves and form tenons for connecting parts, but will also make it possible to make simple fillets from ordinary boards and slats;
- hand saw for cutting baguette. An ordinary hacksaw with high-quality sharpened teeth, or a special file designed for working with foam plastic, polystyrene and PVC, is suitable here;
- painting knife with a sharp and long blade. Indispensable if we need to cut foam fillets a lot and often to finish the ceiling.
Stationary saw and miter box with hacksaw
And yet the main detail, without which you should not start work, is the miter box. It is a U-shaped tray with slots at fixed angles (most often 450, but you can also find miter boxes for polygonal designs). By using this device, which limits the stroke of the saw or knife, we practically guarantee that the cutting line will go where we need it.
Note! Of course, the labor intensity of the process is higher than when using a guillotine or a tuned miter saw, and the result largely depends on skill. So we repeat - for professional work with workpieces, it is better to buy a special machine.
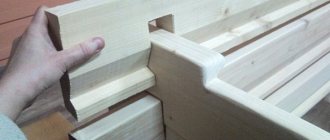
Gluing the frame and the tools needed for it
Now the manufactured frame parts need to be glued together. Titebond II glue is ideal for this; it has been tested by many woodworkers. It is very important to clamp all parts of the frame tightly. To do this, use a special tool - tape clamps. They allow you to tighten all parts of the frame evenly and tightly and maintain perfectly right angles. This simple device is easy to use, even if you are making a picture frame out of baseboard. And it doesn’t matter whether it’s plastic, foam or wood. The most important thing is to initially cut out even corners. You can fasten the frame without glue; for this, metal corners are used that are driven into the joint. However, such fastening is not as reliable as gluing.
Frame Surface Finish
We understood in detail how to make a picture frame with our own hands, and now as for decorating it and covering it with a protective composition. For this purpose, stain and varnish are used. If you need to achieve a dark color, cover it with stain and then varnish. When they want to leave the natural color of the wood, they take a transparent varnish - then all the fibers seem to stand out a little, creating a great look. If you want to add color to the frame, for example, make the wood pinkish, then you can add a little potassium permanganate to the varnish. All compounds that are applied must be of the highest quality. If you take cheap ones, you can easily damage the frame. If everything is applied to the surface using a spray gun or airbrush, then the risk of damage to the product is reduced due to the finest spray.
Creating a carved frame
First of all, the image that is going to be cut is drawn or translated on the blank. After this, it is cut out with a jigsaw. Well, then they begin the most difficult part - wood carving. This process cannot be described in words; it can only be comprehended in practice. It is better to start with simple drawings and gradually move on to more complex ones. Now about the tree. For carving, only seasoned material from soft rocks (for example, linden) is taken. All other processes are identical to the above.
The presented picture frames, the photo of which clearly displays all types of their coatings, as well as the main shapes, look simply amazing. The main thing is to want and try.
We fully understand how to make a picture frame with our own hands, now all that remains is to assemble all its parts. To do this, you need to place the frame face down on a clean surface and insert everything in the following sequence:
- glass;
- painting;
- piece of cardboard.
After this, you need to secure everything with nails driven into the frame. This is quite a responsible process, so it is worth dwelling on it in detail. To successfully fix a picture in a frame, you need to be careful and careful. After all, making picture frames is a rather labor-intensive process, not to mention painting canvases, so you need to do everything perfectly.
We attach the nail to the frame with light blows. It should press the cardboard, picture and glass tightly enough. Then a ruler is slipped under this baited nail. Place the head of the hammer on top and, carefully sliding along the surface, make blows until the nail is driven deep enough so that it can hold everything tightly. In this way, all the nails that are necessary to tightly hold all parts of the picture are driven in.
In this article, we examined in detail how to make a picture frame with your own hands and assemble it. All that remains is to do everything in a practical way and get what you want.
All photos from the article
If you have a lot of photographs or any paintings and other compositions that you would like to hang on the wall, then you can’t do without frames; any of the above options will look much better with them. The cost of ready-made options is quite high, but if you wish, you can make frames on your own, which is what this article will focus on.
Processing technique
Profile cutting technology
In this section we will tell you how to properly trim baguettes and how to join them after this operation.
This work begins, as usual, with measurements:
Using a professional tool will ensure maximum processing quality
- We measure out a fragment of the part of the required length, and then apply clearly visible markings to the workpiece.
- We take the miter box and place it on a flat, stable surface - a workbench is best for this.
- We place the baguette in the miter box in the position in which it will be located in the future. The wrong side of the baguette should be pressed tightly against the walls of the miter box.
Advice! Thin carved polyurethane moldings or shaped wood products may break when trying to trim. To avoid this, we place a piece of wooden bead or a simple polystyrene dumbbell under the figured part, and then saw both parts together.
- Then we insert the tool into the slot located at the desired angle. For polystyrene and polystyrene we take a saw with a fine tooth or a knife, for wood - a hacksaw with a medium-sized tooth.
- Carefully cut or saw off the part, trying not to cut off more than necessary. A small excess of material left on the workpiece will not hurt - if necessary, we can easily remove it with a knife or sandpaper.
- After completing the operation, remove the part from the miter box and apply it to another fragment of the baguette to check the quality of the trim.
Using a miter box
If your workshop does not have a miter box for cutting baguettes, you can make cardboard or paper templates with your own hands. First, we apply them to the desired location, adjust the shape and size if necessary, and then, using the template, mark the cutting line on the wooden or foam part. The quality, of course, will be worse, but it’s still better than “by eye.”
Docking and corner connections
After all the parts are adjusted to size, we proceed to the docking itself.
It all depends on what purpose we need the baguette for:
- When shaped panels are used to finish the ceiling or to decorate furniture, we apply the parts to the base to check the tightness of the joint.
- If necessary, we clean the ends, ensuring that the gap is minimal.
- Apply glue to the wrong side of the parts, then install them and press them tightly.
- If we still make a mistake during the trimming process, then fill the resulting gap with putty.
Corner gluing
When making a frame for a picture or photograph with your own hands, we proceed a little differently:
- As in the previous case, we carefully clean the ends.
- Apply wood glue to the joints.
- From the wrong side we “sew” the parts together with staples.
Advice! At this stage, it is advisable to check the perpendicularity of the parts using a square.
- We clamp the structure with wooden blocks or special clamps until the glue dries completely.
Photo of the structure fixed with clamps
What do you need for work?
Let's figure out what materials and equipment will be needed when carrying out the work:
| Wooden elements | These can be a wide variety of options: from slats and remnants of plinth or platband to any other similar materials. If you want to create a very skillful product, you can purchase ready-made wooden baguettes and use them |
| Saw and miter box | With this simple kit, you will be able to file joints at a perfect 45-degree angle, so the joints will be of the highest quality, which has a very positive effect not only on the reliability of the products, but also on their appearance |
| Carnations and glue | Connections can be made in two ways: either using finishing nails and reduced heads, or by using wood glue, which can also provide good reliability. If very high strength is needed, then the options can be used together |
| Special clamp | If you are going to make frames more than once or perfect quality is important to you, we recommend purchasing this type of equipment, since with its help you can press the parts very well when gluing, while maintaining the ideal geometry of the structure |
Important! And don’t forget about paints and varnishes; a wide variety of options can be used – from varnishes and impregnations to stains, and special compositions to give products an antique look with gilding and patina.
Construction and use
Before using cutters for the manufacture of frames presented on our website, it is recommended to make a drawing in which, by comparing the shape of the cutting edges with the profile of the part being manufactured, it will be easier to determine the cross-section of the workpiece. The tool is used on machines with manual and automatic control and makes it possible to use a copier during work. Equipping with a special bearing provides support during processing and allows the production of elements not only with straight, but also with curved shapes.
Carbon steel is used as a material for creating equipment. Blade attachment is usually done mechanically, and the teeth can be pointed or backed. The first type is characterized by increased resistance to wear and is subject to sharpening over the entire surface of the cutting edge. Sharpening of cutters for frames with backed teeth is carried out along the front working edge, subject to strict observance of the angle in relation to the back of the blade. Consumables with pointed teeth are considered the most suitable for performing precise and high-quality processing.
Regardless of the monolithic or prefabricated type of construction, equipment for the production of baguettes and other joinery products demonstrates reliability during long-term use on machines of domestic or imported production. The cutters retain their size after repeated sharpening, completely restoring the sharpness of the cutting edge. Combining parts allows you to greatly speed up the work process and operate the equipment with maximum efficiency. Compliance with optimal conditions when using the tool guarantees a high working life, making it possible to process wood in quantities amounting to thousands of linear meters.
The working process
Even those who have never engaged in such activities can figure out the question of how to make a wooden frame with their own hands. We'll go over the workflow to make your job even easier.
Preparing everything you need and cutting the workpieces
First of all, you need to select photographs, paintings, collages, embroidery and other compositions that you want to arrange in frames, this is necessary in order to take actual dimensions and make exactly the configuration that you need, and not to adjust the elements to a ready-made version , this is a huge advantage of homemade frames.
As for the process, it happens as follows:
- If the photo contains mats (frames made of cardboard), then they need to be made in advance and the dimensions of the frames can be taken from them. With the exact parameters, you can move on to choosing the material for manufacturing, both and other options will be suitable, you can find many blanks on sale, price which are low, they are perfect in our case;
- Next, you need to take measurements, it is important to do this carefully so as not to make mistakes, otherwise the finished product will come out crooked. Make sure paired elements are the same size;
- Cutting workpieces at precise angles used to be considered a difficult and painstaking job, but these days you can buy a miter box with a saw for little money and cut wooden elements very accurately and very quickly. The most important thing here is to use a saw with a fine tooth so that it provides the best cutting quality; the more perfect the edges, the better the elements will connect and the more attractive the finished product will be;
- Lastly, on the back side of the blanks you need to select a groove for the glass; its depth should be 3-4 mm greater than the thickness of the glass so that it can be fixed with small nails.
Product assembly
The instructions for this stage are very simple and clear:
- First, you need to connect the two elements and securely fix them, as noted above, the best method of fixation is to use a special corner clamp, with its help you will securely fix the parts in the desired position, and they will not move when dry, the geometry of the connection will be ideal;
- After gluing, you can begin further work, first of all, this is the decor of the wooden frame, here your imagination is not limited by anything, so the design style and the chosen color scheme depend only on you;
Important! You can achieve the effect of antiquity by painting the frame first with dark paint, and then with light paint, after which the top layer is wiped in some places with fine sandpaper.
- Then you need to insert the glass, behind it there is a passe-partout, if available, or immediately a photo, then you need to insert thick cardboard for rigidity and fix this entire system with nails or attach special small rotary fasteners;
- To mount it on the wall, you can attach special eyes on the back side (they can be purchased at furniture hardware stores) or drill a hole along the diameter of the fastener so that you can simply put the frame on the head of a protruding nail or self-tapping screw.
Material
For production we will need boards of the following thickness
- 3/4 inch (approx. 1.9cm)
- 1/2 inch (approx. 1.27 cm)
- 1/4 inch (approx. 0.64 cm)
Preparation of blanks
First of all, we unravel the boards along the length to obtain the required width of the workpiece.
Treatment
We remove one of the edges of the workpiece along the entire length using an edge molding cutter (a shaped cutter with a lower support roller). For these purposes, it is very convenient to use a milling table with a router mounted at the bottom and a cutter located upward.