A hand router is a unique tool that greatly facilitates the process of making wood products. It is used not only to create technological connections, but also during decorative processing. The main advantage of a manual router is mobility, the ability to work regardless of the availability of a workshop.
DIY table for a router with drawings and production
Do-it-yourself carriage for a milling machine – Machine tools, welding, metalworking
We will try to answer this question in our article. For those who make wooden products on their own, a router (especially a manual one) is an indispensable assistant.
The power tool itself, even if equipped with an excellent set of cutters, is completely useless without additional accessories. It is impossible to hold a working milling cutter within a given trajectory with your hands.
The rotating cutter will move chaotically, reacting to the vibrations of the tool and the structure of the material being processed. Even the owner of steel muscles and a hawk's eye will not be able to work with this tool without the use of guides and fixing devices.
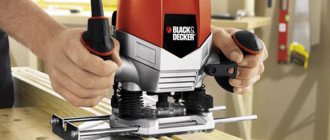
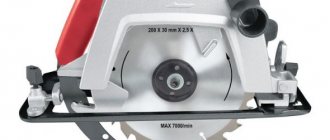
This is what a wood router looks like
Basic devices are usually included with power tools, but they can only be used to perform simple tasks. More complex guides and templates have to be purchased for additional money, while many of them can be made by hand.
The main thing is to have an idea of how this device looks and works. There is no need to look for ready-made drawings and complex technical calculations. Any master knows better how to make this or that device. The efficiency and convenience of work will be higher, not to mention the savings.
Mechanical assistants for hand router
The most common device that is included in the basic kit.
Rip fence
Accessory - Rip fence
The design is so simple that making it yourself will not be difficult. A guide plane is selected relative to the line of passage of the cutter (in some cases this may be the smooth edge of the workpiece itself), along which the milling cutter moves.
The stop can be any flat, oblong object connected to the tool with a fixed rod. For reliability, there can be two rods.
The surface of the guide must be smooth for free sliding. The stop needs to be calibrated.
To do this, a control groove is cut in the workpiece, the distance to it relative to the edge of the workpiece is measured, and the zero mark is fixed. By moving the stop along the rod, you can set any distance with high accuracy.
The rip fence is used for milling grooves and processing the edges of the product, including selecting a quarter. It is also possible to cut blanks of the same width.
Compared to an electric jigsaw, the cut obtained with a milling cutter is smoother and of higher quality. Only the cutter should be of small diameter to save material.
The device can be used when processing rounded surfaces. To do this, a gasket with a cutout in the form of an obtuse angle is installed between the stop and the rounded end of the workpiece.
Popular: Types of wood cutters for a hand router
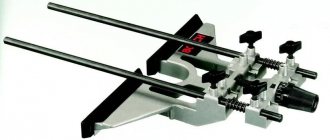
Guide rail
This device is no different in function from a rip fence, and is designed to ensure directed movement of the cutter along a given path.
A useful assistant when working with a router - a guide rail
The main difference is the ability to choose the angle of movement of the router. To do this, the guide is fixed on the surface to be treated using clamps or suction cups. You can make such a device yourself from a profile or corner of a suitable size.
It's good to use an old curtain rod. The main thing is to ensure free movement of the carriage along the guide. For a more stable fixation, it is better to use not one, but two rods. If the width of the workpiece being processed is greater than the length of the rip fence bar, you cannot do without a guide bar.
Using such a device, you can mill grooves along a broken line or trim the edge of a product along a complex trajectory. To do this, the milling cutter stops at the break point, the fastening is given to the guide, which rotates at a given angle relative to the previous direction.
In this case, the cutter remains in the workpiece, acting as an axis of rotation. The guide is then fixed again and milling continues in the new direction.
More advanced models have the ability to change the angle of inclination of the router relative to the vertical. This allows you to significantly expand the possibilities of using power tools.
Compass for router
The purpose of this device is clear from the name. Used for milling grooves in a circle or cutting out circles.
Want to make a perfect circle? You will need a compass for the router
The principle of operation is simple. A guide rod with a groove or a plate with calibrated holes is used as a compass leg, allowing you to cut circles of any diameter. A pin is fixed in the center of the proposed circle, around which the entire structure moves. But at the other end of the guide there is a router.
Factory compasses for a router can have a variety of designs. A rod with a support platform and a hinge (the design with two rods is more stable), a plate with a slot or calibrated holes.
Template for cutting circles
The main thing is to ensure reliable fixation of the central pin, otherwise the structure may shift due to vibration and the workpiece will be damaged. You can make such a device yourself from any durable and smooth material, for example, textolite.
Homemade device for cutting circles
A carriage with a fixing device moves in a sawn groove; holes are provided for attaching the router. There are also more complex devices for forming ovals.
It is based on the same design as the compass, but instead of an axis of rotation, a support with a cross system of grooves is used. Moving along them, the virtual axis constantly shifts, resulting in the formation of a regular oval.
Device for cutting oval holes with a router
Using such a tool, you can make oval cuts both around the nozzle and next to it. The possibilities for choosing the path of movement of the cutter are practically unlimited.
Copy sleeve
Sometimes it becomes necessary to mill a complex pattern or replicate identical cutouts. For convenience and increased speed of work, pre-made templates are used. For example, a template is often used - a tenon cutter.
Copy sleeve or copy ring
Or it becomes necessary to cut several identical recesses for door hinges. Copy rings are used to move the router along the contour of the template. The sleeve rests against the template, and the cutter exactly copies its profile.
What requirements must the table meet?
A professional craftsman spares no expense in purchasing the most modern and reliable equipment - such investments not only pay off, but also bring significant profits. This is his permanent job and main income, and the higher the labor productivity, the less unproductive loss of materials and the better the quality, the more profit the master has. There is no point in buying expensive machines and equipment for novice craftsmen; one hand cutter is enough for them. Accordingly, the machine must be made in such a way that the cutter can be quickly removed at any time and can be used in normal mode.
The design of the machine should be as simple as possible and at the same time reliable
Another requirement is that the table should be as simple to manufacture as possible. You can do it with your own hands and using the simplest set of tools that non-professionals have.
Drawing of a simple tabletop for a router
Due to such requirements, we will not consider options for complex tables; only master carpenters can make them. In addition, most projects require reworking a hand router; after reconstruction, the tool can no longer be used in manual mode; you need to buy a second copy. It is economically unprofitable to waste time and financial resources on making a table for a router just to use it for a few hours a year, and for ordinary, more frequent work, buy another manual router.
If the need for a manual milling machine is higher, there is no point in building a complex machine
Do-it-yourself carriage for a milling machine
For accurate operation, a milling cutter requires auxiliary devices; at the same time, the sales package of the device includes a limited set of such items.
The market for milling attachments extends from protractors to numerous attachments. The user, for whom this is not enough, can make auxiliary devices himself.
Templates and copy sleeve
The copying ring is a circle with a protrusion that slides along a template, guaranteeing accuracy of processing.
The ring can be screwed to the base of the router or secured with antennae.
The diameter of the device is selected so that it does not come into contact with the working part of the tool.
The ring template is fixed on the material being processed, firmly adhering to the tabletop.
Reliable clamping is provided by double-sided tape and clamps.
Having finished the part, you need to make sure that the sleeve fits tightly along the edge of the template when working.
A self-made template for a router can also be used for processing the corners of a part, when it is necessary for them to be round. Depending on the location and dimensions of the template, the radius size of the rounding can be any.
The template design often includes bearings or rings. If this is a ring, then it should be selected according to the size of the cutter.
If there is a difference in diameters, it is necessary to add stops to the template design, with the help of which you can move the device away from the edge of the part.
The special design of the accessory makes it possible to effectively create recesses for door hinges.
Using a template, you can even carry out decorative work with a router, for example, cutting out wooden patterns.
Compass
This auxiliary tool is designed to create round and oval cutouts.
The basic compass design includes a rod with a pin fastening at the end.
By inserting the fastener into the hole in the center of the circle along which the groove is made, you can change the size of the circle by simply moving the rod.
Note! The convenience and reliability of the design is increased by adding a second rod.
There are various auxiliary elements that work on the circular principle.
They offer the advantage of creating different radii of circular grooves.
A mandatory component of such auxiliary devices is a pin with a screw for adjusting the length of the radius.
If a small hole is cut, the compass structure must be adapted for mounting on the base of the router. When processing a part, the pin is located directly under the tool.
A wood router, in addition to round ones, is also capable of cutting elliptical holes. The device for this can be assembled with your own hands from the following parts:
- base with fixation on material made of screws or suction cups;
- shoes moved on crossing guides – 2 pcs.;
- rods for installation – 2 pcs.;
- bracket for connecting the structure to the tool.
The fastening bracket, thanks to the grooves intended for this purpose, allows the frame of the structure to be in the same plane as the base of the router.
Cutting round openings is done using one shoe. If you need an oval hole, both are used.
This auxiliary design makes it possible to make holes more accurately and faster than other tools, such as a band saw or jigsaw.
For grooves on narrow surfaces
Recesses for locks or door hinges can be made with a drill and chisel, but a router is much better suited for this. You just need to equip the tool with a certain device.
It consists of a flat plate that is attached to the base of the device. The shape of the plate can be round or rectangular.
2 pins are made on it, ensuring smooth movement of the tool during operation.
The main parameter that must be adhered to when manufacturing such an element is that the axis of each pin must be on the same line as the center of the cutter.
If this parameter is observed, the groove will be cut exactly in the middle of the workpiece, regardless of thickness.
If it is necessary to shift the groove to the right or left, a sleeve of the size needed for the desired shift is put on the corresponding pin.
Using this design, the router is driven with the pins tightly pressed to both sides of the workpiece.
The same effect is achieved if you use two parallel stops with a router.
Even one stop may be enough. It is necessary to strengthen the workpiece between two surfaces, for example boards, so that all three elements are in the same plane. In this case, the problem of insufficient part width is eliminated.
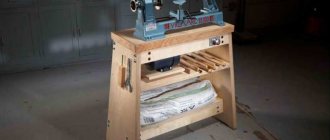
Step-by-step instructions for making a wooden table
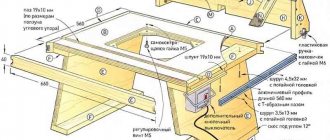
You will need plywood 18 mm thick, the sheet size is standard, you can buy a board of approximately 1.5 × 1.5 m. The table frame is made of 30 × 40 mm wooden blocks. The structure is fixed using ordinary wood screws. The tools you need to prepare are an electric jigsaw or a portable circular saw, a hand router, a drill or a screwdriver.
Standard milling table device
Making a countertop
Step 1. Cut a blank for the tabletop from a sheet of plywood. The size can be arbitrary, but not less than 80x80 cm. It is inconvenient to work on very small ones, the workpieces constantly fall, they have to be supported from the opposite side. Mark the plywood, attach it to the workbench with clamps, install a saw fence and carefully cut off the excess material.
Cut the sheet to the size of the tabletop
Practical advice. We strongly recommend that all work with an electric jigsaw and portable saw be done only under a ruler. You should not hope that you will get an even cut without this device.
Step 2. Mark the location of the hole for the cutter. This is also an arbitrary parameter. Much depends on whether you will subsequently adapt the stop ruler for the router, whether a box is provided for collecting and removing sawdust, what parts are supposed to be processed, etc. As practice shows, it is recommended to place the hole at a distance of 1/3 of the width from the longitudinal edge .
Mark the hole for the cutter
Make a mark and drill a hole. Its diameter should be only a few millimeters larger than the diameter of the largest cutter that will be used on this machine. There is no need to make a hole that is too large for several reasons:
- The larger the gap between the working knives of the cutter and the tabletop, the higher the likelihood that material will get into it. And this provokes the emergence of dangerous situations: the router may jam or fragments flying off at high speed may injure the craftsman;
- If you have to mill thin parts, the ends will vibrate strongly in the cracks - there is no stop. As a result, it is necessary to cut off uneven parts, which increases the consumption of lumber.
The hole is drilled with a special crown of the appropriate diameter.
Drill a hole according to the markings
Step 3. Place the router in the hole, making sure it is positioned correctly. Very carefully draw a line around the perimeter of the base. Make sure that the tool does not move during this process; always hold it with one hand.
Try the router on the hole and carefully trace it with a pencil
Step 4. Set the cutting depth on the router to 5 mm and very carefully cut out the seat along the drawn contour. Check the hole, insert the router into it. It should fit tightly and not wobble. If necessary, adjust the mounting socket to the required parameters. Everything is fine - excellent, remove the burrs with sandpaper and continue working on making the table for the router.
The seat must exactly match the contour of the router
Step 5. Prepare the same mounting nest on another piece of plywood, only now you need to make it through. Cut the part; its dimensions should be approximately 15–20 cm larger than the diameter of the router base.
Make a blank with a cutout of the same shape and size
Step 6. Place the workpiece on the countertop, align the holes and place the router in them. You need to note the location and dimensions of the two parallel guides. A router ruler is installed on them; in our case, it is removed. But you don’t need to touch the guides; they increase the reliability of fixing the router to the table and completely eliminate the possibility of rotating the body. The fact is that over time, the mounting socket may increase slightly in diameter, and the housing with the engine will begin to wobble. The long guides create fairly large arms that handle turning loads well.
The workpieces are combined and the router is inserted
Step 7. Measure the diameter of the metal pins, set the appropriate depth of the cutter and make grooves for them.
Cutting grooves for pins
Step 8. Connect the two table elements, put the router in place. Check the position carefully, turn the rotor manually, it should not touch anything. Everything is fine - screw the plywood.
After adjusting the elements, screw the blanks with self-tapping screws
Important. Be sure to screw the screws into the pre-drilled holes, otherwise cracks may appear. The diameter of the drill for the hole should be several millimeters smaller than the diameter of the threaded part of the hardware.
Manufacturing and inserting the mounting plate
Screw the screws around the perimeter of the stand at a distance of approximately 15 cm, separately secure the sections between the metal pins. Sand the surfaces again. This should not be done to improve the appearance, since the elements are located under the table and are invisible. By grinding, the surfaces are leveled, small chips are removed, the parts to be joined fit tightly, and the fixation is more reliable. And this is very important for any machine - vibration appears during operation, weak connections quickly become loose with all the negative consequences.
The entire surface must be sanded thoroughly
Step 9. Use small strips of plywood to secure the router in the working position. Turn on the power and check the operation of the tool. It should not wobble; if there are uncharacteristic noises, it is necessary to find their cause and be sure to eliminate it.
To fix the router, use two plywood strips
Everything is normal - proceed to the next step. Now we need to make a table frame for the tabletop.
Manufacturing of fasteners
Assembling the table frame
Step 1. Nail 30x40 mm slats to the bottom of the tabletop around the perimeter to add strength. Saw off the blanks at an angle of 45°, screw the parts with self-tapping screws of the appropriate length. Do not forget to lubricate the parts with wood glue before screwing. It performs two functions: it glues surfaces and perfectly aligns the cut planes, ensuring maximum stability of the connection.
Wooden blocks are attached along the perimeter of the tabletop
Step 2. Assemble the lower table support frame, it can have the same dimensions as the upper one.
Roll the frame from the bars to the size of the tabletop
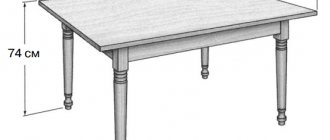
Step 3. Attach the legs to it, the height is about 1 m, but adjust the specific values to suit your height, in which position it is most convenient to work, this should be the height of the table for the router. Be sure to install corner braces, otherwise the structure will become loose over time.
The legs are attached to the frame, after which the frame is reinforced with spacers
Step 4. Check the strength of the structure, try to tilt it, bend it, etc. with great effort. If you find any wobbling, install additional spacers and levers, the number depends on the actual need. You don’t need to pay special attention to the appearance; you are not making beautiful furniture for the living room, but a durable machine for the workshop. The difference in requirements is significant. The frame is ready, install the tabletop in place and you can start working.
Putting the tabletop in place
DIY accessories for a wood router
The functionality of milling equipment can be significantly expanded by using special devices. Serial accessories that can be found on sale are quite expensive. That is why many craftsmen decide to make accessories for a wood router with their own hands.
Most of the manufactured elements are intended for the correct placement of hand tools in space. In addition, accessories for a wood router can significantly increase the accuracy of processing. Some instruments come with accessories out of the box.
However, they are not highly specialized equipment and are often not suitable for the assigned tasks. Let's take a closer look at the most common equipment.
DIY accessories for a wood router
DIY accessories for a wood router: stops, templates, guide rails
For accurate operation, a milling cutter requires auxiliary devices; at the same time, the sales package of the device includes a limited set of such items.
The market for milling attachments extends from protractors to numerous attachments. The user, for whom this is not enough, can make auxiliary devices himself.
Making a carriage for a router
In order to design a CNC machine, it is necessary to use several variants of units. Non-factory-made devices often have rails from the carriage of a printing machine, as well as a printer. The main quality indicators irreversibly affect the processing performance and devices based on a milling machine with a tenoning carriage, so excessive savings can only do harm.
Details
Most often, polished shafts are used, which are inexpensive. Purchasing these items will not be difficult. They are subject to mounting and processing. Most often made of durable steel.
After this, the top layers are subject to induction hardening, which has a beneficial effect on the period of use and wear rate. Ideal smoothness makes it possible for the carriage to move over the polished layer extremely successfully. The shafts can be fastened at both ends with two hands without unnecessary problems.
But there are also many counterfeit elements made of low-quality metal on the market, since the likelihood of an accurate on-site inspection is zero.
Flaws:
- The base is not fixed. The shaft can only be supported by two fastening devices. This makes it possible to significantly facilitate installation by hand, but at the same time independent of the table support. Because of this, the possibility of defects during product processing increases. Over time, lathe carriage guides roll and become bent.
- There is sagging at long intervals. Due to sagging, a shaft with a length of more than 100 cm is not used when processing for a machine. The thickness and length of the gross surface also matter. The best option is 0.05, and even more profitable is 0.06 - 0.1.
Bearings in the carriage for a router
There are two types of bearings when installing guides:
- Bushings for ball elements.
- Bearings to provide a sliding surface.
Ball cylindrical fairings, as well as parts for ensuring rolling, have two significant disadvantages compared to rail carriages: an insignificant level of load capacity and a rather large backlash. To ensure weight support, the tenoning carriage is installed on a guide line with several shafts.
Disadvantages of this type of bearings:
- Withstands light load.
- Formation of high pressure due to low operating life. The need to periodically replace the shaft due to the formation of a groove.
- Sawdust and sticky dust clog the slots.
Bearings to ensure sliding on the surface are made from non-hard metals such as caprolon. If all tolerances are maintained, the load-carrying capacity and precision of the sliding bearing are quite high. However, sawdust and dirt cannot harm the unit. But this only applies to bronze parts that are well processed.
Over time, wear occurs on the product, which requires periodic adjustment to get rid of gaps. As a rule, more affordable bearings are used for making them yourself.
Shafts for splined bushings
Certain bushing balls move inside the longitudinal shaft. The design has a high level of rigidity, much stiffer than conventional shafts after grinding. They also have a longer period of use. Torsion shaft reinforcements are of additional importance. They can be very successfully installed on the shaft mounting structure.
A significant disadvantage of the spline guide is its high cost. This is the reason for the rare use of CNC in standard units.
The cylindrical design makes it possible to maintain balance along the entire length, preventing sagging elements due to the weight of the tenoning carriage. This type of guide is also called linear support shafts. They have precise fixation along the mechanism body thanks to threaded holes. Such guides allow you to move carriages with large weights without sagging.
Disadvantages associated with cylindrical machine tool shafts:
- Short period of operation.
- Significant backlash of rods.
If in linear bearings they interact equally with the loads of different guide vectors, then on shafts with a cylindrical cross-section the tenoning carriage is not so stable.
This is a consequence of the closed sleeve surface, which the tenoning carriage does not have. Therefore, it is necessary to take into account the fact that the CNC hardware will function less stably than a similar machine using ordinary round rail movers.
Modern cylindrical rails are produced by both well-known companies and small artisans. This affects the cost of the device and its technical components. It happens that carriages and rails from one manufacturer do not meet general standards.
This type of guides is installed in high-precision CNC metal-cutting machines.
Main varieties: with balls and rollers.
Guides with configurations
Standard guides have a track on which special carriages are installed. This makes it possible to distribute the load along the entire length of the track - the ball is attached to the rail mover along an arc with a high degree of accuracy. Heavy weight carriages do not stop moving in a straight line. They have high durability with low backlash.
Disadvantages of ball rails:
- The attachment points must be straight and without any roughness.
- Difficult process of mounting on the machine.
There are many models of carriages on the open market that are very ambiguous in terms of load capacity and tension elements. For this reason, their production is not homemade, but rather high quality market products. The best guide elements are produced under the TNK brand, as well as Khivin.
One of the best guides that has flat rocking grooves. Instead of balls, there are built-in rollers.
This affects the efficiency of the guide modules. They are best suited for stone, as well as metals such as steel and cast iron.
Rails with prismatic section
Primary installation location: manufacturing industry. The rails cannot be dismantled; they are part of the structure of the frame.
Very difficult to manufacture and repair. Cannot be dismantled by hand. Usage: CNC-based equipment for professionals.
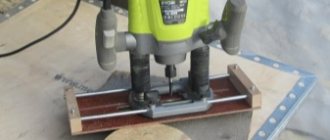
: Precision carriage for milling table.
How to make a carriage for a router with your own hands
What can be used to make a homemade carriage or sled at home:
- corners;
- bearings;
- nuts;
- bolts.
Only steel angles are used, never aluminum. Steel or round timber can be further hardened or nothing can be changed. But be sure to polish it. For installation, you do not need to choose wide bearings; narrow ones, but with a high degree of friction, are better. The diameter of the bolts cannot be larger than the internal diameter of its roller.
Source: https://metmastanki.ru/karetka-dlya-frezera-svoimi-rukami
Why do you need a router table?
Professional craftsmen do not ask this question; they have separate milling machines. This can be not only woodworking equipment of industrial series, but also special machines for household use. As a rule, they are complex mechanisms that have a circular saw, jointer, milling cutter and drilling machine in various combinations on one frame.
Woodworking machine requires relevant experience
Ordinary hobbyists do not need to buy such equipment; an ordinary hand router is enough for them. But situations arise when many people think about making a table for a router. Why?
- It is not possible to mill by hand, the tool does not move in a straight line, the surface of the parts is wavy. You have to go through one place several times, and this has a negative impact on the final quality.
- The need to mill long workpieces - only on a table can this operation be performed in just one pass.
- There is a need to work on cutters with a complex profile; the manual method does not provide the required surface cleanliness.
It is not always convenient to work with a hand router.
It should be noted that not all technological operations can be done on the table; there are some that can only be performed with a hand router. For example, it is impossible to mill profiles with a closed contour located in the center of the workpiece on the machine.